Atdec TH-PT24 Bruksanvisning
Atdec Inte kategoriserad TH-PT24
Läs gratis den bruksanvisning för Atdec TH-PT24 (2 sidor) i kategorin Inte kategoriserad. Guiden har ansetts hjälpsam av 23 personer och har ett genomsnittsbetyg på 4.6 stjärnor baserat på 2 recensioner. Har du en fråga om Atdec TH-PT24 eller vill du ställa frågor till andra användare av produkten? Ställ en fråga
Sida 1/2
Installation Instructions
TH-PT24
Projector | Suspended Ceiling Tile 24"
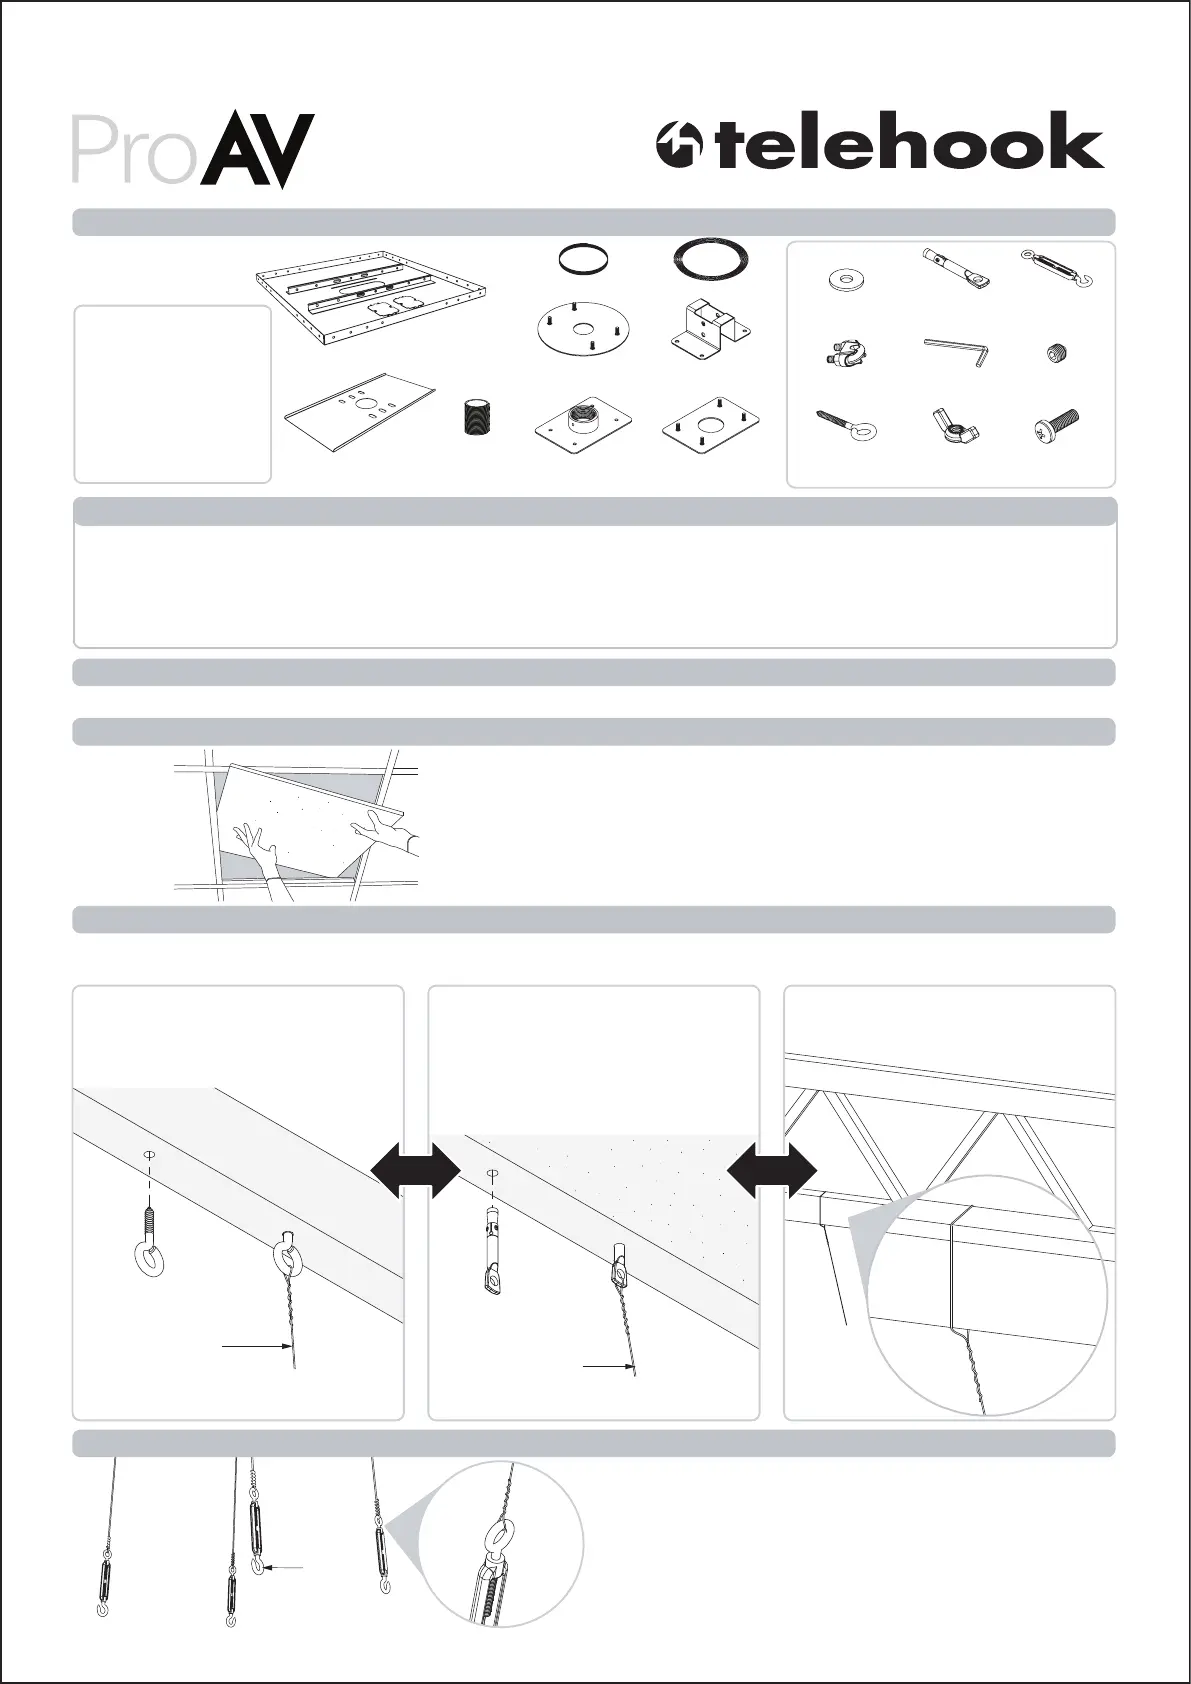
Component Checklist
IMPORTANT INFORMATION:
! IMPORTANT - Install Telehook Projector - Suspended Ceiling Tile 24" as per Installation Instructions.
! Compatible with 1.5” NPT Pole Mounts, Atdec Pole Mount (TH-WH-PJ-CM), Atdec Flush Mount (TH-WH-PJ-FM),
Atdec ProAv Projector Ceiling Mount (TH-PF) and Atdec pole accessories (TH-PPA-18-25, TH-PPA-24-48 & TH-PPE-24).
! Maximum weight capacity 22.7kg (50lbs).
! The manufacturer accepts no responsibility for incorrect installation.
Step 1. Check Components
Check you have received all parts against the Component Checklist and Hardware above.
Step 2. Remove Existing Ceiling Tile
Remove existing ceiling tile from ceiling grid where the product
is going to be installed.
TIP: Also temporarily remove an adjacent ceiling tile to allow easy
access to the product during installation.
Step 3. Fix Anchors to True Ceiling
Uncoil Support Wire and cut into 4 equal lengths. Select the anchoring method appropriate to your ceiling (see below).
NOTE: Each anchor point should be directly above each corner of the Suspended Ceiling Tile.
Wooden Joists
Drill 4x Ø6mm holes, at least 50mm deep
(4x ؼ
”
holes, 2”deep).
Fully screw Lag Eye bolts into wooden joists.
Solid Concrete
Drill 4x Ø6mm holes, 36mm deep
(4x ؼ
”
holes 1½
”
deep).
Tap anchors into hole to an embedded depth
of at least 25mm deep (1” deep).
Using a claw hammer, pull anchor out 6mm
(¼
”
) to activate anchor.
Truss Beams
Thread one end of Support Wires through the
trusses, and wrap 5 times to secure.
Hardware
M6 Wing
Nut (x4)
M6 Washer
(x8)
Lag Eye
Bolt (x4)
Concrete
Anchor
Bolt (x4)
Safety Clamp
(x2)
Thread one end of each support wires through
a Lag
Eye Bolt, and wrap 5 times to secure.
Thread one end of each support wires through
a Lag
Eye Bolt, and wrap 5 times to secure.
Support Wire (x4)
Lag Eye Bolt (x4)
Concrete Anchor
Bolt (x4)
Support Wire (x4)
Truss Beam
Support
Wire (x4)
Solid
Concrete
Wooden
Joist
M6 Set
Screw (x2)
Turnbuckle
(x4)
Support Wire
Safety Wire
M6x16mm
Screw (x4)
1.5” NPT Upper
Mounting Plate
1.5” NPT Lower
Mounting Plate
1.5” NPT
Mounting
Collar
3mm
Allen Key
Turnbuckle
Hooks
Tools Required:
Phillips head screwdriver
Wire cutters
Power drill
6mm (
1
/
4
”) drill bit
6mm (
1
/
4
”) masonry drill bit
Claw hammer
Jigsaw/Hole cutter
Spirit level
Suspended
Ceiling Tile
Pole Lower
Mounting Plate
Pole Upper
Mounting Plate
Cover Plate
OR
OR
Step 4. Attach Turnbuckles onto Support Wires
Loop each dangling Support Wire through a Turnbuckle, and wrap
5 times to secure.
Make sure that the position of the p1-x4 Turnbuckles are approximately
at the same height.
TIP: The turnbuckle hooks should be level with the top of ceiling grid.
Turnbuckle
(x4)
Support
Wire (x4)
Produktspecifikationer
| Varumärke: | Atdec |
| Kategori: | Inte kategoriserad |
| Modell: | TH-PT24 |
| Maxvikt: | 22700 kg |
| Justerbar arm: | Ja |
| Produktens färg: | Vit |
| Monteringssätt: | Tak |
Behöver du hjälp?
Om du behöver hjälp med Atdec TH-PT24 ställ en fråga nedan och andra användare kommer att svara dig
Inte kategoriserad Atdec Manualer

30 Januari 2025
29 December 2024
7 December 2024
7 December 2024
7 December 2024
20 September 2024
10 September 2024
10 September 2024
10 September 2024
10 September 2024
Inte kategoriserad Manualer
Nyaste Inte kategoriserad Manualer
9 April 2025
9 April 2025
9 April 2025
9 April 2025
9 April 2025
9 April 2025
9 April 2025
9 April 2025
9 April 2025
9 April 2025