Britax-Romer Trifix 2 I-Size Bruksanvisning
Britax-Romer Bilbarnstol Trifix 2 I-Size
Läs gratis den bruksanvisning för Britax-Romer Trifix 2 I-Size (4 sidor) i kategorin Bilbarnstol. Guiden har ansetts hjälpsam av 23 personer och har ett genomsnittsbetyg på 4.3 stjärnor baserat på 8 recensioner. Har du en fråga om Britax-Romer Trifix 2 I-Size eller vill du ställa frågor till andra användare av produkten? Ställ en fråga
Sida 1/4
06
05
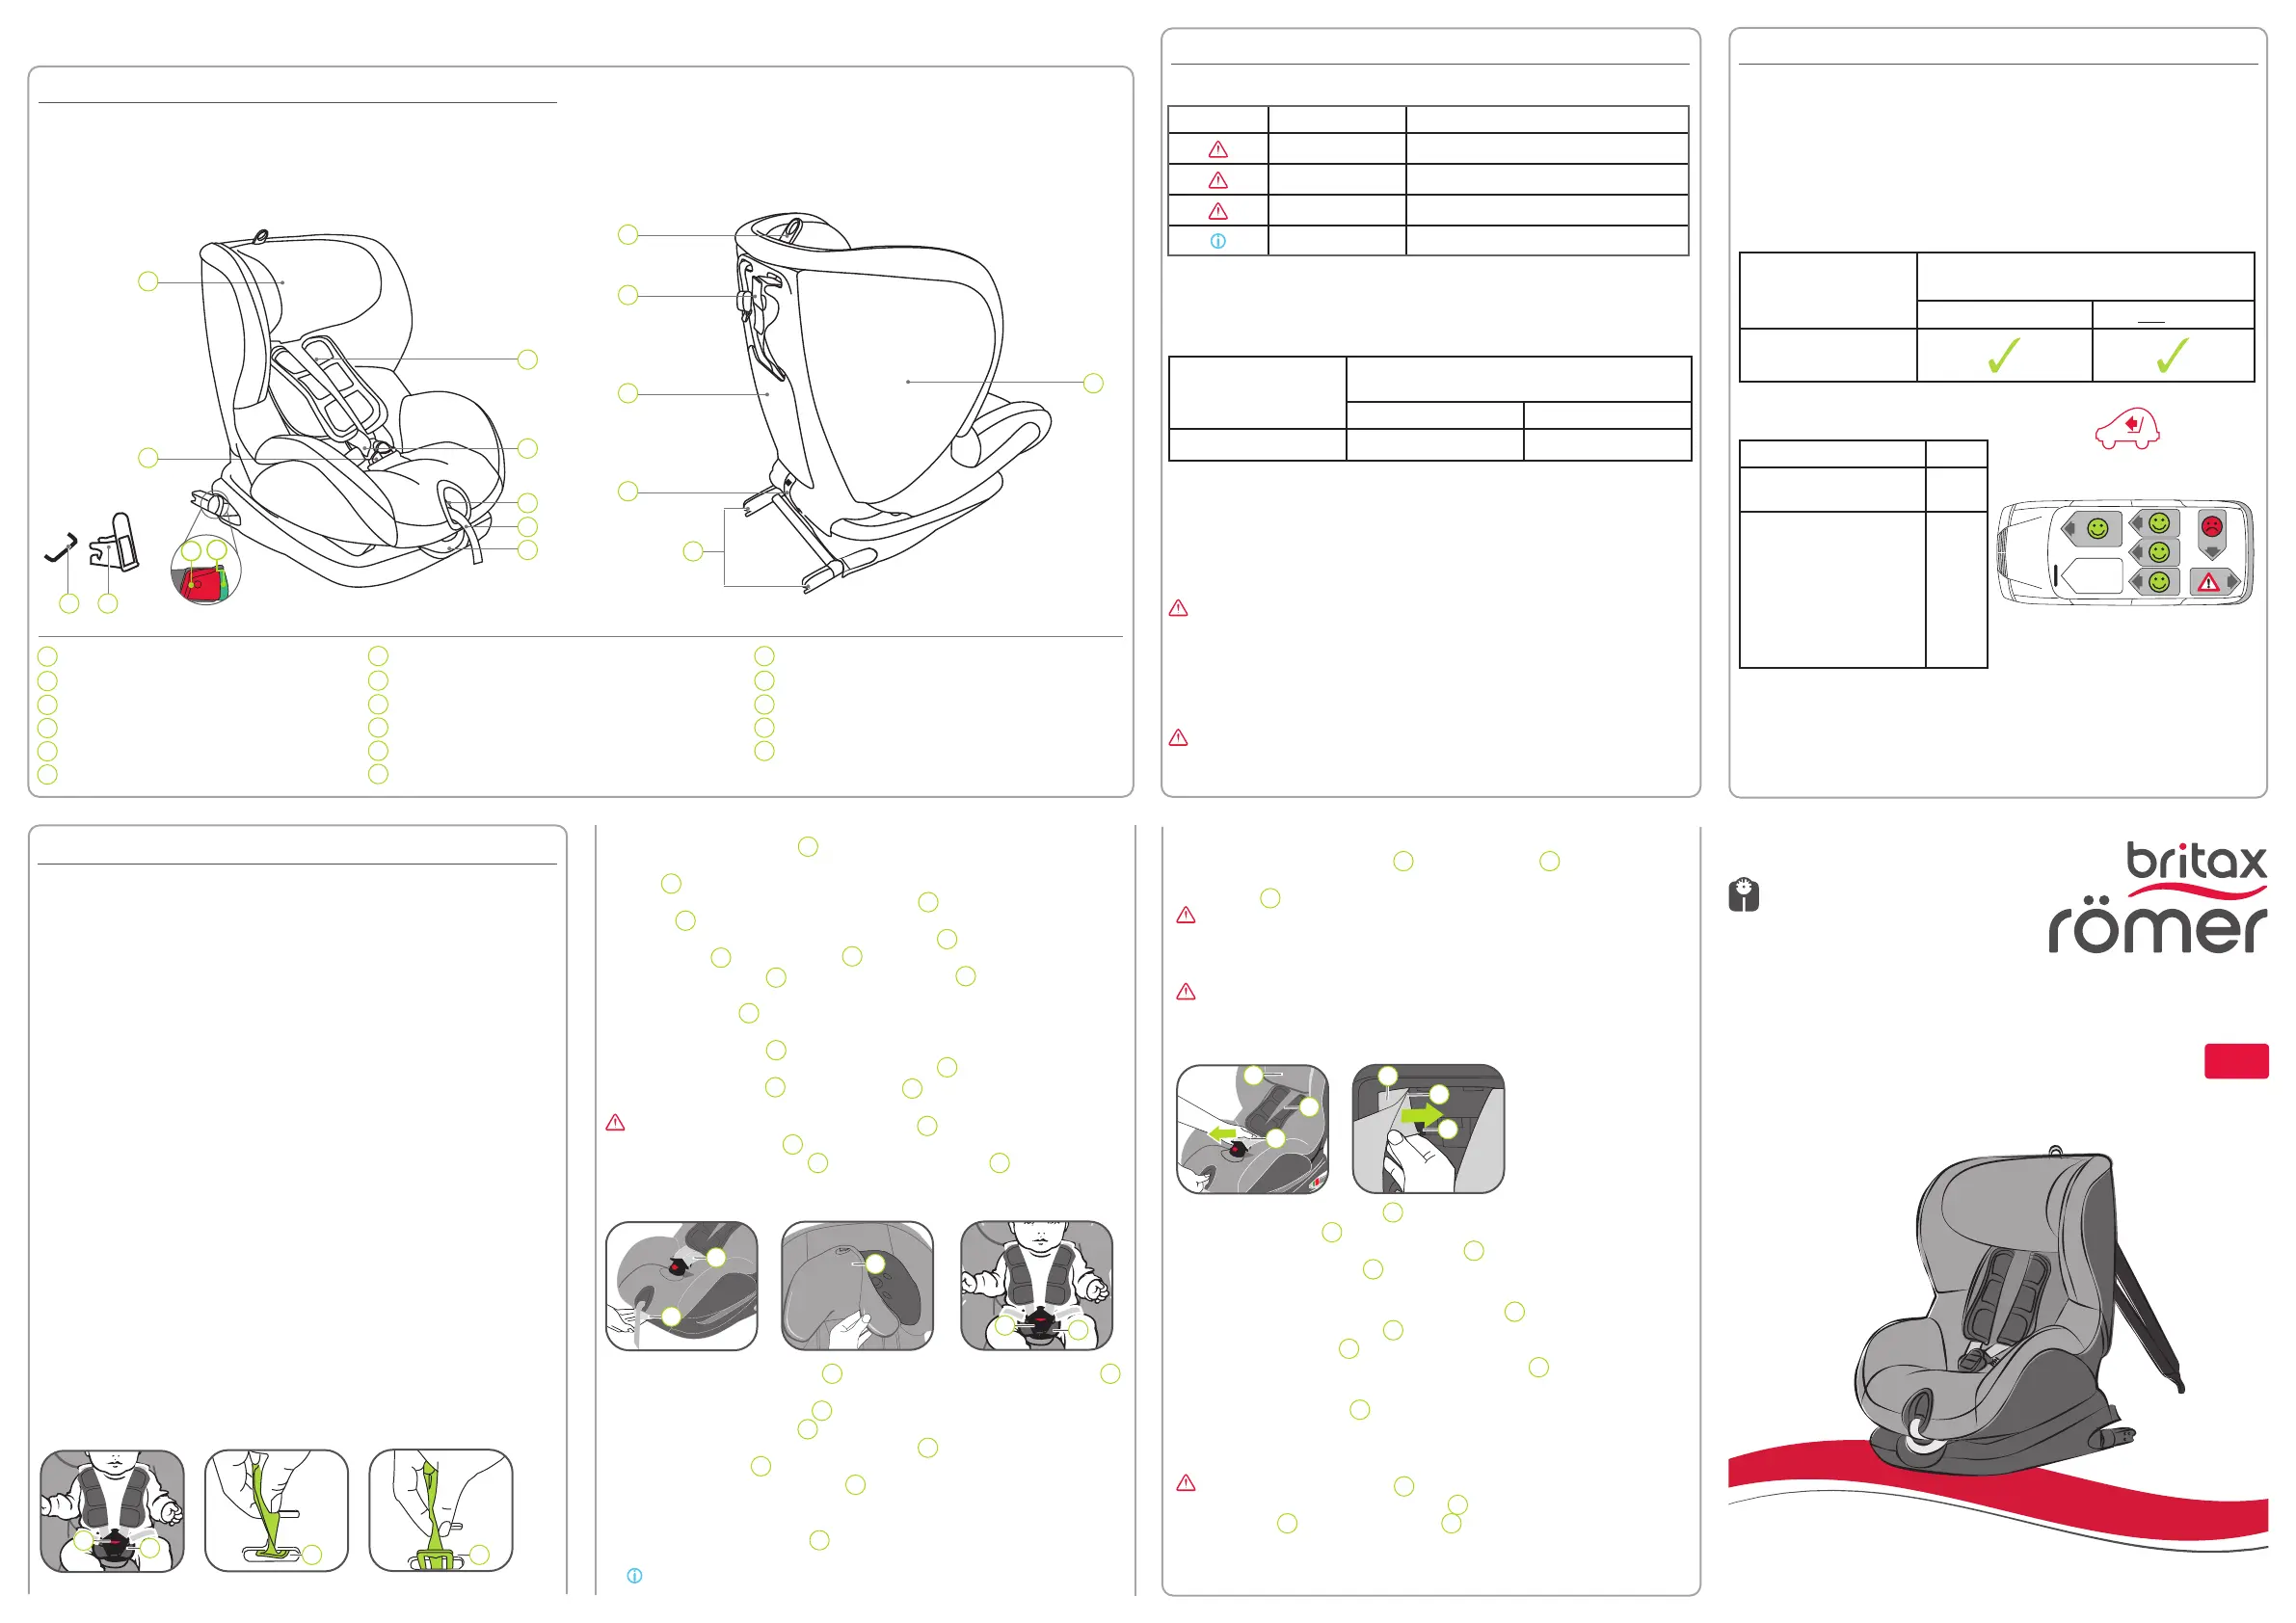
Seat shell
ISOFIX locking arms
Fabric loop
Operating instructions compartment
Adjusting ring of the headrest
Tilt adjustment lever
Adjustment belt
Adjustment button
Shoulder straps
Shoulder pads
Release button
Harness buckle
Headrest
ISOFIX insertion aids
ISOFIX fastening points (car)
Top tether
1. PRODUCT OVERVIEW
2. APPROVAL
These instructions use the following symbols stated below:
SymbolKeywordExplanation
DANGER!Risk of severe personal injury
WARNUNG!Risk of minor personal injury
CAUTION!Risk of material damage
TIP:Useful notes
3. USE IN THE VEHICLE
Please observe the instructions for using children's restraining systems in the
operating instructions of your vehicle. During use, be sure to observe any restric-
tions relating to airbags.
Please refer to the operating instructions for your vehicle for information about
vehicle seats which are certified for the use of children's restraining systems according
to ECE R16.
TRIFIX² i-SIZE usage options:
BRITAX RÖMER
child safety seat
Vehicle seat position with ISOFIX and
top tether
i-Size
Not i-Size
TRIFIX² i-SIZE
You can use your child safety seat as follows:
In the direction of travelYes
1)
Against the direction of
travel
No
On seats featuring:
ISOFIX fastenings (be-
tween the seat surface
and backrest) and top
tether anchoring points
(e.g. on the loading area,
on the floor or behind the
backrest)
Yes
2)
(Please observe the applicable regulations in force in your country)
1) Using the seat in a backwards-facing car seat (e.g. in a van or minibus) is only permitted if
the car seat is also approved for transporting adults. The seat may not be in the area of eect
of an airbag.
2) If there is a passenger airbag: Slide the passenger seat well backwards and follow any
relevant directions in your vehicle's operating instructions.
76–105cm
≤ 22kg
Safety button
06
05
04
03
02
01
12
11
10
09
08
07
17
16
15
14
13
04
03
12
13
14
15
0102
07
08
09
10
11
17
16
We are pleased that you have chosen our
TRIFIX² i-SIZE
to accompany your child safely through a new stage of his or her life.
In order to protect your child correctly, the
TRIFIX² i-SIZE
must always be used and installed as described in these instructions.
The
TRIFIX² i-SIZE
is exclusively intended to secure your baby
in your vehicle.
BRITAX RÖMER
child safety seat
Tested and approved according to
ECE* R 129/02
Body sizeBody weight
TRIFIX² i-SIZE
76–105 cmNJ
*ECE = European Standard for Child Safety Equipment
The child safety seat has been designed, tested and approved according to
the requirements of the European Standard for Child Safety Equipment (ECE
R 129/02). The seal of approval "E" (in a circle) and the approval number are
located on the orange approval label (sticker on the child safety seat).
DANGER! This certification will be invalidated if you make any modifica-
tions to the child safety seat. Only the manufacturer is permitted
to make modifications to the child safety seat. Unauthorised
technical changes can cause the protective function of the
seat to be reduced or completely eliminated. Do not make any
technical changes to the child safety seat.
DANGER! Use the
TRIFIX² i-SIZE
exclusively for securing your child in your
vehicle. It is in no way suitable for use as a seat or toy in the
home.
PAGE I
4. CARE AND MAINTENANCE
Cleaning
Please only use authentic BRITAX RÖMER replacement seat covers. The
seat cover is an integral part of the child safety seat and is key to ensuring the
trouble-free functionality of the system. Replacement seat covers are available
from your dealer.
• The cover can be removed and washed with a mild detergent in the
delicates programme of the washing machine (30°C). Please observe the
instructions on the washing label of the cover.
• The shoulder pads can be removed and washed in luke-warm soapy
water.
• The plastic parts and the harness can be cleaned with soapy water. Do not
use any caustic cleaning agents (such as solvents).
Care for the harness buckle
To ensure the safety of your child, it is absolutely essential that the harness
buckle continues to function correctly. Harness buckle malfunctions are usu-
ally caused by a build-up of soiling or by external objects:
• When you press the red release button, it takes a long time for the buckle
tongues to be ejected.
• The buckle tongues no longer engage (i.e. when you try to push them in,
they pop out again).
• The buckle tongues engage without an audible "click".
• The buckle tongues are dicult to push in (you feel a certain amount of
resistance).
• The buckle can only be opened by applying extreme force.
Remedy: Clean the harness buckle so that it functions properly again with no
trouble:
Cleaning the harness buckle
1. Open the harness buckle
04
(press the red release button).
2. Unhook the elastic seam of the cover from the bottom edge of the seat
shell
17
.
3. Open the Velcro fastener on the crotch pad
18
and pull it over the harness
buckle
04
along with the cover.
4. Rotate the crotch harness with the metal plate
19
which holds the har-
ness buckle
04
in the seat shell
17
by 90° in the longitudinal slot.
5. Slide the metal plate
19
through the harness slot
20
with the narrow edge
facing forwards.
6. Soak the buckle
04
in warm water containing washing-up liquid for at least
an hour. Rinse the buckle thoroughly and dry it.
7. Slide the metal plate
19
fully into the longitudinal slot from the front.
8. Rotate the crotch harness with the metal plate
19
by 90° until it is hooked
into the harness slot
20
on the seat shell
17
perpendicular to the direction
of motion.
DANGER! Tug hard on the harness buckle
04
to make sure that it is
secure in the seat shell
17
.
9. Thread the harness buckle
04
through the crotch pad
18
on the cover
and then re-fasten the Velcro fastener and the cover.
Removing the cover
1. Push the tilt adjustment lever
11
upwards and slide back the seat shell
17
to upright position.
2. Loosen the shoulder straps
08
as far as possible.
3. Open the harness buckle
04
(press the red release button).
4. Open the Velcro fastener on the crotch pad
18
.
5. Slide the headrest
03
into the lowest position.
6. Pull o the cover of the headrest
03
.
7. Open the snap fasteners on the left and right of the rear part of the cover.
8. Turn over the rear part of the cover onto the seat surface.
9. Thread the shoulder straps
08
through the recesses in the cover. Unhook
the elastic seam of the cover from the bottom edge of the seat shell.
TIP: Start with the handles on the side and top of the seat shell.
10. Pull the cover up and over the border of the strap adjuster.
11. Unthread the harness buckle
04
and the strap end
09
from the cover.
12. Pull the cover upwards a little and then put it with the recess over the
headrest
03
.
DANGER! The child seat must not be used without the seat cover.
Reattaching the cover:
Proceed in reverse order to put on the cover.
Caution: The harnesses must not be twisted and must be correctly posi-
tioned in the harness slots.
Removing the shoulder pads
1. Loosen the shoulder straps
08
as far as possible.
2. Slide the headrest
03
into the second position from the top.
3. Fold up the bottom part of the headrest
03
upwards.
4. Open the shoulder pads
07
at the Velcro fasteners at the side.
Rear of the child safety seat
5. Open the operating instructions compartment
14
.
6. Pull out the shoulder straps
08
a little so that you can see the strap loops
of the shoulder pads
07
underneath.
7. Unhook the strap loops from the plastic fasteners
25
of the height ad-
juster.
8. Pull the shoulder pads
07
forwards out of the harness slots.
Re-attaching the shoulder pads:
Simply follow the steps above in reverse order.
Caution: The shoulder pads
07
or harnesses must not be twisted or
changed places. The shoulder straps
08
must be located under the black
cover band
21
in the shoulder pads
07
.
18
04
04
18
1920
08
11
03
08
03
07
07
25
08
76–105cm
≤ 22kg
TRIFIX² i-SIZE
User instructions
GB
2000029654 20/05
www.britax-roemer.com
Produktspecifikationer
| Varumärke: | Britax-Romer |
| Kategori: | Bilbarnstol |
| Modell: | Trifix 2 I-Size |
Behöver du hjälp?
Om du behöver hjälp med Britax-Romer Trifix 2 I-Size ställ en fråga nedan och andra användare kommer att svara dig
Bilbarnstol Britax-Romer Manualer

13 September 2024
12 September 2024
12 September 2024
12 September 2024
12 September 2024
12 September 2024
12 September 2024
12 September 2024
12 September 2024
12 September 2024
Bilbarnstol Manualer
Nyaste Bilbarnstol Manualer
2 April 2025
2 April 2025
1 April 2025
28 Februari 2025
8 Februari 2025
6 Februari 2025
27 Januari 2025
10 Januari 2025
7 Januari 2025
7 Januari 2025