Caliber MCD 260M Bruksanvisning
Läs gratis den bruksanvisning för Caliber MCD 260M (42 sidor) i kategorin bilradio. Guiden har ansetts hjälpsam av 32 personer och har ett genomsnittsbetyg på 4.0 stjärnor baserat på 6 recensioner. Har du en fråga om Caliber MCD 260M eller vill du ställa frågor till andra användare av produkten? Ställ en fråga
Sida 1/42
ENGLISH
1
SPECIFICATIONS
GENERAL
Power Supply DC 12V
PolarityNegative Ground
Speaker impedance 4-8 ohms
Power Output4 x 55W
CD PLAYER
SystemCompact disc audio system
Usable discCompact disc
Sampling frequency44.1KHz
No of quantization bits16bit
Frequency20-20,000Hz
Number of channels2 stereo
S/N Ratio>60dB
RADIO SECTION
FM
Frequency Range87.5-108 Mhz
Usable SensitivityBetter than 12dB at S/N 30 dB
Stereo Separation30 dB at 1KHz
S/N Ratio45 dB
MW
Frequency Range522-1620 Khz
Intermediate Frequency450KHz
Usable SensitivityBetter than 38dB at S/N 20 dB
S/N Ratio35 dB
REMARK :
Specifications subject to change without notice.
MCD 260M
4x 70W
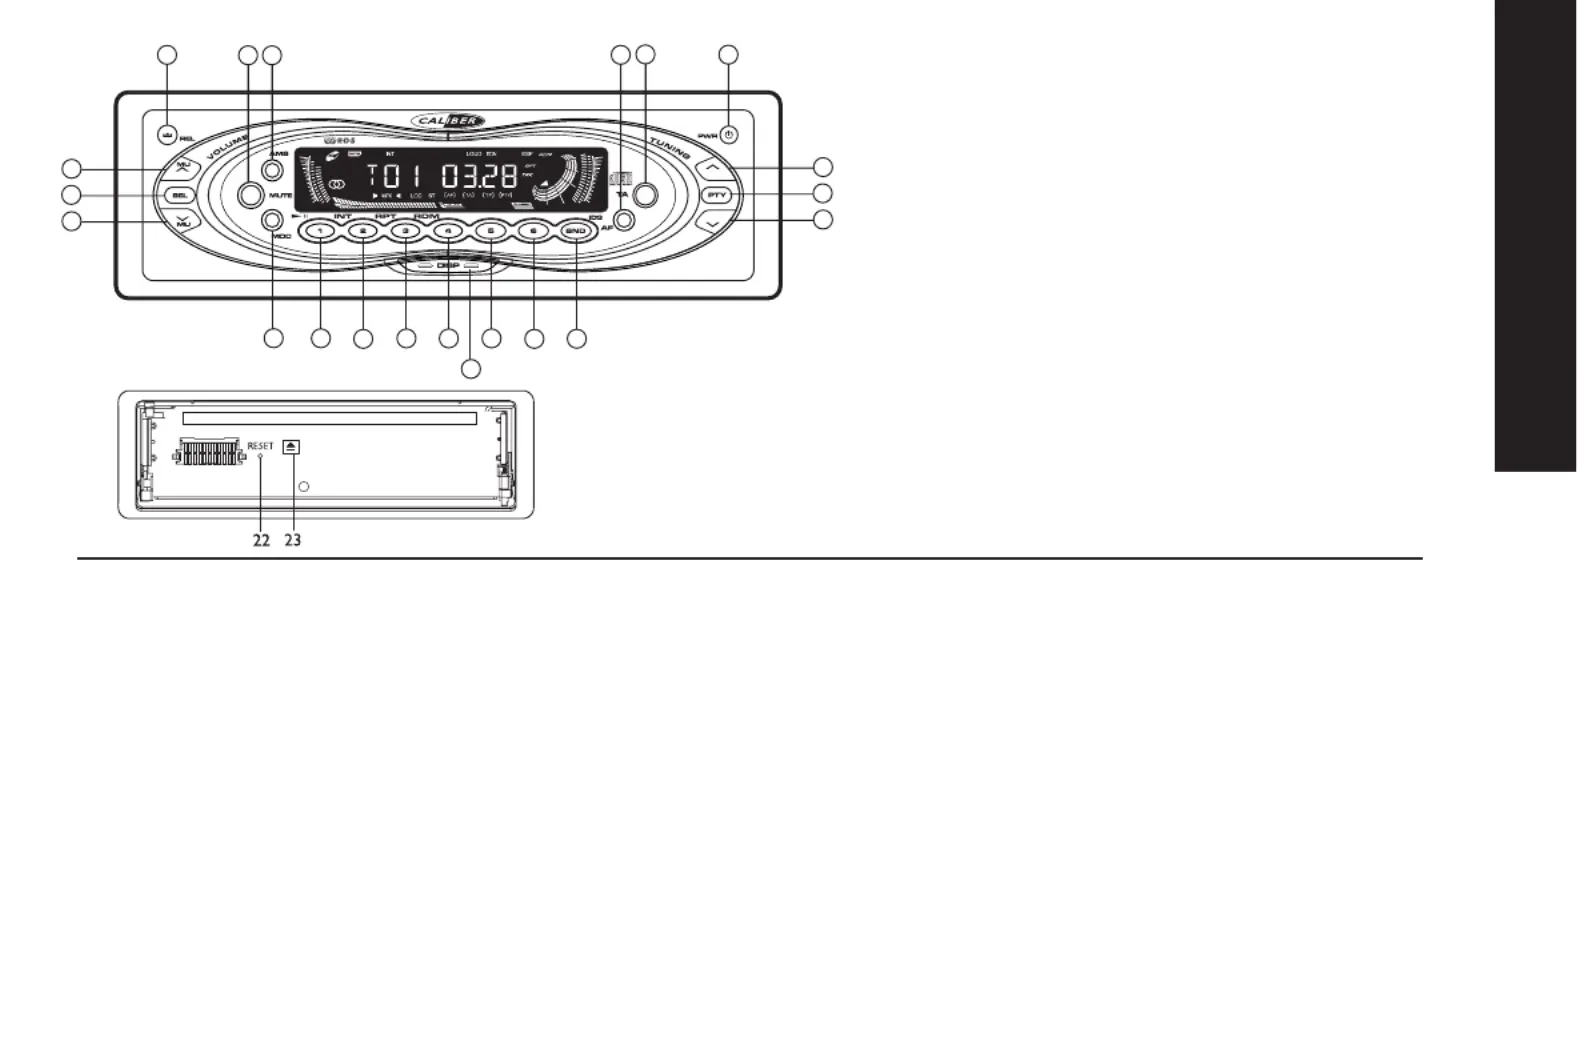
4
65
8
7
9
3
2
1
10
11
12
1314
16
151718
19
20
21
1.VOLUME DOWN BUTTON
2.SEL BUTTON
(Volume/Bass/Treble/Balance/Fader)
3.VOLUME UP BUTTON
4.PANEL RELEASE BUTTON
5.MUTE BUTTON
6.AMS (MP3) BUTTON
7.AF BUTTON
8.TA BUTTON
9.POWER BUTTON
10.TUNE/SEEK/TRACK FORWARD BUTTON
11.PTY BUTTON
12.TUNE/SEEK/TRACK REVERSE BUTTON
13.BAND/ID3 BUTTON
14/15/17/18/19/20.PRESET STATIONS BUTTONS (M1~M6)
16.DISPLAY BUTTON
17.RANDOM BUTTON
18.REPEAT BUTTON
19.INT BUTTON
20.PAUSE BUTTON
21.MODE BUTTON
22.RESET BUTTON
23.DISC EJECT
Produktspecifikationer
| Varumärke: | Caliber |
| Kategori: | bilradio |
| Modell: | MCD 260M |
Behöver du hjälp?
Om du behöver hjälp med Caliber MCD 260M ställ en fråga nedan och andra användare kommer att svara dig
bilradio Caliber Manualer

18 Augusti 2025
17 Augusti 2025
17 Augusti 2025
17 Augusti 2025
17 Augusti 2025
17 Augusti 2025
17 Augusti 2025
17 Augusti 2025
17 Augusti 2025
17 Augusti 2025
bilradio Manualer
Nyaste bilradio Manualer
23 Mars 2026
22 Februari 2026
18 Februari 2026
18 Februari 2026
18 Februari 2026
17 Februari 2026
17 Februari 2026
17 Februari 2026
17 Februari 2026
16 Februari 2026