Casio G-Shock Master of G GA-1100-1A1ER Bruksanvisning
Läs gratis den bruksanvisning för Casio G-Shock Master of G GA-1100-1A1ER (8 sidor) i kategorin Titta. Guiden har ansetts hjälpsam av 19 personer och har ett genomsnittsbetyg på 4.4 stjärnor baserat på 5 recensioner. Har du en fråga om Casio G-Shock Master of G GA-1100-1A1ER eller vill du ställa frågor till andra användare av produkten? Ställ en fråga
Sida 1/8
MO1502-EA
© 2015 CASIO COMPUTER CO., LTD.
Congratulations upon your selection of this CASIO watch.
Applications
This watch has built-in sensors that measure direction and temperature.
Measurement results are indicated by the watch’s hands and displays. These features make this watch
useful when hiking, mountain climbing, or when engaging in other such outdoor activities.
Warning!
• The measurement functions built into this watch are not intended for taking measurements that
require professional or industrial precision. Values produced by this watch should be considered
as reasonable representations only.
•
When engaging in mountain climbing or other activities in which losing your way can create a
dangerous or life-threatening situation, always use a second compass to confi rm direction readings.
• Note that CASIO COMPUTER CO., LTD. assumes no responsibility for any damage or loss
suffered by you or any third party arising through the use of this product or its malfunction.
EE-1
ENGLISH
Important!
• Whenever you use the digital compass of this watch for serious trekking, mountain climbing, or other
activities, always be sure to take along another compass to confi rm readings. If the readings produced
by the digital compass of this watch are different from those of the other compass, perform bidirectional
calibration of the digital compass to ensure more accurate readings.
• Direction readings and digital compass calibration will not be possible if the watch is in the vicinity of a
permanent magnet (magnetic accessory, etc.), metal objects, high-voltage wires, aerial wires, or
electrical household appliances (TV, computer, cellphone, etc.)
E-2
About This Manual
• Depending on the model of your watch, display text appears either as
dark fi gures on a light background, or light fi gures on a dark
background. All examples in this manual are shown using dark fi gures
on a light background.
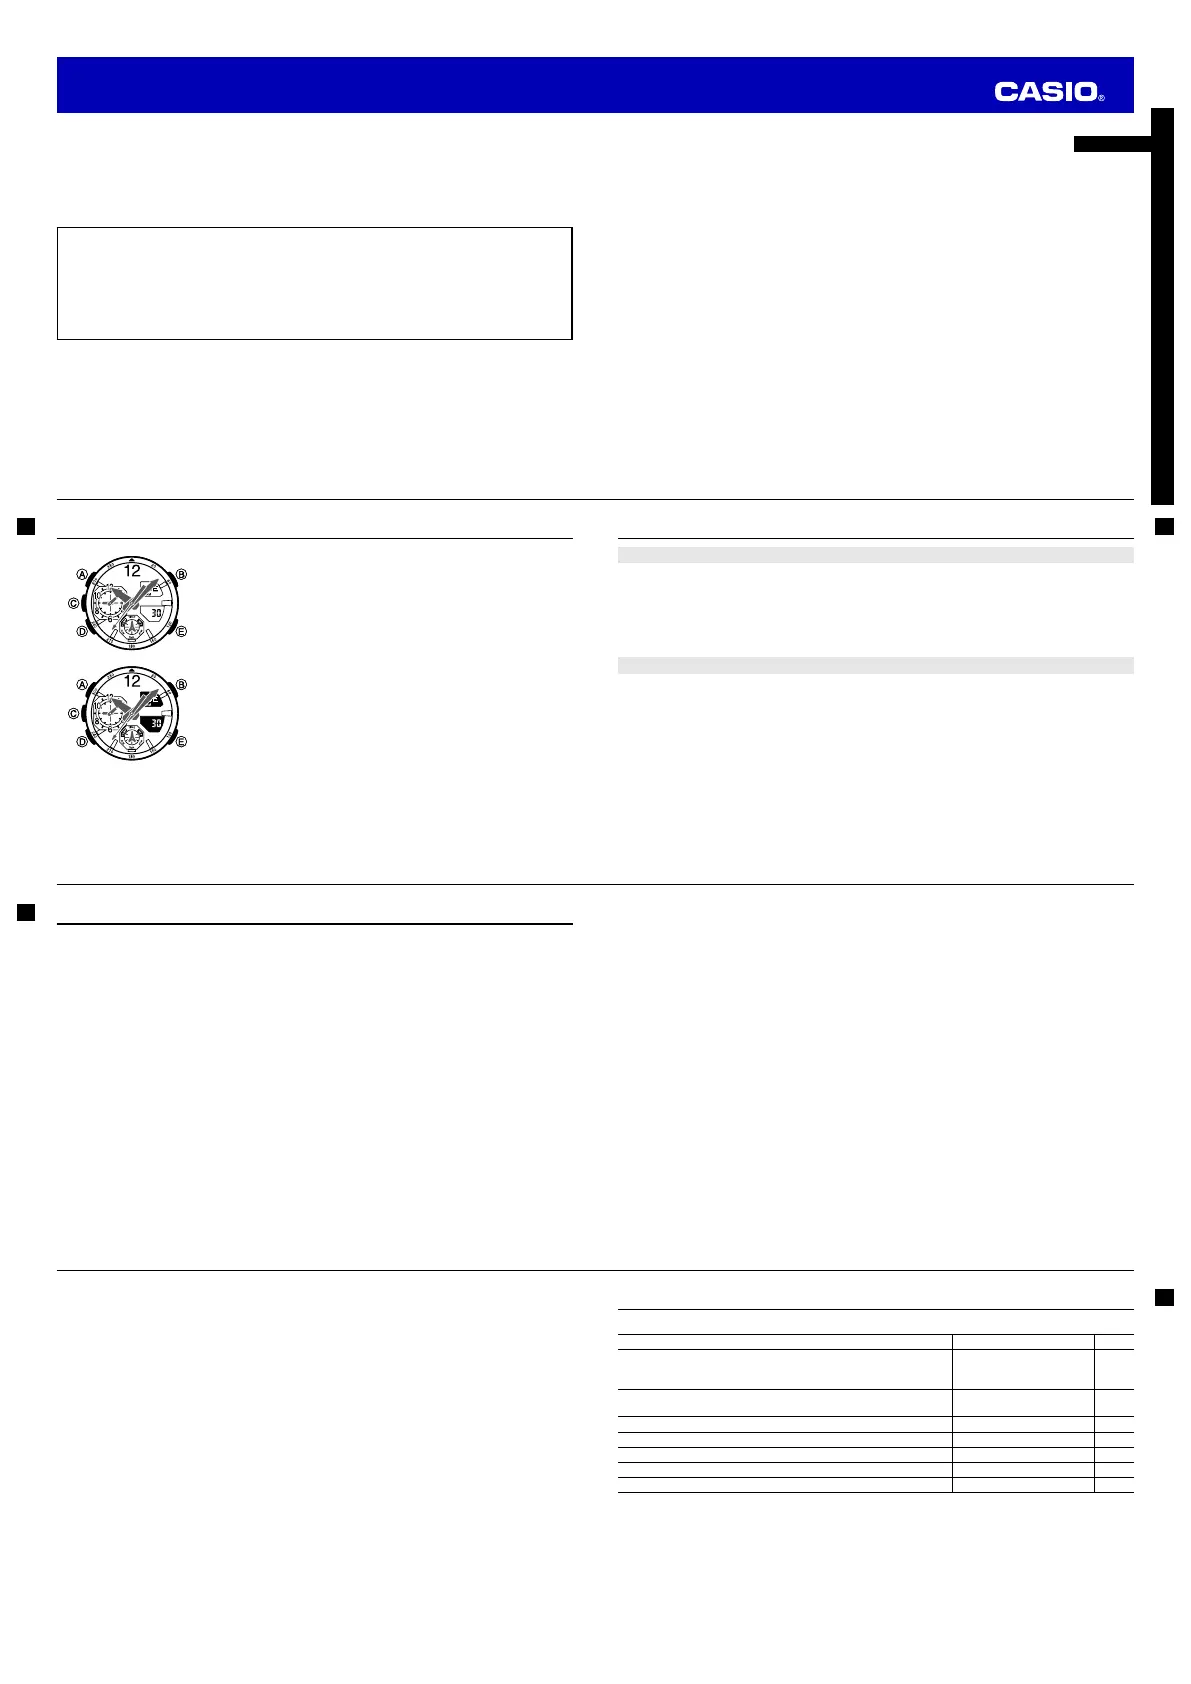
• Button operations are indicated using the letters shown in the
illustration.
• Note that the product illustrations in this manual are intended for
reference only, and so the actual product may appear somewhat
different than depicted by an illustration.
E-3
Things to check before using the watch
1. Check the Home City and the daylight saving time (DST) setting.
Use the procedure under “To confi gure Home City settings” (page E-14) to confi gure your Home City and
daylight saving time settings.
Important!
Proper World Time Mode data depends on correct Home City, time, and date settings in the Timekeeping
Mode. Make sure you confi gure these settings correctly.
2. Set the current time.
See “Confi guring Current Time and Date Settings” (page E-16).
The watch is now ready for use.
E-4
Contents
About This Manual ……………………………………………………………………………………………E-2
Things to check before using the watch …………………………………………………………………E-3
Mode Reference Guide ………………………………………………………………………………………E-7
Timekeeping …………………………………………………………………………………………………E-13
Confi guring Home City Settings …………………………………………………………………………E-14
To confi gure Home City settings ……………………………………………………………………E-14
To change the daylight saving time (summer time) setting………………………………………E-15
Confi guring Current Time and Date Settings …………………………………………………………E-16
To change the current time and date settings ……………………………………………………E-16
Hand Home Position Adjustment ………………………………………………………………………E-19
To adjust home positions ……………………………………………………………………………E-19
Using the Digital Compass ………………………………………………………………………………E-21
To perform a digital compass operation ……………………………………………………………E-21
To perform bidirectional calibration …………………………………………………………………E-25
To perform magnetic declination correction ………………………………………………………E-27
Taking Temperature Readings ……………………………………………………………………………E-31
To take temperature readings ………………………………………………………………………E-31
To calibrate the temperature sensor ………………………………………………………………E-33
E-5
Specifying Temperature Unit ……………………………………………………………………………E-34
To specify the temperature unit ……………………………………………………………………E-34
Checking the Current Time in a Different Time Zone …………………………………………………E-35
To enter the World Time Mode ……………………………………………………………………E-35
To confi gure World Time City and summer time settings ………………………………………E-36
To swap your Home Time and World Time Cities ………………………………………………E-37
Using the Stopwatch ………………………………………………………………………………………E-38
To enter the Stopwatch Mode ………………………………………………………………………E-38
To perform an elapsed time operation ……………………………………………………………E-38
To pause at a split time ………………………………………………………………………………E-38
To measure two fi nishes ……………………………………………………………………………E-39
Using the Countdown Timer ………………………………………………………………………………E-40
To enter the Countdown Timer Mode ………………………………………………………………E-40
To specify the countdown start time ………………………………………………………………E-40
To perform a countdown timer operation …………………………………………………………E-41
To stop the alarm ……………………………………………………………………………………E-41
Using the Alarm ……………………………………………………………………………………………E-42
To enter the Alarm Mode ……………………………………………………………………………E-42
To set an alarm time …………………………………………………………………………………E-43
To test the alarm ……………………………………………………………………………………E-43
To turn an alarm and the Hourly Time Signal on and off…………………………………………E-44
To stop the alarm ……………………………………………………………………………………E-44
E-6
Illumination …………………………………………………………………………………………………E-45
To illuminate the display manually …………………………………………………………………E-45
To change the illumination duration ………………………………………………………………E-45
To enable or disable the auto light switch …………………………………………………………E-47
Button Operation Tone ……………………………………………………………………………………E-49
To enable or disable the button operation tone …………………………………………………E-49
Low Battery Indication ……………………………………………………………………………………E-50
Troubleshooting ……………………………………………………………………………………………E-51
Specifi cations ………………………………………………………………………………………………E-55
E-7
Mode Reference Guide
Your watch has 7 “modes”. The mode you should select depends on what you want to do.
To do this:Enter this mode:See:
• View the current date in the Home City
• Confi gure Home City and daylight saving time (DST) settings
• Confi gure time and date settings
Timekeeping ModeE-13
• Determine north and the bearing to a destination
• Determine your current location using the watch and a map
Digital Compass ModeE-21
Determine the temperature at your current locationThermometer ModeE-31
View the current time in 48 cities (31 time zones) and UTCWorld Time ModeE-35
Use the stopwatch to measure elapsed timeStopwatch ModeE-38
Use the countdown timerCountdown Timer ModeE-40
Set an alarm timeAlarm ModeE-42
Operation Guide 5441
Produktspecifikationer
| Varumärke: | Casio |
| Kategori: | Titta |
| Modell: | G-Shock Master of G GA-1100-1A1ER |
| Enhetsplacering: | Ingebouwd |
| Typ av operation: | Touch |
| Färg på produkten: | Zwart |
| Antal effektnivåer: | 14 |
| Inbyggd display: | Ja |
| Timer: | Ja |
| Vikt: | 12120 g |
| Bredd: | 780 mm |
| Djup: | 520 mm |
| Höjd: | 23 mm |
| Barnlås: | Ja |
| Förpackningens vikt: | 13860 g |
| Typ av material (överst): | Glaskeramiek |
| Brännare/kokzonseffekt 2: | 2300 W |
| Brännare/kokzonseffekt 3: | 2300 W |
| Brännare/kokzonseffekt 1: | 2300 W |
| Antal brännare/kokzoner: | 4 zone(s) |
| Typ av häll: | Inductiekookplaat zones |
| Antal gasbrännare: | 0 zone(s) |
| Antal elektroniska kokzoner: | 4 zone(s) |
| Kontrollposition: | Boven voorzijde |
| Ansluten last (elektrisk): | 7200 W |
| Installationsfackets bredd: | 750 mm |
| Installationsfack djup: | 490 mm |
| Ansluten last (gas): | - W |
| Hob²Hood funktion: | Ja |
| Skriv timer: | Digitaal |
| Bredd på häll: | 80 cm |
| Boost funktion: | Ja |
| Antal boosters: | 4 |
| Restvärmeindikator: | Ja |
| Brofunktion: | Ja |
| Certifiering: | CE, DEMKO, UL, WABE |
| Brännare/kokzonseffekt 4: | 1400 W |
| Strömkälla brännare/kokzon 1: | Electrisch |
| Strömkälla brännare/kokzon 2: | Electrisch |
| Strömkälla brännare/kokzon 3: | Electrisch |
| Strömkälla för brännare/kokzon 4: | Electrisch |
| Kookzone 1 boost: | 3600 W |
| Kookzone 2 boost: | 3200 W |
| Kookzone 3 boost: | 3200 W |
| Kookzone 4 boost: | 2500 W |
| Placera brännare/kokzon 1: | Rechts achter |
| Diameter brännare/kokzon 1: | 240 mm |
| Placera brännare/kokzon 2: | Links voor |
| Brännare/kokzons diameter 2: | 210 mm |
| Placera brännare/kokzon 3: | Links achter |
| Brännare/kokzons diameter 3: | 210 mm |
| Placera brännare/kokzon 4: | Midden vooraan |
| Brännare/kokzons diameter 4: | 145 mm |
| Klart larm: | Ja |
| AC-ingångsspänning: | 220 - 240 V |
| AC-ingångsfrekvens: | 50 - 60 Hz |
| Type beeldscherm: | TFT |
| Inbyggd fläktkåpa: | Nee |
Behöver du hjälp?
Om du behöver hjälp med Casio G-Shock Master of G GA-1100-1A1ER ställ en fråga nedan och andra användare kommer att svara dig
Titta Casio Manualer

5 April 2025
5 April 2025
5 April 2025
4 April 2025
4 April 2025
4 April 2025
1 April 2025
30 Mars 2025
17 Februari 2025
16 Januari 2025
Titta Manualer
Nyaste Titta Manualer
26 Mars 2025
26 Mars 2025
13 Mars 2025