Dimplex 403BTB Bruksanvisning
Läs gratis den bruksanvisning för Dimplex 403BTB (4 sidor) i kategorin element. Guiden har ansetts hjälpsam av 18 personer och har ett genomsnittsbetyg på 4.1 stjärnor baserat på 3 recensioner. Har du en fråga om Dimplex 403BTB eller vill du ställa frågor till andra användare av produkten? Ställ en fråga
Sida 1/4
attention has to be given where children and
vulnerable people are present.
WARNING: Do not use the heater in small rooms
when they are occupied by persons who are not
capable of leaving the room on their own, unless
constant supervision is provided.
WARNING:To reduce the risk of re, keep
textiles, curtains or any other ammable material
a minimum distance of 1m from the air outlet.
Do not use the heater if it has been dropped.
Do not use the heater if there are any visible
signs of damage.
If the mains lead is damaged, it must be replaced
by the manufacturer or its service agent or a
similarly qualied person in order to avoid a
hazard.
The heater should only be used on a horizontal
and stable surface with the feet securely tted
Electrical connection
WARNING – THIS APPLIANCE MUST BE EARTHED
The use of an extension lead or multi-plug adaptor is not advised when
connecting this product to the mains. Connection through these devices
could lead to a risk of overloading, overheating and even re at the extension
lead or adaptor due to inadequate connection quality.
This heater must be used on an ~ supply only and the voltage marked on
the heater must correspond to the supply voltage. This heater is tted with
a rewireable plug incorporating a 13 amp fuse. In the event of replacing
the fuse in the plug supplied, a 13 amp fuse approved by ASTA to BS 1362
must be used. If any other type of plug is used, a 15 amp fuse must be
tted in the plug, the adaptor, or at the distribution board.
IMPORTANT : If the plug is not suitable for your socket, the 13 amp plug
should be removed. Before wiring the appropriate plug, please note that
the wires in this mains lead are coloured in accordance with the following
code : GREEN AND YELLOW: EARTH
BLUE : NEUTRAL
BROWN : LIVE
Connect the GREEN AND YELLOW wire to the terminal marked ‘E’ or
by the earth symbol , or coloured GREEN or GREEN AND YELLOW.
Connect the BROWN wire to the terminal marked ‘L’ or coloured RED.
Connect the BLUE wire to the terminal marked ‘N’ or coloured BLACK.
Important Safety Advice
WARNING: This appliance must not be used in
a bathroom.
WARNING: Do not use this heater in the
immediate surroundings of a bath, a shower or
a swimming pool.
WARNING: This heater must not be located
immediately below a xed socket outlet.
The heater carries a warning symbol to
alert the user to the risk of re that exists
if the heater is accidentally covered.
WARNING: In order to avoid a hazard due to
inadvertent resetting of the thermal cut-out,
this appliance must not be supplied through an
external switching device, such as a timer, or
connected to a circuit that is regularly switched
on and off by the utility.
This appliance can be used by children aged
from 8 years and above and persons with
reduced physical, sensory or mental capabilities
or lack of experience or knowledge if they have
been given supervision or instruction concerning
the use of the appliance in a safe way and
understand the hazards involved. Children shall
not play with the appliance. Cleaning and user
maintenance shall not be made by children
without supervision.
Children of less than 3 years should be kept
away unless continuously supervised. Children
aged from 3 years and less than 8 years shall
only switch on/off the appliance provided that
it has been placed or installed in its intended
normal operating position and they have been
given supervision or instruction concerning
the use of the appliance in a safe way and
understand the hazards involved. Children aged
from 3 years and less than 8 years shall not plug
in, regulate and clean the appliance or perform
user maintenance.
CAUTION: Some parts of this product can
become very hot and cause burns. Particular
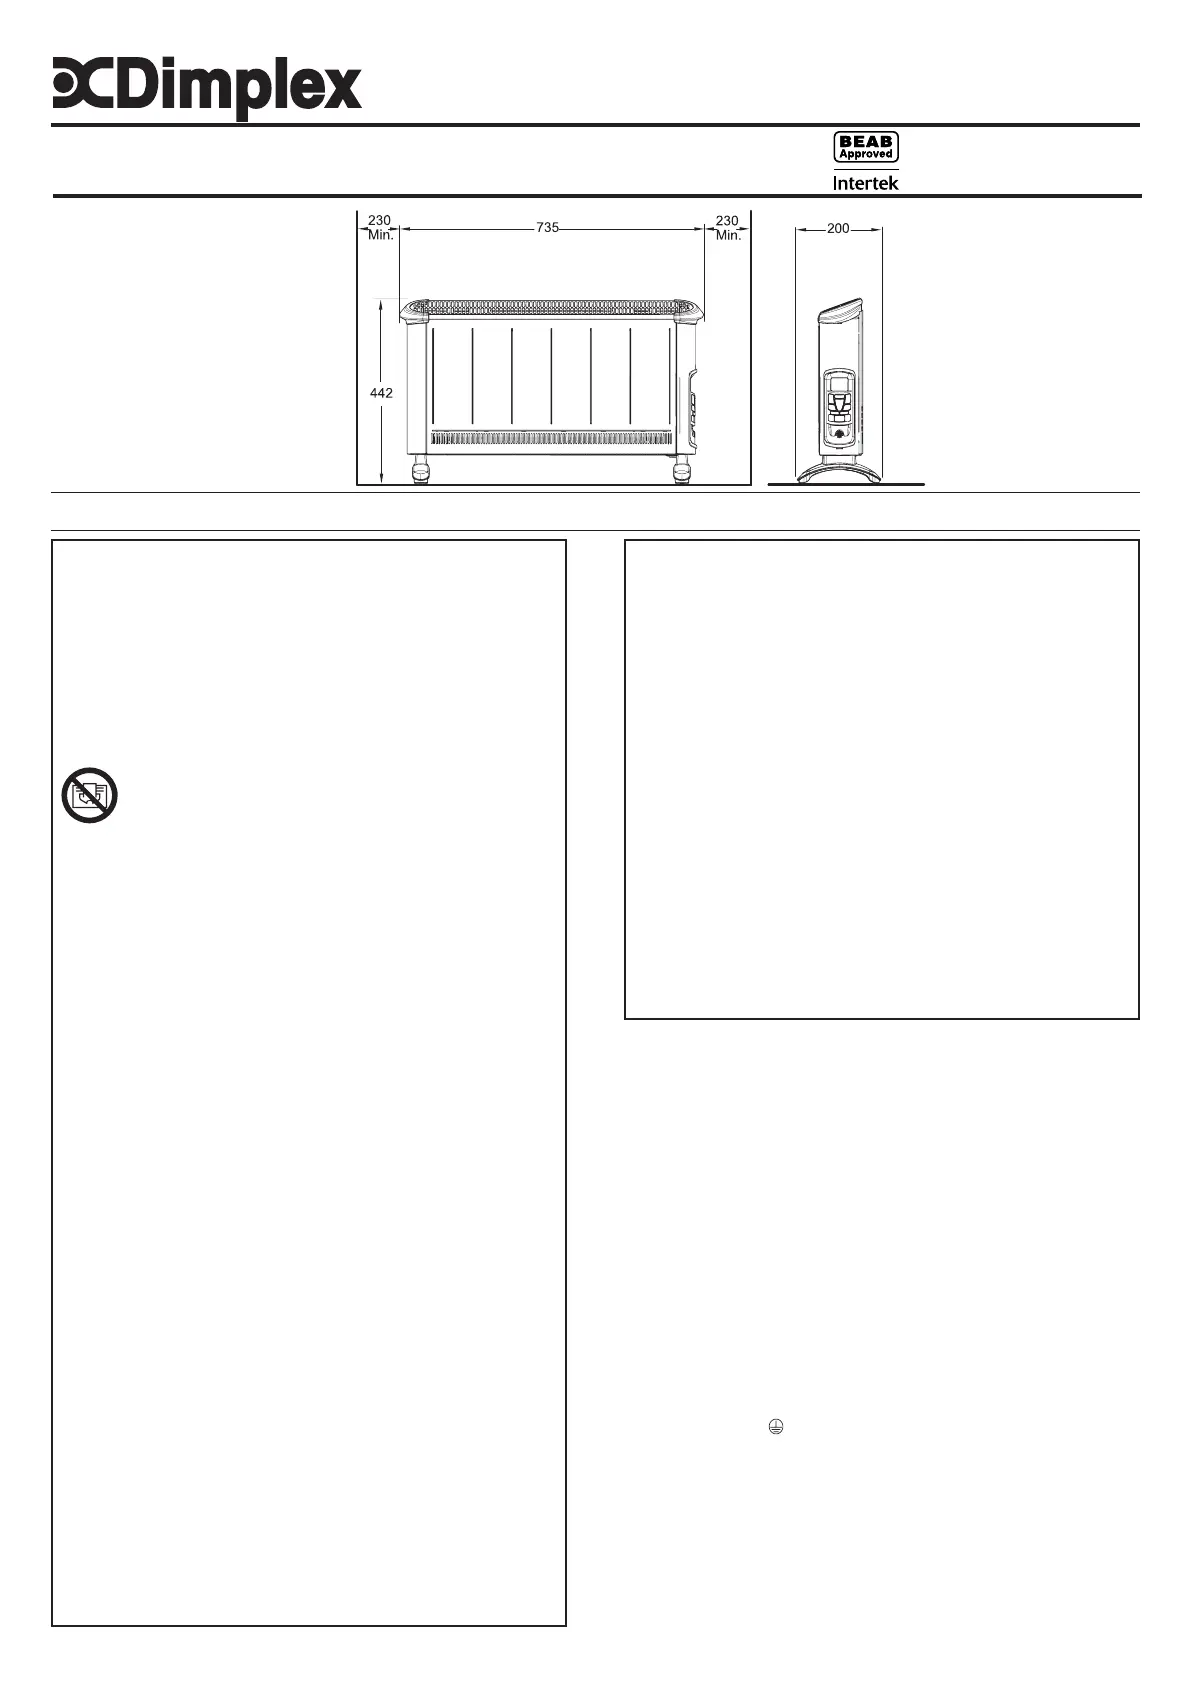
Dimensions
(Millimetres)
Installation and Operating Instructions
Dimplex Convector Heater
Models : 403BTB & 403BT
INDCUK40BT Issue 4
IMPORTANT : THESE INSTRUCTIONS SHOULD BE READ CAREFULLY AND RETAINED FOR FUTURE REFERENCE
As with all portable heating appliances - This product is only suitable for well insulated spaces or occasional use
Fig. 1
Produktspecifikationer
| Varumärke: | Dimplex |
| Kategori: | element |
| Modell: | 403BTB |
| Inbyggd display: | Ja |
| Timer: | Ja |
| Vikt: | 5100 g |
| Bredd: | 733 mm |
| Djup: | 200 mm |
| Höjd: | 442 mm |
| Förpackningens bredd: | 820 mm |
| Avfrostningsfunktion: | Ja |
| Lämplig för: | inomhus |
| Modell: | Elektrisk konvektionsvärmare |
| Fjärrstyrd: | Ja |
| Fjärrkontroll ingår: | Ja |
| Placeringsalternativ: | Golv |
| Produktens färg: | Svart |
| Låddjup: | 130 mm |
| Vikt inkl. förpackning: | 4800 g |
| Värmeeffekt: | 3000 W |
Behöver du hjälp?
Om du behöver hjälp med Dimplex 403BTB ställ en fråga nedan och andra användare kommer att svara dig
element Dimplex Manualer

18 Mars 2026
17 Mars 2026
15 Mars 2026
15 Mars 2026
14 Mars 2026
14 Mars 2026
14 Mars 2026
13 Mars 2026
12 Mars 2026
12 Mars 2026
element Manualer
Nyaste element Manualer
2 April 2026
2 April 2026
31 Mars 2026
26 Mars 2026
24 Mars 2026
23 Mars 2026
23 Mars 2026
22 Mars 2026
21 Mars 2026
21 Mars 2026