Dormakaba J300 Bruksanvisning
Läs gratis den bruksanvisning för Dormakaba J300 (2 sidor) i kategorin Inte kategoriserad. Guiden har ansetts hjälpsam av 30 personer och har ett genomsnittsbetyg på 4.7 stjärnor baserat på 7 recensioner. Har du en fråga om Dormakaba J300 eller vill du ställa frågor till andra användare av produkten? Ställ en fråga
Sida 1/2
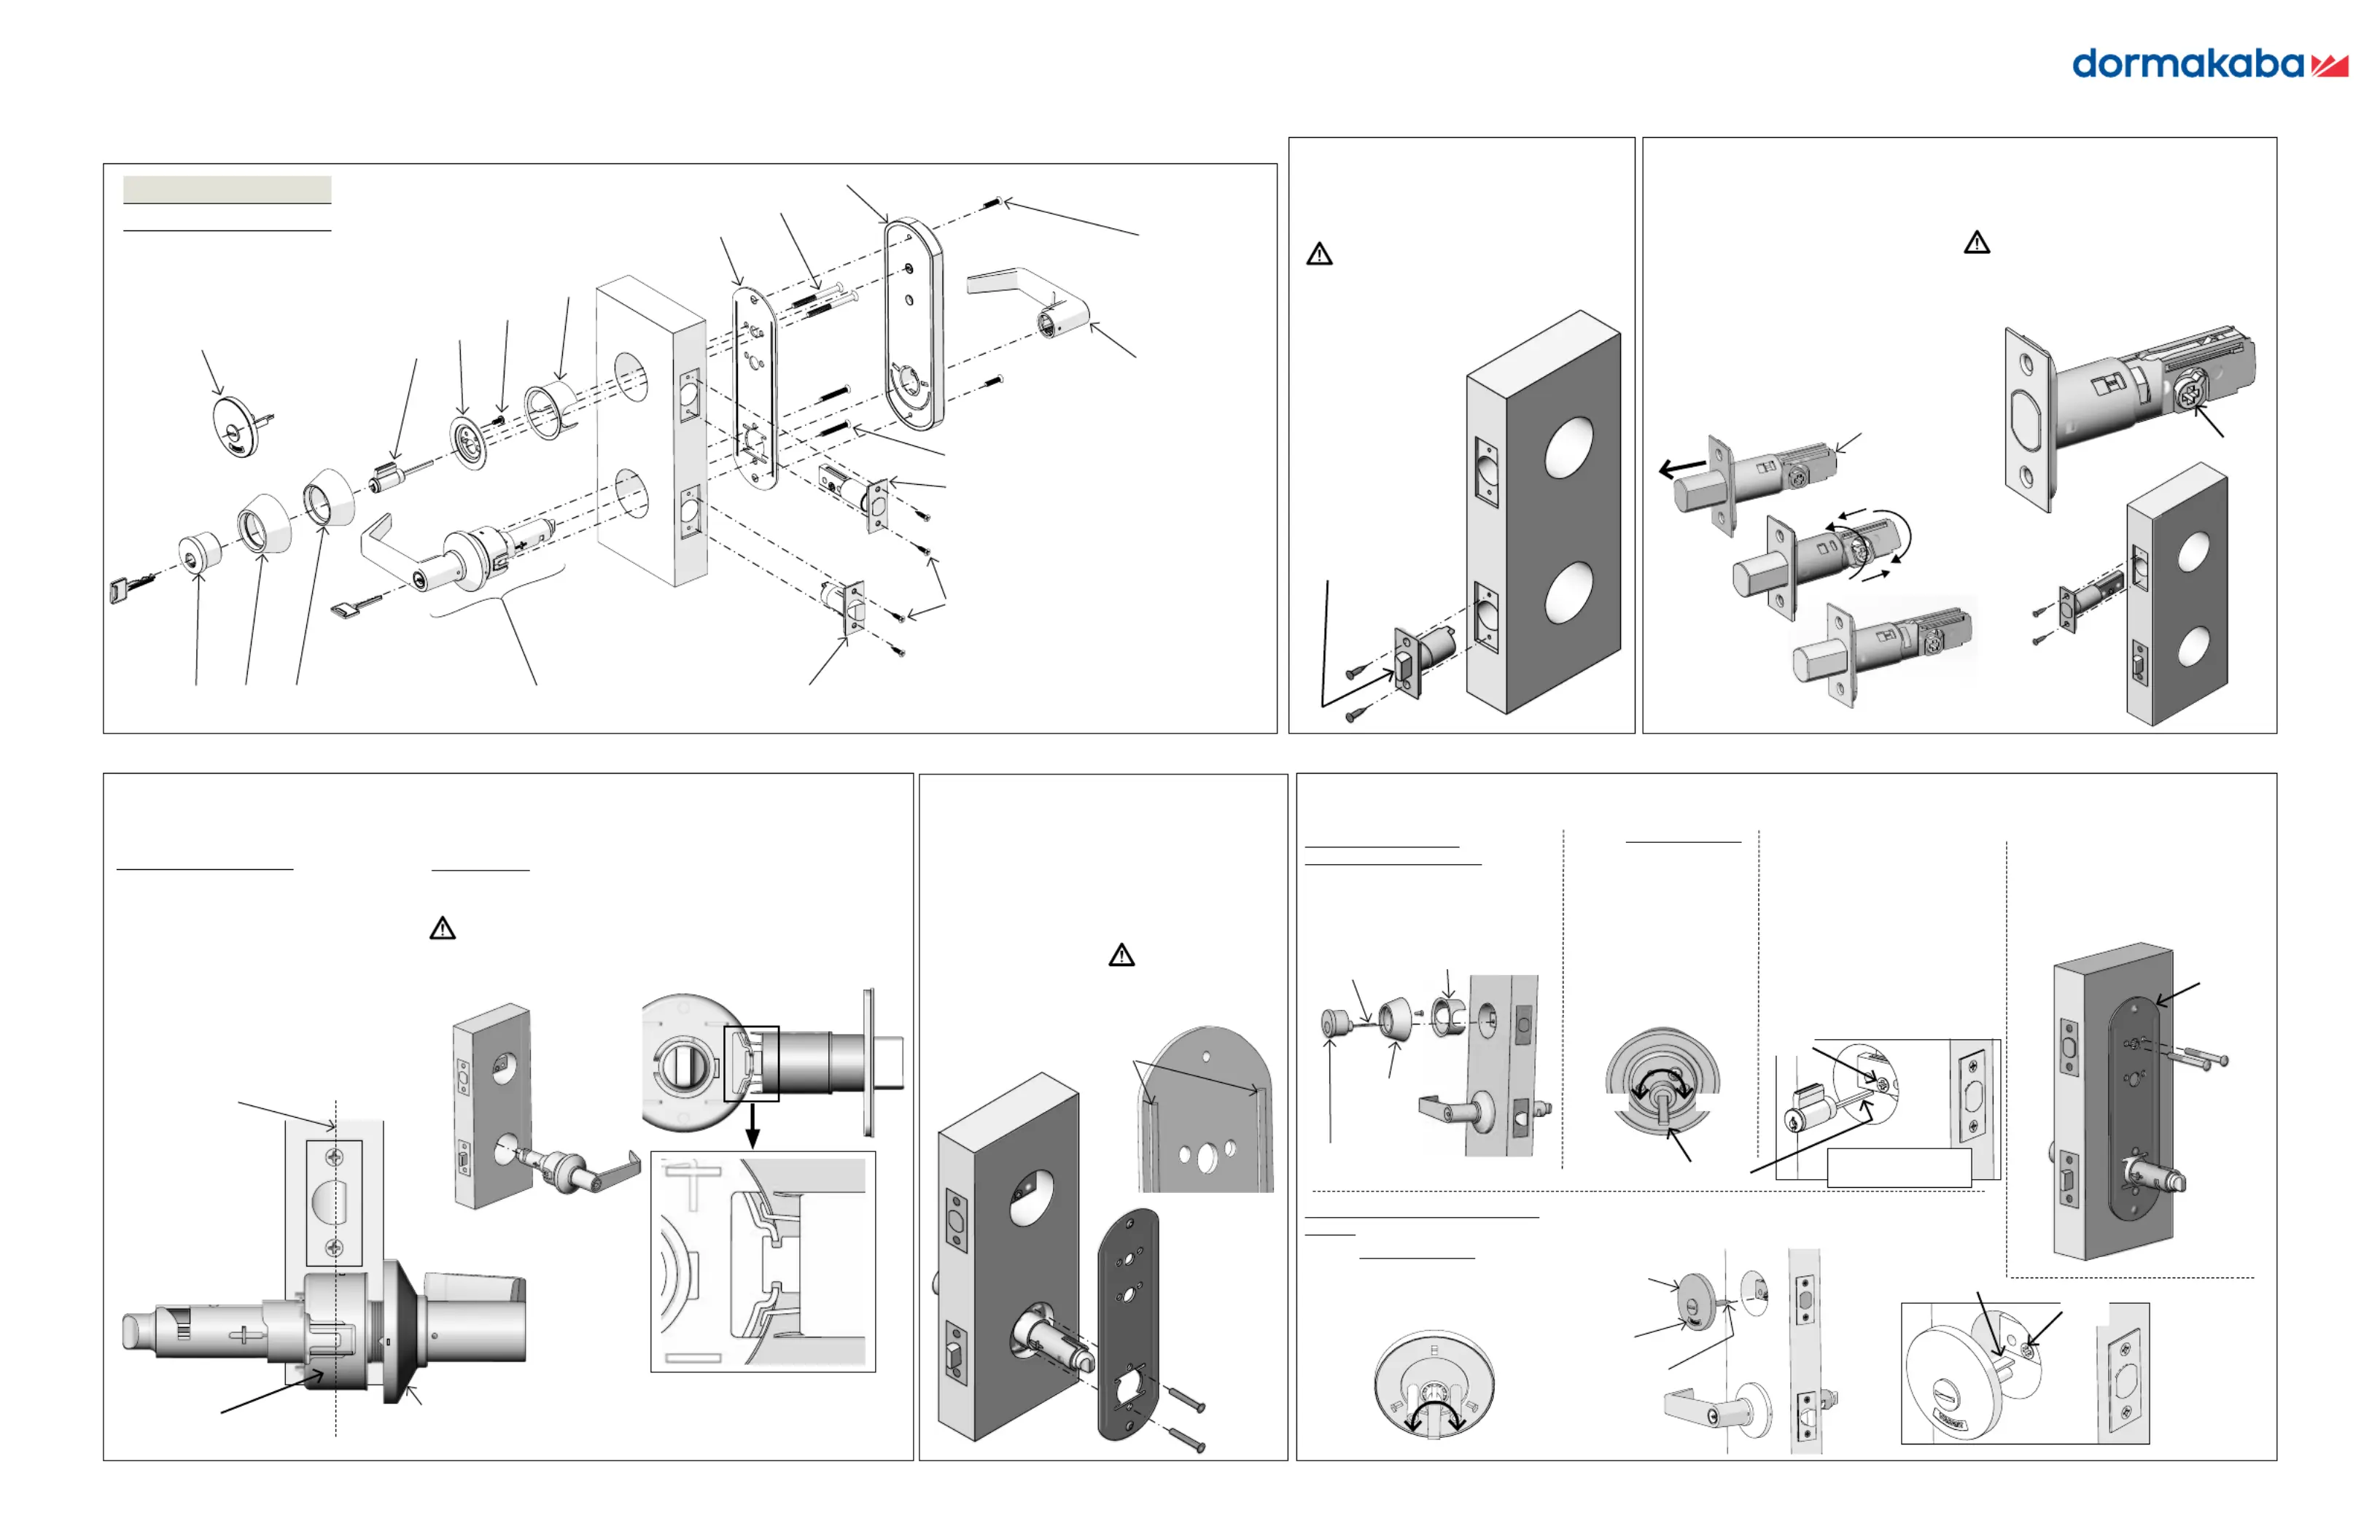
J300 Interconnected Lock
Installation Instructions
76019635 03/18www.dormakaba.us
.. Place latch into door edge.
Orient with beveled edge of latch
facing door jamb.
.. Secure with two - x /” combo
screws.
Dead bolt
housing
ADJUST BACKSET PRIOR TO
INSTALLATION (IF NECESSARY)
.. : Extend dead bolt
• Turn cross drive with screwdriver.
.. Set backset:
• Twist dead bolt housing; push/pull
to appropriate backset.
.. Lock backset:
• Twist housing back to lock in place.
Adjust for door thickness
NOTE: Lock comes adjusted for 1-3/4”
door from the factory.
.. Align so center of chassis is in line
with center of latch.
.. Rotate outside rose assembly to
adjust for proper door thickness.
.. Secure inside
mounting plate
to door.
.. Secure with two
- x -/”
screws.
Install chassis
.. Slide lock assembly into face
of door.
Be sure to engage the inner
latch mechanism of the
chassis with the back of the
latch as shown.
SECURE DEAD BOLT
ASSEMBLY: (J, J)
.. Insert dead bolt sleeve
into exterior face of door.
1 Interconnected lock installation
. Install latch
. Install dead bolt latch
. Install lock assembly
.
Install inside mounting
plate
NOTE: The raised
features on the
mounting plate should
face outward.
DO NOT
OVERTIGHTEN!
. Install dead bolt cylinder assembly (J310, J353) or indicator assembly (J346)
PART LIST
- DEAD BOLT CYLINDER HOUSING
- CYLINDER GUARD ROSE
- CYLINDER GUARD
- CYLINDER
- CYLINDER RETAINING PLATE
- DEAD BOLT SLEEVE
- INSIDE MOUNTING PLATE
- /- X -/” SCREWS (X)
- ESCUTCHEON ASSEMBLY
- - X /” SCREWS (X)
- INSIDE LEVER
- - X -/” SCREWS (X)
- DEAD BOLT LATCH
- - X /” COMBO-SCREWS (X)
- LATCH
- LOCK ASSEMBLY
- INDICATOR ASSEMBLY (J)
Tools required
# Cross drive screwdriver
screw
Beveled
edge
.. Retract dead bolt.
.. Place dead bolt latch in door edge.
Orient with cross drive towards the
bottom. (Fig A)
.. Secure with two - x /” combo
screws.
From 2-3/4” to 2-3/8”
and vice versa
[2-3/8”
backset]
[2-3/4”
backset]
Center of
latch
Chassis
Outside rose
assembly
Latch
Chassis
Raised
features
.. Secure dead bolt (J,
J) or indicator (J)
through inside mounting
plate.
.. Use two ⁄- x -⁄”
screws.
Inside
mounting
plate
Fig 2A
Cross
drive
SECURE INDICATOR ASSEMBLY
(J346):
.. Prepare tailpiece:
• ENSURE TAILPIECE IS
HORIZONTAL and ‘VACANT’
SHOWS IN WINDOW.
Cross
drive
Tailpiece
.. Slide indicator through deadbolt housing, so it
engages with cross drive in dead bolt latch.
Tailpiece
CCWCW
CCWCW
Tailpiece
Indicator
.. Prepare tailpiece:
• LH/LHR: turn
tailpiece
CLOCKWISE
• RH/RHR: turn
tailpiece
COUNTER-
CLOCKWISE
TAILPIECE MUST BE
HORIZONTAL.
.. Insert cylinder
assembly through
cylinder rose/guard.
.. Slide tailpiece
through dead bolt
housing, so it engages
with cross drive in
dead bolt latch.
ENSURE TAILPIECE
IS HORIZONTAL.
Dead bolt
sleeve
Cylinder
rose/
guard
Tailpiece
Cylinder
assembly
Cross
drive
Some parts hidden
for easier viewing
Window
Produktspecifikationer
| Varumärke: | Dormakaba |
| Kategori: | Inte kategoriserad |
| Modell: | J300 |
Behöver du hjälp?
Om du behöver hjälp med Dormakaba J300 ställ en fråga nedan och andra användare kommer att svara dig
Inte kategoriserad Dormakaba Manualer

10 September 2024
10 September 2024
10 September 2024
10 September 2024
10 September 2024
10 September 2024
10 September 2024
10 September 2024
10 September 2024
10 September 2024
Inte kategoriserad Manualer
Nyaste Inte kategoriserad Manualer
9 April 2025
9 April 2025
9 April 2025
9 April 2025
9 April 2025
9 April 2025
9 April 2025
9 April 2025
9 April 2025
9 April 2025