Easypix V912 Bruksanvisning
Läs gratis den bruksanvisning för Easypix V912 (3 sidor) i kategorin Kamera. Guiden har ansetts hjälpsam av 35 personer och har ett genomsnittsbetyg på 5.0 stjärnor baserat på 3 recensioner. Har du en fråga om Easypix V912 eller vill du ställa frågor till andra användare av produkten? Ställ en fråga
Sida 1/3
Manual
1. Get to know your camera
9.0 Mega pixels resolution sensor
Digital still camera
Digital video camcorder
Built-in flash Light
8x digital zoom
2.7" TFT color display
Micro SD card support
2xAAA alkaline batteries
Smile detection
Anti-shaking still capture
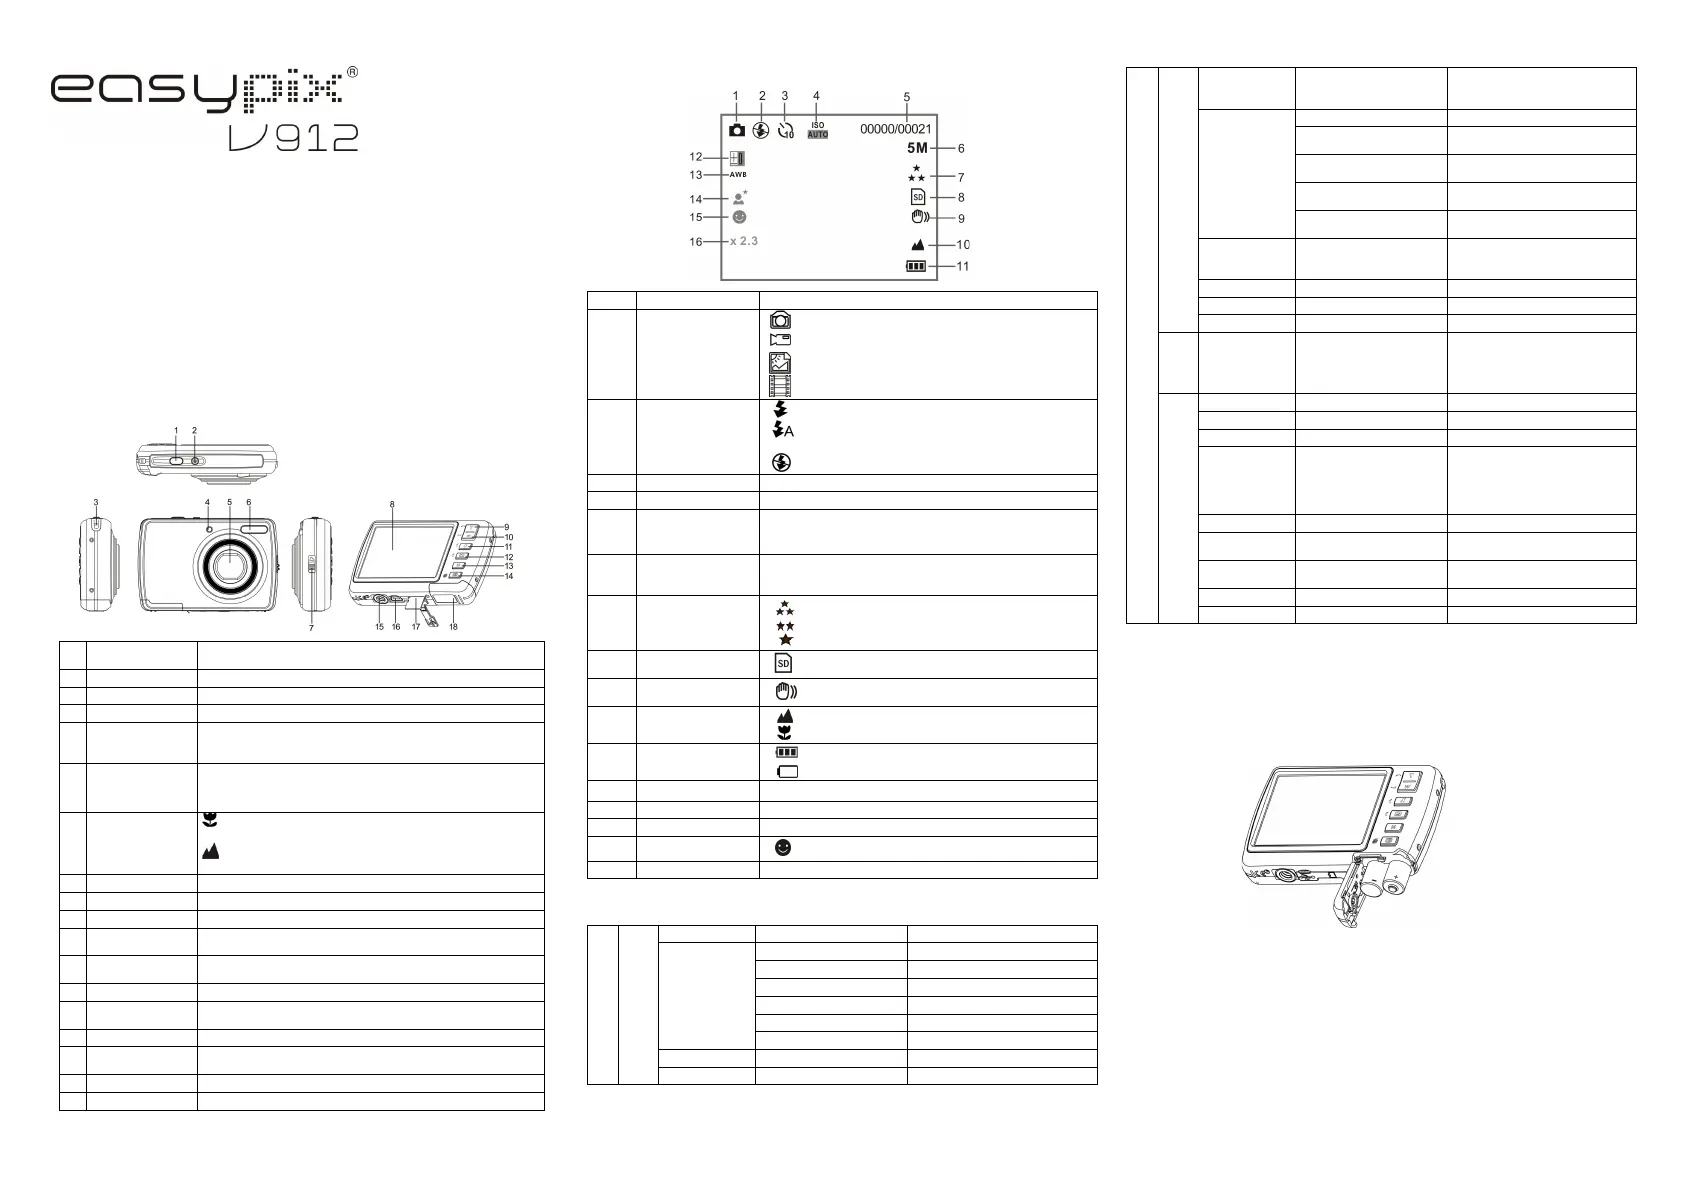
2. Functional parts
1 Shutter
Press this button to take photographs or to start /stop recording
a video clip,or to confirm changes in menu mode.
2 Power on/off button
Press this button to turn on, press again to turn off.
3 Strap hook Hook for attaching the wrist strap to the camera.
4 Busy indicator When the indicator is blinking,the camera is busy
5 Lens
Records the image to be taken.
Note: Keep the lens clean. Dirt and fingerprints will affect the
quality of the picture.
6 Flash light
Use the built-in flash to give the subject extra lighting if it is in
dark surrounding(the best flash distance is recommended within
1.5m).
7 Macro switch
Macro mode: Select this mode to take close-up
photographs (distance 11cm - 18cm).
Normal mode: Select this mode to take photographs from
0.5m - infinity.
8 LCD screen Display photographs, video clips, camera setting and menu.
9 Up Up & Digital zoom in.
10 Down Down & Digital zoom out.
11 Left / Flash light
For LEFT selection in menu mode.
For flash light function selection in photo mode.
12 Right / Playback
For RIGHT selection in menu mode.
Press it to enter playback mode.
13 Mode Press it to select PHOTO/VIDEO mode.
14 Menu / Delete
Press it to enter camera setting mode.
Press it to delete the photos/videos in playback mode.
15 Tripod connector To fix the camera on tripod.
16 USB interface
Via this connection, you can download photographs and video
clips to a computer.
17 Micro SD card slot Micro SD card storage location.
18 Battery door Door for battery.
3. Explanation of the status icons
Item Function Description
1 Mode selected
Photographs mode.
Videos capture mode.
Photo playback mode.
Video playback mode.
2 Flash indicator
Force flash: The flash is on in any environment.
Auto flash: The camera determines if
the flash should be used or not.
No flash : The flash is turned off.
3 Self-timer 10s Timer
4 ISO Sensitivity select.
5
Photo/Video
counter
Photo mode: No. of pictures had been taken.
Video mode: Recording time in second.
Playback mode:No. of pictures or video file.
6 Selected resolution
12M = 4032x3024; 9M=3456x2592
5M = 2560x1920; 3M = 2048x1536;
1.3M = 1280x960; VGA = 640x480
7 Picture quality
Super fine.
Fine.
Normal.
8 SD card indication
The SD card is inserted and will be used as storage for
PHOTO and VIDEO
9
Brightness
alert-anti-shaking
Alert user to hold the camera steadily.-on/off
10
Normal/Macro
mode indicator
Mode (0.5m – infinity).
Macro mode (11cm – 18cm).
11 Battery indicator
The batteries are full.
The batteries are empty.
12 Exposure value
Show EV±value.
13 White Balance White balance selection.
14 Scene mode Landscape/Backlight/Night scene/Portrait/Sports/auto
15 Smile detection
On/Off
16 Zoom indicator Showing zoom ratio.
4. Details for camera setting
capture Mode Single / 10s Timer Single or 10s timer selection
12M pixel resolution 4032 x 3024
9.0M pixel resolution 3456 x 2592
5.0M pixel resolution 2560 x 1920
3.0M pixel resolution 2048 x 1536
1.3M pixel resolution 1280 x 960
Resolution
VGA resolution 640 x 480
Quality Super Fine/Fine/Normal Picture quality setting
SET
Still
SharpnessStrong/Normal/SoftSharpness setting
Exposure
±2,±5/3,±4/3,±1,
±2/3,±1/3,0
Exposure setting
Auto Automatic white balance
Daylight
White balance selected for daylight
surrounding
Cloudy
White balance selected for cloudy
surrounding
Tungsten
White balance selected for tungsten
lighting
White balance
Fluorescent
White balance selected for
fluorescent surrounding
Scene
Auto/Landscape/
Backlight/Night
scene/Portrait/Sports
Scene setting
ISO Auto/50/100/200 Sensitivity select
Smile detection On / Off Smile detection setting
Anti-shaking On / Off Anti-shaking setting
Video
Resolution
VGA 640 x 480
QVGA 320 x 240
Video resolution set up
Date/Time YY/MM/DD Date or time setting
Auto power off Off / 1Minute / 3 Minutes Auto power off selection
Beep sound Off/On Beep sound setting
Language
English/T-Chinese/
S-Chinese/French/
Deutsch/Italian/Spanish/
Portuguese/Japanese/Ned
erlands
Select display language
Date stamp Date &Time /Date /Off Date stamp
Frequency 50Hz / 60Hz
Select power frequency in your
location
Format
Internal Memory/
SD card
Format the memory location
selection.
Default setting Cancel / OK Default setting
Setup
Version See the firmware version
Note: The camera will remain the last setting when it is turned off.
5. Using the camera
5.1 Installing the batteries
1.
Open the battery door.
2. Insert 2xAAA alkaline batteries into the camera.
3. Close the battery door.
5.2 Inserting a memory card (not included)
This camera has built-in internal memory. This memory can be extended with a micro SD memory
card (not included).
Follow the instructions given below to insert the optional micro SD memory card into the camera.
1. Turn off the camera first.
2. Open the card bar.
3. Insert the micro SD card into the camera.
Note: There is only one right direction to insert the micro SD memory card into the slot. Do not
force the card into the slot, or else it may damage both the camera and the micro SD
memory card.
Produktspecifikationer
| Varumärke: | Easypix |
| Kategori: | Kamera |
| Modell: | V912 |
| Vikt: | 950 g |
| Bredd: | 63 mm |
| Djup: | 219 mm |
| Höjd: | 35.5 mm |
| Internationell säkerhetskod (IP): | IP20 |
| Hållbarhetscertifikat: | RoHS |
| Uteffekt: | 150 W |
| Spännande: | 54 V |
| AC-ingångsspänning: | 100 - 305 V |
Behöver du hjälp?
Om du behöver hjälp med Easypix V912 ställ en fråga nedan och andra användare kommer att svara dig
Kamera Easypix Manualer

11 Oktober 2024
2 Oktober 2024
24 September 2024
15 September 2024
1 September 2024
31 Augusti 2024
29 Augusti 2024
27 Augusti 2024
23 Augusti 2024
23 Augusti 2024
Kamera Manualer
Nyaste Kamera Manualer
9 April 2025
9 April 2025
3 April 2025
3 April 2025
1 April 2025
29 Mars 2025
29 Mars 2025
27 Mars 2025
27 Mars 2025
27 Mars 2025