Emerson AV510 Bruksanvisning
Emerson
Inte kategoriserad
AV510
Läs gratis den bruksanvisning för Emerson AV510 (4 sidor) i kategorin Inte kategoriserad. Guiden har ansetts hjälpsam av 9 personer och har ett genomsnittsbetyg på 5.0 stjärnor baserat på 5 recensioner. Har du en fråga om Emerson AV510 eller vill du ställa frågor till andra användare av produkten? Ställ en fråga
Sida 1/4

Quick Set Up Guide
MODEL : AV510
Complete Home Theater System with 5 DVD/CD Changer and Digital Tuner
This Quick Set Up Guide will help you get your new Emerson Home Theater System connected, positioned, and operating so
you can begin enjoying movies and music as quickly as possible.
All of the initial default settings have been pre-set for the system to be operated in North America. No further adjustments are
required at this time.
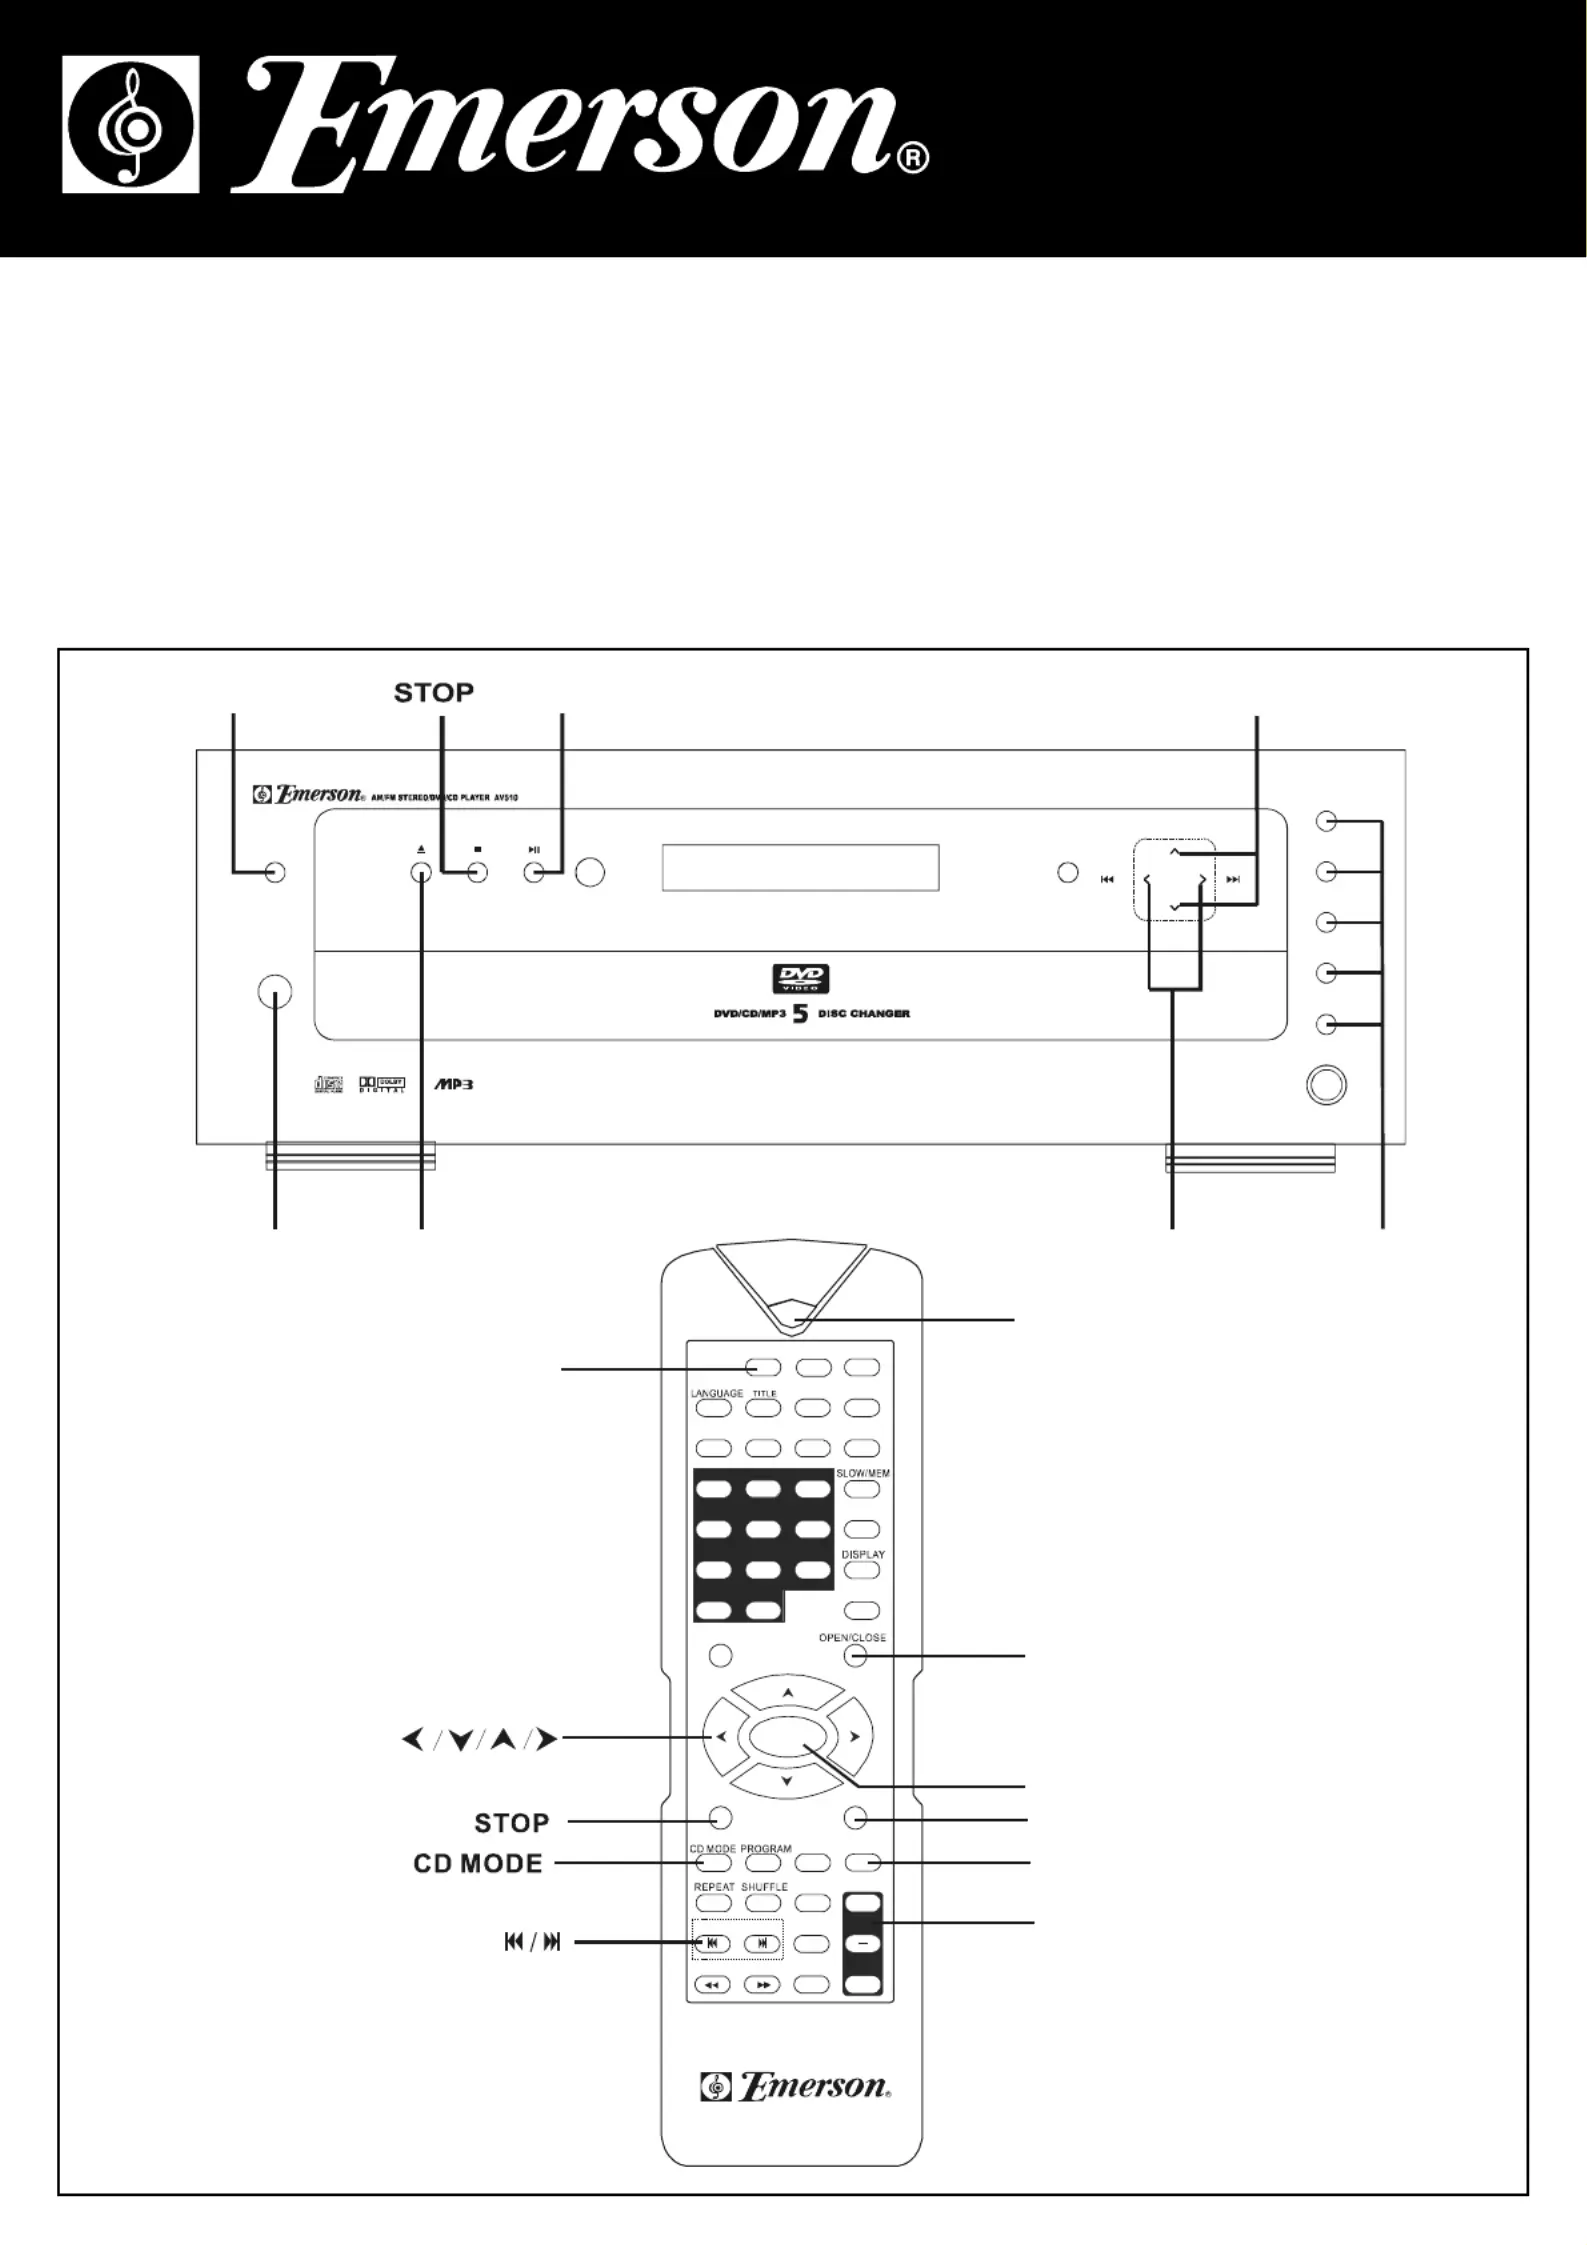
The diagrams below show the important controls on the front panel and remote control that you will use to perform the operations
in this Quick Set Up Guide.
S
TANDB Y
PLAY /PAU SE
DIS C SKI P
A-B
S
LEEP
123
456
7
8 9
0>10
ENT E R
SKIP
TUNIN G
STOP
TITLE
SETU P
SUB
ZOOM
A
UDI O
ANG L E
N/P
GOTO
DIM
LIST ENIN G
MUTE
VOL
/AD J
S E L EC T
DIS C
NUM BER
SOURCE
+
:
S
TANDBY
OPEN/CLOSE
ENTER
PLAY/PAUSE
D
ISC SKIP
V
OL/ADJ
+/-
SOURCE
MENU
STEP
S
T/MO
TUNING
SENSOR
STANDBY
SELECT
V
OL. UP
V
OL. DN
UPDOWN
SOURCE
POWER
1
2
3
4
5
PHONES
S
OURCE
POWER
OPEN/CLOSE
PLAY/PAUSE
T
UNING UP/DOWN
V
OL. UP/DOWN
D
ISC 1/2/3/4/5
-----CD MODE

BASIC SETUP AND CONNECTIONS
1.) Carefully remove the system from the display carton and confirm that you have the following items:
•Main Unit x 1. •Remote Batteries x 2.
•Satellite Speakers with cables x 5. •Video Cable x 1.
•Subwoofer with cable x 1. •AM and FM Antennas.
•Remote Control x 1. •Owner’s Manual.
Save the carton and all packing materials.
2.) Install the batteries in the remote control.
3.) Place the main unit in the desired location but do not connect the AC power cord at this time.
4.) Refer to the following connection diagram.
•Connect all 6 speakers to the color coded terminals on the back of the main unit. The cables and terminals are color
coded for your convenience.
•Connect your TV to the back of the main unit using the supplied video cable (yellow plugs on each end).
•Connect the AM and FM antennas to the back of the main unit.
•Connect the power cord of the main unit to a 120V 60Hz AC household outlet. The red STANDBY indicator turns ‘On’
to confirm the unit has been in Standby state.
Note:
To suit your convenience, we suggest the unit be kept in Standby mode. If the system will not be used for an extended period
such as a two week vacation, etc - then you’d better unplug the power cord from the AC household outlet.
(4
(8 )
1
DVD VIDEO PLAYER
POWER SOURCE AC 120V~60 Hz 100WATTS
MODEL.: AV510
EMERSON RADIO CORP.,
9 ENTIN ROAD
PARSIPPANY, NJ07054
MADE IN CHINA
VIDEO IN
TV SET
Subwoofer
Left Front
Right Front
Center
Right Surround Left Surround
AM antenna
FM antenna

POSITIONING THE SPEAKERS
Refer to the following speaker positioning diagram. All 5 satellites should be approximately the same distance from your listening
position.
•Place center speaker either directly above or below your TV screen.
•Place front left and right speakers to the left and right of TV at approximately same height as center speaker.
•Place surround left and right speakers either in line with, or behind your listening position, at ear level, or slightly above, when
seated.
•Place subwoofer on floor in front of room, either next to TV or in corner, facing your listening position.
DVD PLAYBACK
1.) Turn on your TV. If necessary press the Source or Video button on your TVs front panel or TV remote control to select the external
source connected to your TVs Video In jack. (If necessary refer to your TVs instruction manual.)
2.) Press the STANDBY button on the AV510 remote control. The Emerson DVD logo screen should appear on your TV.
3.) Press the OPEN/CLOSE button on the AV510 remote control or front panel. Drawer opens.
4.) When the tray opens fully you will be able to load up to 2 DVD discs in the exposed pockets. Place up to 2 discs in the
pockets with printed lable sides facing up. If necessary, press the DISC SKIP button on the remote control to rotate the tray
and load up to 3 additional discs if desired.
IMPORTANT: Make sure that the CD MODE indicator does not appear in the display. If this indicator appears the system is
in 'CD only playback mode', and it will not read DVD discs. In this case press STOP button, then the CD MODE button on the
remote control to cancel CD Mode function. The CD MODE indicator will disappear.
5.) Press the OPEN/CLOSE button to close the drawer. The player will search for the first disc in the tray. It will read the first disc
that it finds and, depending on the way the disc is formatted, will either begin playback immediately or display the disc menu
screen. You may then press the PLAY/PAUSE or ENTER buttons to begin playback, or select other disc menu options. If you
loaded multiple discs in the tray you may press the DISC SKIP button on the remote or one of the 5 Direct Disc Access
buttons on the front panel to select a different disc for playback.
6.) If disc has Dolby Digital or Dolby Pro Logic soundtrack, you will hear sound from all 5 satellites plus subwoofer. If disc has
stereo soundtrack you may only hear sound from front left and right speakers plus subwoofer.
7.) Press VOL/ADJ (Adjust Volume) “+” or “–” buttons to adjust volume level.
8.) When finished watching press STOP and/or OPEN/CLOSE buttons. Remove disc or discs, press STANDBY button to turn
off AV510. The STANDBY indicator turns ‘ ’On . Also turn off your TV.
Surround-left
( )Included
Surround-right
(Included)
Center (Included)
Front-left
(Included)
Front-right
(Included)
Subwoofer
(Included)
or
oror
LISTENING
POSITION
Produktspecifikationer
Varumärke: | Emerson |
Kategori: | Inte kategoriserad |
Modell: | AV510 |
Behöver du hjälp?
Om du behöver hjälp med Emerson AV510 ställ en fråga nedan och andra användare kommer att svara dig
Inte kategoriserad Emerson Manualer
3 Mars 2025
26 Februari 2025
28 December 2024
28 December 2024
28 December 2024
11 December 2024
11 December 2024
11 December 2024
24 September 2024
24 September 2024
Inte kategoriserad Manualer
- American DJ
- CaterChef
- Techly
- Sonifex
- Nebula
- Hamron
- DPA
- Oceanic
- Amer
- Puls Dimension
- Peloton
- Chord
- ASM
- Ernesto
- Moki
Nyaste Inte kategoriserad Manualer
9 April 2025
9 April 2025
9 April 2025
9 April 2025
9 April 2025
9 April 2025
9 April 2025
9 April 2025
9 April 2025
9 April 2025