Emerson CKS1401 Bruksanvisning
Emerson
Inte kategoriserad
CKS1401
Läs gratis den bruksanvisning för Emerson CKS1401 (4 sidor) i kategorin Inte kategoriserad. Guiden har ansetts hjälpsam av 18 personer och har ett genomsnittsbetyg på 4.0 stjärnor baserat på 9.5 recensioner. Har du en fråga om Emerson CKS1401 eller vill du ställa frågor till andra användare av produkten? Ställ en fråga
Sida 1/4

13) Referallservicingtoqualiedservicepersonnel.Servicingisrequiredwhenthe
unithasbeendamagedinanyway,suchaspower-supplycordorplugis
damaged,liquidhasbeenspilledorobjectshavefallenintotheunit,theunithas
beenexposedtorainormoisture,doesnotoperatenormally,orhasbeen
dropped.
14) Useonlywiththecart,stand,tripod,bracket,ortable
speciedbythemanufacturer,orsoldwiththeunit.Whena
cartisused,usecautionwhenmovingthecart/unit
combinationtoavoidinjuryfromtip-over.
15) Theunitshallnotbeexposedtodrippingorsplashingandno
objectslledwithliquids,suchasvases,shallbeplacedonunit.
16) Mainsplugisusedasdisconnectdeviceanditshouldremainreadilyoperable
duringintendeduse.Inordertodisconnecttheunitfromthemainscompletely,the
mainsplugshouldbedisconnectedfromthemainssocketoutletcompletely.
CAUTION: Dangerofexplosionifbatteryisincorrectlyreplaced.Replaceonlywiththe
sameorequivalenttype.
PRÉCAUTION: Dangerd’explosionsilespilessontremplacéesdefaconincorrect.
Remplacerlespilesseulementparlemémetypedepileou
léquivalent.
Les marquagessont inscritsen basde lappareil.Les précautionsdemploi sont
inscritesenbasdel'appareil.
La prise dusecteur ne doit pasetreobstruée ou doit etrefacilement accessible
pendantson utilisation Pourétre complètement déconnectéde lalimentationdentrée,
laprisedoittredébranchéedusecteur.
Lespilesnedoiventpasetreexposéesàdefortechaleurtelquálalumieredusoleilau
feuouautreschosesdesemblable.
Laprisedusecteurestutilisépourdéconnecterlesvstème.
Laprisedusecteurnedoitpasêtreobstrueeoudoitêtrefaciementaccessiblependant
sonutilisation.
Pour êtrecomplètement déconnectéde l’alimentation dentréela prisedoit être
débranchéedusecteur.
L'adaptateurAC/ACdelappareilestutilisépourdéconnecterlesystème.
LadaptateurAC/AC delappareilne doitpas être obstrué ou doitêtrefacilement
accessiblependantsonutilisation.
Pour êtrecomplètement déconnectéde ’alimentationd’entréeadantateurAC/AC de
l’appareildoiêtredéconnectédusecteur.
*minimumdistances10cmaroundtheunitforsufcientventilations.
10cmdedistanceminimaleautourdelappareilpouruneventilationsufsante.
*theventilationshouldnotbeimpededbycoveringtheventilationopeningswithitems
suchasnewspapertablecloths,cutains,etc.
Nepas recouvrir lesentrées daérations avecdes objets telquunjournalune nappeun
rideau,etc...
*noopenamesourcessuchaslitcandlesshouldbeplacedontheunit.
Aucunesourcedeammenue,telqu'unebougie,nedoitêtreplacéesurlappareil.
*attentionshouldbedrawntotheenvironmentalaspectsofbatterydisposal.
Lespilesusagesdoiventêtrejetéesenrespectantl'environnement.
*theuseofunitintropicaland/ormoderateclimates.
Lutilisationdel'appareildansunclimattropicalet/oumodéré
ThankyouforpurchasingthisEmersonSmartSet
®
DualAlarmClockRadio.
ThisclockradiousesEmerson'spatentedSmartSet
®
AutomaticTimeSettingSystem.
The rst time you connect this clock radio to yourAC outlet, and after every power
interruption, within seconds the clock will automatically set itself to the correct Year,
Month, Date, Day, andTime. In additionall changes from Standard Timeto Daylight
SavingTime,andbacktoStandardTime,aremadeautomatically.
6 Operating Instructions
Setting The Time, The First Time
IMPORTANT: SmartSet The rst time you connect your new
®
clock radio to the AC
outlet the internal computer will automatically set the time correctly for the Eastern
Time Zone,whichistheinitialdefaultsetting.Thedisplaywillscanfora fewseconds
andthenshowthecorrectDayandTimeintheEasternzone.IfyouliveintheEastern
Timezone,there'snothingelsetodo.Yourclockissetcorrectlyandrunning.
IfyoudonotliveintheEasternTimeZoneyoumustchangethedefaultzonedisplay
toyourownzone.
Thereare7timezonesprogrammedintoyourradioasfollows:
- ZONE1
AtlanticTime
- ZONE2 EasternTime(DefaultSetting)
- ZONE3 CentralTime
- ZONE4 MountainTime
- ZONE5 PacicTime
- ZONE6 YukonTime
- ZONE7 HawaiianTime
To change the default time zone display
1) Pressandholdthe button.untilthedisplayTIME ZONE
'Flashes'thenumber" "willappearonthedisplay2
indicatingthatthedefaultzoneisZONE2,Eastern
Time.
2) Releasethe buttonandthenrepeatedlypressthe Set-/Tune-ButtonTIME ZONE
or Set+/Tune+Buttonuntilyourowntimezoneappearsonthedisplay.
The clock display will change to the correct time in the time zone you selected.
Theclockwillalwaysreturntothecorrecttimeinthezoneyouselectedafterevery
powerinterruption.Ifyoumovetoadifferenttimezone,simplychangethedefault
zonedisplaytothenewzoneandtheSmartSet
®
willrememberthatsettingforyou.
Note:TimezonesettingscanonlybeadjustedinStandbymode,wheretheAM/FM
Radioisdisabled.
Manually Setting the Year, Date, Time
Setting the Year
1) Pressandholdthe buttonuntiltheYear'Flashes'.CLOCK SET
2) Pressthe Set-/Tune-Buttonor Set+/Tune+Buttonto
adjusttheYear.
Setting the Date
3) Pressthe buttonagain,theDate'Flashes'.CLOCK SET
4) Pressthe Set-/Tune-Buttonor Set+/Tune+ButtontoadjusttheMonth.
5) Pressthe Up/Volume+Buttonor Down/Volume-Button
toadjusttheDate.
Forexample,July15thwillappearas'7.15'.
Setting the Time
6) Pressthe buttonagain,theHour'Flashes'.CLOCK SET
7) Pressthe Set-/Tune-Buttonor Set+/Tune+ButtontoadjusttheHour(where
AMindicator'On'isAM,'Off'isPM).
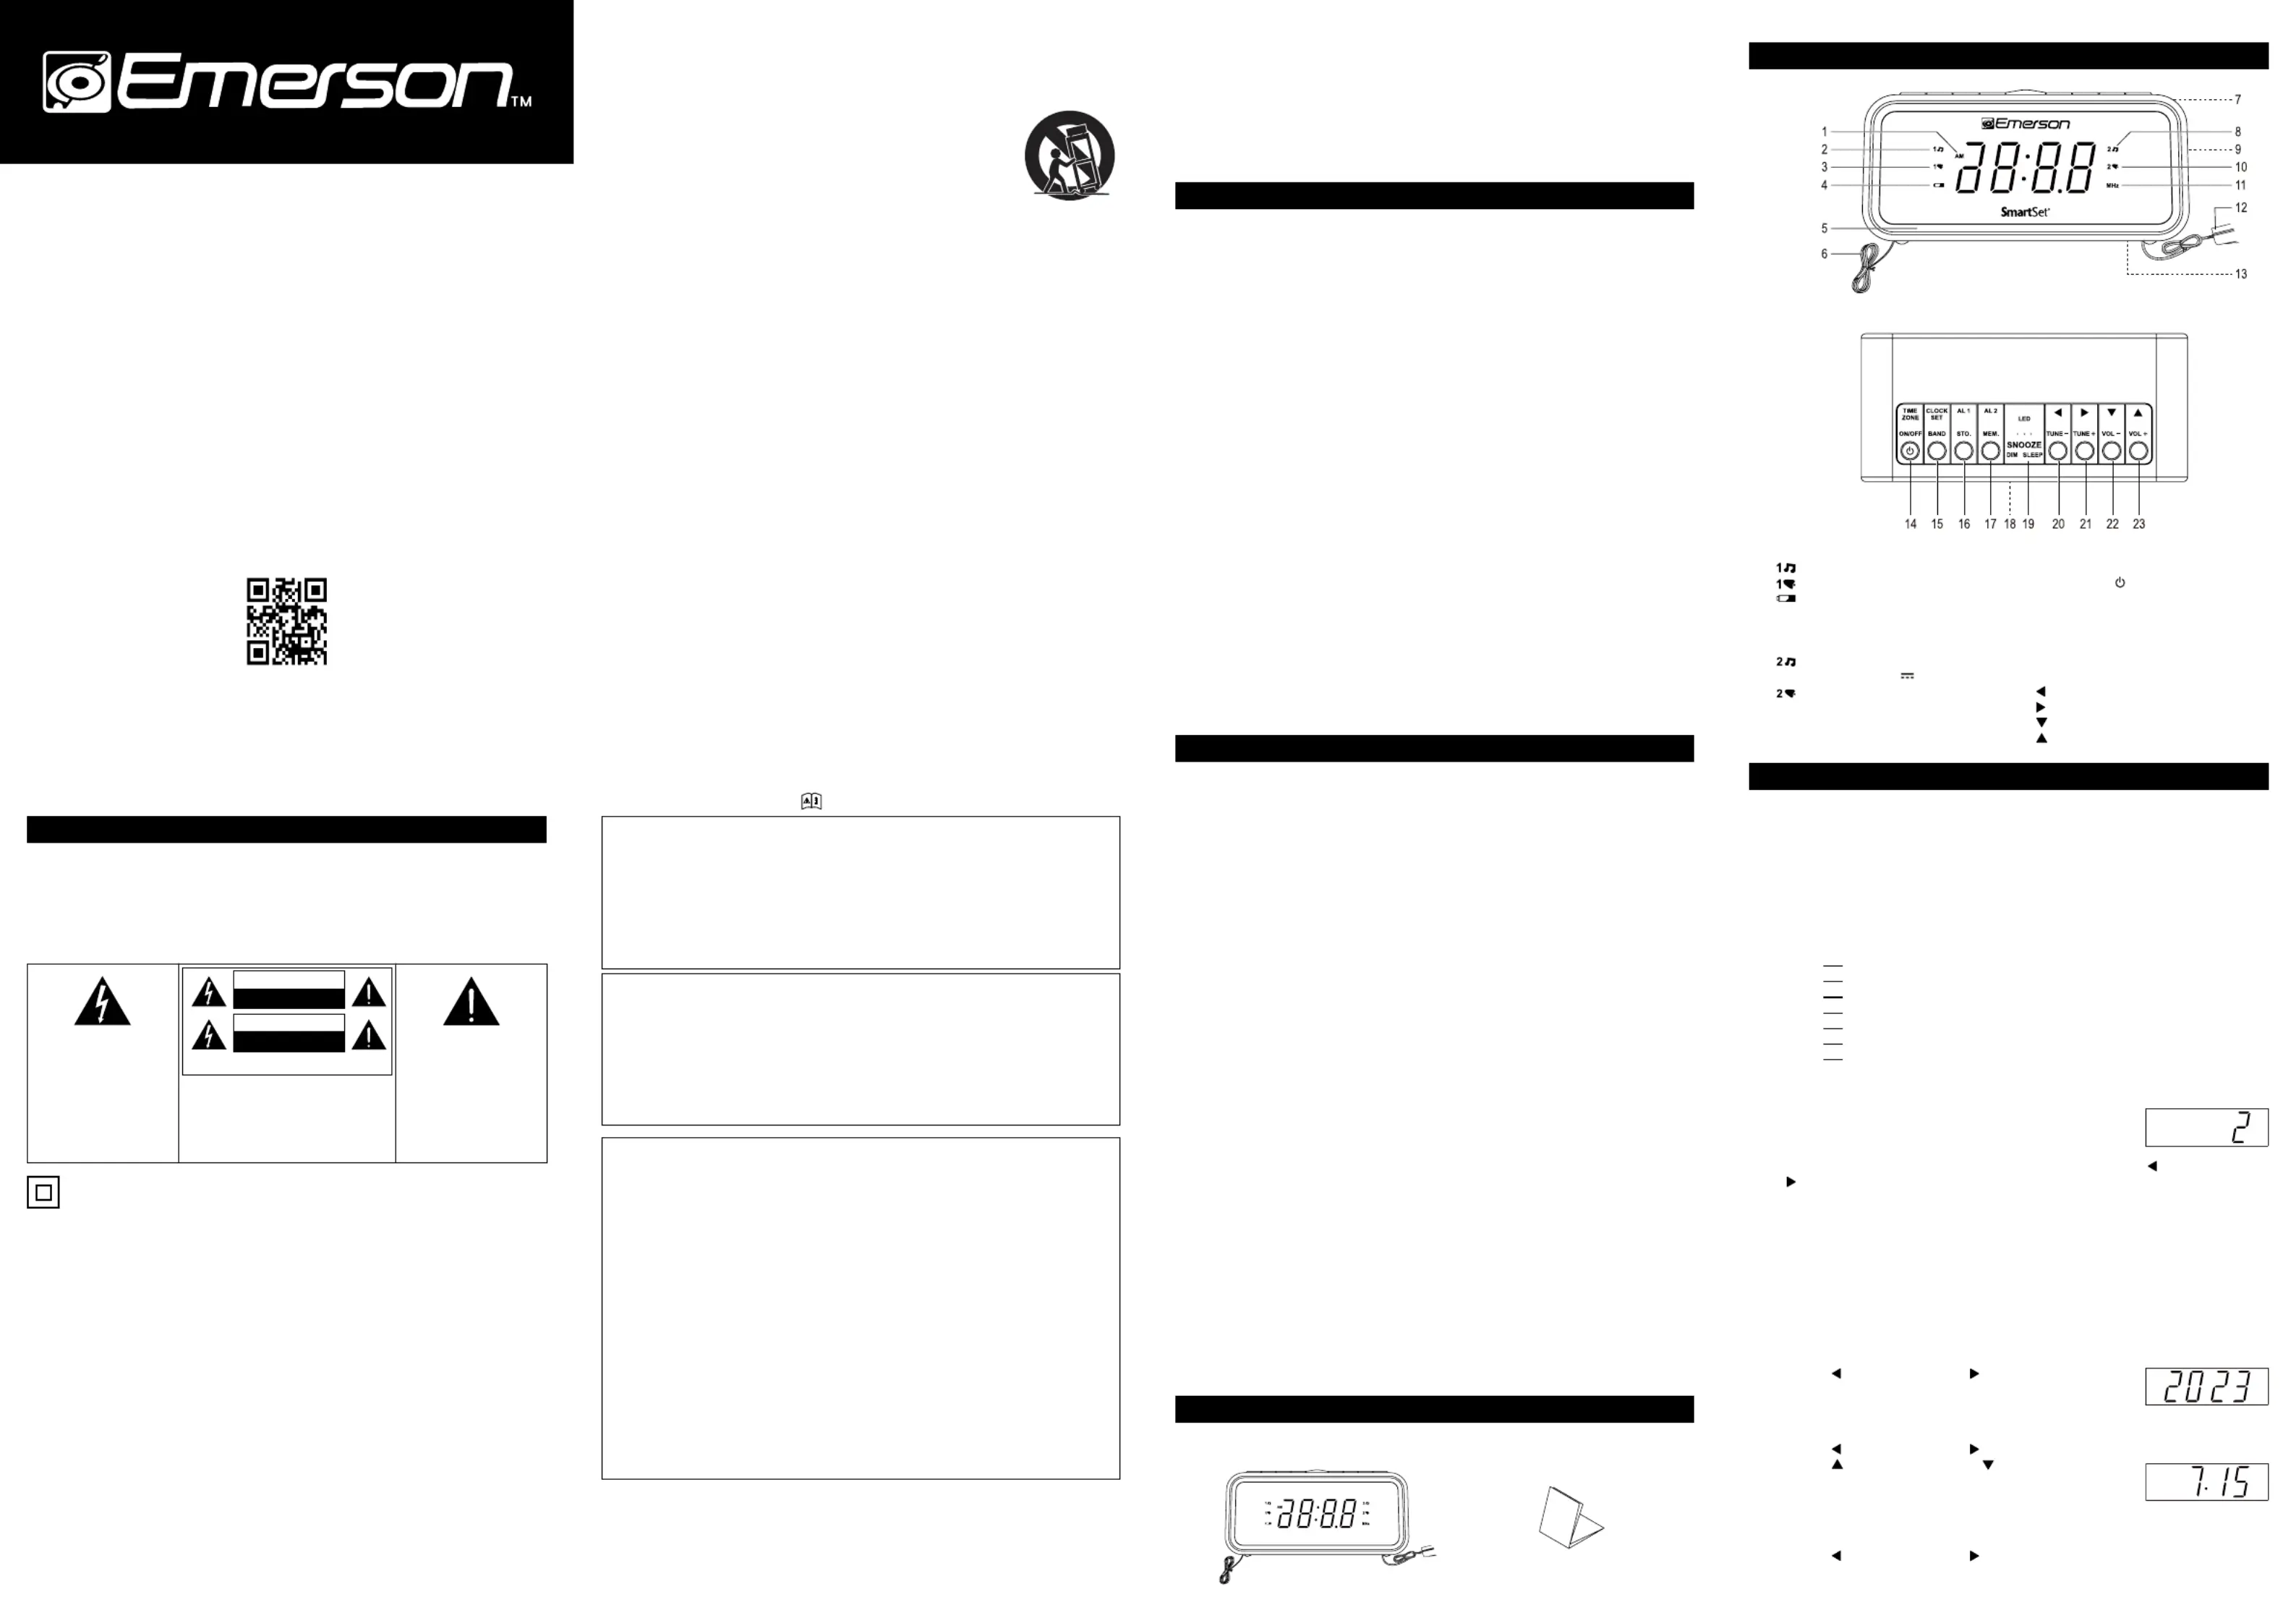
5 Location of Controls and Indicators
FrontPanel
TopPanel
1 WARNING
AVERTISSEMENT: AFIN DE PRÉVENIR TOUT RISQUE D’INCENDIE OU D’
ÉLECTROCUTION N’EXPOSEZ PAS CET APPAREIL Á LA PLUIE NI À L’HUMIDITÉ.
TO PREVENT FIRE OR SHOCK HAZARD, DO NOT USE THIS PLUG WITH
ANEXTENSION CORD, RECEPTACLE OR OTHER OUTLET UNLESS THE
BLADESCAN BE FULLY INSERTED TO PREVENT BLADE EXPOSURE. TO
PREVENTFIREORSHOCKHAZARD,DONOTEXPOSETHISAPPLIANCETORAIN
ORMOISTURE.
This is CLASS II unit with double insulation, and no protective earth
provided.
The Caution Marking and Rating plate are located at the bottom enclosure of the
unit.
Important Safety Instructions
1) Readtheseinstructions.
2) Keeptheseinstructions.
3) Heedallwarnings.
4) Followallinstructions.
5) Donotusethisunitnearwater.
6) Cleanonlywithdrycloth.
7) Donotblockanyventilationopenings.Installinaccordancewiththe
manufacturer'sinstructions.
8) Donotinstallnearanyheatsourcessuchasradiators,heatregisters,stoves,or
otherunit(includingampliers)thatproduceheat.
9) Donotdefeatthesafetypurposeofthepolarizedorgrounding-typeplug.A
polarizedplughastwobladeswithonewiderthantheother.Agroundingtype
plughastwobladesandathirdgroundingprong.Thewidebladeorthethird
prongisprovidedforyoursafety.Iftheprovidedplugdoesnottintoyouroutlet,
consultanelectricianforreplacementoftheobsoleteoutlet.
10) Protectthepowercordfrombeingwalkedonorpinchedparticularlyatplugs,
conveniencereceptacles,andthepointwheretheyexitfromtheunit.
11) Onlyuseattachments/accessoriesspeciedbythemanufacturer.
12) Unplugthisunitduringlightningstormsorwhenunusedforlongperiodsoftime.
SmartSet
®
Clock Radio
With Auto-Time Setting System,
Dual Alarm Clock,
PLL AM/FM Radio
4-Level Dimmer
Multi-Color LED Decor
(U.S. Patent No.6,567,344)
OWNER'S MANUAL
CKS1401
Visitourwebsiteatwww.emersonradio.com
ToobtainamanualinSpanish,pleasedownloaditfromourwebsite:
Paraobtenerunmanualenespañol,descárguelodenuestrositioweb:
https://www.emersonradio.com/documents/
Therearedualalarmsthatcanbesetandusedindependently,andbothofthealarms
canbeprogrammedforeverydayoperation,weekdaysonly,orweekendsonly.
Thereisalonglifelithiumbatteryinstalledinthisclockradiowhenyoubuyit.
Thisbatterycanmaintainthetimeandalarmsettingsfor3to5years,orevenlonger.
Wehavetakeneveryprecautiontomakesurethisradiowasinperfectworkingorder
when it left our factory. If you encounter any problems with the set up or operation
of this item, please call the Emerson Consumer Products Corp.,Customer Service
Hotline,tollfree,at .1-800-898-9020
2 Important Notes
- Avoidinstallingthisunitinplacesexposedtodirectsunlightorclosetoheat
radiatingappliancessuchaselectricheaters,ontopofotherstereoequipmentthat
radiatestoomuchheat,placeslackingventilationordustyareas,placessubjectto
constantvibrationand/orhumidormoistareas.
- Operatecontrolsandswitchesasdescribedinthemanual.
- Beforeturningonthepower,makecertainthattheAC/DCadapterisproperly
installed.
- Whenmovingtheset,besuretorstdisconnecttheAC/DCadapter.
FCC Information
This equipment has been testedand found to comply with the limits for a Class B
digital device, pursuant toPart 15 of the FCC Rules.These limits are designed to
providereasonableprotectionagainstharmfulinterferenceinaresidentialinstallation.
This equipment generates, uses, and can radiate radio frequency energy and, if not
installedandusedinaccordancewiththeinstructions,maycauseharmfulinterference
to radio communications.However, there is no guarantee that interferencewill not
occurin a particularinstallation. Ifthis equipment doescause harmfulinterference to
radio or television reception, which can be determined by turning the equipment off
andon,theuserisencouragedtotrytocorrecttheinterferencebyoneormoreofthe
followingmeasures:
- Reorientorrelocatethereceivingantenna.
- Increasetheseparationbetweentheequipmentandreceiver.
- Connecttheequipmentintoanoutletonacircuitdifferentfromthattowhichthe
receiverisconnected.
- Consultthedealeroranexperiencedradio/TVtechnicianforhelp.Thisdevice
complieswithPart15oftheFCCRules.Operationissubjecttothefollowingtwo
conditions:
(1) Thisdevicemaynotcauseharmfulinterference,and
(2) Thisdevicemustacceptanyinterferencereceived,includinginterferencethat
maycauseundesiredoperation.
Changes or modifications not expressly approved by the party responsible for
compliancecouldvoidtheuser'sauthoritytooperatetheequipment.
3 Preparation for Use
Unpacking And Set Up
- Removetheradiofromthecartonandremoveallpackingmaterialfromtheradio.
We suggest that you save the packing material, if possible, in the unlikely
event that your radio ever needs to be returned for service. The original
carton and packing material is the only safe way to pack your radio to protect
it from damage in transit.
- Removeanydescriptivelabels,stickersorprotectivelmsonthefrontortop
of the cabinet, if any.Donotremoveanylabelsorstickersfromthebackor
bottomofthecabinet.
- Notetheserialnumberonthebottomofyourradioandwritethisnumberinthe
spaceprovidedontheWarrantypageofthismanual.
- Placeyourradioonalevelsurfacesuchasatable,deskorshelf,convenientto
anACoutlet,outofdirectsunlight,andawayfromsourcesofexcessheat,dirt,
dust,moisture,humidity,orvibration.
- UnwindandextendfullytheFMantennawirelocatedattheback(ANT),andorient
itforbetterFMreception..
Protect Your Furniture
Thismodelisequippedwithnon-skidrubber'feet'topreventtheproductfrommoving
whenyou operate the controls. These'feet' aremadefrom non-migratingrubber
material specially formulated to avoid leaving any marks or stains on your furniture.
Howevercertaintypesofoilbasedfurniturepolishes,woodpreservatives,orcleaning
spraysmaycausethe rubber'feet'tosoften,andleave marksorarubberresidueon
the furniture. To prevent any damage to your furniture we strongly recommend that
you purchase small self-adhesive felt pads, available at hardware stores and home
improvement centers everywhere, and apply these pads to the bottom of the rubber
'feet'beforeyouplacetheproductonnewoodenfurniture.
Power Source
Thisradioisdesignedtooperateonnormal120V60HzACpoweronly.Donotattempt
tooperatetheradioonanyotherpowersource.Youcouldcausedamagetotheradio
thatisnotcoveredbyyourwarranty.
ThisradioshouldbeconnectedtoanACoutletthatisalways'live'.Donotconnectitto
anoutletthatiscontrolledbyawallswitch.Whenthepowertotheradioisinterrupted,
thebuilt in lithium battery takes over to maintain thetimeand alarmsettings.To
maximizethelifeofthelithiumbatterykeeptheradioconnectedtoa'live'ACoutletat
alltimes.
4 Package Contents
CKS1401ClockRadio Owner'sManual
RISK OF ELECTRIC SHOCK
DO NOT OPEN
CAUTION
RISQUE D' ÉLECTROCUTION
NE PAS OUVRIR
ATTENTION
WARNING:SHOCKHAZARD-DONOTOPEN
AVIS:RISQUE DE CHOCELECTRIQUE-NE PAS OUVRIR
WARNING:TOREDUCETHERISKOF
ELECTRICSHOOKDONOTREMOVE
COVER(ORBACK).NOUSERSERVICEABLE
PARTSINSIDEREFERSERVICINGTO
QUALIFIEDSERVICEPERSONNEL.
AVIS:RISQUE DE CHOC ELECTRIQUE-NE
PAS OUVRIR
T h e l i g h t n i n g f l a s h w i t h
arrow-head symbol, within
an eq ui lat er al t ri an gl e is
intendedtoalert theuser to
the presenceof uninsulated
'dangerousvoltage'withinthe
product's enclosurethat may
beof sufcient magnitudeto
constitute a risk of electric
shocktopersons.
T h e e x c l a m a t i o n p o i n t
withinanequilateral triangle
i s i n t e n d e d t o a l e r t t h e
u s e r t o t h e p r e s e n c e o f
i m p o r t a n t o p e r a t i n g a n d
m a i n t e n a n c e ( s e r v i c i n g )
instructions in the literature
accompanyingtheappliance.
1) AMIndicator('On'=AM,'Off'=PM)
2)
(Alarm1'Radio')Indicator
3) (Alarm1'Buzzer')Indicator
4)
LOWBATT.Indicator
5) LEDDecorLights
6) AntennaWire(BackCabinet)
7) Speaker(BackCabinet)
8) (Alarm2'Radio')Indicator
9) USBOutputPort5V
1A
10)
(Alarm2'Buzzer')Indicator
11) MHzIndicator('On'=FMRadio,
'Off'=AMRadio)
12) AC/DCadapter(BackCabinet)
13) BackUpBatteryCompartment
(BottomCabinet)
14) TIME ZONE/
ON/OFFButton
15) CLOCK SET/BANDSelectButton
16) AL 1Setting/ (Store)ButtonSTO.
17) Setting/ (Memory)ButtonAL 2 MEM.
18) DisplayLens(FrontCabinet)
19) SNOOZE/DIM /SLEEP(Dimmer) /
LEDDecorButton
20)
Set-/Tune-Button
21) Set+/Tune+Button
22)
Down/Volume-Button
23)
Up/Volume+Button
WARNING
WARNING
Donotingestthebattery,ChemicalBurnHazard.
Thisproductcontainsacoin/buttoncellbattery.
Ifthecoin/buttonisswallowed,itcancausesevereinternalburnsinjust2hoursand
canleadtodeath.
Keepnewandusedbatteriesawayfromchildren.
Ifthebatterycompartmentdoesnotclosesecurely,stopusingtheproductandkeep
itawayfromchildren.
Ifyouthinkbatteriesmighthavebeenswallowedorplacedinsideanypartofthe
body,seekimmediatemedicalattention.
AVERTISSEMENT
Nepasingérerlapile,Dangerdebrülurechimique.
Ceproduitcontientunepilebouton.Silapileboutonestavalée,ellepeutprovoquer
degravesbrüluresinternesen2heuresseulementetpeutentrainerlamort.
Conserverlespilesneuvesetuséeshorsdeportéedesenfants.
Silecompartimentpilenesefermepascorrectement,cesserd'utiliserleproduitet
tenirhorsdeportéedesenfants.
Encasdedouteconcernantlefaitquelespilespourraientavoirétéavaléesou
introduitesdansunepartiequelconqueducorps,consulterimmédiatementun
médecin.
WARNING
a) Removeandimmediatelyrecycleordisposeofusedbatteriesaccordingto
localregulationsandkeepawayfromchildren.DoNOTdisposeofbatteries
inhouseholdtrashorincinerate.
b) Evenusedbatteriesmaycausesevereinjuryordeath.
c) Callalocalpoisoncontrolcenterfortreatmentinformation.
d) Compatiblebatterytype:CR2032
e) Nominalbatteryvoltage:3.0V
f) Non-rechargeablebatteriesarenottoberecharged.
g) Donotforcedischarge,recharge,disassemble,heatabove(manufacturer's
speciedtemperaturerating)orincinerate.Doingsomayresultininjurydue
toventing,leakageorexplosionresultinginchemicalburns.
h) Ensurethebatteriesareinstalledcorrectlyaccordingtopolarity(+and-).
i) Donotmixoldandnewbatteries,differentbrandsortypesofbatteries,
suchasalkaline,carbon-zinc,orrechargeablebatteries.
j) Removeandimmediatelyrecycleordisposeofbatteriesfromequipment
notusedforanextendedperiodoftimeaccordingtolocalregulations.
k) Alwayscompletelysecurethebatterycompartment.Ifthebattery
compartmentdoesnotclosesecurely,stopusingtheproduct,removethe
batteries,andkeepthemawayfromchildren.

IMPORTANT:
- Ensurethatyouhavesettheclockcorrectly.(See"ManuallySettingtheYear,Date,
Time".)
- AlarmsettingscanonlybeadjustedinStandbymode.
Wake to Radio ( or )
1) Pressthe buttonrepeatedlyuntiltheAL 1
indicatorlightonthedisplay.
2) Pressandholdthe buttonuntilthedisplayblinksthewakeuptimeontheAL 1
display.
3) Pressthe Set-/Tune-Buttonor Set+/Tune+ButtontoadjustHour,andpress
the Up/Volume+Buttonor Down/Volume-ButtontoadjustMinutes.
Note: BesurethatyouhavesetthewakeuptimecorrectlybyobservingtheAM
indicator.
- IftheAMindicatoris'On'thewakeuptimeis"AM".
- IftheAMindicatoris'Off',thewakeuptimeis"PM".
4) Pressthe button,thealarmvolumewillblink.AL 1
5) Pressthe Up/Volume+Buttonor Down/Volume-Buttontoadjustalarmvolume
(V01~V16)thatwillcomeonatwake-uptime.
6) Pressthe button,thealarmweekmodewillblink.AL 1
7) Pressthe Set-/Tune-Buttonor Set+/Tune+Buttontoselectalarmweekmode.
• :Everyday-thealarmwillturnonall7days.d1-7
• :Weekdaysonly-thealarmwillonlyturnonMondaythroughFriday;d1-5
• :Weekendsonly-thealarmwillonlyturnonSaturdayandSunday.d6-7
8) Pressthe buttontosavethealarmsettings.AL 1
* AttheselectedwakeuptimetheradiowillturnONandhasitsradiovolume
graduallyreachesitspresetlevel.ItwillplayforonehourandthenshutOFF
automatically.
* Tostoptheradiosooner,pressthe
ON/OFFbutton.Theradiowillstopbutthe
alarmremainssetandwillturntheradioONagainatthesametimeonthe
followingday(dependingontheAlarmWeekModesetting).
* IfyoudonotwantthealarmtoturntheradioONthefollowingday,repeatedly
pressthe buttonuntiltheAL 1
indicatorlightisOFF.
Note:
Followthesameproceduretosettheradiotowake-upforalarm2ifnecessary.
Wake to BUZZER (
or )
Note:Alarm1andAlarm2havedifferentbuzzersounds.
* Alarm1isa"Singlebeep"sound.
* Alarm2isa"Doublebeep"sound.
Youwillbeabletotellwhichalarmisgoingoffbythesoundthatitmakes.
1) Pressthe buttonrepeatedlyuntiltheAL 1
indicatorlightonthedisplay.
2) Pressandholdthe buttonuntilthedisplayblinksthewakeuptimeontheAL 1
display.
3) Pressthe Set-/Tune-Buttonor Set+/Tune+ButtontoadjustHour,andpress
the Up/Volume+Buttonor Down/Volume-ButtontoadjustMinutes.
Note:BesurethatyouhavesetthewakeuptimecorrectlybyobservingtheAM
indicator.
- IftheAMindicatoris'On'thewakeuptimeis"AM".
- IftheAMindicatoris'Off',thewakeuptimeis"PM".
4) Pressthe button,thealarmweekmodewillblink.AL 1
5) Pressthe Set-/Tune-Buttonor Set+/Tune+Buttontoselectalarmweekmode.
• :Everyday-thealarmwillturnonall7days.d1-7
• :Weekdaysonly-thealarmwillonlyturnonMondaythroughFriday;d1-5
• :Weekendsonly-thealarmwillonlyturnonSaturdayandSunday.d6-7
6) Pressthe buttontosavethealarmsettings.AL 1
* Attheselectedwakeuptimethebuzzerwillsound.Itwillcontinueforonehourand
thenshutoffautomatically.
Note:Wake-to-buzzeralarmvolumeisxed,cannotbeadjusted.
* Tostopthebuzzersooner,pressthe
ON/OFFbutton.Thebuzzerwillstopbutthe
alarmremainssetandwillturnthebuzzeronagainatthesametimeonthe
followingday.
* IfyoudonotwantthealarmtoturntheradioONthefollowingday,repeatedly
pressthe buttonuntiltheAL 1
indicatorlightisOFF.
Note:
Followthesameproceduretosetthebuzzertowake-upforalarm2ifnecessary.
Snooze/Repeat Alarm
WhenthealarmcomesON,pressthe button,thealarmisstoppedanditwillSNOOZE
comeONrepeatedlyafter9minutes,thecorrespondingALARMindicatorwillblink.
TheSnoozeoperationmayberepeatedseveraltimesifdesiredbutafteronehourthe
alarmwillnotcomeonagain.
Radio and Buzzer Operation
YoumayalsosetonealarmforwaketoRADIOandtheotherforwaketoBUZZER.
After conrming the alarm information, repeatedly press the corresponding AL 1 or
AL 2 buttons to set the buzzer or radio to wake-up for alarm, the alarm indicators
correspondingdisplayonthedisplay.
- :Alarm1'Radio'Indicator
- :Alarm1'Buzzer'Indicator
- :Alarm2'Radio'Indicator
- :Alarm2'Buzzer'Indicator
Note:Ifalarmisdeactivate,theindicatorlightsarealloff.
View The Wake-up Times and Alarm Week Mode
1) WheneveryouwanttocheckthewakeuptimeortheAlarmWeekModesettings,
simplypressandholdeitherthe settingbutton,untilthedisplay'Flashes'theAL 1
wakeuptimeonthedisplay.
2) Pressthe settingbutton,thedisplay'Flashes'theDAYOFWEEKIndicatorsAL 1
onthedisplay.
3) Pressthe settingbuttonagaintoreturntocorrecttime.AL 1
Note:FollowthesameproceduretocheckingtheWakeUpTimesandAlarmWeek
ModeforAlarm2ifnecessary.
9 Sleep to Music Timer
Youcan set the sleep timertoplay the radio forup to 90 minutesand then shut Off
automatically.
Activate the sleep timer
Pressthe
ON/OFF SLEEPbuttontoturnontheunitrst,thenrepeatedlypressthe
buttonto select aset period of time(in minutes: 10,20, ...... 80, 90), restore time
displayinafewseconds.
To deactivate sleep timer
Repeatedlypressthe buttonuntil"OFF"isdisplayed,restoretimedisplayinaSLEEP
fewseconds.
10 4-Level Dimmer Control
Todimorbrightenthedisplay,repeatedlypressthe buttonwhileinStandbymodeDIM
toselectanyofthefourlevels.
11 Multi-Color LED Decor
Press and hold the button forabout twoseconds to turnthe LED décoron/offLED
whenneeded.
Please note that the color of LED décor can only be changed within therst three
secondsafterLEDdécorturnedon:
· Pressthe buttonrepeatedlytochangethecolorofLEDdécorinfollowingLED
cyclingmanner:
Multi-color, Red, Orange, Yellow, Green, Cyan, Blue, Purple and Auto-
changing color.
Note: IfthecolorcannotbechangedwithintherstthreesecondsafterLEDdécor
turnedon,youneedtoturnofftheLEDdécorandturnitbackonbypressing
andholdingthe buttonforabout2secondstorepeatthestepsabove.TheLED
lastcolorsetbeforeLEDdécorturnedoffcanbeautomaticallyrestorednext
time.
12 USB-C Port for Charging
ThisclockradiohasaUSBportatthesideoftheright,whichcanprovideupto5V1A
tochargedeviceslikesmartphone,tabletetc.viaaUSBcable(notprovided).
Note: ElectricalenergydrawnfromtheUSBportmayvaryduetodifferentcharging
cablecondition,batterycharacteristicorpowermanagementsystemofyour
devicebeingcharged.
13 Battery Backup
IMPORTANT:
- Whenthebatterypowerdropsbelowacertainlevel,the
(lowbattery)indicator
will'Flash'topromptyoutochangethebatteryatyourearliestconvenience.
- When changing the lithium batteries, leave the AC/DC adapter connected to
your AC outlet.Thiswillprovidepowertotheinternalcomputermemorywhilethe
originallithiumbatteriesareremoved.
Changing The Lithium Battery
1. Loosenthescrewonthebatterycompartmentcoverwithascrewdriver.Pulloutthe
batterycompartmentwithyourngernails.
2. Replaceanewbattery(typeCR2032)correctlyandfullyinsertthebattery
compartmentbacktotheoriginalposition.Tightenthescrewwithascrewdriver.
Caution:
- Batteries(batterypackorbatteriesinstalled)shallnotbeexposedtoexcessive
heatsuchassunshine,reorthelike.
- Dangerofexplosionifbatteryisincorrectlyreplaced.Replaceonlywiththesame
equivalenttype.
- Batteriescontainchemicalsubstances,sotheyshouldbedisposedofproperly.
Restore Initial Default Setting
- IfthelithiumbatteryisexhaustedandyouexperienceaninterruptionintheAC
powersupply,theradiowillresetitselftoitsinitialdefaultsettingwhenthepoweris
restored.Theinitialdefaultsettingis"12:00AM,Sunday,January1st2023".
- PleasefollowtheinstructionsonpreviouspagetoinstallanewCR2032lithium
batteryinthebatterycompartment,andmanuallysettheclocktothecorrectyear,
dateandtime(observethe'AM'indicator).Afterresettingtheclock,pleasedonot
forgettoresetyourwakeuptimesandalarmmodesettingsaswell.
14Specications
Powersupply............................................................................................... 120V~60Hz
BatteryBackup..............................................................3V×1(CR2032lithiumbattery)
AMFrequencyRange............................................................................... 520-1710KHz
FMFrequencyRange................................................................................87.5-108MHz
OutputPower..........................................................0.5W×1(8
Ω
Speaker)@10%THD
Signaltonoiseratio...............................................................................................≥30dB
USBPortChargingOutput................................................................................ 5V
1A
Dimensions..........................................................................148(W)x70(H)x66(D)mm
Note:Designandspecicationsaresubjecttochangewithoutpriornotice.
15 Care and Maintenance
Care of Cabinets
Ifthecabinetbecomesdusty.wipeitwithasoftcloth.Ifthecabinetbecomessmudged
ordirty,cleanitwithasoft,slightlydampenedcloth.
Neverallowwaterorany liquidtogetinsidethecabinetNeveruseany abrasive
cleanersorcleaningpadsasthesewilldamagethenishofyourradio.
16 LIMITED WARRANTY
EmersonRadio Corp. warrants thisproductto be free frommanufacturingdefects in
original material, including original parts, and workmanship under normal home use
andconditions (“manufacturingdefect”)for aperiodof ninety(90) daysfrom dateof
original purchase in, and if used in the United States. Should service be necessary
under thiswarranty, Emerson willprovide the followingat our Return Repair Facility
providedthemanufacturingdefectisveriedalongwiththedateofpurchase:
* Repair service for ninety(90) days from date of original purchase at no charge
for labor and parts.
ToReceiveAuthorizationtoReturnaDefectiveItem,pleasecontactEmersoncustomer
Service at 1-800- 898-9020 or at http:/www.emersonradio.com/service/return-policy.
HaveyourModelnumber,SerialNumberanddatedProofofPurchasewithyouwhen
youcall.IntheeventtheproductmustbereturnedtoEmerson:
* Packtheunitinawell-paddedheavycorrugatedbox.Pleaseinsuretheitemiswell
paddedtoavoiddamagewhileintransitbacktoourfacility.
If the item incurs damage. it will NOT be replaced and the consumer will be
responsible for return freight costs to receive their same unit back.
* EncloseyourcheckormoneyorderpayabletoEmersonRadiointheamountof
$10tocoverreturnshippingandhandlingcosts.
* Encloseanotewithyourname,addressphonenumber,ReturnAuthorization
numberandbriefreasonforreturningtheunit.
* Encloseacopyofyourproofofpurchase(warrantyservicewillnotbeprovided
withoutdatedproofofpurchase).
* ShiptheunitprepaidviaUPSorparcelpost(SHIPINSUREDandobtainatracking
number).
NOTE: Thiswarrantydoesnotcover:
(a)Damagetoequipmentnotproperlyconnectedtotheproduct.
(b)CostincurredintheshippingoftheproducttoandfromEmerson’sReturnFacility.
(c) Damageorimproperoperationofunitcausedbycustomerabuse,misuse,
negligenceorfailuretofollowoperatinginstructions(includingcleaninginstructions
providedwiththeproduct.
(d)Ordinaryadjustmentstotheproductwhichcanbeperformedbycustomeras
outlinedintheowner'smanual.
(e)Signalreceptionproblemscausedbyexternalantennaorcablesystems.
(f) ProductsnotpurchasedintheUnitedStates.
(g)DamagetoproductifusedoutsidetheUnitedStates.
(h)Refurbishedunits.
THISWARRANTYISNON-TRANSFERABLEANDAPPLIESONLYTOTHEORIGINAL
PURCHASERAND DOES NOT EXTEND TOSUBSEQUENT OWNERSOF THE
PRODUCT.ANYAPPLICABIEAMPHED WARRANTES, INC UDNGTHEWARRANTY
OF MERCHANTABILITY,ARE LIMITED INDURATION TOA PERIOD OF THE
EXPRESSED WARRANTYAS PROVIDED HEREIN BEGINNING WITH THE
DATE OF ORIGINAL PURCHASEAT RETAILAND NO WARRANTIES, WHETHER
EXPRESSED ORIMPLIED,SHALLAPPLYTO THE PRODUCT THEREAFTER.
EMERSONMAKESNO WARRANTY ASTOTHEFITNESS OFTHEPRODUCT
FORANYPARTICULAR PURPOSEOR USE.THEEXTENTOFEMERSON RADIO
CORP'S LIABILITY UNDERTHIS LIMITED WARRANTY ISTHE REPAIR OR
REPLACEMENTPROVIDEDABOVEAND,INNOEVENT,SHALLEMERSONRADIO
CORP'SLIABILITYEXCEEDTHE PURCHASEPRICE PAID BYTHE PURCHASER
OF THEPRODUCT. UNDER NO CIRCUMSTANCES SHALLEMERSON RADIO
CORP.BE LIABLE FORANYLOSS, DIRECT, INDIRECT, INCIDENTAL, SPECIAL,
ORCONSEQUENTIAL DAMAGEARISINGOUT OFOR IN CONNECTIONWITH
THEUSE OFTHIS PRODUCT.THISWARRANTY ISVALID ONLYIN THEUNITED
STATESOFAMERICA. THISWARRANTY GIVES YOUSPECIFIC LEGAL RIGHTS.
HOWEVER,YOUMAYHAVEOTHERRIGHTSWHICHMAYVARYFROMSTATETO
STATE.SOMESTATESDONOTALLOWLIMITATIONSONIMPLIEDWARRANTIES
OR EXCLUS I ON OF CONSEQ U ENTIA L D A MAGE, TH E REFOR E T H ESE
RESTRICTIONSMAYNOTAPPLYTOYOU.
10-90-1402A
TheSerialNumbercanbe foundonthe bottomcabinet.Wesuggest thatyou record
theSerialNumberofyourunitinthespacebelowforfuturereference.
ModelNumber:CKS1401
SerialNumber:__________________________________
Toregisteryourproductonlinepleasevisit
http://www.emersonradio.com/service/product-registration/
8) Pressthe Up/Volume+Buttonor Down/Volume-ButtontoadjusttheMinutes.
9) Pressthe buttonagaintostoreallnewsettingsandrestoreittotimeCLOCK SET
displaymode.
Note:
- Year,DateandTimesettingscanonlybeadjustedinStandbymode,wherethe
AM/FMRadioisdisabled.
- Ifyoumanuallyadjustthetime,yournewsettingisenteredintotheSmartSet
®
memory.Ifthepowerisinterrupted,thedisplaywillreturntoyournewsetting,not
theoriginalsetting,whenthepowerisrestored.
View the Current Year, Date, Day of Week, Time Settings
Repeatedlypressthe buttontoviewthecycleofyear,date,dayofweekCLOCK SET
andtime.
Torestoretimedisplaymode,leaveitidleforfewsecs.
Note: Fromd1,d2tod7standforfromMonday,Tuesdayto
Sundayseparately.
Daylight Saving and Leap Year Adjustments
All DaylightSaving and Leap Year adjustmentsare madeautomaticallyby the
SmartSet
®
Internalcomputerasfollows:
• StartofDaylightSavingTime:
At"2:00AM"onthe2ndSundayinMarch,theclockwillautomaticallyadvanceto
"3:00AM".
• EndofDaylightSavingTime:
At'3:00AM' onthe1stSundayinNovember, theclock will automaticallyreset to
"2:00AM".
• LeapYear:
At"12:00Midnight"onFebruary28th,thecalendardisplaywillchangeto"2.29".
Turn Daylight Saving Function Off/On (in Standby Mode)
If you do notneed to adjustDaylight Saving,youcan press andhold the Up/
Volume+Button or Down/Volume- Buttonuntilthe "ON" isdisplay,and then press
the Up/Volume+Buttonor Down/Volume-Buttontosetitto"OFF".
7 Listening to The Radio
Tuning in to a Station
1) Pressthe
ON/OFFbuttontoturntheradio‘On’.
ThefrequencyofthetuningFrequencywillshowforafewsecondsonthedisplay.
2) Repeatedlypressthe buttontosettheAMorFMband.BAND
3) TunetothedesiredstationbytheTUNINGcontrolasdescribed.
- ManualTuning
Pressthe buttons,the receivingfrequency will increase orTUNE- TUNE+ or
decreasebyonestep.
- AutoTuning
Press and hold the buttons forone second then releaseAutoTUNE- TUNE+ or
StationSeekingwillbeengaged,thereceivingfrequencywillincreaseordecrease
automaticallyuntilastationwithacceptablereceptionisfound.
4) SettheVOLUMEbypressing
Up/Volume+Buttonor Down/Volume-Buttonto
adesiredlevel.
5) Whenyouarenishedlistening,pressthe
ON/OFFbuttontoturntheradio'Off’.
Storing and Recalling Radio Station Memory
Whenyouhaveafewfavoriteradiostationstolistentoyoumayliketosavethem,and
pickoneoutoftheminafewsecondswithoutneedingtosearchiteachtime.
Ourdigitaltuningtechnologyallowsyoutodothiseasilybyfollowingthestepsbelow:
Storing to the Memory
1) MakesuretheradioisONandtheAMorFMbandisselected.
2) TunetothedesiredstationbytheTUNINGcontrolasdescribed.
3) Pressandholdthe button,"PXX"blinksindicatingthememorylocationtoSTO.
storethecurrentlisteningstation.
4) While"PXX"isblinking.pressthe Set-/Tune-Buttonor Set+/Tune+Buttoncan
changethememorylocationfrom1through20.
Fore.g."P 03"means thecurrent listening stationis aboutto stored intothe 3rd
locationofthememory.
5) Afterdecidingthememorylocation,pressthe buttonagainthecurrentSTO.
listeningstationisstored.
6) Thedisplaywillturntothefrequencyofthestationsafterwards.andafterafew
seconds,thecorrecttimeshows.
Recalling Station from the Memory
1) MakesuretheradioisONandtheAMorFMbandisselected.
2) Pressthe button,"PXX"showsonthedisplay,andthestationaccordingtoMEM.
thememorylocationistuned.
3) While"PXX"isshowingonthedisplay,pressthe Set-/Tune-Buttonor
Set+/Tune+Buttoncanchangethememorylocationfrom1through20,andthe
stationstoredinthelocationistunedoncethelocationischangedto.
4) Thedisplaywillturntothefrequencyofthestationsafterwards,andafterafew
secondsthecorrecttimeshows.
Antenna Information
AM-TheAMbarantennaisinsidethecabinet.IfAMreceptionisweak,changethe
positionofcabinetuntiltheinternalantennapicksupthestrongestsignal.
FM-TheFMantennaisalongwirelocatedattheback.Extendthisantennawirefully
andorientitforbetterFMreception.
8 Setting the Alarm Timer
YourSmartSet
®
clockradio has two separate alarms that can beset and used
independently.Youmayuse thealarmstowaketwo peopleatdifferenttimes,oryou
may useone alarm forweekdays andthe other forweekend wakeuptimes. The
procedureforadjustingthewakeuptimesisthesameforbothAlarm1andAlarm2.
NEGA
TIVE (-)
EmersonPartNo.
CKS1401-20240112-00 PrintedinChina
Produktspecifikationer
Varumärke: | Emerson |
Kategori: | Inte kategoriserad |
Modell: | CKS1401 |
Behöver du hjälp?
Om du behöver hjälp med Emerson CKS1401 ställ en fråga nedan och andra användare kommer att svara dig
Inte kategoriserad Emerson Manualer
3 Mars 2025
26 Februari 2025
28 December 2024
28 December 2024
28 December 2024
11 December 2024
11 December 2024
11 December 2024
24 September 2024
24 September 2024
Inte kategoriserad Manualer
- Pardini
- ACOPower
- OptiTrack
- Livarno
- Creda
- Loctite
- Smartwares
- Kambrook
- MiPow
- Jonsered
- Active Era
- Eve Audio
- Lansinoh
- Atlas
- Energizer
Nyaste Inte kategoriserad Manualer
9 April 2025
9 April 2025
9 April 2025
9 April 2025
9 April 2025
9 April 2025
9 April 2025
9 April 2025
9 April 2025
9 April 2025