Eureka Tetragon Bruksanvisning
Läs gratis den bruksanvisning för Eureka Tetragon (2 sidor) i kategorin tält. Guiden har ansetts hjälpsam av 36 personer och har ett genomsnittsbetyg på 4.0 stjärnor baserat på 7 recensioner. Har du en fråga om Eureka Tetragon eller vill du ställa frågor till andra användare av produkten? Ställ en fråga
Sida 1/2
REV. D 4.09
Component List:
1 Tent Body, 2 Tent Poles, 1 Carry Bag, 1 Tent Fly, 2 Brim Rods,
1 Stake Bag w/Stakes, 1 Pole Bag, 2 Storage Pockets, 1 Sewn-in Gear Loft
Your tent is now ready for use.
ASSEMBLY INSTRUCTIONS
FOR A TETRAGON TWO
POLE DOME TENT:
NOTE:
• Although it is possible to pitch this tent alone, it is faster andeasierwith
twopeople.
• Do not droptent bag or pole bag on its end. Do not bounce tent bag on its
end to get the tent out. These actions may cut the shock-cord and/or damage
the pole ends.
• The tentclipwebbing is now color coded for eveneasier set-up. Just clip
one pole to one color.
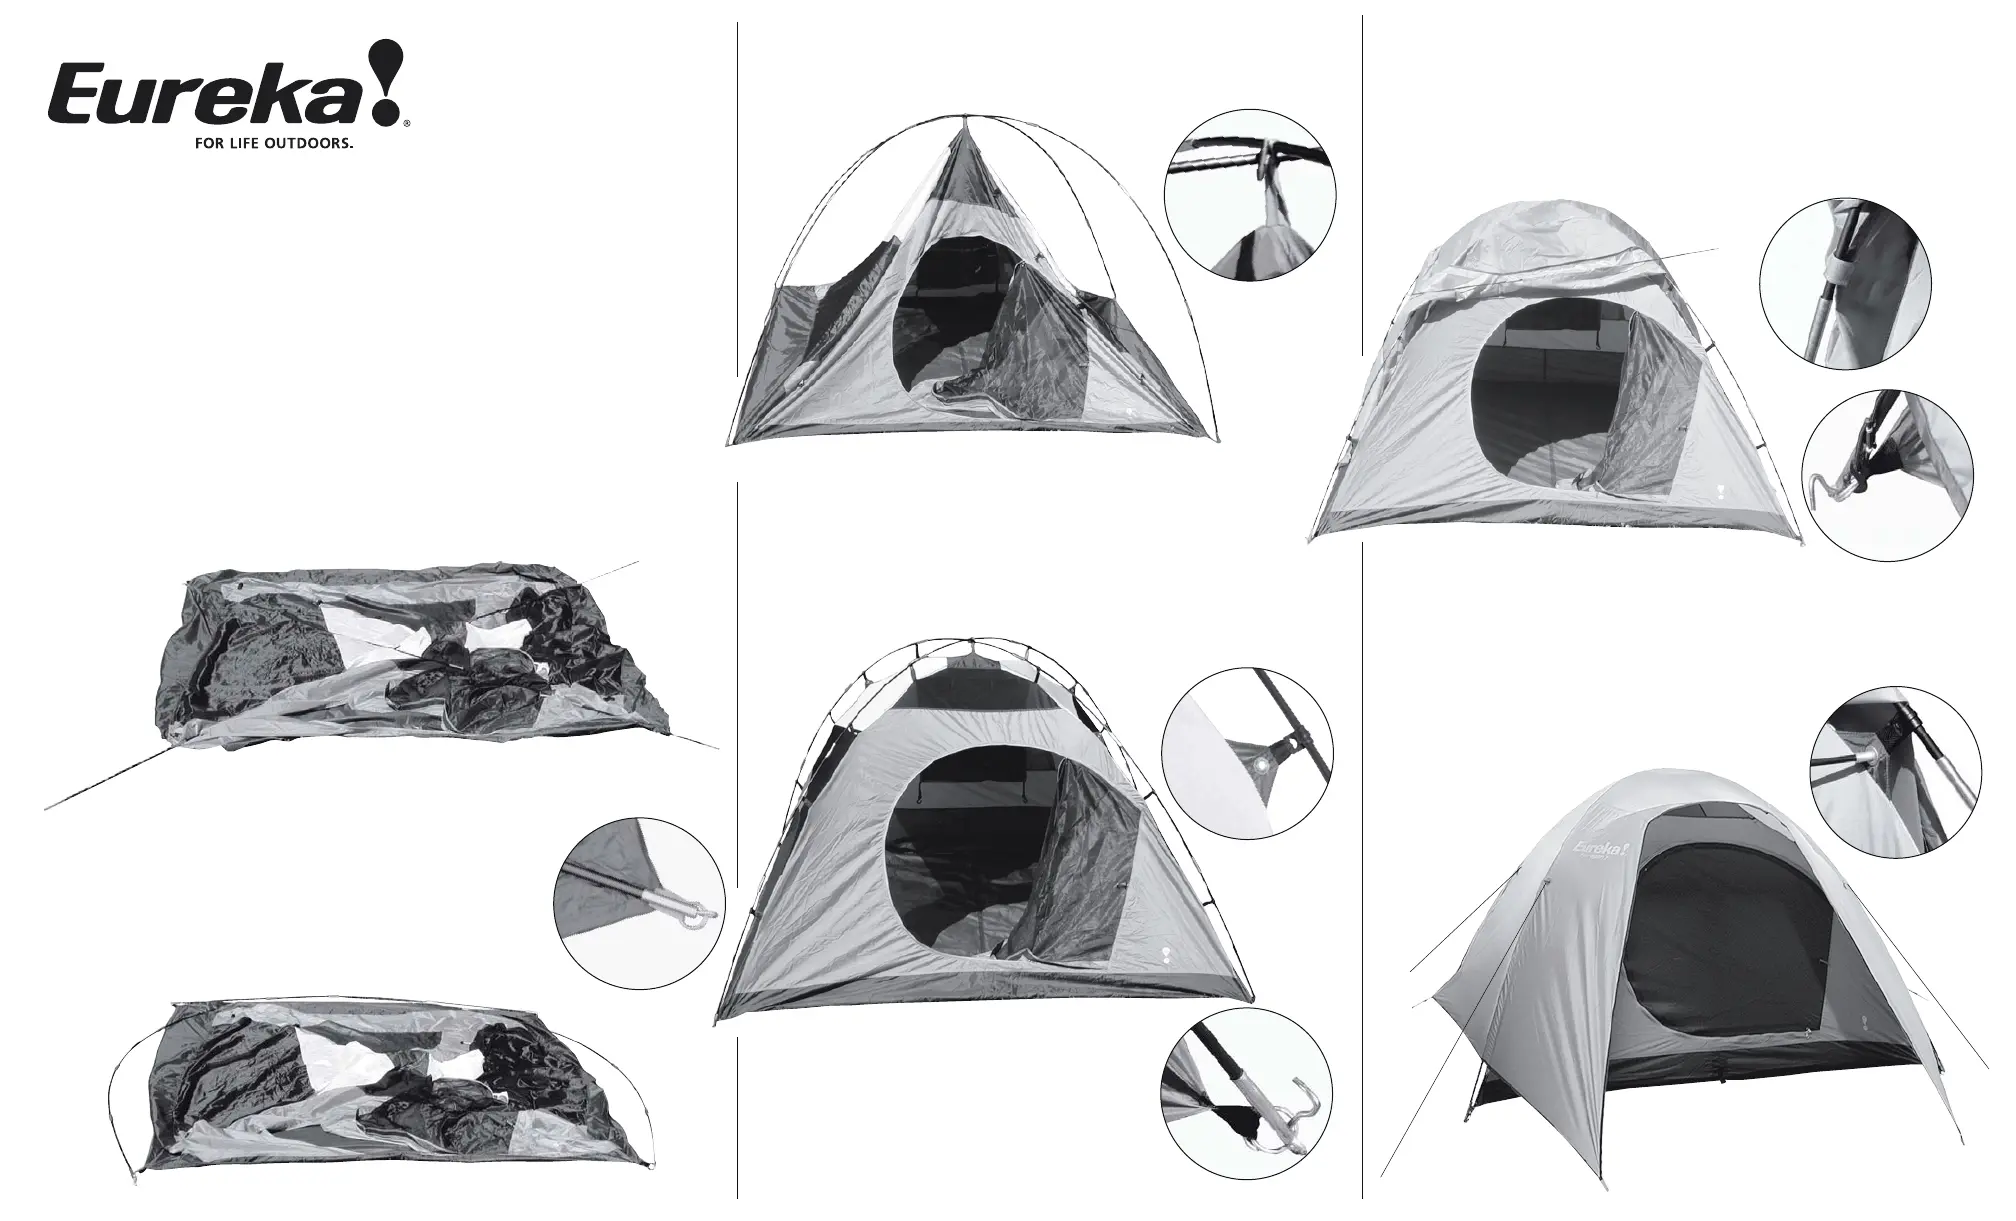
Place a corner pin into the end of one of the poles. See fig 2.
At the opposite end, with the pole in one hand and
a pin & ring in the other, feed the pole up, bending it
evenly along its length to create an arc. Make sure
the ferrules do not get caught on the tent body.
Place the pin into the end of the pole to maintain
tension. Repeat with the other pole. See fig 3.
fig 1
fig 2
fig 3
fig 4
fig 5
fig 9
fig 11
fig 12
fig 13
fig 10
fig 6
fig 7
fig 8
Raise up the tent poles and attach the peak of the tent to
them. Capture both poles, with the toggle and loop, where
they cross. See fig 4 and 5.
Start at the bottom and attach all the clips to the poles to
create a freestanding tent. Place it in the desired location.
Stake the tent down through the corner rings. Stake the
opposite corners while applying tension to smooth the floor
wrinkles. NOTE: General purpose stakes are included but
snow or sand stakes can be purchased at a Eureka! dealer.
See fig 6, 7 and 8.
Unroll and unfold the tent andlay it on the ground. If it's windy, stake down
one front corner into wind.
Assemble all the poles to their full length. Lay the poles side by side and
divide according to length.
Lay the two long poles across the tent body.
They should run corner to corner crossing in the center. See fig 1.
Drape the fly over the tent with the rod sleeves above the door and
rear window. Slide the brim rods into these sleeves. See fig 9.
Reach under the fly and wrap the hook and loop straps around the
poles to secure the fly to the tent frame. See fig 10.
Fasten the shock corded J-hook, at each of the corners of the fly,
to the stake out rings on corners of the tent. See fig 11.
Reach under the fly and insert the brim rod tips into web grommets
to tension the rod and create an arch over the door. Repeat this
over the rear window. See fig 12.
Pull out and stake down the two front loops of the fly vestibule.
Then pull out, stake down and tension the
attached cord on each the side of the fly.
We recommend that you attach cords to the fly
storm loops and stake
them down.
See fig 13.
Produktspecifikationer
| Varumärke: | Eureka |
| Kategori: | tält |
| Modell: | Tetragon |
Behöver du hjälp?
Om du behöver hjälp med Eureka Tetragon ställ en fråga nedan och andra användare kommer att svara dig
tält Eureka Manualer

12 Augusti 2025
11 Augusti 2025
11 Augusti 2025
11 Augusti 2025
11 Augusti 2025
11 Augusti 2025
11 Augusti 2025
11 Augusti 2025
11 Augusti 2025
11 Augusti 2025
tält Manualer
Nyaste tält Manualer
3 April 2026
18 Mars 2026
18 Mars 2026
11 Mars 2026
10 Mars 2026
4 Mars 2026
4 Mars 2026
4 Mars 2026
4 Mars 2026
3 Mars 2026