Hoonved ST 53E Bruksanvisning
Hoonved
Diskmaskin
ST 53E
Läs gratis den bruksanvisning för Hoonved ST 53E (20 sidor) i kategorin Diskmaskin. Guiden har ansetts hjälpsam av 12 personer och har ett genomsnittsbetyg på 4.4 stjärnor baserat på 6.5 recensioner. Har du en fråga om Hoonved ST 53E eller vill du ställa frågor till andra användare av produkten? Ställ en fråga
Sida 1/20

ST 43 E
ST 48 E
ST 53 E
ST 60 E
DP 35 E
DP 40 E
DP 45 E
DP 50 E
Instructions for user
Ed. 10/2012

Via Ugo Foscolo, 1
21040 Venegono Superiore
Varese (Italy)
www.hoonved.com
info@hoonved.com
DICHIARAZIONE DI CONFORMITÀ CE I
DECLARATION OF CONFORMITY CE GB
CE DECLARACION DE CONFORMIDAD
E
DECLARATION DE CONFORMITÉ CE
FR
KONFORMITÄTSERKLÄRUNG CE D
CE CONFORMITEITSVERKLARING
NL
CE KONFORMITETSERKLÆRING
DK
Noi dichiariamo sotto la nostra esclusiva responsabilità che il prodotto:
The undersigned hereby declares under full responsability that the following product:
Declaramos bajo nuestra responsabilidad que el produeto:
Nous soussignées attestons sous notre entière responsabilité que le produit suivant:
Die unterzeichnete Fa. erklärt unter eigener Verantwortung, dass folgende Produkte:
Ondergetekende firma verklaart dat de:
Hermed erklæres at f
Ø
lgende produkter:
LAVASTOVIGLIE - DISHWASHER – LAVAVAJILLAS - LAVE-VASSEILLE - GESCHIRRSPÜLER -
VAATWASMACHINE - TALLERKENOPVASKEMASKINE -UNDERBANKDISKMASKIN
ST 43 E...,ST 48 E...,ST 53 E...,ST 60 E...,ST 43 DE...,ST 48 DE...,ST 53 DE...,ST 60 DE...
DP 35 E...,DP40 E...,DP45 E...,DP 50 E...,DP 35 DE...,DP40 DE...,DP45 DE...,DP 50 DE...,
al quale questa dichiarazione si riferisce, è conforme alle seguenti norme:
for which this declaration refers to in accordance to the following standards:
al que se refiere asta declaracciones de conformidad a las siguientes normas:
auquel se référe cette dèclaration,est conforme aux normes suivantes:
auf welche sich diese Erklärung bezieht, folgendem Standard entsprechen:
waarop deze verklaring betrekking heeft, volgens de standaard:
som er omfattet af denne erklæring, overholder f
Ø
lgende standarder:
EN 60335-1, EN 60335-2-58, EN 61000-3-2, EN 61000-3-3, EN 55014-1, EN 55014-2
in base a quanto previsto dalle Direttive CEE:
on the basis of what is foreseen by the Directives CEE:
en base a lo previsto en la directiva CEE:
selon ce qui est prevu par les Directives CEE:
aufgrund der vorgesehenen Richtlinien:
gebaseerd op de CE-richtlijnen:
iht. EU-direktiv:
2006/95/CE (LVD) - 200 /108/CE (EMC)4
Decliniamo ogni responsabilità per sinistri a persone o a cose derivanti da manomissione da parte di terzi o da carenza di manutenzione o
riparazione.
We decline any responsability for injuries or damage derived from machine misuse, abuse by others or improper machine maintenance
or repairs.
Declinamos toda responsabilidad por sinostros a personas por la incorrecta manipulacion por parte de tercero e la carencia de
mantenimjento o reparaciòn.
Nous déclinons toute responsabilité pour sinistres à personnes ou à objetqui derivent de l'intervention de la part de tiers non specialistes
ou de carences de manutentionou reparation.
Wir lehnen jegliche Verantwortung für Schäden an Personen oder Dingen ab, die auf fehlerhaftes Eingreifen Dritter oder auf mängelhafte
Wartung oder Reparation zurückzuführen sind.
Wij zijn op geen enkele manier verantwoordelijk voor schade aan personen of materrialen welke voortvloeien uit onoordeelkundig
gebruik, reparatie dan onderhoud aan de machines door derden.
Vi frasiger os ethvert ansvar for skader opstàet son f
Ø
lge af fejlagtig anvendelse af maskinen, misbrug, eller utilstrækkeligt vedligehold
eller reparation.
_____ _____ 23/12/2009
(Data emissione)
(Date of issue)
(Fecha de emisiòn)
(Date d'emission)
(Ausgabedatum)
(D.D)
(Udstedelsesdato)
Giuseppe RIENZI
DELEGATO ALLA SICUREZZA DEL PRODOTTO
__________________________________________
(Nome e firma o timbratura equivalente della persona autorizzata)
(Name signature or equivalent of authorized representative)
(Nombre y firma o equivalente de la persona autorizada)
(Nom et signature ou cachet de la personne autorisée)
(Name und Stempel der rechtskräftigen Person)
(Naam handtekening of equivalent van de rechtsgeldige vertegenwoordiging)
(Underskrift)
ST E.doc

3
cod. 37590
ST 43 E - DP 35 E
ST 48 E - DP 40 E
ST 53 E - DP 45 E
ST 60 E - DP 50 E
DISHWASHING MACHINE
The illustrations concerning these instructions are on the inside of the back cover
Mod.

5
La ditta costruttrice si riserva il diritto di apportare
modiche che si renderanno utili ai propri prodotti
senza comprometterne le caratteristiche essenziali.
The manufacturer reserves the right to modify the
products whenever necessary, without affecting their
main features.
Le constructeur se réserve le droit de modier ses
produits sans en compromettre les caractéristiques
essentielles.
Der Hersteller behält sich das Recht vor , seine Pro-
dukte abzüandern , falls es notwendig sei , ohne die
haupteigenschaften des Gerät zu wechseln.
La Firma constructora se reserva el derecho de modi-
car sus productos sin comprometer las características
esenciales.
A empresa construtora se reserva o direito de fazer
modicações que se renderem necessárias aos pró-
prios produtos sem o comprometimento das carac-
terísticas essenciais.
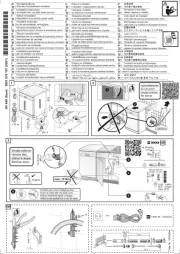
ITA AVVERTENZA
Prima di procedere all'installazione, alla messa in funzione, alla regolazione e alle operazioni di manutenzione della lavastoviglie
Mod. ST/DP E, leggere attentamente il presente manuale.
In caso di guasto o cattivo funzionamento della macchina rivolgersi esclusivamente ad un centro tecnico autorizzato o diretta-
mente alla ditta HOONVED.
°
ENG IMPORTANT
Become thoroughly familiar with the contents of this manual before installing, setting up, adjusting and servicing dishwasher
machine Mod. ST/DP E.
Only contact an authorized technical center or HOONVED in the event of breakdowns or faulty machine operation.
FRA IMPORTANT
Lisez attentivement cette notice avant la mise en place, la mise en service, le réglage et les opérations d’entretien de la machine
lave-vaisselle Mod ST/DP E.
En cas de panne franche ou de dysfonctionnement de la machine, adressez-vous exclusivement à un service technique agréé
ou directement à la société HOONVED.
DEU HINWEIS
Bevor man den Geschirrspüler Mod. ST/DP E installiert, in Betrieb nimmt, einstellt oder Wartungsarbeiten daran vornimmt, ist
dieses Handbuch aufmerksam durchzulesen.
Bei Betriebsstörungen der Maschine wenden Sie sich bitte ausschließlich an ein autorisiertes Kundendienst-Zentrum oder direkt
an Firma HOONVED.
ESP ATENCION
Antes de realizar la instalación, la puesta en marcha, los ajustes y las operaciones de mantenimiento de la máquina lavavasos
Mod. ST/DP E, lea atentamente este manual.
En caso de avería o de mal funcionamiento se dirija exclusivamente a un centro técnico autorizado o directamente a la empresa
HOONVED.
POR ADVERTÊNCIA
Antes de proceder a instalação, a colocação em funcionamento, a regularização e as operações de manutenção da Lava
louças Mod . ST / DP E, ler atentamente o presente manual. Em caso de avaria ou mal funcionamento da máquina procurar
exclusivamente um centro técnico autorizado ou directamente a empresa HOONVED.

7
INDICE - INDEX - ÍNDICE
RAEE.................................................................... pag. 4
Avvertenza. ......................................................... pag. 5
Important
Important
Hinweis
Advertencias
Advertência
Dimensioni d'ingombro. .................................... pag. 6
Overall dimensions pag. 6 ...............................................
Dimensions d'encombrement pag. 6 ...............................
Platzbedarfmasse ................................................. Seite. 6
Dimensiones máximas pág. 6 .........................................
Dimensões pág. 6............................................................
Dati tecnici. ......................................................... pag. 7
Technical data pag. 7.......................................................
Données techniques pag. 7 .............................................
Technischen daten................................................ Seite 7
Datos técnicos pág. 7 ......................................................
Dados técnicos pág. 7 .....................................................
Descrizione comandi........................................... pag. 8
Decription of the controls pag. 8 .......................................
Description des commandes pag. 8 .................................
Beschreibung der Bedienvorrichtungen pag. 8 ................
Descripción de los mandos pag. 8 ...................................
Descrição dos comandos pag. 8 ......................................
ITALIANO. ........................................................ Pagina 9
ENGLISH. ......................................................... Page 18
FRANÇAIS. ...................................................... Page 27
DEUTSCH. ....................................................... Seite 36
ESPAÑOL. ....................................................... Página 45
PORTUGUÊS. .................................................. Pág. 54

8
DIMENSIONI DI INGOMBRO - OVERALL DIMENSIONS - DIMENSIONS D'ENCOMBREMENT
PLATZBEDARFSMASSE - DIMENSIÓNES - DIMENSõES
ST 43 E - DP 35 E 430 530 694 860 280
ST 48 E - DP 40 E 480 530 694 860 280
ST 53 E - DP 45 E 530 620 751 964 270
ST 60 E - DP 50 E 600 620 816 1030 330
Modello Model A B C D E
10
CYCLE
II III
START
CHECK
A
B
D
C
E

10
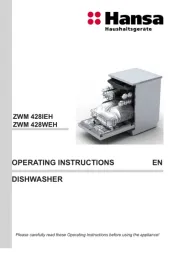
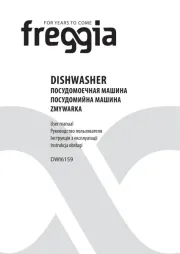
CRUSCOTTO COMANDI - CONTROL PANE PANNEAU DES COMMANDESL -
SCHALTBLENDE - PANEL DE MANDOS - PAINEL DE COMANDOS
Fig. 1
LEYENDA
Q1) Interruptor ON/OFF
S4) Botón regeneración (solo para mod. "D")
LRCK) Lámpara led CHECK
LTV) Lámpara led temperatura agua tina
LC1) Lámpara led ciclo CORTO
LC2) Lámpara led ciclo MEDIO
LC3) Lámpara led ciclo LARGO
S9) Botón selecciòn CICLO
S3) Botón de Arranque CICLO (START)
P3) Temperatura cuba (display)
P2) Temperatura boiler (display)
LEGENDA
Q1) Interruttore ON/OFF
S4) Tasto Rigenera (solo su modelli "D")
LRCK) Lampada led CHECK
LTV) Lampada led temperatura vasca
LC1) Lampada led ciclo CORTO
LC2) Lampada led ciclo MEDIO
LC3) Lampada led ciclo LUNGO
S9) Tasto selezione CICLO
S3) Tasto AVVIO CICLO (START)
P3) Display temperatura vasca
P2) Display temperatura boiler
LEGEND
Q1) Line button ON/OFF
S4) Regeneration button ( only for models "D")
LRCK) CHECK led light
LTV) Tank temperature led light
LC1) SHORT cycle led light
LC2) MEDIUM cycle led light
LC3) LONG cycle led light
S9) CYCLE selection button
S3) START CYCLE button
P3) Tank temperature (display)
P2) Boiler temperature (display)
LEGENDE
Q1) Bouton de ligne ON/OFF
S4) Bouton de régénération
(seulement pour "D")
LRCK) Lampe led de CHECK
LTV) Lampe led de temperature de la cuve
LC1) Lampe led cycle COURT
LC2) Lampe led cycle MOYEN
LC3) Lampe led cycle LONG
S9) Bouton de Sélection CYCLE
S3) Bouton de Démarrage CYCLE (START)
P3) Display temperature cuve
P2) Display temperature boiler
LEGENDAS
Q1) Tecla ON/OFF
S4) Botão regenerador (Só nos modelos “D”)
LRCK) Lâmpada Led CHECK
LTV) Lâmpada Led temper. do tanque
LC1) Lâmpada Led ciclo CURTO
LC2) Lâmpada Led ciclo MÉDIO
LC3) Lâmpada Led ciclo LONGO
S9) Botão de selecção de ciclo
S3) Botão início ciclo (START)
P3) Temperatura agua tina (display)
P2) Temperatura hervidor (display)
ZEICHENERKLÄRUNG
Q1) Schalter Ein-/Aus
S4) Regenerierungs-Taste (nur bei "D")
LRCK) Led Leuchte Regenerierung CHECK
Alarm
LTV) Led Leuchte tanktemperature erreich
LC1) Led Leuchte KURZER zyklus
LC2) Led Leuchte NORMALER zyklus
LC3) Led Leuchte LANGER zyklus
S9) Wahltaste ZYKLUS
S3) Taste ZYKLUS STARTEN
P3) Tankstemperature (display)
P2) Boilerstemperature(display)
C
C C
III III
P3 P2 Q1 S4 LRCK LTV S9 S3
LC1LC2LC3
START
CHECK

23
PARTICULAR RECOMMENDATIONS
FOR THE OPERATOR
- Do not operate the machine without having become fully
familiar with the contents of this manual and without having
acquired a comprehensive knowledge of the specic tech-
niques and machine controls.
- Check that the area in which the machine is to be installed is
compatible with the dimensions of the machine itself before
installing this latter.
- If this machine is a ”built in” type , pay attention that the
housing and the furnishings nearby are suitable ones ,
i.e. they have not to suffer from exposure to steam that
may come out from the machine during its functioning
and especially during the opening of the door at each
washing cycle.
- Only use lifting and handling means that are suited to the
weight of the machine when this must be installed or removed
either completely or in part.
- Never allow unauthorized or unqualied personnel to start,
adjust, operate or repair the machine. Always refer to this
manual for the necessary operations.
- The mechanical parts and electrical/electronic components
situated inside the machine are protected by entirely closed
panels.
- Always ensure that the main switch has been set to the
“OFF” position before cleaning and/or servicing the machine.
This will disconnect the power source during the operator’s
intervention.
- The electrical powering system must be equipped with an
automatic release system prior to the main machine switch
and with a suitable grounding system that complies with all
the requisites established by industrial provisions for the
prevention of accidents.
- Always disconnect the power source if work must be carried
out on the main switch or in its vicinity.
- All inspections and maintenance operations requiring remo-
val of the safety guards are carried out under the complete
responsibility of the users.
These operations should therefore only be carried out by
specialized and authorized technical personnel.
- Make sure that none of the accident preventing safety de-
vices (barriers, guards, casings, microswitches, etc.) have
been tampered with and that they are all perfectly functional
before operating. These devices should be repaired if this is
not the case.
- Never remove the safety devices.
- To prevent personal risks, only use power tools that are
correctly connected to the grounding tap and that conform
to the national safety regulations.
- Never ever tamper with the electrical system or with any
other mechanism.
- Never ever use the hands or unsuitable instruments to locate
leaks from pipes. Air, uids under pressure or irritants could
cause serious damage to both persons and/or property.
- Never use the hands instead of adequate tools when operating
the machine.
- Never use the hands or other objects to stop moving parts.
- PAY THE UTMOST ATTENTION TO THE DATA PLATES
AFFIXED TO THE MACHINE WHENEVER WORKING ON
THIS OR IN THEIR NEAR VICINITY.
- The user is obliged to keep all the data plates and stickers
in a legible condition.
- Never climb on to the door or on to the top of the machine.
- It is essential for the user to replace all data plates and
stickers that may have deteriorated for any reason or that
are not clearly visible, ordering new ones from the Spares
Service.
- Contact the person in charge of maintenance in the event of
malfunctions or damage to the machine components without
proceeding with further repairs.
- It is absolutely forbidden for anyone to use the machine for
purposes other than those explicitly established and docu-
mented. The machine must always be used in the ways, times
and places dictated by common sense and the laws in force
in each country, even when there are no specic provisions
to govern the sector in the particular country of use.
- The manufacturer declines all responsibility for accidents
or damage to either persons or property as may arise
following failure to comply with either the relative safety
provisions or the instructions herein.
- These instructions, together with the provisions gover-
ning machine installation and electrical connections form
an integral part of the Accident Preventing Industrial
regulations in force in each individual country.
- THESE SAFETY PROVISIONS INTEGRATE AND DO NOT
SUBSTITUTE THE SAFETY PROVISIONS LOCALLY IN
FORCE.
- NEVER ever make hurried or inaccurate repairs that
could jeopardize the correct operation of the machine.
- ALWAYS ASK FOR HELP FROM SPECIALIZED PERSON-
NEL IN CASE OF DOUBT.
- ANY TAMPERING BY THE USER RELIEVES THE MA-
NUFACTURER FROM ALL LIABILITY, THE USER BEING
IN THIS CASE SOLELY RESPONSIBLE TOWARDS THE
COMPETENT ACCIDENT PREVENTION AUTHORITIES.
- The machine must not be used by people (chidren inclu-
ded) with reduced physical, sensory or mental abilities,
with lack of experience or acquaintance, unless they
could have a supervision or instruction concerning
the use of the machine, through the intermediation of a
person responsible for their safety.
- It is forbidden to clean the machine with water jets.
ENGLISH
Traslation from the original instructions

25
ENGLISH
Part 2: For the operator
2.1 WASHING PHASES ST/DP E
2.1.a Switching on and Preparing the machine
(Fig.1/9)
To switch on the machine,press and hold the power switch
( ) into the position button for a few seconds, then Q1 ON
release.
The LED indicating the last cycle selected will become
CONSTANTLY LIT (LC1, LC2, LC3 or LC1+LC2+LC3)
, as will the CHECK LED .
IMPORTANT
On rst switching on, LED LC2 will light up.
The boiler, and then the tank, will start to ll automatically.
Once the water level has been reached, the heating
elements will switch in, rst in the boiler, then in the tank.
Once the water in the tank reaches the correct tempera-
ture, the tank temperature LED ( ) will go ON. LTV
The thermometers P3 and reect the tank and boiler P2
values of temperature.
WASHING OPERATION
If not equipped with an automatic dosing system, pour
into the tank a quantity of detergent suitable for the volu
me and hardness of the water. For quantities, refer to the
specic instructions for the detergent in use.
ATTENTION
When items to be washed are encrusted with burnt
on matter, or a long time has passed between use
and washing, it is essential to carry out a pre-was
soak using a suitable softening agent.
The use of hand-washing products is to be avoided
as they could produce foam inside the machine.
IPlace the basket of items to be washed inside the ma-
chine, having rst removed any solid waste.
2.1.b Selecting a Cycle
The duration of the washing cycle can be chosen from
4 different lengths of time, to be selected using the
“CYCLE” button.
Each time the button is pressed, the LEDs “CYCLE”
(LC1, LC2,LC3 or LC1+LC2+LC3), will light up or go out
in sequence as shown in the following table:
LC 1 : = 90 sec. SHORT CYCLE
LC 2: = 120 sec. MEDIUM CYCLE
LC 3: = 180 sec. LONG CYCLE
LC 1+LC2+LC3: = 8 1/2 min. INTENSIVE CYCLE
2.1.c STARTING UP THE WASHING CYCLE
IMPORTANT
The selection of MANUAL orAUTOMATIC start to be
made with machine in stand-by mode
STARTING the MANUAL WASHING CYCLE
To start the washing cycle, press and hold the START (S3)
button for a few seconds, then release.
Throughout the washing cycle the LED(s) for the selected
cycle or will FLASH.(LC1, LC2 LC3 or LC1+LC2+LC3)
ATTENTION
We recommend that you top up the detergent used up
by washing grease or dispersed during rinsing every 4-5
complete cycles.
The use of the machine ensures rinsing at the ideal tem-
perature for hygienic purposes every time;
Indeed, if the temperature is not sufcient the wash will
be automatically prolonged so as to ensure the necessary
conditions of optimum rinsing at 85°C.
The waiting time required to attain optimum temperature
can extend to a maximum of .8 minutes
While this is taking place, the LED will FLASH CHECK
RAPIDLY until the end of the cycle. To reset the ashing,
switch the machine off and back on using the power
switch ( ) .Q1
STARTINGUPTHEWASH. CYCLEAUTOMATICALLY
To start up the cycle AUTOMATICALLY (by opening and
closing the door), you will need to change the cycle start
up mode. Press and hold the “ ” button until theCYCLE
pre-selected cycle LED remains BLINKING LIT
(approx. 10 sec.) and the washing cycle will then start up
AUTOMATICALLY when the door is closed.
The functioning of the led (CONTINUOUS or BLINKING)
depends on the chosen type of functioning(MAN. or AUT)
2.1.d Interrupting the cycle
1) It is possible to interrupt the washing cycle momentarily
by opening the door, this is an EMERGENCY measure:
the cycle LEDs (LC1, LC2,LC3 or or LC1+LC2+LC3) will
start to FLASH, alternating with the LED CHECK .
On closing the door, operations will resume from the point
in which they stopped.
2) The cycle can also be interrupted by SWITCHING the
machine’s power switch ( ) to the position.Q1 OFF
3) On switching the machine back on, the LED indicating
the last cycle selected will light up.
At the end of the washing cycle, take out the basket
and shake it gently so as to remove the last drops
left on the washed items.
Allow items to dry and remove them from the basket with
clean hands.
Store all items on hygienic and completely stable surfaces.
2.1.e Manual Draining
It is possible to drain the water from the tank at any time
during the day, according to the waste accumulated.
To carry out this operation, proceed as follows:
- SWITCH the machine’s power switch ( ) to the Q1 OFF
position and release the overow, allowing all the water
to drain from the tank;
- Remove the tank lters (22/23) and clean;
C
I II III
LC1LC2LC3
CHECK

26
ENGLISH
Part 2: For the operator
2.1.e.1Manual draining for mach. with drainage pump
For machines tted with a drainage pump it is possible
to empty the tank by carrying out the manual draining
cycle, during which only the drainage pump remains
active.
IMPORTANT
This cycle can only be carried out by leaving the ma-
chine SWITCHED ON with the tank full of water and the
door OPEN.
Having released the overow, press and hold the
START (S3) button until the LED LC2 and CHECK
together) begins to FLASH, and then release the
START (S3) button;
The DRAINAGE CYCLE will begin.
IMPORTANT
By pressing the START ST ( ) button or switching
the power switch ( ) to OFF, you can interrupt the Q1
drainage cycle before the preset time is up;
to restart the interrupted cycle, press START (S3)
again.
When the LED lights up CONSTANTLY,LC2
the drainage cycle is nished.
At the end of the cycle, restore the lters (22/23) and the
overow (21) to their respective positions.
2.1.f Self-washing and draining
At the end of the washing operations SWITCH OFF the
machine pressing the switch ( )Q1
After having unlocked the overow pipe, close the door
of tank access , press push button START (S3) (about
5 sec.)
The cycle Self-washing and draining will start ; Led LC1
and will light, while led is FIXED ON, with LC3 CHECK
draining pump ON (for the machines equipped with).
The end of the described phase is indicated by the switch-
ing OFF of the Led ,CHECK
2.1.g Cold rinsing (optional)
With machine ON (switch line is ON ), tank full of Q1
water and door closed (LC1 or LC2 or LC3 and CHECK
= FIXED ON)
keep pressed regeneration button ( ) to make the cold S4
rinsing of the crockeries for all the wished time.”
2.1.h Switching off at the end of the day
At the end of the working day SWITCH OFF the ma-
chine by pressing the power switch ( ) into the Q1
OFF position.
Switch off the mains switch feeding the machine
and close the water supply taps.
For any repairs, contact only assistance centres au-
thorised by the manufacturer.
Warnings during the operation
1) Ensure that the washing temperature remains at
approx. 55-60°C;
2) Avoid immersing bare hands in the detergent-lled
water; if this should happen, rinse immediately and
thoroughly with running water;
3) Use only anti-foaming detergents, specics for use in
industrial machines;
4) Deactivate the machine in case of break-down or
malfunction.
For any repairs, contact only assistance centres autho-
rised by the manufacturer, and insist on the use of
original parts.
5) In no case should you change the the original for-
mulations without rst consulting an authorised
assistance centre;
6) When the machine is operating, do not open the door
too rapidly.
7) Wash tank water should be changed at least twice a
day or according to daily wash requirements.
Failure to follow the above warnings may compromise
the safety of the washing machine.
Useful advice for better washibg results
Any unsatisfactory results from washing can be seen
when traces of dirt are left on dishes or other items; any
water marks may be caused by insufcient rinsing.
In this case, ensure that the rinsing nozzles (27) are
clean and that there is pressure in the water system.
If there are traces of waste, ensure that:
- The lters (22/23) are clean;
- the water temperature is around 55-60°C;
- items are correctly positioned in the basket;
- the washing/rinsing nozzles are clean (26/27);
- the arms (24/25) rotate freely.
2.1.i RESIN REGENERATION OPERATION
(for model D only)
We recommend that you carry out regeneration when all
work is nished.
First of all, ensure that there is coarse cooking salt in the
salt container, and proceed as follows:
1. unscrew the salt container plug and pour in 1 Kg of
coarse salt.
2.Screw the plug down tight, to ensure that the container
is completely sealed.
On reaching the set number of cycles, the LED CHECK
will ash;
this indicates that it is time to carry out regeneration.
The signal that the set number of cycles has been reached
can only be deactivated by starting the regeneration cycle
(regenerate button ). ( )S4
REGENERATION OPERATIONS
With the machine SWITCHED OFF (the power switch
( ) in the position), and the tank EMPTY (release Q1 OFF
the overow) and the door CLOSED, press and hold the
regenerate button (Fig. 1/ 9), until the LED ( )S4 CHECK
FLASHES.
The REGENERATION CYCLE will begin, and the
CHECK LED will ash continuously.
The machine will now automatically carry out all the ne-
cessary operations for a MAXIMUM of 20 mins, during
which the machine cannot be used.
ATTENTION
Opening the door during the cycle will stop the regenera-
tion cycle; the LED will start to ash RAPIDLY; CHECK
on closing the door the cycle will resume from where it
was stopped.
CI II III
LC1LC2LC3
CHECK

27
ENGLISH
Part 2: For the operator
When the LED switched OFF, the CHECK
regeneration cycle is nished.
The machine is now ready for use again.
ATTENTION
Programming of cycles for the start-up of regeneration
should be carried out by authorised technicians only (see
Part 3: Reserved for technicians, paragraph 3.2 Setting
cycles for REGENERATION PROMPT).
2.2 CLEANING (Fig. 10)
2.2.a General information
Strict compliance with the maintenance instructions in this
section will keep your machine in a good working condition
and will notably reduce the need for repairs.
ATTENTION
If any machine component becomes faulty, FIRST CHECK
that all the instructions given in the previous paragraphs
have been complied with during use.
Repairs must be carried out immediately, as soon as the
fault occurs. This will prevent the trouble from becoming
worse and damaging other parts.
ATTENTION
Daily operations to carry out when work has ended, with
the machine OFF , the main circuit-breaker disconnected,
the water cocks off and the washing tub empty.
1. Thoroughly clean the inside parts of the machine.
2. Remove the suction protection (23).
3. Remove the lter (22) from the bottom of the machine
by releasing the overow (21).
4. Wash the lters under running water and t them cor-
rectly back in their housings.
ATTENTION
Frequently check and clean the spraying units, removing
them from their housings and eliminating any dirt and
fouling. The frequency with which this operation must be
carried out depends on the quantity of dirt or on the unsa-
tisfactory washing results. Never use corrosive products
like sodium hypochlorite (bleach) or hydrochloric acid, wire
wool or steel brushes to clean either the inside or outside
parts of the machine.
2.3. PREVENTION MAINTENANCE (Fig. 10)
The preventive maintenance operations must be carried
out with the machine OFF, the main circuit-breaker di-
sconnected, the water delivery cocks off and the washing
tub empty.
2.3.a Checking and cleaning the spray arms and
nozzles (Fig. 10)
Periodically check to make sure that the lower washing
arm and rinsing arm (24/25) and their relative nozzles are
not clogged (26/27).
Cleaning the lower/upper unit
1. Unscrew the ring nut and lift the arm (24/25).
2. Wash the washing and rinsing arm.
If the nozzles (27) are clogged, unscrew them to de-
mount and clean, taking care to prevent the shape of
the nozzle from being deformed. After cleaning, t the
nozzles exactly back in their original positions.
3. Remount all parts by complying with the above in-
structions in reverse.
2.4 DESCALING
Where hard water is present lime scale deposits will for
in the machine and on dishes, which must, for reasons
of hygiene, be removed by descaling.
Advice on operation procedures and frequency for this
treatment are generally given by the detergent supplier,
who can provide suitable products.
In order to avoid damaging the machine, do not
exceed recommended doses, follow the detergent
producer’s directions scrupulously and, having
nished operations, rinse thoroughly.
2.5 TEMPORARY STOPPAGE
If the machine is to be left inactive for a period of some
weeks, it is advisable beforehand to load the tank and
run a few empty cycles with clean water then drain, so
as to avoid the formation of unpleasant odours.
If necessary, repeat the process several times until the
water is still clean after washing.
If the stoppage is to be very long, it is advisable to
drain the water from the boiler and from the electric
pump.
2.6 DEMOLITION and DISPOSAL
When the machine is to be scrapped, drain the water
from the tank and from the boiler, as indicated in the
points above, and disconnect the machine from the
water and electricity supply networks, then dispose of
the components according to current regulations, re
specting national and local ecological and environmetal
legislation, and taking care to separate the parts as
follows:
- metallic parts: body work, surfaces, panels, lters;
- electrical parts: motors, remote switches, micro-
switches, cabling;
- plastic parts: connectors, baskets;
- rubber parts: tubes, couplings
2.7 SCHEDULED MAINTENANCE
It is advisable to subject the machine to scheduled
maintenance every 6 months.
The producer declines all responsibility for any
printing errors contained in this booklet.
The instructions, drawings, tables and everything else
in this manual are of a condential technical nature.
For this reason, none of the information may be either
completely or partially duplicated or disclosed to
third parties without prior written authorization from
HOONVED which is the sole proprietor and which
reserves the right to make any modications as may
be considered necessary without advance warning.

28
ENGLISH
Part 2: For the operator
SUMMARY TABLE of CYCLE LED CHECK SIGNALS
MACHINE STATUS CYCLE LED CHECK
Machine OFF OFF
Machine on line but STAND/BY ON CONSTANT
CYCLE: washing, pause, rinsing ON CONSTANT
ALARM: lack of heating RAPID flashing
ALARM: door open RAPID flashing
Manual drain RAPID flashing
Regeneration cycle SLOW flashing
*REGENERATION ALARM SLOW flashing
* Can only be stopped by starting the regeneration cycle, or if it has not been
programmed at all.
Produktspecifikationer
| Varumärke: | Hoonved |
| Kategori: | Diskmaskin |
| Modell: | ST 53E |
Behöver du hjälp?
Om du behöver hjälp med Hoonved ST 53E ställ en fråga nedan och andra användare kommer att svara dig
Diskmaskin Hoonved Manualer

7 Mars 2025

31 December 2025

6 September 2024

4 September 2024

4 September 2024

4 September 2024

3 September 2024

2 September 2024

2 September 2024

1 September 2024
Diskmaskin Manualer
- Cylinda
- Kunft
- Kubo
- Profilo
- Elis And Elsa
- Tisira
- Respekta
- Emilia
- Rhima
- Oranier
- Proline
- KitchenAid
- Exquisit
- Point
- Elektra Bregenz
Nyaste Diskmaskin Manualer
21 Augusti 2025
21 Augusti 2025
21 Augusti 2025
21 Augusti 2025
21 Augusti 2025
21 Augusti 2025
21 Augusti 2025
20 Augusti 2025
20 Augusti 2025
20 Augusti 2025