Hotpoint SA2 844 H IX Bruksanvisning
Läs gratis den bruksanvisning för Hotpoint SA2 844 H IX (8 sidor) i kategorin Ugn. Guiden har ansetts hjälpsam av 5 personer och har ett genomsnittsbetyg på 4.7 stjärnor baserat på 3 recensioner. Har du en fråga om Hotpoint SA2 844 H IX eller vill du ställa frågor till andra användare av produkten? Ställ en fråga
Sida 1/8

EN
Quick guide
FIRST TIME USE
1. SETTING THE TIME
You will need to set the time when you switch on the appliance
for the rst time: Press icon and the two digits until the
for the hour start ashing on the display.
Use or to set the hour and press to con rm. The two
digits for the minutes will start ashing. Use o to set the
minutes and press to con rm.
Please note: When the
icon is flashing, for example following
lengthy power outages, you will need to reset the time.
2. HEAT THE OVEN
A new oven may release odors that have been left behind
during manufacturing: this is completely normal. Before starting
to cook food, we therefore recommend heating the oven with it
empty in order to remove any possible odors.
Remove any protective cardboard or transparent lm from the
oven and remove any accessories from inside it.
Heat the oven to 250 °C for about one hour. The oven must be
empty during this time.
Please note: It is advisable to air the room after using the appliance
for the first time.
FUNCTIONS & DAILY USE
CONVENTIONAL
For cooking any kind of dish on one shelf only.
FORCED AIR
For cooking di erent foods that require the same cooking
temperature on several shelves (maximum three) at the same
time. This function can be used to cook di erent foods without
odours being transferred from one food to another.
MAXI COOKING
For cooking large joints of meat (above 2.5 kg). We
recommend turning the meat over during cooking to ensure
that both sides brown evenly. We also recommend basting the
joint every so often to prevent it from drying out excessively.
PIZZA
For baking di erent types and sizes of pizza and bread. It
is a good idea to swap the position of the baking trays halfway
through cooking.
GRILL
For grilling steaks, kebabs and sausages, cooking
vegetables au gratin or toasting bread. When grilling meat, we
recommend using a Baking tray to collect the cooking juices:
position the pan on any of the levels below the wire shelf and
add 500 ml of drinking water.
TURBO GRILL
For roasting large joints of meat (legs, roast beef, chicken).
We recommend using a Baking tray to collect the cooking juices:
position the pan on any of the levels below the wire shelf and
add 500 ml of drinking water.
RISING
For helping sweet or savoury dough to rise e ectively. Turn
the thermostat knob to the icon to activate this function.
THANK YOU FOR BUYING A HOTPOINT
PRODUCT
In order to receive a more complete
assistance, please register your product on
www . hotpoint . eu/register
Before using the appliance carefully read the Safety
Instruction.
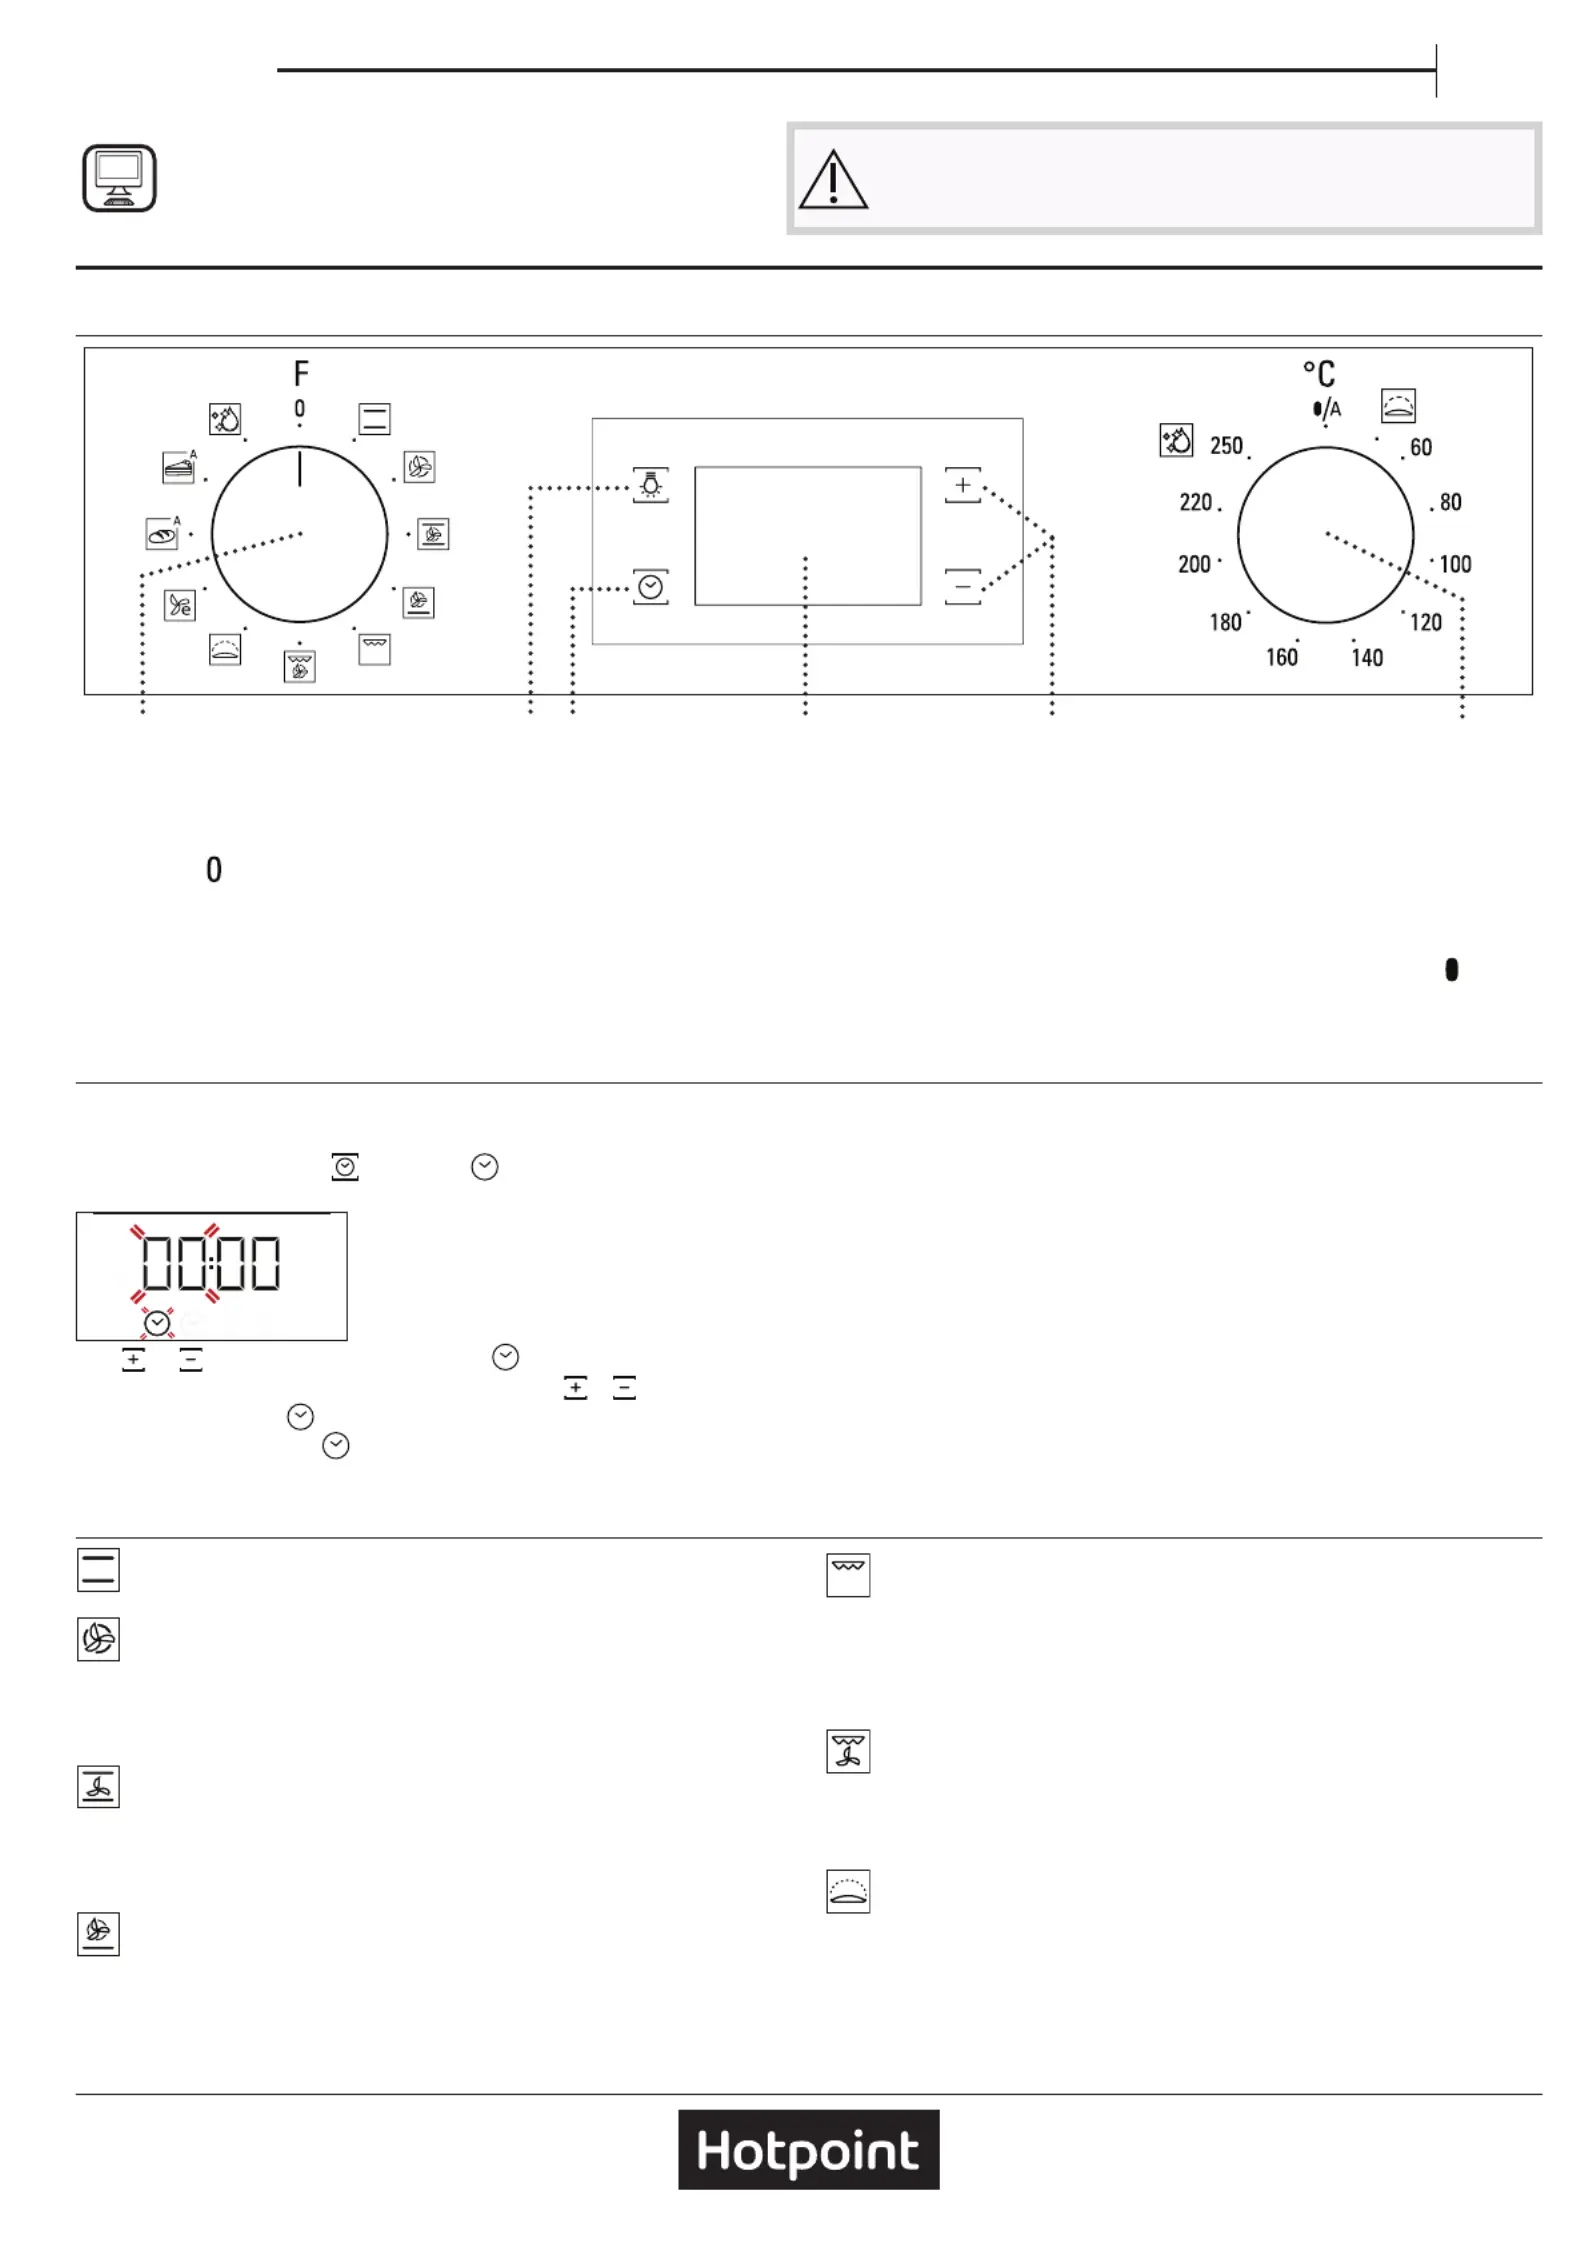
CONTROL PANEL DESCRIPTION
1 32 4 5 6
1. SELECTION KNOB
For switching the oven on by selecting a
function.
Turn to the position to switch the oven
o .
2. LIGHT
With the oven switched on, press to turn
the oven compartment lamp on or o .
3. SETTING THE TIME
For accessing the cooking time settings,
delayed start and timer.
For displaying the time when the oven is
o .
4. DISPLAY
5. ADJUSTMENT BUTTONS
For changing the cooking time settings
6. THERMOSTAT KNOB
Turn to select the temperature you
require when activating manual
functions.
For automatic functions keep on
/A.

ECO FORCED AIR
For cooking roasts and stued roasting joints on a single
shelf. Food is prevented from drying out excessively by gentle,
intermittent air circulation. When this ECO function is in use, the
light will remain switched o during cooking but can be switched
on again by pressing .
BREAD AUTO
This function automatically selects the ideal temperature
and baking time for bread. For best results, carefully follow the
recipe. Activate the function when the oven is cold.
PASTRY AUTO
This function automatically selects the ideal temperature
and baking time for cakes. Activate the function when the oven
is cold.
DIAMOND CLEAN
For The action of the steam released during this special
low-temperature cleaning cycle allows dirt and food residues to be
removed with ease. Pour 200 ml of drinking water on the bottom of
the oven and only activate the function when the oven is cold.
1. SELECT A FUNCTION
To select a function, turn the to the symbol forselection knob
the function you require: the display will light up and an audible
signal will sound.
2. ACTIVATE A FUNCTION
To start the function you have selected, turn the thermostat knob
to set the temperature you require.
To interrupt the function at any time, switch o the oven, turn
the selection knob and the .thermostat knob to
Please note: During cooking you can change the function by
turning the selection knob or adjust the temperature by turning
the thermostat knob.
The function will not start if the thermostat knob is on 0 °C. You can
set the cooking time, cooking end time (only if you set a cooking
time) and a timer.
AUTOMATIC
To start the automatic function you have selected (“Bread”
or “Pastry”), keep the thermostat knob at the position for
automatic functions (
/A).
To nish cooking, turn the selection knob to position .
Please note: You can set the cooking end time and timer.
RISING
To start the “Rising” function, turn the thermostat knob to the
relevant symbol; if the oven is set to a dierent temperature, the
function will not start.
Please note: You can set the cooking time, cooking end time (only
if you set a cooking time) and a timer.
3. PREHEATING AND RESIDUAL HEAT
Once the function starts, an audible signal and a ashing icon
on the display indicate that the preheating phase has been
activated. At the end of this phase, an audible signal and the
xed icon on the display will indicate that the oven has
reached the set temperature: at this point, place the food inside
and proceed with cooking.
Please note: Placing the food in the oven before preheating has
finished may have an adverse effect on the final cooking result.
After cooking and with the function deactivated, the icon
may continue to remain visible on the display even after the
cooling fan has switched o to indicate that there is residual
heat in the compartment.
Please note: The time after which the icon switches off varies
because it depends on a series of factors such as ambient
temperature and function used. In any case, the product should be
considered to be off when the pointer on the selection knob is at
“ ”.0
4. PROGRAMMING COOKING
You will need to select a function before you can start
programming cooking.
DURATION
Keep pressing
until the icon and “00:00” start ashing
on the display.
Use or to set the cooking time you require, then press
to conrm.
Activate the function by turning the thermostat knob to the
temperature you require: an audible signal will sound and the
display will indicate that cooking is complete.
Notes: To cancel the cooking time you have set, keep pressing
until the icon starts flashing on the display, then use
to reset the cooking time to “00:00”. This cooking time includes a
preheating phase.
PROGRAMMING THE END COOKING TIME/DELAYED START
After a cooking time has been set, starting the function can be
delayed by programming its end time: press
until the icon
and the current time start ashing on the display.
U
se o to set the time you want cooking to end and press r
to nrm. co
Activate the function by turning the thermostat nob k to the
temperature ou quire: he unction ill main aused ntil y re t f w re p u
it starts automatically after the period of time that has been
calculated in order forcooking to nish at the time you have set.
Notes: To cancel the setting, switch the oven off by turning the
selection knob to the position.
Notes: Delay to start functionality is not available for Grill and
Turbo Grill functions.
END OF COOKING
An audible signal will sound and the display will indicate that
the function has finished.
Turn the to select a dierent function or to selection knob
position “ ” to switch the oven o.
Please note: If the timer is active, the display will show “END”
alternately with the remaining time.
5. SETTING THE TIMER
This option does not interrupt or program cooking but allows
you to use the display as a timer, either during while a function is
active or when the oven is o.
Keep pressing
until the icon and “00:00” start ashing on
the display.
Use or to set the time you require and press to conrm.

An audible signal will sound once the timer has nished
counting down the selected time.
Notes: To cancel the timer, keep pressing
until the icon
starts flashing, then use to reset the time to “00:00”.
6. DIAMOND CLEAN FUNCTION
To activate the “Diamond Clean” cleaning function, pour 200
ml of drinking water into the bottom of the oven, then turn the
selection knob and the thermostat knob to the
icon.
Please note: The position of the icon does not correspond to the
temperature reached during the cleaning cycle.
The function will activate automatically: the display shows the
time remaining to the end, alternating with “DC”.
Please note: It is only possible to programme the end time of this
function. The duration is automatically set to 35 minutes.
COOKING TABLE
RECIPE FUNCTION PREHEAT
TEMPERATURE
(°C)
DURATION
(MIN)
LEVEL AND
ACCESSORIES
Leavened cakes
Yes 170 30 - 50
2
Yes 160 30 - 50
2
Yes 160 40 - 60
4 1
Biscuits/tartlets
Yes 160 25 - 35
3
Yes 160 25 - 35
3
Yes 150 35 - 45
4 2
Pizza / Focaccia
Yes 190 - 250 15 - 50
1/2
Yes 190 - 250 20 - 50
4 2
Lasagne / baked pasta / cannelloni / ans 190 - 200 45 - 65Yes
2
Lamb / veal / beef /pork 1 kg 190 - 200 80 - 110Yes
3
Chicken/rabbit/duck 1 kg 200 - 230 50 - 100Yes
2
Baked sh/en papillote 0,5 kg
(llets, whole)
Yes 170 - 190 30 - 45
2
Toasted bread 5’ 250 2 - 6
5
Roast potatoes Yes 200 - 210 35 - 55 **
3
** Turn food two thirds of the way through cooking (if necessary).
The level is indicated on the wall of the cooking compartment.
The time indicated does not include the preheating phase:
we recommend placing the food in the oven and setting the
cooking time only after the required temperature has been
reached.
Download the complete Use and Care Guide from
docs . hotpoint.eu for the table of tested recipes, compiled for
the certication authorities in accordance with the standard IEC
60350-1.
ACCESSORIES
Wire shelf
Baking dish or cake tin
on the wire shelf
B
aking tray/Drip tray or Baking
dish on the wire shelf
Drip tray / Baking tray
with 200 ml of water
Produktspecifikationer
Varumärke: | Hotpoint |
Kategori: | Ugn |
Modell: | SA2 844 H IX |
Behöver du hjälp?
Om du behöver hjälp med Hotpoint SA2 844 H IX ställ en fråga nedan och andra användare kommer att svara dig
Ugn Hotpoint Manualer
18 Augusti 2025
18 Augusti 2025
18 Augusti 2025
14 Augusti 2025
5 Augusti 2025
4 Augusti 2025
4 Augusti 2025
4 Augusti 2025
4 Augusti 2025
4 Augusti 2025
Ugn Manualer
- Etna
- Coyote
- Micromaxx
- Gys
- Konig
- Westinghouse
- Lincoln
- Navitel
- Mellerware
- Elica
- BSK
- Concept
- Tecnolux
- Pando
- Moulinex
Nyaste Ugn Manualer
14 September 2025
14 September 2025
14 September 2025
14 September 2025
14 September 2025
14 September 2025
14 September 2025
14 September 2025
14 September 2025
14 September 2025