Icom OPC-2389 Bruksanvisning
Icom ej kategoriserat OPC-2389
Läs gratis den bruksanvisning för Icom OPC-2389 (2 sidor) i kategorin ej kategoriserat. Guiden har ansetts hjälpsam av 8 personer och har ett genomsnittsbetyg på 4.7 stjärnor baserat på 6 recensioner. Har du en fråga om Icom OPC-2389 eller vill du ställa frågor till andra användare av produkten? Ställ en fråga
Sida 1/2
CONNECTION CABLE
INSTRUCTIONS
Thank you for choosing this Icom product.
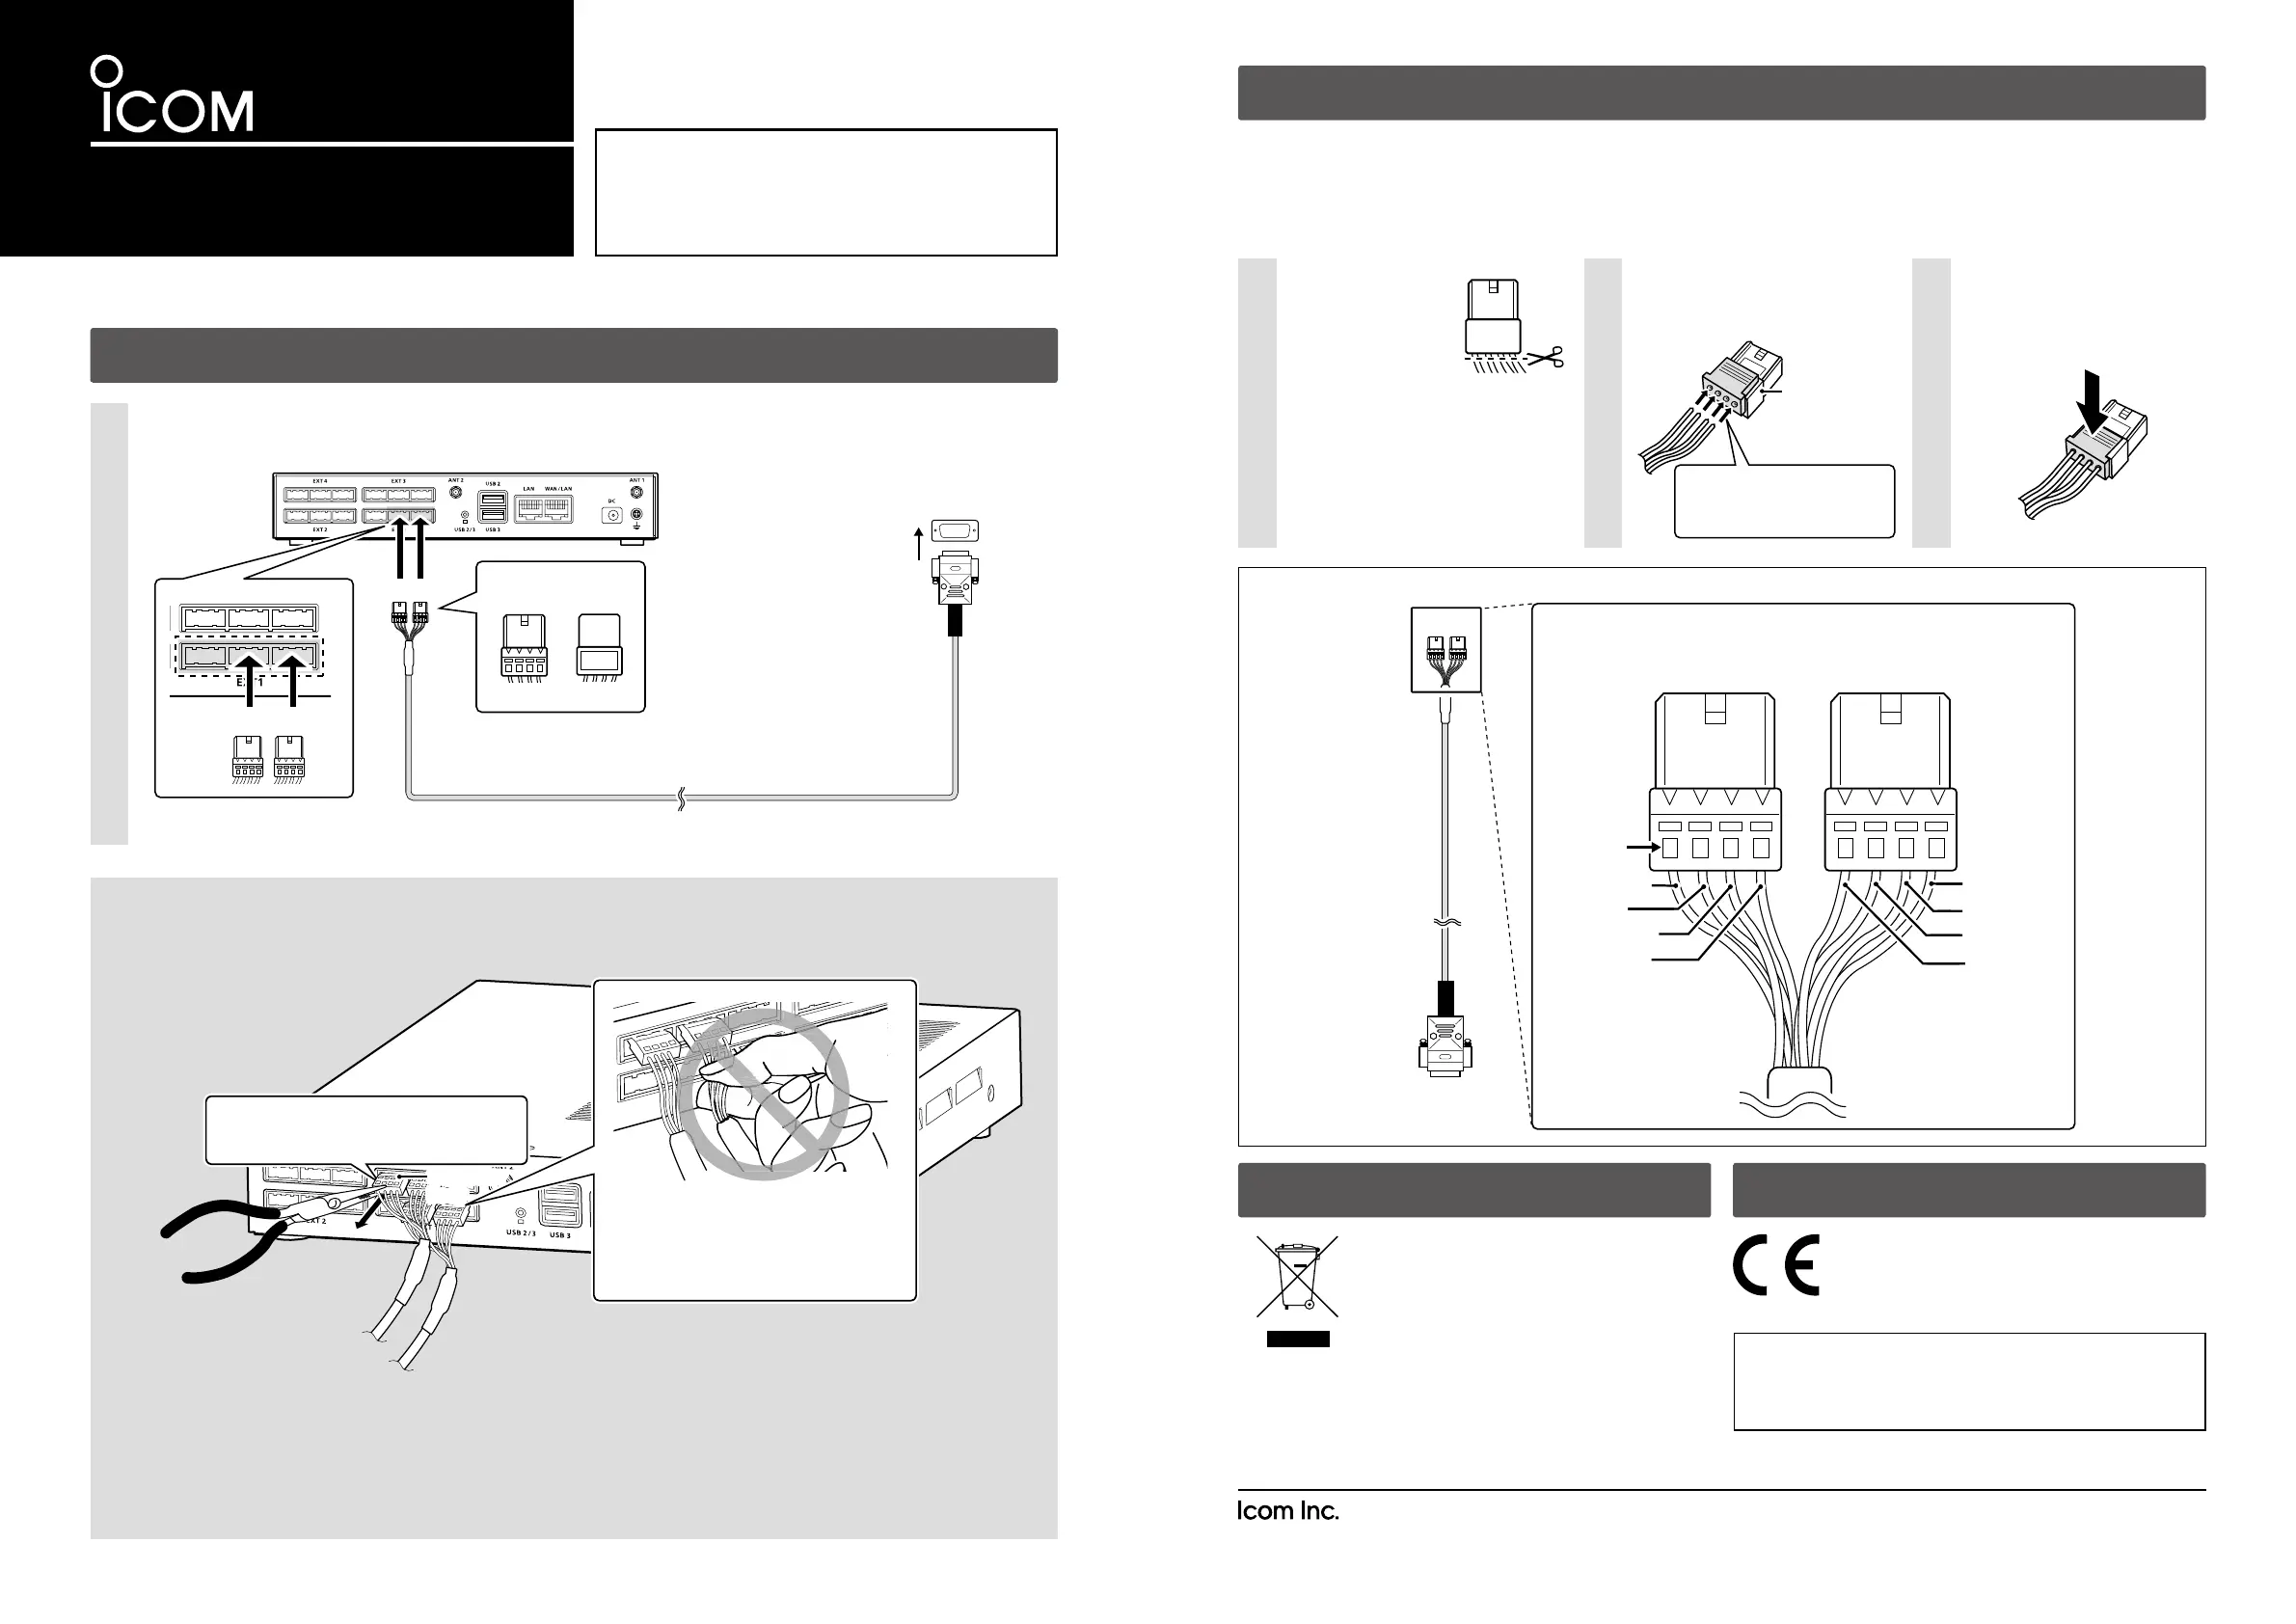
The OPC-2389 connection cable is used to connect a
serial communication device to the VE-PG3 or VE-PG4.
READ ALL INSTRUCTIONS carefully and completely
before using this product.
Turn OFF the all devices that are connected to the VE-PG3 or VE-PG4, and then connect the OPC-2389, as shown below.
1
CONNECTING THE OPC-2389
CAUTION
• Verify that both the serial communication and the VE-PG3 or VE-PG4 are turned OFF when connecting or disconnecting
the cable.
• Hold the connector body when connecting or disconnecting them.
• Never bend or pinch the cable.
• Never place a heavy object on the cable.
• Never touch the cable with wet hands.
•
Always connect the cable correctly. An incorrect connection could damage the VE-PG3 or VE-PG4 and/or the connected device.
• Never add a pulling tension to the cable.
• Never use the OPC-2389 with any device other than VE-PG3 and VE-PG4.
Some serial communication devices may not be used.
VE-PG4 (Rear view)
OPC-2389
•
This is an example of connecting a serial communication device to the [EXT1] port.
A1~A4A1~A4B1~B4B1~B4C1~C4C1~C4
A1~A4
A1~A4B1~B4B1~B4C1~C4C1~C4
A1~A4
A1~A4B1~B4B1~B4C1~C4C1~C4
A1~A4
A1~A4B1~B4B1~B4C1~C4C1~C4
BC
Be sure to insert the
connectors top side up.
Bottom
To a serial communication device
Top
B
1234
qtrew
yoiu
BC
When other cables are connected, you can
use needle-nose pliers to carefully insert or
remove connectors.
VE-PG4 (Rear view)VE-PG4 (Rear view)
Needle-nose pliersNeedle-nose pliers
NEVER pull the connector by holding the
cable. This will damage the cable.
*If the cable becomes damaged, replace the
connector(s). See “REPLACING THE
CONNECTOR” to the right for replacement
details.
Connector
body
Connector
body
REPLACING THE CONNECTOR
If the cable becomes damaged, replace the connector(s). Make wire connections as described below.
• Spare connectors*
1
are supplied with the VE-PG3 or VE-PG4.
• If reconnecting is repeated about 30 times, replace the connector.
*
1
Manufacturer: DDK. Name: 232D-04S1B-DA5-FA
DO NOT lock the connector parts before inserting all wires.
Press the clear insert down
until it locks in place.
• After the insert is locked, it is
impossible to release it again.
3
Insert the wires into the holes
according to the assigned pin
numbers.
2
Connector
(Supplied with
the VE-PG3
or VE-PG4)
Connector
(Supplied with
the VE-PG3
or VE-PG4)
The wires for each hole
are assigned by color. See
the illustration below.
OPC-2389
BC
Pin No.
OrangeOrange
BlueBlue
YellowYellow
GrayGray
B
Connector top (Expanded view)
BrownBrown
GreenGreen
PurplePurple
RedRed
C
12341234
OPC-2389 connection and wires assignment
Icom and the Icom logo are registered trademarks of Icom Incorporated (Japan) in Japan, the United States, the United
Kingdom, Germany, France, Spain, Russia, Australia, New Zealand, and/or other countries.
A7471X-1J-2
Printed in Japan
© 2018–2023 Icom Inc.
1-1-32 Kamiminami, Hirano-ku, Osaka 547-0003, Japan
Jan. 2023
OPC-2389
Cut the wires*
2
*
3
near the connector.
*
2
Remove the cable
from the VE-PG3
or VE-PG4, before
cutting the wires.
*
3
DO NOT cut the wires too short.
Otherwise it will be difficult to
reconnect them to the VE-PG3 or VE-
PG4.
1
1234
DISPOSAL
The crossed-out wheeled-bin symbol on your
product, literature, or packaging reminds you
that in the European Union, all electrical and
electronic products, batteries, and
accumulators (rechargeable batteries) must
be taken to designated collection locations at
the end of their working life. Do not dispose of these products
as unsorted municipal waste. Dispose of them according to
the laws in your area.
ABOUT CE
Versions of the OPC-2389 which have the “CE”
symbol on the product comply with the essential
requirements of the 2014/30/EU directive for
Electromagnetic Compatibility.
Below statement is for UKCA purpose only
United Kingdom Authorised Importer: Icom (UK) Ltd.
Address: Blacksole House, Altira Park, Herne Bay, Kent,
CT6 6GZ, U.K.
Produktspecifikationer
| Varumärke: | Icom |
| Kategori: | ej kategoriserat |
| Modell: | OPC-2389 |
Behöver du hjälp?
Om du behöver hjälp med Icom OPC-2389 ställ en fråga nedan och andra användare kommer att svara dig
ej kategoriserat Icom Manualer

8 Mars 2026
12 September 2025
10 September 2025
10 September 2025
10 September 2025
10 September 2025
10 September 2025
10 September 2025
10 September 2025
10 September 2025
ej kategoriserat Manualer
Nyaste ej kategoriserat Manualer
3 April 2026
3 April 2026
3 April 2026
3 April 2026
3 April 2026
3 April 2026
3 April 2026
3 April 2026
3 April 2026