Indesit YT M11 83K RX EU Bruksanvisning
Indesit Torktumlare YT M11 83K RX EU
Läs gratis den bruksanvisning för Indesit YT M11 83K RX EU (7 sidor) i kategorin Torktumlare. Guiden har ansetts hjälpsam av 14 personer och har ett genomsnittsbetyg på 4.0 stjärnor baserat på 6 recensioner. Har du en fråga om Indesit YT M11 83K RX EU eller vill du ställa frågor till andra användare av produkten? Ställ en fråga
Sida 1/7
THANK YOU FOR BUYING AN INDESIT PRODUCT.
In order to receive a more complete assistance,
please register your product on
www.indesit.eu/register
Policies, standard documentation, ordering of spare parts and additional product information can be found by:
• Using QR codein your appliance
• Visiting our websitedocs.indesit.eu and parts-selfservice.whirlpool.com
• Alternatively,contact our After-sales Service (See phone number in the warranty booklet). When contacting our After-sales
Service, please state the codes provided on your product's identication plate.
EN
Before using the appliance carefully
read the Safety Instruction.
PLEASE SCAN THE QR CODE ON YOUR APPLIANCE IN ORDER TO REACH MORE INFORMATION.
Quick guide
Before using the appliance carefully
read the Safety Instruction.
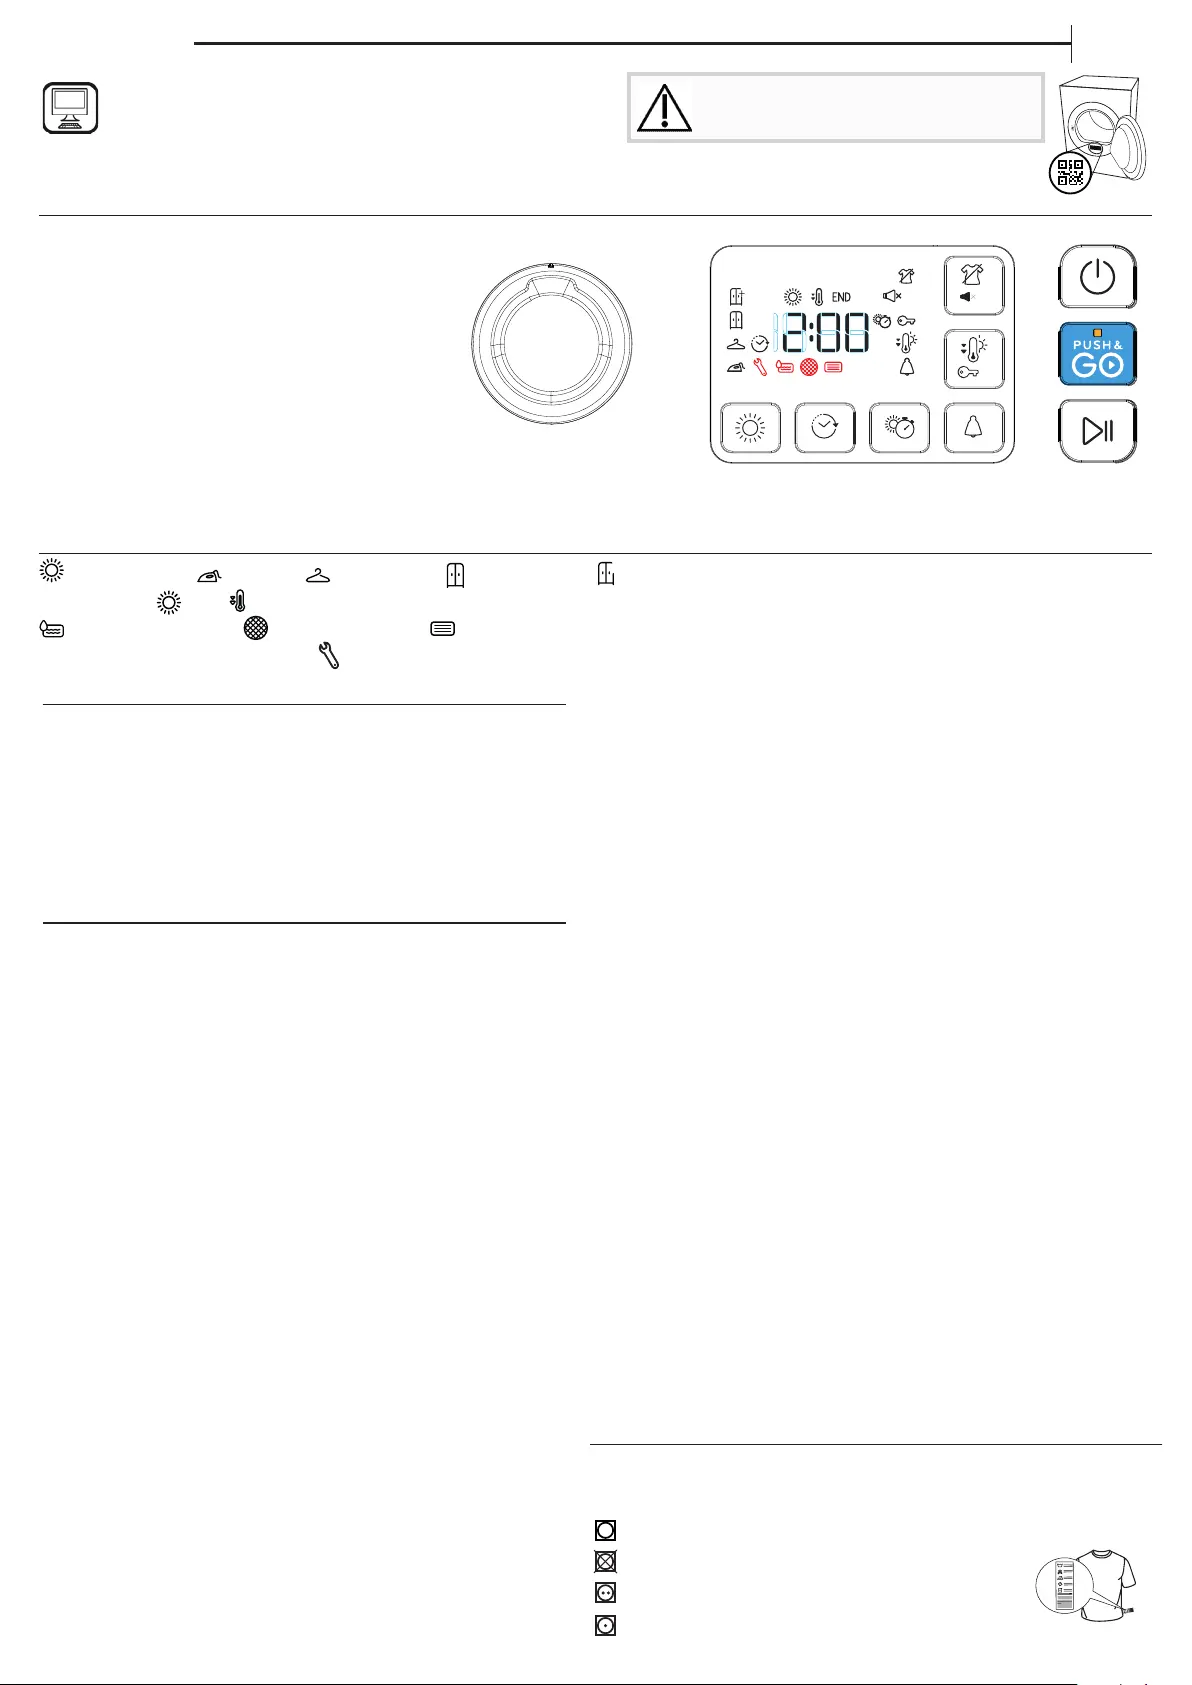
CARE LABEL
Always check the care labels, especially when placing garments in
the tumble dryer for the rst time. Below are the most commonly
used symbols:
May be tumble dried.
Do not tumble dry.
Tumble dry – high heat.
Tumble dry – low heat.
DAILY USE
Doing this will keep your machine working at its BEST:
- remember to empty your water tank after each drying
cycle.
- remember to clean your lters after each drying cycle.
Refer to the Care & Maintenance section.
1. Plug the dryer into the power supply socket.
2. Open the door and load garments; always refer to instructions
on clothing labels and the max loads indicated in the
programme section. Empty pockets. Make sure garments do not
get caught between the door and/or the door lter. Do not load
items that are dripping wet. Do not tumble dry large, very bulky
items. For optimal drying result, garments should be loaded one
by one.
3. Close the door.
4. Press the "On/O" button.
5. Select the most suitable programme
for the type of fabric in
that load.
6. Select the options, if necessary.
7. Press the "
Start/Pause"
button to begin drying.
8. At the end of the drying cycle, a buzzer will beep. An indicator
on the control panel signals the end of the cycle. Turn the
machine o by pressing the "On/O" button, open the door and
pull the clothing immediately out to prevent the formation of
creases on laundry.
If the machine is not switched o manually, after about a quarter
of an hour from the end of the cycle , the appliance turns o
automatically to save energy.
Note that some programme/option accords with "Crease Care"
system. This means that for some hours, after the end of the
drying cycle, the drum rotates at regular intervals to prevent the
formation of creases.
Note that some models perform a nal cool tumble phase, for this
reason the fabrics may not feel hot.
In case of power failure, it is necessary to press the "Start/Pause"
button to restart the cycle.
PUSH & GO
This function serves to start a cycle, after machine switching on,
without enabling any further button an/or knob (the programme
PUSH & GO will be deactivated instead).
It is always necessary to follow the points 1, 2, and 3 concerning
the daily use.
To start the cycle PUSH & GO, keep the button pressed. The light on
signals that the cycle is started. The cycle is suitable for cotton and
synthetic textiles. Max. load 4 kg. (Cycle duration 100’).
If the door is opened during the cycle, to restart it, close the door and
press the button START/PAUSE. This programme does not allow to
set other options.
Opening the door during the cycle
The tumble dryer door can be opened at any time during the cycle
to check progress and remove any garments already dry.
However, since opening the door can extend the drying time, the
recommendation is to keep the door closed throughout the cycle
process to save time and energy.
After closing the door, press the "Start/Pause" button within 15
minutes to resume the machine operation.
FIRST TIME USE
Make sure that the water tank is correctly inserted. Make sure
that the drain hose on the back of the dryer is properly xed,
either to the dryers's water tank or to the domestic sewage
system.
The dryer must be installed in a room with a temperature
ranging between 5°C and 35°C to ensure proper operation.
Before you use your dryer ensure that it has been in a upright
position for at least 6 hours.
CONTROL PANEL
1 ON/OFF button (hold for Reset)
2 Programme selection knob
3 Start/Pause
4 Push & Go
Options buttons*
5 Dryness level
6 Start delay
7 Timed drying
8 Cycle end
9 Light drying (hold for Key Lock)
10 Crease care ( hold for Mute)
*Note: some models may have the wording in full instead of the icons.
INDICATORS
Dryness level: Iron dry - Hanger dry - Cupboard dry -
+
Extra dry
Cycle phase: Dry - Cool tumble - END End of cycle
Empty water tank - Clean door lter - Clean bottom lter
Refer to Troubleshooting section: Failure call After-sales Service
start delay
1
3
2
4
10
8
9
567
DEMO
3’’
3’’
Produktspecifikationer
| Varumärke: | Indesit |
| Kategori: | Torktumlare |
| Modell: | YT M11 83K RX EU |
| Inbyggd display: | Ja |
| Vikt: | 44000 g |
| Bredd: | 595 mm |
| Djup: | 649 mm |
| Höjd: | 849 mm |
| Årlig energiförbrukning: | 175 kWh |
| Energiförbrukning: | 1.42 kWh |
| Torksystem: | Värmepump |
| Sladdlängd: | 1.5 m |
| Närfältskommunikation (NFC): | Nej |
| Justerbara fötter: | Ja |
| Nominell kapacitet: | 8 kg |
| Indikator för full vattentank: | Ja |
| Torkprogram: | Wool, Sport, Timed, Quick, Freshen-up, Shoes, Blanket, Blouse/shirt, Cotton, Synthetics |
| Produktens färg: | Vit |
| Kontrolltyp: | Buttons, Rotary |
| Vikt inkl. förpackning: | 46500 g |
| Justerbar torknivå: | Ja |
| Apparatens placering: | Fristående |
| Gångjärnssida: | Höger |
| Energieffektivitetsskalning: | A+++ till D |
| Ström: | 10 A |
| Ljudnivå Lc IEC: | 65 dB |
| Laddning: | Frontmatad |
| Strömväxlingsteknik: | Ja |
| Drum volym: | 120 l |
| Dörr färg: | Black, White |
| Fördröjd start timer: | Ja |
| Fördröjd start: | 24 h |
| Återstående tidindikering: | Ja |
| Strömförbrukning i vänteläge: | 1 W |
| Ansluten effekt: | 700 W |
| Strömförbrukning i avslaget läge: | 0.5 W |
| Skrynkelreducering: | Ja |
| Periodlängd: | 165 min |
| Alarm: | Ja |
| Innerbelysning: | Nej |
| Wi-Fi-styrning: | Nej |
| Dörrstil: | Lucka med glasfönster |
Behöver du hjälp?
Om du behöver hjälp med Indesit YT M11 83K RX EU ställ en fråga nedan och andra användare kommer att svara dig
Torktumlare Indesit Manualer

4 September 2025
31 Augusti 2025
20 Augusti 2025
19 Augusti 2025
19 Augusti 2025
19 Augusti 2025
19 Augusti 2025
19 Augusti 2025
19 Augusti 2025
19 Augusti 2025
Torktumlare Manualer
Nyaste Torktumlare Manualer
3 April 2026
1 April 2026
1 April 2026
31 Mars 2026
30 Mars 2026
30 Mars 2026
30 Mars 2026
29 Mars 2026
29 Mars 2026
28 Mars 2026