Klein Tools 60249 Bruksanvisning
Läs nedan 📖 manual på svenska för Klein Tools 60249 (4 sidor) i kategorin Inte kategoriserad. Denna guide var användbar för 10 personer och betygsatt med 3.5 stjärnor i genomsnitt av 5.5 användare
Sida 1/4

60248
60105
60100
NOTE: This label is representative; contents will vary based on model #.
NOTA: esta etiqueta es representativa; los contenidos variarán según el n.º del modelo #.
REMARQUE: Cette étiquette est fournie à titre indicatif; son contenu varie en fonction du modèle #.
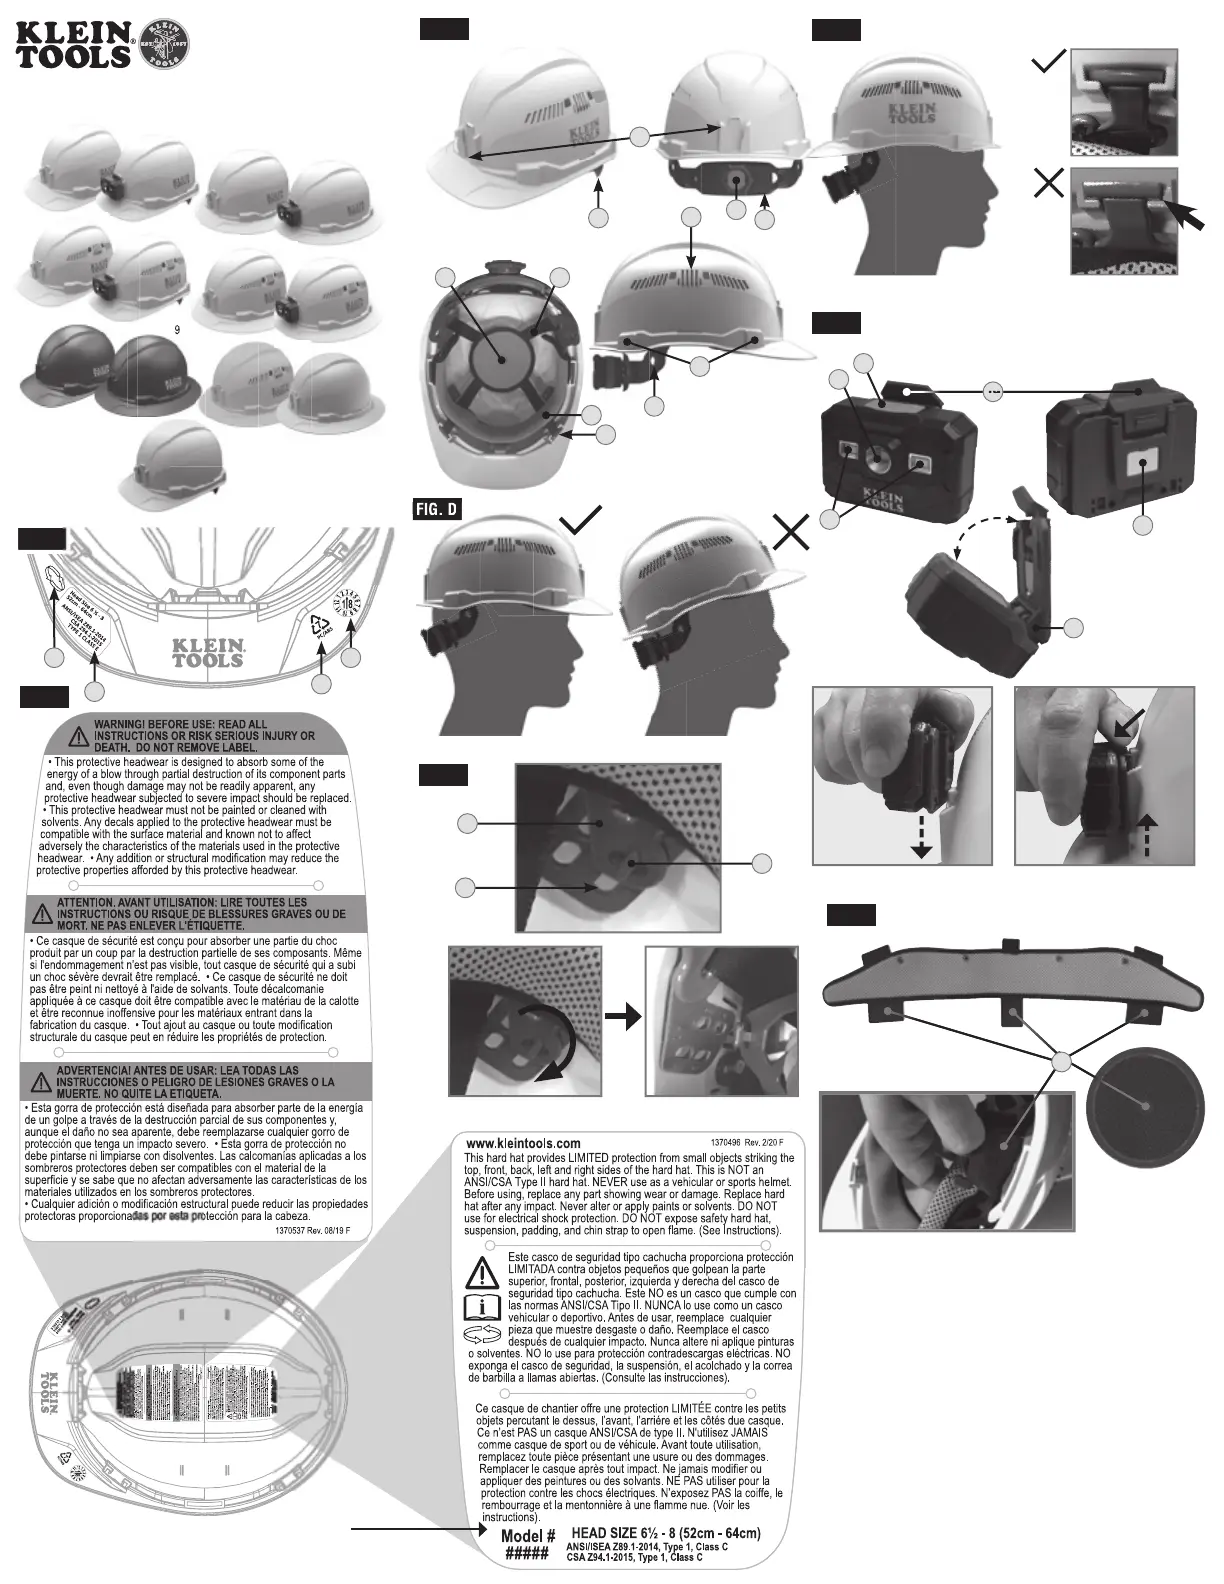
Instructions for Hard Hats
Instrucciones para cascos de seguridad
Instructions pour les casques de chantier
BASED ON: 1390408 Rev 02/22 F
FIG. A
1 4
3
2
FIG. B
FIG. D
FIG. F
FIG. G
FIG. H
6
510
9
1413
11
12
15
8
7
FIG. E
16
18
17
25
23
20
21
22
24
64°
19
FIG. C
60107RL 60400
60113RL
6024
60406RL
60401 60407RL
60262
60489
Models / Modelos / Modèles :
60100, 60105, 60107RL, 60113RL,
60248, 60249, 60262, 60400, 60401,
60406RL, 60407RL, 60489, 60535
60535

GENERAL SPECIFICATIONS
• Standards: These Klein Tools Hard Hats comply with Type I ANSI/
ISEA Z89.1-2014, CSA Z94.1-15:
• Class E non-vented Hard hats have been tested up to 20kV.
EN397:2012+A1:2012 (Clauses listed only):
• 5.2.4-Lateral Deformation (LD)
EN12492:2012 (Listed clauses only):
• 4.2.1.2-Front Energy Absorption Capacity
• 4.2.1.3-Side Energy Absorption Capacity
• 4.2.1.4-Rear Energy Absorption Capacity
• Fits: Head Sizes 6-1/2 to 8 (20-1/2 to 25 inches / 52 to 64 cm)
SYMBOLS ON PRODUCT (FIG. A)
1
Reverse donning logo
2
Compliant Standards, Class, Type, and Head Size information
3
Recycling Code and material type
4
Date of manufacture
WARNING LABELS (FIG. B)
There are two warning labels affixed to the inside of this hard hat.
Read, understand, and follow these instructions to ensure safe
operation. REMOVE THESE LABELS.DO NOT
WARNINGS
READ ALL INSTRUCTIONS. FAILURE TO FOLLOW THESE WARNINGS
AND INSTRUCTIONS MAY RESULT IN SERIOUS BODILY INJURY OR
DEATH.
• This hard hat provides LIMITED protection from small objects
striking top, front, back, left and right sides of the hard hat. This is
NOT an ANSI/CSA Type II hard hat.
• DO NOT expose suspension and padding to open flame.
• ELECTRICAL WARNING: Avoid areas where the chance of electrical
shock exists. Non-vented versions meet Class E requirements by
providing limited electrical protection. Class C vented models provide
NO electrical protection.
• IMMEDIATELYIf the hard hat has sustained an impact, dispose of it ,
even if damage is not visible.
• NEVER alter, puncture, modify or engrave the shell or the
suspension.
• DO NOT use paints, solvents, chemicals, adhesives, gasoline or like
substances on this hard hat – doing so can lessen the protection
offered against impact and penetration.
• DO NOT use this hard hat as a vehicular or recreational hard hat.
• DO NOT
store objects between the suspension and the shell, as the
hard hat will not function as intended and can lessen the protection
from impact and penetration.
• Exposure to direct sunlight, corrosive environments, and/or extreme
temperatures below -40°F (-40°C) or above 120°F (49°C) can lessen
the ability of the hard hat to withstand impact and penetration.
MAINTENANCE
HARD HAT CLEANING AND STORAGE
• Clean the hard hat and suspension with mild soap and water only.
Rinse and wipe dry. Clean optional chin strap with damp cloth only.
Store in a cool place.
• See SWEATBAND AND TOP COMFORT PAD section of the operating
instructions (on other side) for additional maintenance information.
INSPECTION AND REPLACEMENT
Inspect the hard hat, including the suspension and shell, before and
after each use:
• Check the Hard Hat’s shell for any cracks, breakage, discoloration,
chalky appearance, or any other damage, excessive wear or
unusual condition. These conditions may indicate reduced impact
or penetration resistance and the Hard Hat must be replaced
IMMEDIATELY.
• The suspension and optional chin strap should be checked
for cracks, breaks, damaged stitching or any other damage,
excessive wear or unusual condition. If any of these conditions
exist, the suspension and optional chin strap must be replaced
IMMEDIATELY.
• Always use genuine Klein Tools replacement parts. This product
works as a system, and use of unauthorized suspensions may
reduce the protection you receive from this hard hat.
USEFUL LIFE
SUSPENSION AND OPTIONAL CHIN STRAP: Must be replaced after
no more than 12 months of use.
ENTIRE HARD HAT: Entire Hard Hat should be replaced after 2
years of use, or no more than 5 years from the date of manufacture,
whichever comes first.
These are useful service life guidelines. Regular inspection as
detailed in the MAINTENANCE section above MUST be performed,
and may result in possible earlier replacement.
NOTE: This replacement schedule is a guideline that assumes
normal use and storage conditions for the hard hat. If the hard
hat is exposed to temperature extremes, persistent sunlight,
or chemicals, replacement may be required in a shorter time
frame.
WARRANTY
www.kleintools.com/warranty
ACCESSORIES AND REPLACEMENT PARTS
Klein Tools hard hat accessories and replacement parts are
available online or at major distributors:
• KHHSPN: Replacement Suspension
• KHHSWTBND: Sweatband (3-pack)
• KHHTOPPAD: Top Comfort Pad (3-pack)
• KHHSTRP: Chin Strap
• 56049: Rechargeable Light Array Headlamp (Flood only)
• 56062: Rechargeable Headlamp / Worklight (Spot/Flood)
• 56048: Rechargeable Auto-Off Headlamp (Spot/Flood)
• 56063: Safety Lamp
• 60156: Intrinsically Safe LED Headlamp
NOTE: KLEIN TOOLS CANNOT GUARANTEE THAT THIRD-
PARTY ACCESSORIES WILL PERFORM OR FIT OPTIMALLY
WITH KLEIN TOOLS HARD HATS.
DISPOSAL / RECYCLE
Do not place hard hat or its accessories in the trash. Items must
be properly disposed of in accordance with local regulations.
See www.epa.gov/recycle for additional information.
CUSTOMER SERVICE
KLEIN TOOLS, INC.
450 Bond Street, Lincolnshire, IL 60069 1-800-553-4676
customerservice@kleintools.com www.kleintools.com
ENGLISH
ADJUSTMENTS (FIG. E)
STEP 3: Verify the hard hat fits properly. Follow the steps
in the FITTING section to ensure proper fit. Ensure that
accessories you plan to use fit and function properly while
maintaining the hard hat’s ability to perform its function
optimally. Check with a qualified safety expert, if unsure.
NOTE: The suspension strap lengths are xed and cannot be
adjusted. DO NOT attempt to alter.
REVERSE DONNING (FIG. F)
NOTE:
Some jobsites may not permit reverse donning - Check
with your jobsite's Safety Supervisor before changing your
hard hat to this con guration.
STEP 1: Place your forefinger under the strap anchor, and
your thumb over the anchor slot
11
. Push up with forefinger
using enough force to release the anchor from the slot.
Do this for all anchor slots (4 total).
NOTE: DO NOT pull
on the suspension straps to free the anchor. This could
permanently damage the straps, preventing them from
performing as intended.
STEP 2: Make any height adjustments for the suspension
before installation.
STEP 3: Push down each anchor until a click is heard and the
anchor cannot be pushed down any further. Do this for all 4
anchors.
NOTE: DO NOT use sharp tools that may damage
the anchors, or pull on the straps to secure the anchors.
STEP 4: Check proper installation by pushing up on all 4
anchor bases. The anchors should remain fully seated in their
slots. If not, repeat STEP 3.
STEP 5: Verify the hard hat fits properly. Follow the steps in
the FITTING section to ensure proper fit. Also ensure that
accessories you plan to use fit and function properly while
maintaining the hard hat’s ability to perform optimally.
SWEATBAND AND TOP COMFORT PAD (FIG.H)
Klein Tools hard hats come with an advanced sweatband
and top comfort pad designed to wick away sweat. They are
machine washable in a normal wash cycle. Do NOT wash with
bleach or with detergents containing bleach. Machine dry on
normal or low heat setting only.
The sweatband and top comfort pad can be easily removed and
reinstalled on the suspension:
• The top comfort pad is held in place by a single hook-and-
loop pad
25
.
• The sweatband is held in place by four suspension hooks
26
and three hook-and-loop pads
25
,
on the side and front. To
remove, simply detach all hook-and-loop pads and slide the
sweatband off the suspension hooks.
VENTS (C-CLASS ONLY)
Klein Tools Class C hard hats have vents and shutters on both
sides. The vents can be adjusted by simply sliding the shutter
tabs
7
up or down.
The vents and shutters will NOT prevent vapors, liquids,
or debris smaller than the vents from entering the hard hat.
56062 HEADLAMP (FIG.G)
The optional 56062 is a rechargeable headlamp designed
specifically for Klein hard hats that have the integrated front
and rear accessory slots. It functions as a spot light or flood
light, and has magnet to attach onto magnetic surfaces for
use as a worklight. Charging cable is included with models
that include rechargeable headlamps.
19
Release tab
22
Flood lights
20
On/Off/Mode button
23
Magnet
21
Spot light
24
Pivoting mount
The 56062 can be attached to both the front and back of the hard hat
via the Klein Tools accessory slot. It can be tilted up to 64 degrees on
the hard hat and stand alone as a worklight.
To install the headlamp onto a Klein hard hat, align the pivoting
mount
24
with the Klein Tools accessory slot
6
on the hard
hat and push down until the headlamp clicks securely into
place.
To remove the headlamp, press forward on the Release Tab
19
, and lift the headlamp out of the accessory slot.
REFLECTIVE STICKERS (FIG. C)
Klein Tools hard hats come with four reflective stickers. For
optimal performance, affix only to the designated areas
15
.
Do NOT apply stickers in areas that will impede the functionality
of accessories or of the hard hat itself.
FEATURE DETAILS (FIG.C)
5
Universal accessory slots
12
Washable sweatband
6
Klein Tools accessory slots
13
Washable top comfort pad
7
Vents with shutter
(C-Class only)
14
Suspension straps
8
Pivot adjustment
15
Re ective sticker locations
9
Size adjustment knob
16
Suspension bracket
10
Rear neck pad
17
Bracket key
11
Suspension strap
anchor slots
18
Bracket key slots
FITTING (FIG. D)
All hard hats come with suspension pre-installed at factory settings.
The suspension can be adjusted to ensure proper and secure fit to
your head for maximum protection. Follow the steps below:
STEP 1: Turn the size adjustment knob
9
counterclockwise to
loosen the fit. Position the rear pad on the back of your head, closer
to the neck. Dress any bandana knots or ponytails the rear neck over
pad
10
.
STEP 2: Tighten by turning the
size adjustment knob
9
clockwise until the hard hat is comfortable and snug. Move
your head up, down and side-to-side gently, like you would
normally, and make sure the hard hat stays on. Make sure that
the hard hat is not angled forward or backward, but rests level
on your head.
ADJUSTMENTS (FIG. E)
If the hard hat does not fit properly at the factory settings, you
can further adjust the fit:
STEP 1: Free the suspension by turning the suspension
bracket
16
approximately 90 degrees to free the bracket key
17
from the bracket key slots.
STEP 2: Determine which slot
18
you want to reattach to.
Using the bracket slots deeper in the hard hat will move it
higher on the head and vice versa. Insert the bracket key
17
and turn the bracket
16
approximately 90 degrees to lock into
place. Always match the settings on the left and right sides to
prevent the suspension from sitting at an angle.
SIDES: EN12492
DEFORMATION: EN397*
BACK: EN12492
FRONT:
EN12492
TOP: Z89.1/Z94.1
*Full-brim models only

ESPAÑOL
ESPECIFICACIONES GENERALES
• Normas: estos cascos de seguridad de Klein Tools cumplen con las
normas ANSI/ISEA Z89.1-2014 Tipo I y CSA Z94.1-15:
• Los cascos de seguridad sin ventilación ClaseE han sido sometidos a
pruebas de hasta 20kV.
EN397:2012+A1:2012 (cláusulas mencionadas únicamente):
• 5.2.4 Deformación lateral (LD)
EN12492:2012 (cláusulas mencionadas únicamente):
• 4.2.1.2 Capacidad frontal de absorción de energía
• 4.2.1.3 Capacidad lateral de absorción de energía
• 4.2.1.4 Capacidad posterior de absorción de energía
•
•
• Se adapta a: tamaños de cabeza de 6-1/2 a 8 (20-1/2" a 25" / 52 a 64cm)
EN EL PRODUCTO (FIG. A)
1
Logotipo de colocación inversa
2
Información sobre normas con las que cumple, clase,
tipo y tamaño de cabeza
3
Código de reciclaje y tipo de material
4
Fecha de fabricación
ETIQUETAS DE ADVERTENCIA (FIG. B)
Hay dos etiquetas de advertencia pegadas en el interior de este casco de
seguridad tipo cachucha.
Lea, comprenda y siga estas instrucciones
para garantizar un funcionamiento seguro. RETIRE ESTAS NO
ETIQUETAS.
ADVERTENCIAS
LEA TODAS LAS INSTRUCCIONES. NO SEGUIR ESTAS ADVERTENCIAS
E INSTRUCCIONES PUEDE CAUSAR LESIONES PERSONALES GRAVES
OMORTALES.
• Este casco de seguridad proporciona protección LIMITADA
contra golpes de objetos pequeños en las partes superior, frontal,
posterior y lateral del casco. Este NO es un casco de seguridad
que cumple con las normas ANSI/CSA TipoII.
• NO exponga la suspensión ni el acolchado a llamas abiertas.
• ADVERTENCIA DE ELECTRICIDAD: evite las áreas donde exista la posibilidad
de recibir choques eléctricos. Las versiones de casco sin ranuras de ventilación
cumplen con los requisitos de ClaseE al brindar una protección eléctrica
limitada. Los modelos de casco ClaseC brindan protección eléctrica. NO
• Si el casco p3-ha sufrido un impacto, deséchelo DE INMEDIATO,
incluso si el daño no es visible.
• NUNCA altere, perfore, modifique o grabe el casquete o la suspensión.
• NO use pinturas, solventes, productos químicos, adhesivos,
gasolina o sustancias similares en este casco, p3-ya que esto puede
reducir la protección que ofrece contra el impacto y la penetración.
• NO use este casco para conducir o con fines recreativos.
• NO
almacene objetos entre la suspensión y el casquete, p3-ya que el
casco de seguridad no funcionará como debe y se puede reducir la
protección contra el impacto y la penetración.
• La exposición a la luz solar directa, ambientes corrosivos y/o
temperaturas extremas por debajo de -40°F (-40°C) o superiores a
120°F (49°C) pueden reducir la capacidad del casco de seguridad para
resistir el impacto y la penetración.
MANTENIMIENTO
LIMPIEZA Y ALMACENAMIENTO DEL CASCO
• Limpie el casco de seguridad y la suspensión únicamente con
agua y jabón suave. Enjuague y seque con un paño. Limpie la correa
de barbilla opcional únicamente con un paño húmedo. Almacene en un
lugar fresco.
• Consulte la sección BANDA ABSORBENTE DE SUDOR Y
ALMOHADILLA SUPERIOR CÓMODA de las instrucciones
de funcionamiento (en el reverso) para obtener información
adicional sobre el mantenimiento.
INSPECCIÓN Y REEMPLAZO
Inspeccione el casco de seguridad, incluyendo la suspensión y el
casquete, antes y después de cada uso:
• Revise el casquete del casco de seguridad para detectar grietas,
roturas, decoloración, apariencia blanquecina o cualquier otro daño,
desgaste excesivo o condición inusual. Estas condiciones pueden
indicar una reducción en la resistencia al impacto o la penetración, y
el casco debe reemplazarse INMEDIATAMENTE.
• Se debe verificar la suspensión y la correa de barbilla opcional para
detectar grietas, roturas, costuras dañadas o cualquier otro daño,
desgaste excesivo o condición inusual. Si se presenta alguna de estas
condiciones, la suspensión y la correa de barbilla deben reemplazarse
INMEDIATAMENTE.
• Utilice siempre piezas de repuesto originales de Klein Tools.
Este producto funciona como un sistema, por lo que el uso de
suspensiones no autorizadas puede reducir la protección provista
por este casco de seguridad.
VIDA ÚTIL
SUSPENSIÓN Y CORREA DE BARBILLA OPCIONAL: debe
reemplazarse después de 12meses de uso.
TODO EL CASCO DE SEGURIDAD: Debe reemplazarse después de
2años de uso, o a los 5años desde la fecha de fabricación, lo que
ocurra primero.
Estas son pautas de vida útil. Se DEBEN realizar inspecciones
frecuentes como se indica en la sección MANTENIMIENTO de
arriba, y puede resultar en un posible reemplazo anticipado.
NOTA: este programa de reemplazo es una pauta que supone
condiciones normales de uso y almacenamiento del casco. Si
el casco de seguridad está expuesto a temperaturas extremas,
luz solar continua o productos químicos, puede ser necesario
reemplazarlo en un periodo más corto.
GARANTÍA
www.kleintools.com/warranty
ACCESORIOS Y PIEZAS DE REPUESTO
Los accesorios y piezas de repuesto para cascos de seguridad tipo cachucha
de Klein Tools están disponibles en línea o con losprincipales distribuidores:
• KHHSPN: Suspensión de repuesto
• KHHSWTBND: Banda absorbente de sudor (paquete de 3unidades)
• KHHTOPPAD: Almohadilla superior cómoda (paquete de 3unidades)
• KHHSTRP: Correa de barbilla
• 56049:
Luz frontal con matriz de luz recargable (luz de proyección únicamente)
• 56062: luz frontal recargable / luz de trabajo (luz enfocada/de proyección)
• 56048:
Luz frontal recargable de apagado automático (luz enfocada/de proyección)
• 56063:
Lámpara de seguridad
• 60156:
Luz Frontal LED Instrínsecamente Segura
NOTA: KLEIN TOOLS NO PUEDE GARANTIZAR QUE LOS ACCESORIOS DE
TERCEROS FUNCIONEN O SE ADAPTEN DE MANERA ÓPTIMA A LOS
CASCOS DE SEGURIDAD DE KLEIN TOOLS.
ELIMINACIÓN/RECICLAJE
No arroje el casco de seguridad tipo cachucha ni sus
accesorios a la basura. Los elementos se deben desechar
correctamente de acuerdo con las regulaciones locales.
Consulte www.epa.gov/recycle para obtener más información.
SERVICIO AL CLIENTE
KLEIN TOOLS, INC.
450 Bond Street, Lincolnshire, IL 60069 1-800-553-4676
customerservice@kleintools.com www.kleintools.com
DETALLES DE LAS CARACTERÍSTICAS (FIG. C)
5
Ranuras para accesorios
universales
12
Banda absorbente
de sudor lavable
6
Ranuras para accesorios
de Klein Tools
13
Almohadilla superior
cómoda lavable
7
Ori cios de ventilación con
rejilla (ClaseC solamente)
14
Correas de suspensión
8
Ajuste de giro
15
Ubicaciones para adhesivos
re ectantes
9
Perilla para ajustar
eltamaño
16
Soporte de suspensión
10
Almohadilla para la nuca
17
Bloqueo de soporte
11
Ranuras de anclaje de
lacorrea de suspensión
18
Ranuras del bloqueo
desoporte
AJUSTE (FIG. D)
Todos los cascos de seguridad cuentan con suspensión preinstalada
con ajuste de fábrica. La suspensión se puede ajustar para
garantizar un ajuste correcto y seguro a su cabeza para máxima
protección. Siga los pasos a continuación:
PASO 1: gire la perilla para ajustar el tamaño
9
en sentido contrario
a las agujas del reloj para aflojar el ajuste. Coloque la almohadilla
trasera en la parte posterior de su cabeza, más cerca de la nuca. Los
nudos de paliacate o colas de caballo deben ir sobre la almohadilla
posterior para la nuca
10
.
PASO 2: ajuste girando la perilla para ajustar el tamaño
9
en
sentido a las agujas del reloj hasta que el casco tenga un ajuste
cómodo y ceñido. Mueva su cabeza hacia arriba, hacia abajo y hacia
los lados suavemente, como lo haría normalmente, y asegúrese de
que su casco se mantenga ajustado. Asegúrese de que el casco no
esté inclinado hacia adelante o hacia atrás, sino que quede nivelado
en su cabeza.
AJUSTES (FIG. E)
Si el casco no se adapta correctamente al ajuste de fábrica, puede
adecuar aún más el ajuste:
PASO1: libere la suspensión girando el soporte de suspensión
16
aproximadamente 90grados para liberar el bloqueo de soporte
17
de
las ranuras del bloqueo de soporte.
PASO2: defina la ranura
18
que desee volver a calzar. Al usar las
ranuras de soporte que se encuentran más al interior del casco, este
se desplazará hacia arriba en la cabeza y viceversa. Inserte el bloqueo
de soporte
17
y gire el soporte
16
aproximadamente 90grados para
bloquearlo en su posición. Siempre haga coincidir los ajustes en los
lados izquierdo y derecho para evitar que la suspensión permanezca
AJUSTES (FIG. E)
PASO3: verifique que el casco se ajusta adecuadamente. Siga los
pasos en la sección AJUSTES para asegurar un ajuste adecuado.
Asegúrese de que los accesorios que planee usar se adapten y
funcionen adecuadamente mientras se mantiene la capacidad del
casco para cumplir con su función de manera óptima. Si no está
seguro, verifique con un experto en seguridad calificado.
NOTA: las longitudes de la correa de suspensión son jas
y no se pueden ajustar. NO intente ajustarlas.
COLOCACIÓN INVERSA (FIG. F)
NOTA: es posible que en algunos lugares de trabajo no se permita
una colocación inversa - Consulte con el supervisor de seguridad
de su lugar de trabajo antes de cambiar su casco de seguridad a
este ajuste.
PASO 1: coloque su dedo índice debajo del anclaje de la correa y
su pulgar sobre la ranura de anclaje
11
. Empuje hacia arriba con el
dedo índice empleando la fuerza suficiente para liberar el anclaje de
la ranura. Haga esto con todas las ranuras de anclaje (son 4 en total).
NOTA: NO jale de las correas de la suspensión para liberar el
anclaje. Esto podría dañar permanentemente las correas, evitando
que funcionen de forma prevista.
PASO 2: realice cualquier ajuste de altura en la suspensión antes de
la instalación.
PASO 3: empuje cada anclaje hacia abajo hasta que se escuche un
clic y no se pueda empujar el anclaje más hacia abajo. Haga esto con
todos los 4anclajes.
NOTA: NO utilice herramientas a ladas que
puedan dañar los anclajes, ni jale de las correas para asegurarlos.
PASO 4: verifique que se haya instalado correctamente empujando
hacia arriba las 4bases de anclaje. Los anclajes deben permanecer
correctamente colocados en sus ranuras. Si no lo están, repitan el
PASO 3.
PASO 5: verifique que el casco se ajusta adecuadamente. Siga los
pasos en la sección AJUSTES para asegurar un ajuste adecuado.
Además, asegúrese de que los accesorios que planea usar se adapten
y funcionen correctamente, a la vez que permiten que el casco de
seguridad tipo cachucha tenga un desempeño óptimo.
BANDA ABSORBENTE DE SUDOR Y ALMOHADILLA
SUPERIOR CÓMODA (FIG. H)
Los cascos de seguridad tipo cachucha de Klein Tools cuentan
con una banda absorbente de sudor avanzada y una almohadilla
superior cómoda diseñada para absorber el sudor. Son lavables
a máquina bajo un ciclo de lavado normal. NO las lave con
blanqueador nicon detergentes que lo contengan. Séquela a
máquina solo atemperatura normal o baja.
La banda absorbente de sudor y la almohadilla superior cómoda
se pueden retirar y volver a colocar fácilmente en la suspensión:
• La almohadilla superior cómoda se mantiene en su lugar
mediante una sola almohadilla de velcro
25
.
• La banda absorbente de sudor se mantiene en su lugar con
cuatro ganchos de suspensión
26
y tres almohadillas de velcro
25
,
en el frente y a los lados. Para quitarla, simplemente
desprenda todas las almohadillas de velcro y retire la banda
absorbente de sudor de los ganchos de suspensión.
ORIFICIOS DE VENTILACIÓN (CLASEC SOLAMENTE)
Los cascos de seguridad tipo cachucha ClaseC cuentan con
orificios de ventilación y rejillas en ambos lados. Los orificios
de ventilación se pueden ajustar simplemente deslizando las
rejillas
7
hacia arriba o hacia abajo.
Los ori cios y las rejillas NO evitarán que vapores,
líquidos o residuos de menor tamaño ingresen en el casco.
LUZ FRONTAL 56062 (FIG. G)
El accesorio opcional 56062 es una luz frontal recargable diseñada
específicamente para los cascos de seguridad de Klein que cuentan
con ranuras integradas para accesorios frontales y posteriores.
Funciona como luz enfocada o luz de proyección, y cuenta con un
imán para sujetarse a superficies magnéticas para su uso como
luz de trabajo. El cable de carga está incluido con los modelos que
incluyen luz frontal recargable.
19
Lengüeta de liberación
22
Luces de proyección
20
Botón de modo/encendido/apagado
23
Imán
21
Luz enfocada
24
Soporte giratorio
La luz frontal 56062 puede sujetarse tanto en la parte frontal como en
la parte posterior del casco de seguridad a través de la ranura para
accesorios de Klein Tools. Puede inclinarse hasta 64° sobre el casco
de seguridad y de forma independiente como luz de trabajo.
Para instalar la luz frontal en el casco de seguridad tipo cachucha de
Klein, alinee el soporte giratorio
24
con la ranura para accesorios de
Klein Tools
6
del casco y empuje hacia abajo hasta que se escuche
un clic y la luz frontal esté firmemente en su lugar.
.
Para retirar la luz frontal, presione hacia adelante la lengüeta de
liberación
19
y levante la luz frontal de la ranura para accesorios.
ADHESIVOS REFLECTANTES (FIG. C)
Los cascos de seguridad tipo cachucha de Klein Tools incluyen
cuatro adhesivos reflectantes. Para un óptimo rendimiento,
fíjelos solo en las áreas designadas
15
. NO coloque los
adhesivos en áreas que impidan la funcionalidad de los
accesorios o del casco como tal.
LADOS: EN12492
DEFORMACIÓN: EN397*
POSTERIOR: EN12492
FRONTAL:
EN12492
SUPERIOR: Z89.1/Z94.1
*Solamente modelos de
cachucha con ala completa
Produktspecifikationer
Varumärke: | Klein Tools |
Kategori: | Inte kategoriserad |
Modell: | 60249 |
Färg på produkten: | Wit |
Vikt: | 3800 g |
Bredd: | 276 mm |
Djup: | 356 mm |
Höjd: | 304 mm |
Förpackningens bredd: | 340 mm |
Djuppackning: | 325 mm |
Förpackningshöjd: | 405 mm |
Snäll: | PC |
Vormfaktor: | Mini Tower |
På-/-Av-knapp: | Ja |
Antal USB 2.0-portar: | 1 |
Lämplig för: | Gamen |
Belysningsplats: | Case fans |
Antal portar USB 3.2 Gen 1 (3.1 Gen 1) Typ A: | 1 |
Kombinerad hörlurs/mikrofonport: | Ja |
Återställningsknapp: | Ja |
SSD-formfaktor: | 2.5" |
Strömförsörjning ingår: | Nee |
Antal 2,5" fack: | 3 |
Antal 3,5" fack: | 2 |
Hårddiskstorlekar som stöds: | 2.5, 3.5 " |
Antal expansionsplatser: | 4 |
Förbättrad kabelhantering: | Ja |
Antal lagringsenheter som stöds: | 5 |
Exponering: | Ja |
Moderkortsformfaktorer som stöds: | Micro ATX, Mini-ITX |
Sidofönster: | Ja |
Härdat glasplatta(r): | Ja |
Maximal CPU-kylarhöjd: | 160 mm |
Maximal grafikkortslängd: | 340 mm |
Maximalt antal främre fläktar: | 2 |
Främre fläktar som stödjer diametrar: | 120 mm |
Maximalt antal fläktar överst: | 4 |
Toppfläktar som stöder diametrar: | 120 mm |
Max antal bakre fläktar: | 1 |
Bakre fläktar stödjer diametrar: | 120 mm |
Installerade bakre fläktar: | 1x 120 mm |
Antal främre fläktar installerade: | 1x 120 mm |
Maximalt antal bottenfläktar: | 2 |
Bottenfläktar som stöder diametrar: | 120 mm |
Antal interna 3,5" fack: | 2 |
Dimensioner för bakre kylare: | 120 mm |
Dimensioner för sidoradiator: | 120,240 mm |
Vätskekylning installerad: | Ja |
Behöver du hjälp?
Om du behöver hjälp med Klein Tools 60249 ställ en fråga nedan och andra användare kommer att svara dig
Inte kategoriserad Klein Tools Manualer

18 Mars 2025

14 Februari 2025

14 Januari 2025

6 Januari 2025

6 Januari 2025

27 December 2024

14 December 2024

26 September 2024

26 September 2024

26 September 2024
Inte kategoriserad Manualer
- Inte kategoriserad Flama
- Inte kategoriserad Mauser Sitzkultur
- Inte kategoriserad PeakTech
- Inte kategoriserad Cresta
- Inte kategoriserad Beaphar
- Inte kategoriserad Thermarest
- Inte kategoriserad Paasche
- Inte kategoriserad Spring
- Inte kategoriserad Bresser
- Inte kategoriserad Kool-It
- Inte kategoriserad Nexcom
- Inte kategoriserad Glock
- Inte kategoriserad Quadro
- Inte kategoriserad Aquasure
- Inte kategoriserad Flame
Nyaste Inte kategoriserad Manualer

9 April 2025

9 April 2025

9 April 2025

9 April 2025

9 April 2025

9 April 2025

9 April 2025

9 April 2025

9 April 2025

9 April 2025