Kramer SID-DVI Bruksanvisning
Kramer AV extender SID-DVI
Läs gratis den bruksanvisning för Kramer SID-DVI (2 sidor) i kategorin AV extender. Guiden har ansetts hjälpsam av 31 personer och har ett genomsnittsbetyg på 4.0 stjärnor baserat på 6 recensioner. Har du en fråga om Kramer SID-DVI eller vill du ställa frågor till andra användare av produkten? Ställ en fråga
Sida 1/2
The Kramer SID- DVI Step-In Commander DVI
Congratulations on purchasing your Kramer DigiTOOLS
®
SID-DVIDVI Step-In
Commander which is ideal for boardrooms and presentation rooms.
The Kramer is a and unbalanced stereo audio remote control commander SID-DVIDVI
that is used to remotely take control of a compatible switcher, for example, the
VP-81SID. The commander is HDCP compliant and does not need a power adapter if
located within 50m (1ft) of the switcher. 64
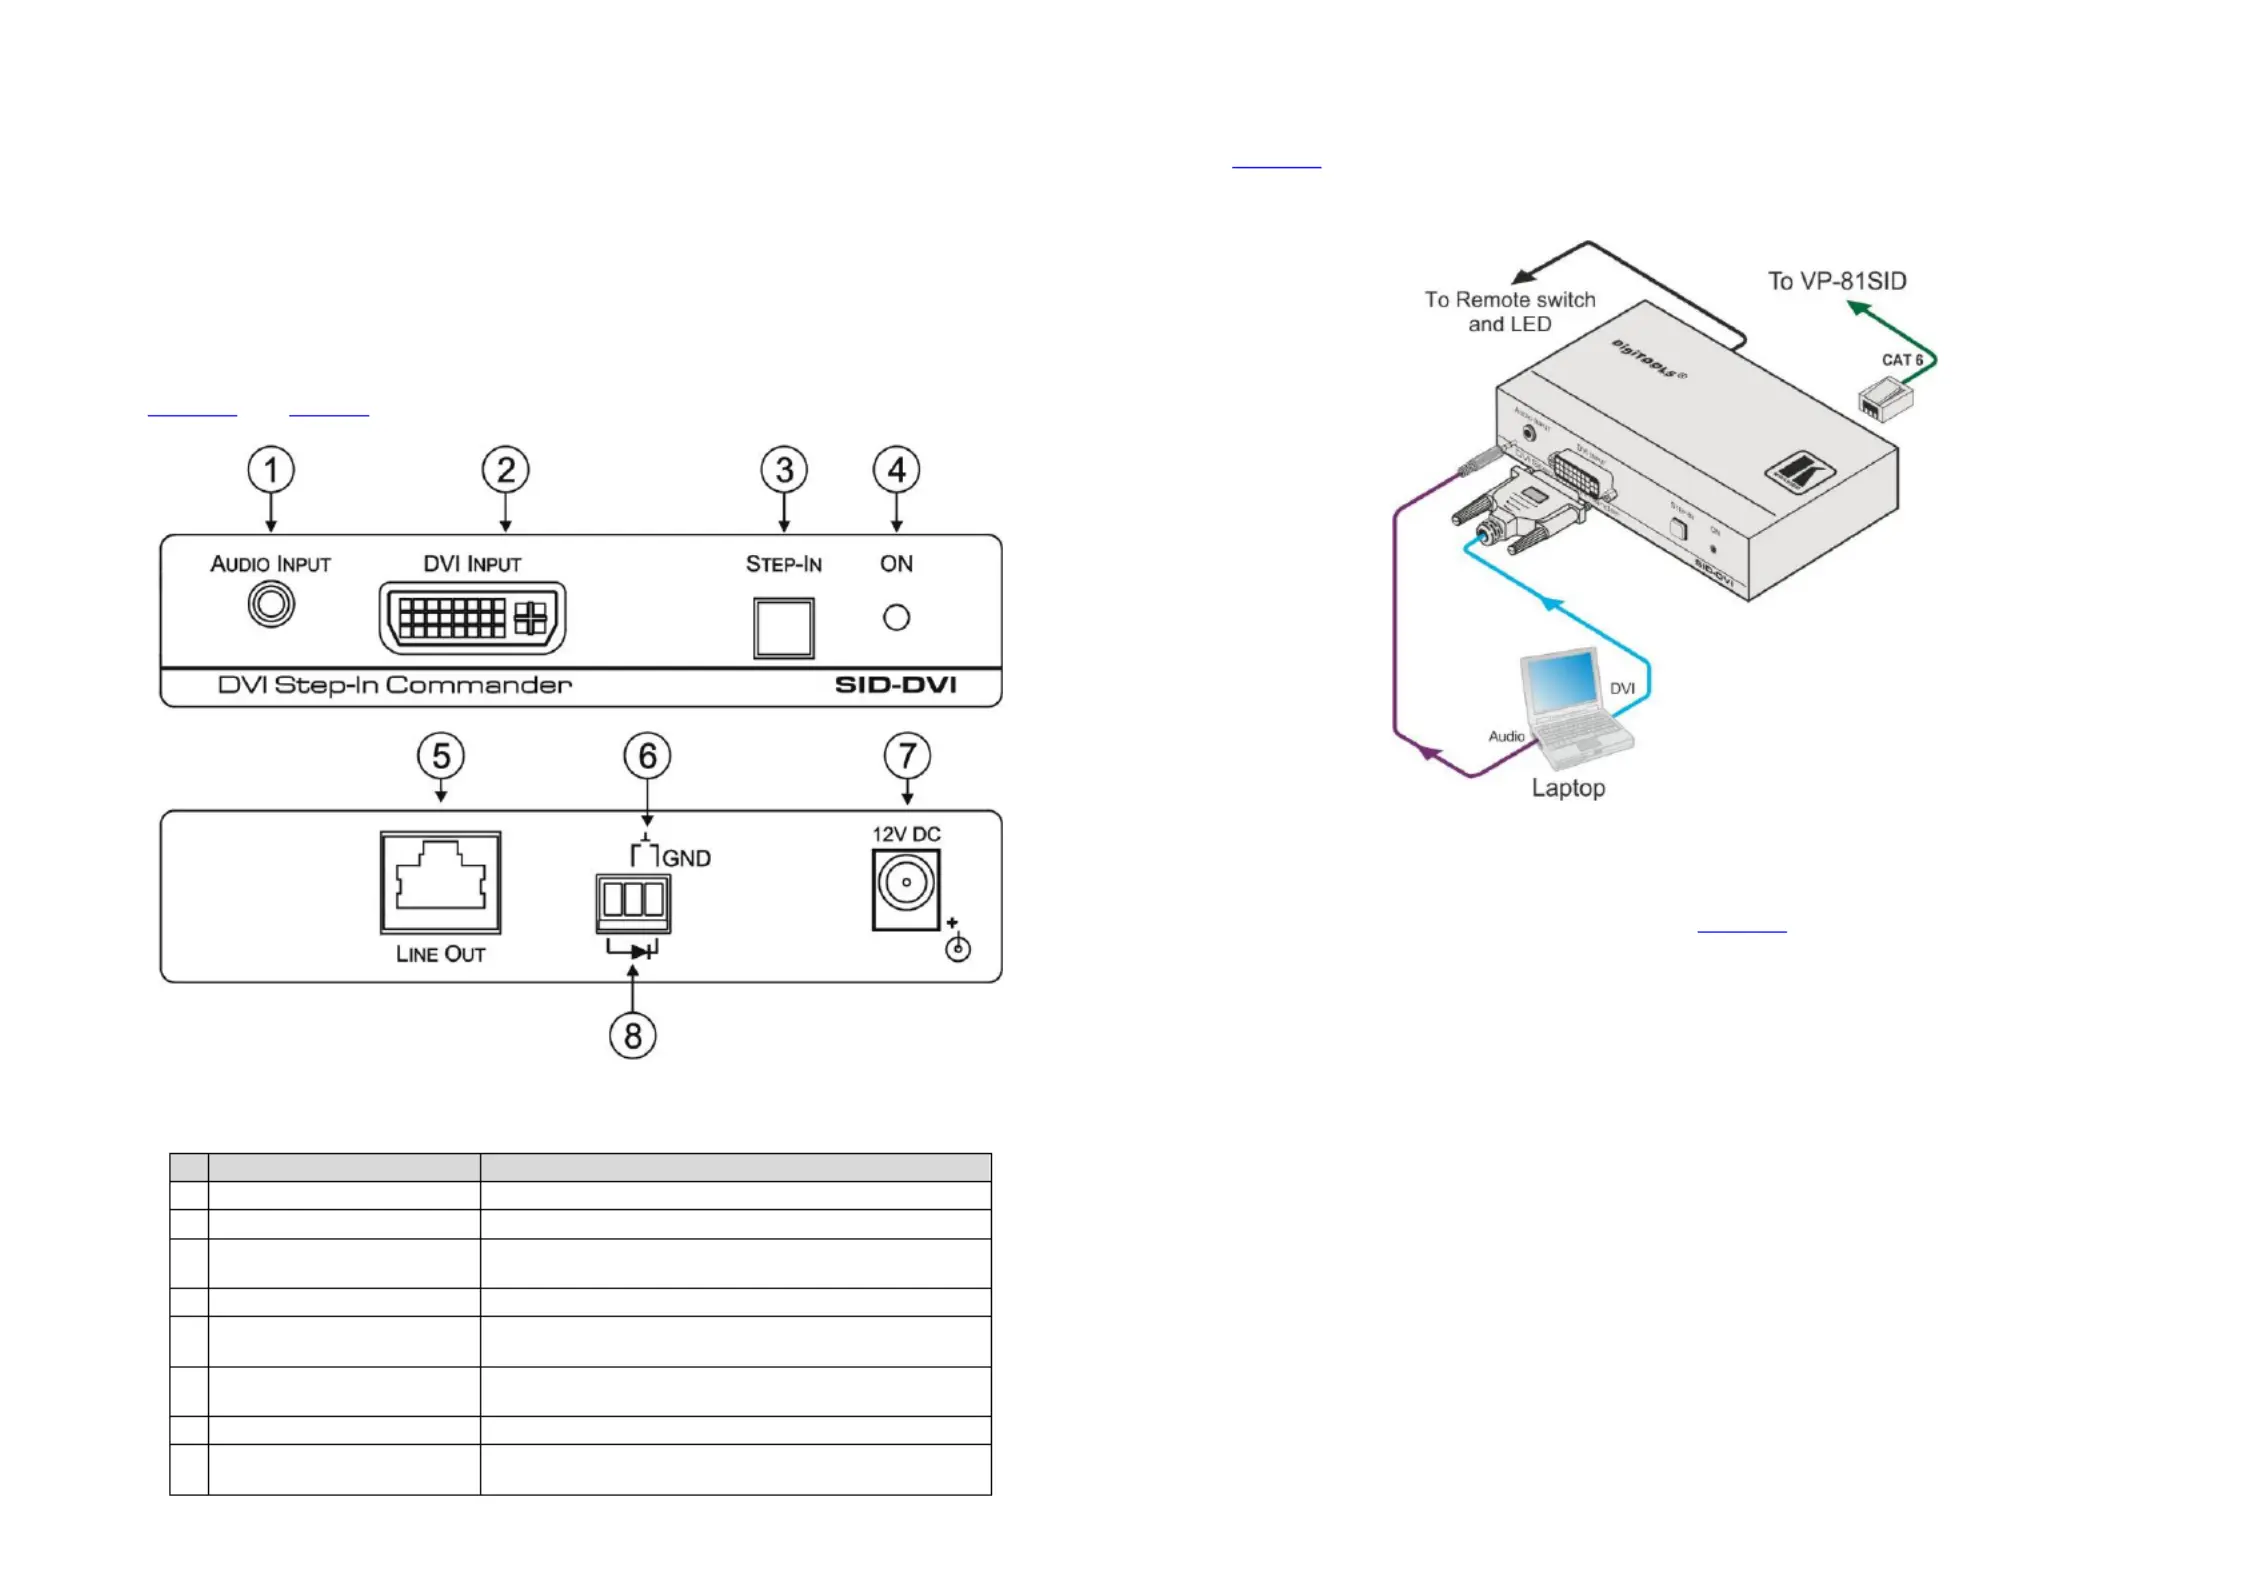
Figure 1Table 1 and dene the . SID- DVIDVI Step-In Commander
Figure 1SID-DVI DVI Step-In Commander Front and Rear Panel :
Table 1SID-DVI DVI Step-In Commander Front and Rear Panel Features :
#
Feature
Function
1
AUDIO INPUT3.5mm Mini Jack
Connect to the unbalanced stereo audio source
2
DVI INPUT DVI Connector
Connect to the DVI video source
3
STEP Button IN
Press to switch the input to this remote control commander. The
button lights when active
4
ON LED
Lights green when the unit receives power
5
LINE OUT Twisted Pair RJ-45
Connector
Connect to the TP input of a compatible switcher (for example,
the VP-81SID) using CAT 6 or higher specication cable
6
Remote Switch Terminal Block
Connections (pins 2 and 3)
Connect to the remote step-in switch
7
12V DC Power Connector
Connect to the power adapter
8
Remote LED Terminal Block
Connections (pins 1 and 3)
Connect to the remote LED (observe correct polarity, pin 1 to the
LED anode and pin 3 to the cathode) )
Figure 2 shows the wiring connections of the SID-DVI.
Figure 2SID-DVI Wiring Connections :
To connect the SID- as illustrated in : DVIFigure 2
1. Connect the DVI video sourc(for example, a computer graphics sourceto the e )
D connector on the front panel of the VISID-DVI.
2. Connect the unbalanced stereo audio source (for example, a computer graphics
source) to the 3.5mm mini jack AUDIO INPUT connector on the front of the
SID-DVI.
3. Using STP cable, connect the LINE OUT RJ-45 connector on the rear panel of the
SID--81SIDDVI to one of the inputs on the rear panel of the VP (up to 50m away).
4. OptionalConnect the terminal block on the rear of the to the remote —SID-DVI
switch and LED.
Note: The LED supply includes a current limiting resistor and is designed to work
with any standard LED.
5. Connect the power adapter to the 12V DC connector on the rear of the SID-DVI
and to the mains electricity (if the distance exceeds 50m (ft) from the switcher). 164
Produktspecifikationer
| Varumärke: | Kramer |
| Kategori: | AV extender |
| Modell: | SID-DVI |
| Vikt: | 300 g |
| Maximal upplösning: | - pixlar |
| Modell: | Sändare för AV-utrustning |
| RJ-45 utgångsportar: | 1 |
| Kabeltyper som stöds: | Cat6, Cat7 |
| Produktens färg: | Svart |
| Produktstorlek (BxDxH): | 120 x 70 x 24 mm |
| AC-inspänning: | 12 V |
| Likströmsingång: | Ja |
| Ljudanslutning: | 1 |
| DVI ingångar: | 1 |
Behöver du hjälp?
Om du behöver hjälp med Kramer SID-DVI ställ en fråga nedan och andra användare kommer att svara dig
AV extender Kramer Manualer

2 Februari 2025
20 December 2024
20 December 2024
20 December 2024
20 December 2024
20 December 2024
20 December 2024
20 December 2024
20 December 2024
20 December 2024
AV extender Manualer
Nyaste AV extender Manualer
8 April 2025
1 April 2025
1 April 2025
1 April 2025
1 April 2025
1 April 2025
26 Februari 2025
25 Februari 2025
20 Februari 2025
20 Februari 2025