Lexmark XM7155x Bruksanvisning
Läs gratis den bruksanvisning för Lexmark XM7155x (60 sidor) i kategorin Skrivare. Guiden har ansetts hjälpsam av 16 personer och har ett genomsnittsbetyg på 4.6 stjärnor baserat på 9 recensioner. Har du en fråga om Lexmark XM7155x eller vill du ställa frågor till andra användare av produkten? Ställ en fråga
Sida 1/60
Lexmark XM7100 Quick
Reference
Learning about the printer
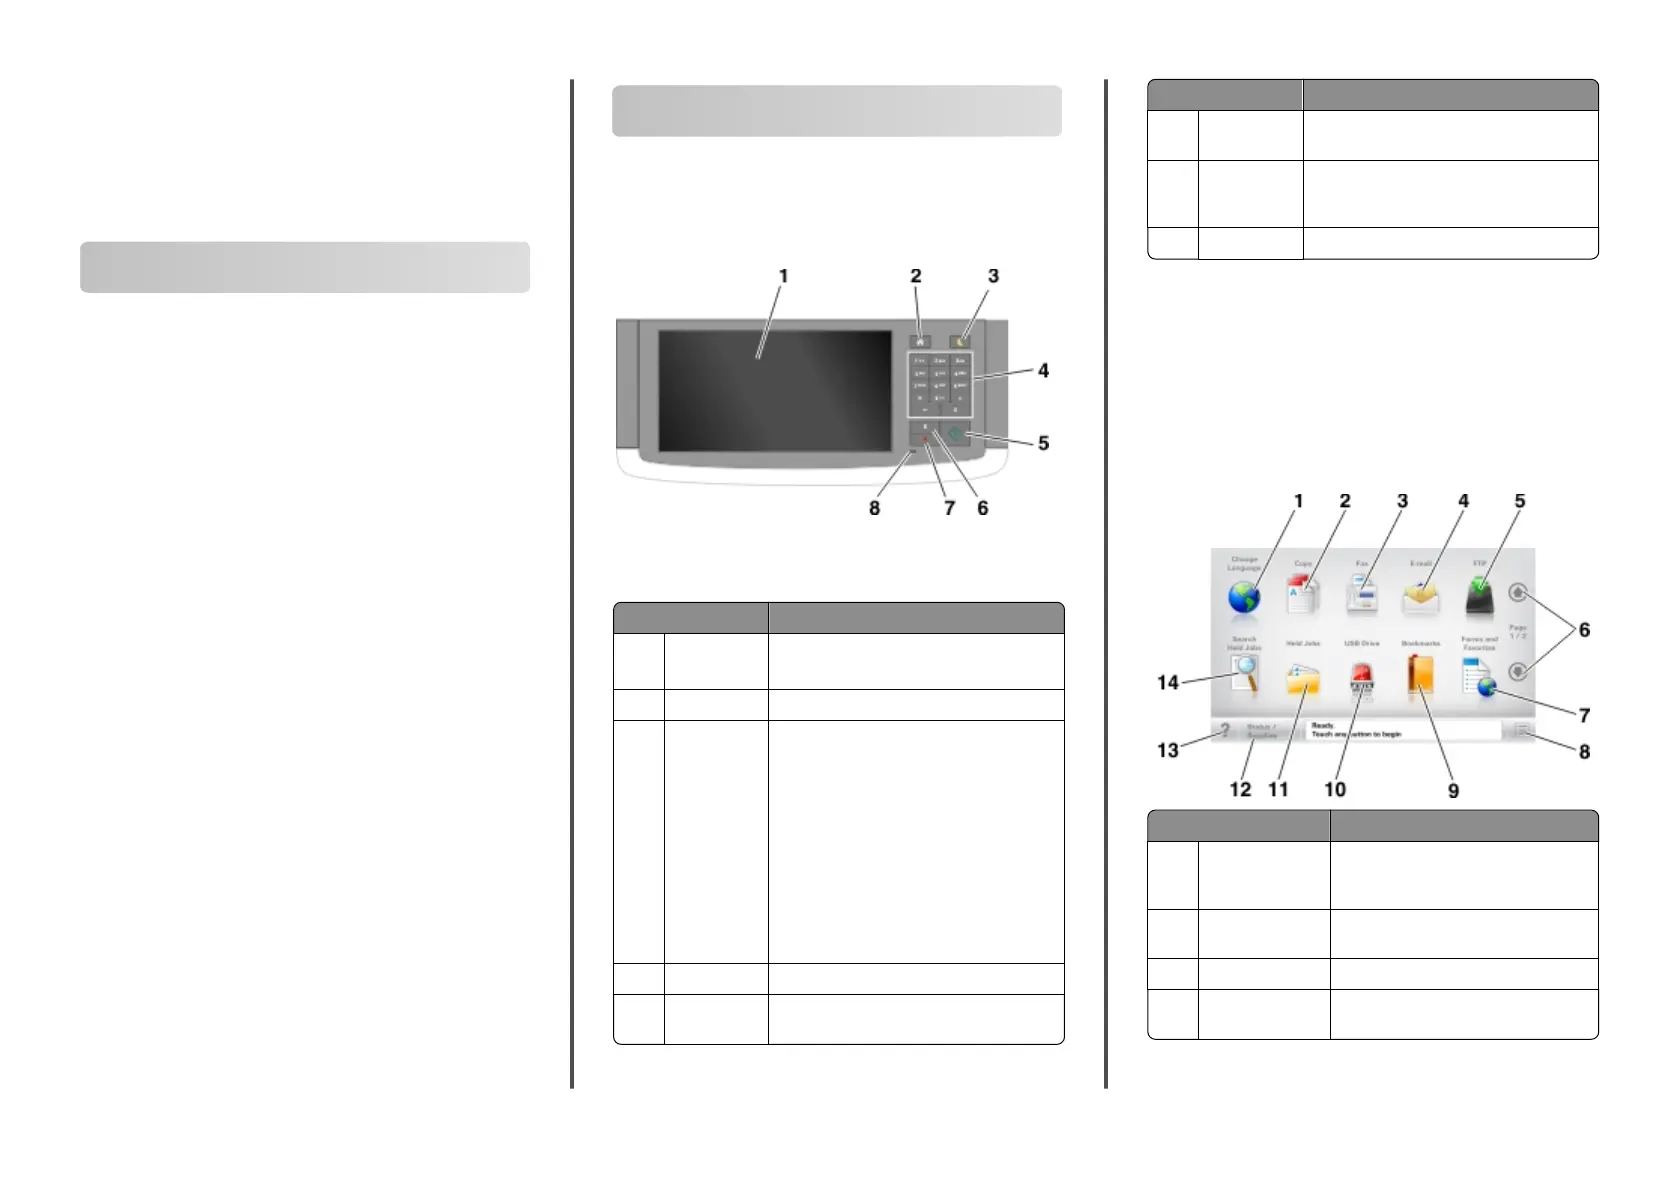
Using the printer control panel
Use theTo
1Display
•View the printer status and messages.
•Set up and operate the printer.
2Home buttonGo to the home screen.
3Sleep buttonEnable Sleep mode or Hibernate mode.
Do the following to wake the printer from
Sleep mode:
•Touch the screen or press any hard
button.
•Open a door or cover.
•Send a print job from the computer.
•
Perform a power‑on reset (POR) with the
main power switch.
•Attach a device to the USB port on the
printer.
4KeypadEnter numbers, letters, or symbols.
5Start buttonStart a job, depending on which mode is
selected.
Use theTo
6Clear all /
Reset button
Reset the default settings of a function,
such as copying, faxing, or scanning.
7Stop or
Cancel
button
Stop all printer activity.
8Indicator lightCheck the status of the printer.
Understanding the home screen
When the printer is turned on, the display shows a basic screen,
referred to as the home screen. Touch the home screen buttons
and icons to initiate an action such as copying, faxing, or scanning;
to open the menu screen; or to respond to messages.
Note: Your home screen may vary depending on your home
screen customization settings, administrative setup, and active
embedded solutions.
TouchTo
1Change
Language
Launch the Change Language pop‑up
window that lets you change the
primary language of the printer.
2CopyAccess the Copy menus and make
copies.
3FaxAccess the Fax menus and send fax.
4E-mailAccess the E-mail menus and send
e‑mails.
Learning about the printer
1
Learning about the printer...................
Contents
Setting up and using the home
screen applications............................
Loading paper and specialty media....
Printing ...................................................
Copying...................................................
E-mailing..................................................
Faxing......................................................
Scanning ................................................
Clearing jams .........................................
1
22
20
19
18
18
16
6
3
Produktspecifikationer
| Varumärke: | Lexmark |
| Kategori: | Skrivare |
| Modell: | XM7155x |
| Inbyggd display: | Ja |
| Vikt: | 112037 g |
| Bredd: | 610.87 mm |
| Djup: | 657.86 mm |
| Höjd: | 1203.96 mm |
| Skärm diagonal: | 10 " |
| Pekskärm: | Ja |
| Processorfrekvens: | 800 MHz |
| Wi-Fi-standarder: | 802.11g, 802.11b, Wi-Fi 4 (802.11n) |
| Maximal upplösning: | 1200 x 1200 DPI |
| Internminne: | 1024 MB |
| Kabelteknik: | 10/100/1000Base-T(X) |
| Maximalt internminne: | 3072 MB |
| Standardgränssnitt: | Ethernet, USB 2.0 |
| Digital avsändare: | Nej |
| Maximal kopieringsupplösning: | - DPI |
| Skanningshastighet (färg): | 66 ppm |
| Modemhastighet: | 33.6 Kbit/s |
| Fax: | Svartvit faxning |
| Mobil utskriftsteknik: | Apple AirPrint |
| Nätverksprotokoll som stöds (IPv4): | TCP/IP IPv4, AppleTalk |
| Nätverksprotokoll som stöds (IPv6): | TCP/IP IPv6, TCP, UDP |
| Valfri anslutning: | Parallel, Serial (RS-422), Wireless LAN |
| Totalt antal inmatningsfack: | 3 |
| Maximalt antal inmatningsfack: | 3 |
| Dubbelsidig faxning: | Ja |
| Serveroperativsystem som stöds: | Windows Server 2008 x64, Windows Server 2012, Windows Server 2008 R2, Windows Server 2003, Windows Server 2012 R2, Windows Server 2003 x64, Windows Server 2008 |
| Automatisk dokumentmatare (ADF): | Ja |
| Ljudtrycksnivå (kopiering): | 55 dB |
| Skanningshastighet (svart): | 66 ppm |
| Produktens färg: | Black, White |
| Kontrolltyp: | Röra |
| Windows-operativsystem som stöds: | Ja |
| Mac-operativsystem som stöds: | Ja |
| Andra operativsystem som stöds: | Ja |
| Utskrift: | Svartvit utskrift |
| Kopiering: | Svartvit kopiering |
| Datahastighet för Ethernet-LAN: | 10,1000,100 Mbit/s |
| Temperatur vid drift: | 16 - 32 ° C |
| Intervall för relativ operativ luftfuktighet: | 8 - 80 % |
| Hållbarhetscertifiering: | ENERGY STAR |
| Kryptering/säkerhet: | HTTPS, MSCHAPv2, LEAP, MD5, PEAP, SSL/TLS |
| Nätverksansluten (Ethernet): | Ja |
| Skanningstyp: | Flatbäddsskanner |
| Bildkomprimeringsformat: | JPG, TIF |
| Displaytyp: | LCD |
| Lednings Protokoll: | HTTP HTTPs (SSL/TLS) SNMPv1, SNMPv2c SNMPv3 WINS IGMP BOOTP, RARP APIPA (AutoIP) DHCP ICMP DNS Bonjour DDNS mDNS ARP NTP Telnet Finger |
| Antal USB 2.0 anslutningar: | 4 |
| USB-port: | Ja |
| Linux operativsystem som stöds: | Ja |
| Positionering på marknaden: | Business |
| Altitud vid drift: | 0 - 2896 m |
| Direktutskrift: | Ja |
| Dokument som stöds: | XPS, PDF |
| Utskriftsteknologi: | laser |
| Utskriftshastighet (Svart, normalkvalitet, A4/US Brev): | 55 ppm |
| Tid för första utskrift (svart): | 4.8 s |
| Driftcykel per månad: | 300000 sidor per månad |
| Språk för sidbeskrivning: | PDF 1.7, PostScript 3, PPDS, PCL 5e, Microsoft XPS, PCL 6 |
| Maximal inmatningskapacitet: | 2750 ark |
| Total inmatningskapacitet: | 550 ark |
| Total utmatningskapacitet: | 550 ark |
| Maximal utmatningskapacitet: | 1050 ark |
| Högsta ISO A-seriestorlek: | A4 |
| Pappersfackets typ av media: | Card stock, Envelopes, Labels, Plain paper, Transparencies |
| ISO A-serie storlek (A0...A9): | A4, A5, A6 |
| Icke-ISO utskriftsmaterial av olika storlek: | Executive (184 x 267mm), Folio (media size), Legal (media size), Letter (media size), Oficio (media size), Statement (140 x 216mm) |
| Maximal utskriftstorlek: | 210 x 297 mm |
| Verifieringsmetod: | 802.1x |
| Optisk skanningsupplösning: | 600 x 600 DPI |
| Skanning: | Färgscanning |
| Kopieringshastighet (normalkvalitet, svart, A4): | 55 kopior per minut |
| Storleksändring kopieringsmaskin: | 25 - 400 % |
| Ljudtrycksnivå (utskrivning): | 55 dB |
| Kuvertstorlek: | 7 3/4, 9,10, C5, DL |
| Allt i ett funktion: | Copy, Fax, Print, Scan |
| Färg allt-i-ett funktionerna: | Skanning |
| Strömförbrukning (genomsnittligt operativt): | - W |
| Skanningsteknik: | CCD |
| Ljudeffektsnivå (vänteläge): | 30 dB |
| Skrivarfäger: | Svart |
| Utskriftsmarginaler (övre, undre, höger, vänster): | 4.24 mm |
| Tid till första kopia (svart, normal): | 4.5 s |
| Dubbelsidig skanning: | Ja |
| Rekommenderad arbetscykel: | 3000 - 50000 sidor per månad |
| Kapacitet för automatisk dokumentmatare: | 150 ark |
| Flerfunktionsfack, kapacitet: | 100 ark |
| Flerfunktionsfack: | Ja |
| JIS B-serien storlekar (B0...B9): | B5 |
| Fax sändningshastighet: | 3 sek/sida |
| Automatisk dokumentmatare (ADF), utmatningskapacitet: | 100 ark |
| Ljudtrycksnivå (scanning): | 57 dB |
| Ljudtrycksnivå (dubbelsidig utskrift): | 54 dB |
| Metod för nätverksutskrift: | LPR/LPD Direct IP (Port 9100) Enhanced IP (Port 9400) FTP, TFTP ThinPrint .print integration Telnet IPP 1.0, 1.1, 2.0 (Internet Printing Protocol) |
Behöver du hjälp?
Om du behöver hjälp med Lexmark XM7155x ställ en fråga nedan och andra användare kommer att svara dig
Skrivare Lexmark Manualer

18 September 2025
17 September 2025
17 September 2025
2 September 2025
19 Augusti 2025
18 Augusti 2025
18 Augusti 2025
29 Juli 2025
19 Juli 2025
19 Juli 2025
Skrivare Manualer
Nyaste Skrivare Manualer
2 April 2026
22 Mars 2026
17 Mars 2026
17 Mars 2026
17 Mars 2026
17 Mars 2026
15 Mars 2026
14 Mars 2026
14 Mars 2026
14 Mars 2026