Lexmark XS796dte Bruksanvisning

Lexmark Skrivare XS796dte

Läs gratis den bruksanvisning för Lexmark XS796dte (36 sidor) i kategorin Skrivare. Guiden har ansetts hjälpsam av 3 personer och har ett genomsnittsbetyg på 4.0 stjärnor baserat på 2 recensioner. Har du en fråga om Lexmark XS796dte eller vill du ställa frågor till andra användare av produkten? Ställ en fråga

Sida 1/36
Quick Reference
Learning about the printer
Understanding the printer control panel
1
3
4
5
6
7
8
9
2
Item Description
1 Display Lets you view scanning, copying, faxing, and
printing options as well as status and error
messages
2 Indicator light
Off—The power is off.
Blinking green—The printer is warming up,
processing data, or printing.
Solid green—The printer is on, but idle.
Blinking red—Operator intervention is
needed.
Item Description
3 Sleep Activates Sleep Mode or Hibernate Mode
The following are the statuses of the indicator
light and the Sleep button:
Entering or waking from Sleep Mode—The
indicator light is illuminated solid green,
Sleep button is unilluminated.
Operating in Sleep Mode—The indicator
light is illuminated solid green, Sleep button
is illuminated solid amber.
Entering or waking from Hibernate Mode
The indicator light is illuminated solid green,
Sleep button is illuminated blinking amber.
Operating in Hibernate Mode—The
indicator light is unilluminated, Sleep
button is blinking amber in pulsing pattern.
4 Keypad Lets you enter numbers, letters, or symbols on
the display
5 Submit Lets you submit changes made in the printer
settings
6 Stop/Cancel Stops all printer activity
Note: A list of option is displayed once
Stopped appears on the display.
7 Home Lets you navigate back to the home screen
8 Card reader Limits the use of certain printer functions to
authenticated users
Note: The card reader may not be available on
all printer models.
9 USB port Lets you insert a USB flash drive to send data or
to save scanned images
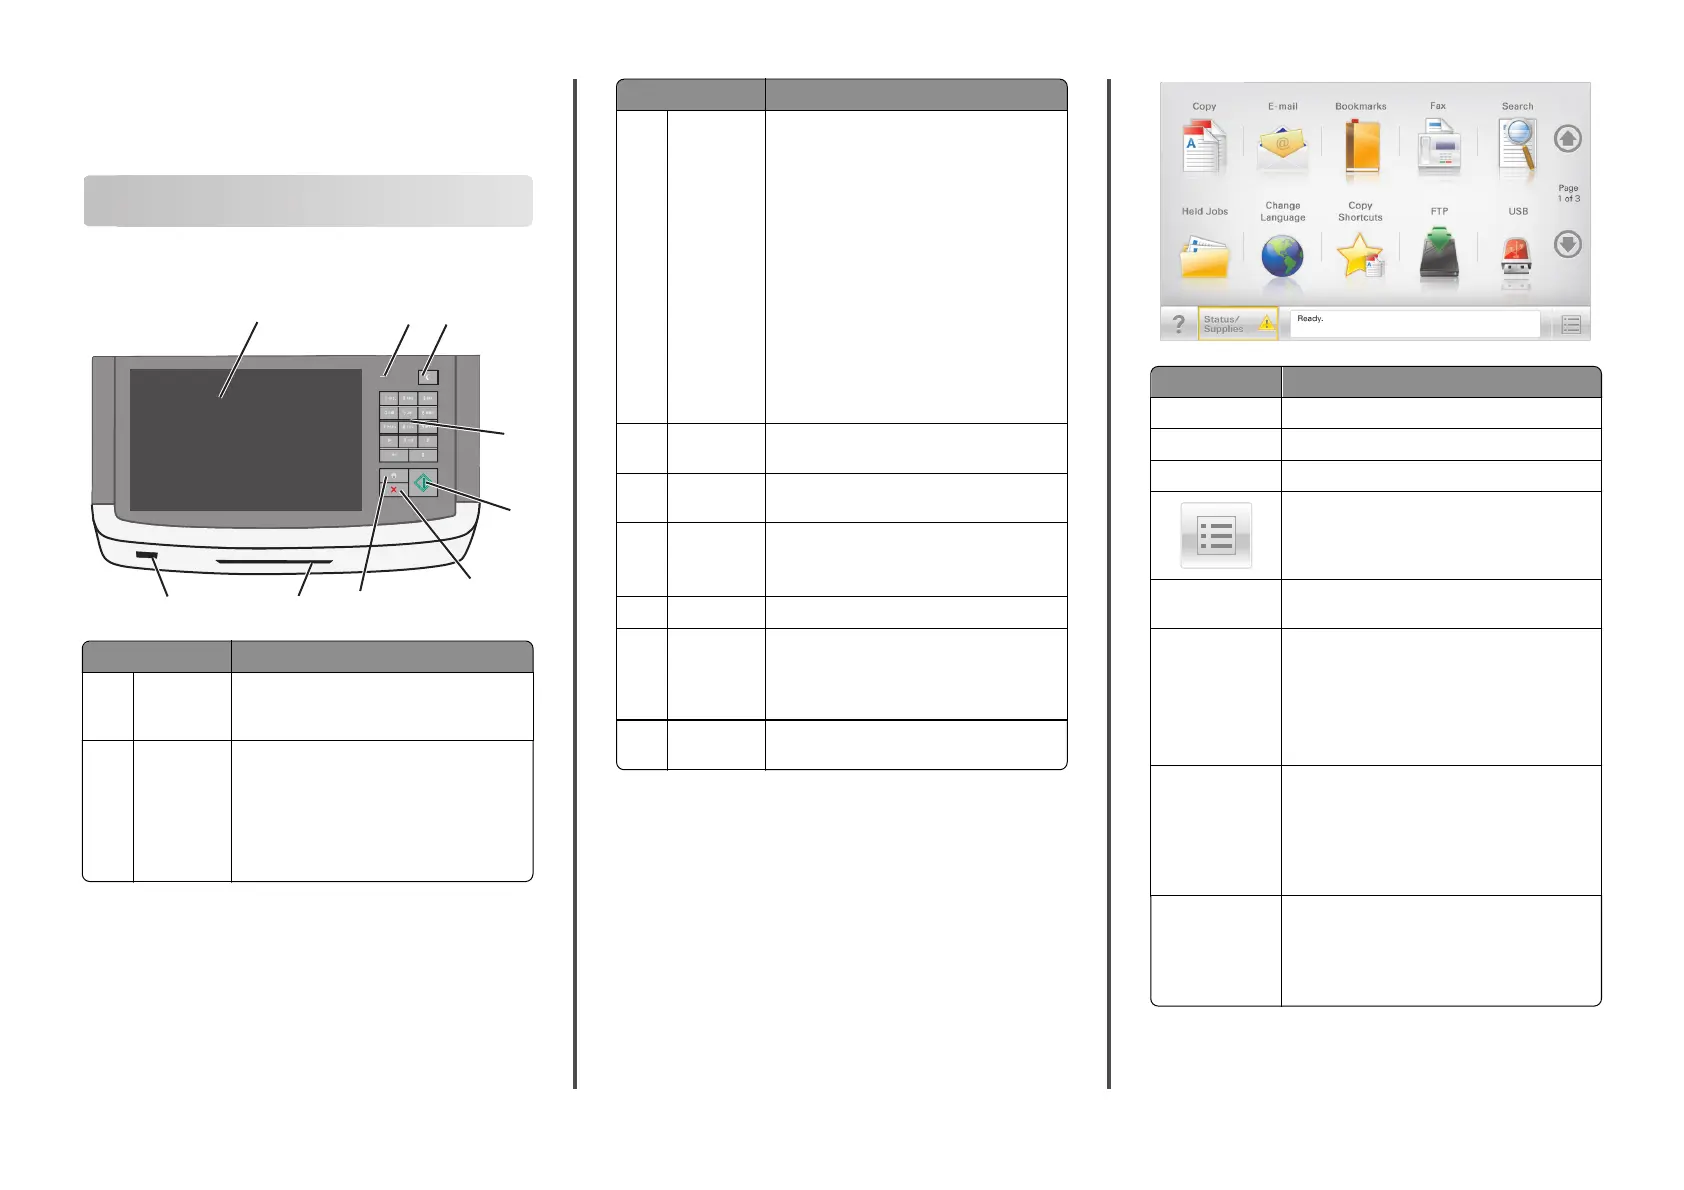
Understanding the home screen
When the printer is turned on, the display shows a basic screen,
referred to as the home screen. Touch the home screen buttons and
icons to initiate an action such as copying, faxing, or scanning; to open
the menu screen; or to respond to messages.
Note: Your home screen, icons, and buttons may vary depending on
your home screen customization settings, administrative setup, and
active embedded solutions.
Touch To
Copy Access the Copy menus and make copies.
E-mail Access the E-mail menus and send emails.
Fax Access the Fax menus and send fax.
Access the printer menus.
Note: These menus are available only when the
printer is in the Ready state.
FTP Access the File Transfer Protocol (FTP) menus and
scan documents directly to an FTP server.
Status message bar
Show the current printer status such as Ready
or Busy.
Show printer conditions such as Toner Low
or Cartridge Low.
Show intervention messages so the printer can
continue processing.
Status/Supplies
Display a warning or error message whenever
the printer requires intervention to continue
processing.
Access the messages screen for more
information on the message, and how to clear
it.
USB or USB
Thumbdrive
View, select, print, scan, or email photos and
documents from a flash drive.
Note: This button appears only when you return
to the home screen while a memory card or flash
drive is connected to the printer.
1
Touch To
Bookmarks Create, organize, and save a set of bookmarks
(URL) into a tree view of folders and file links.
Note: The tree view supports only bookmarks
created from this function, and not from any
other application.
Held Jobs Display all current held jobs.
Other buttons that may appear on the home screen:
Touch To
Search held jobs Search on any of the following items:
User name for held or confidential
print jobs
Job names for held jobs, excluding
confidential print jobs
Profile names
Bookmark container or print job
names
USB container or print job names for
supported file types
Release Held Fax Access the list of held faxes.
Note: This button appears only when
there are held faxes with a scheduled
hold time previously set.
Lock Device Open a password entry screen. Enter the
correct password to lock the printer
control panel.
Note: This button appears only when
the printer is unlocked and password
has been set.
Unlock Device Open a password entry screen. Enter the
correct password to unlock the printer
control panel.
Note: This button appears only when
the printer is locked. The printer
control panel buttons and shortcuts
cannot be used while this appears.
Touch To
Cancel Jobs Open the Cancel Jobs screen. The Cancel
Jobs screen shows three headings: Print,
Fax, and Network.
The following options are available
under the Print, Fax, and Network
headings:
Print job
Copy job
Fax profile
FTP
E-mail send
Each heading has a list of jobs shown in
a column under it which can show only
three jobs per screen. If more than three
jobs exist in a column, then an arrow
appears enabling you to scroll through
the jobs.
Change Language Launch the Change Language popup
window that allows you to change the
primary language of the printer.
Using the touch-screen buttons
Note: Your home screen, icons, and buttons may vary depending on
your home screen customization settings and administrative setup.
Sample touch screen
Submit
Touch To
Submit Submit changes made in the printer settings.
Sample Copy Print a sample copy.
Right arrow
Scroll to the right.
Left arrow
Scroll to the left.
Home
Return to the home screen.
Right increase
Select a higher value.
Left decrease
Select a lower value.
Exit
Exit from the current screen.
Tips
Open a context-sensitive Help dialog on the touch
screen.
2
Other touch-screen buttons
Touch To
Accept
Save a setting.
Cancel
Cancel an action or a selection.
Exit a screen and lets you return to the
previous screen without saving changes.
Reset
Reset values on the screen.
Radio button
Select or clear an item.
Features
Feature Description
Menu trail line:
Menus > Settings >
Copy Settings >
Number of Copies
A menu trail line is located at the top of each
menu screen. This feature shows the path taken
to arrive at the current menu.
Touch any of the underlined words to return to
that menu.
Number of Copies is not underlined since this is
the current screen. If you touch an underlined
word on the Numbe r of Copi es scree n before the
Number of Copies is set and saved, then the
selection is not saved, and it does not become
the default setting.
Attendance message
alert
If an attendance message affects a function,
then this icon appears and the red indicator light
blinks.
Feature Description
Warning
If an error condition occurs, then this icon
appears.
Setting up and using the home
screen applications
Notes:
Your home screen, icons, and buttons may vary depending on
your home screen customization settings, administrative setup,
and active embedded applications. Some applications are
supported only on select printer models.
There may be additional solutions and applications available for
purchase. To learn more, inquire at your point of purchase.
Finding the IP address of the printer
Note: Make sure your printer is connected to a network or to a print
server.
You can find the printer IP address:
From the top left corner of the printer home screen.
From the TCP/IP section in the Network/Ports menu.
By printing a network setup page or menu settings page, and then
finding the TCP/IP section.
Note: An IP address appears as four sets of numbers separated by
periods, such as 123.123.123.123.
Accessing the Embedded Web Server
The Embedded Web Server is the printer Web page that lets you view
and remotely configure printer settings even when you are not
physically near the printer.
1 Obtain the printer IP address:
From the printer control panel home screen
From the TCP/IP section in the Network/Ports menu
By printing a network setup page or menu settings page, and
then finding the TCP/IP section
Note: An IP address appears as four sets of numbers separated
by periods, such as 123.123.123.123.
2 Open a Web browser, and then type the printer IP address in the
address field.
3 Press Enter.
Note: If you are using a proxy server, then temporarily disable it
to load the Web page correctly.
Showing or hiding icons on the home
screen
1 From the Embedded Web Server, click Settings > General
Settings > Home screen customization.
A list of basic printer functions appears.
2 Select the check boxes to specify which icons appear on the printer
home screen.
Cleared check box items are hidden.
3 Click Submit.
Activating the home screen applications
Your printer comes with preinstalled home screen applications. To use
these applications, activate and set up these applications using the
Embedded Web Server. For more information about accessing the
Embedded Web Server, see “Accessing the Embedded Web Server” on
page 3.
For detailed information about configuring and using the home screen
applications, contact the place where you bought the printer.
Setting up Forms and Favorites
Icon Description
The application helps you simplify and
streamline work processes by letting you
quickly find and print frequently used online
forms directly from the home screen.
Note: The printer must have permission to
access the network folder, FTP site, or Web
site where the bookmark is stored. From the
computer where the bookmark is stored,
use sharing, security, and firewall settings to
allow the printer at least a read access. For
help, see the documentation that came with
your operating system.
3

Produktspecifikationer

Varumärke: Lexmark
Kategori: Skrivare
Modell: XS796dte
Vikt: 105570 g
Maximal upplösning: 1200 x 1200 DPI
Internminne: 1024 MB
Energisparläge: Ja
Standardgränssnitt: USB 2.0
Digital avsändare: Nej
Maximal kopieringsupplösning: - DPI
Fax: Nej
Utskrift: Färgutskrift
Dubbelsidig utskrift: Ja
Kopiering: Nej
Produktstorlek (BxDxH): 611 x 657 x 1204 mm
Hållbarhetscertifiering: ENERGY STAR
Nätverksansluten (Ethernet): Nej
USB-port: Ja
Strömförbrukning i vänteläge: 75 W
Strömförbrukning i avslaget läge: 0 W
Positionering på marknaden: Business
Strömförbrukning i PowerSave läge: 17 W
Drivrutiner medföljer: Ja
Utskriftsteknologi: laser
Utskriftshastighet (Svart, normalkvalitet, A4/US Brev): 50 ppm
Utskriftshastighet (färg, normal kvalitet, A4/US Letter): 47 ppm
Driftcykel per månad: - sidor per månad
Typisk elföbrukning: 6.787 kWh/vecka
Total inmatningskapacitet: - ark
Pappersinmatningstyp: Pappersfack
Total utmatningskapacitet: - ark
Högsta ISO A-seriestorlek: A4
Pappersfackets typ av media: Etiketter
ISO A-serie storlek (A0...A9): A4
Optisk skanningsupplösning: - DPI
Skanning: Nej
Ljudtrycksnivå (utskrivning): 52 dB
Allt i ett funktion: Skriv ut
Färg allt-i-ett funktionerna: Skriv ut
Strömförbrukning (genomsnittligt operativt): 850 W
Ljudeffektsnivå (vänteläge): 27 dB

Behöver du hjälp?

Om du behöver hjälp med Lexmark XS796dte ställ en fråga nedan och andra användare kommer att svara dig