Lightware DA2HDMI-4K-Plus Bruksanvisning
Lightware AV extender DA2HDMI-4K-Plus
Läs gratis den bruksanvisning för Lightware DA2HDMI-4K-Plus (2 sidor) i kategorin AV extender. Guiden har ansetts hjälpsam av 34 personer och har ett genomsnittsbetyg på 4.9 stjärnor baserat på 2 recensioner. Har du en fråga om Lightware DA2HDMI-4K-Plus eller vill du ställa frågor till andra användare av produkten? Ställ en fråga
Sida 1/2
Quick Start Guide
DA2HDMI-4K-Plus-A
DA2HDMI-4K-Plus
Further Information
The document is valid with the following rmware version: 1.0.0
The Product brief and further information of this appliance are available on www.lightware.eu.
See the Downloads section on the website of the product.
Contact Us
+36 1 255 3800
+36 1 255 3810
Lightware Visual Engineering LLC.
Peterdy 15, Budapest H-1071, Hungary
Doc. ver.: 1.1
19200046
INPUT
LIVE
AUDIO
OUTPUT
HDCP
enable
HDCP
disable
Important Safety Instructions
Please read and keep the information in the attached safety instructions supplied with the
product before you start using the device.
Introduction
DA2HDMI-4K-Plus-A is a multifunctional distribution amplier with built-in EDID Management
and Pixel Accurate Reclocking, supporting DVI and HDMI 1.4 signals with or without HDCP
encryption. The output signal is reclocked and stabilized using Lightware Pixel Accurate
Reclocking technology to remove jitter caused by long cables or poor quality sources. The
product features Advanced EDID Management and can emulate any HDMI display for
continuous video output, even if the attached display is disconnected or powered down.
Box Contents
Distribution Amplier5V DC Power Adaptor
with Interchangeable Plugs
USB Cable
Phoenix Combicon
5-pole connector
Safety and Warranty info,
Quick Start Guide
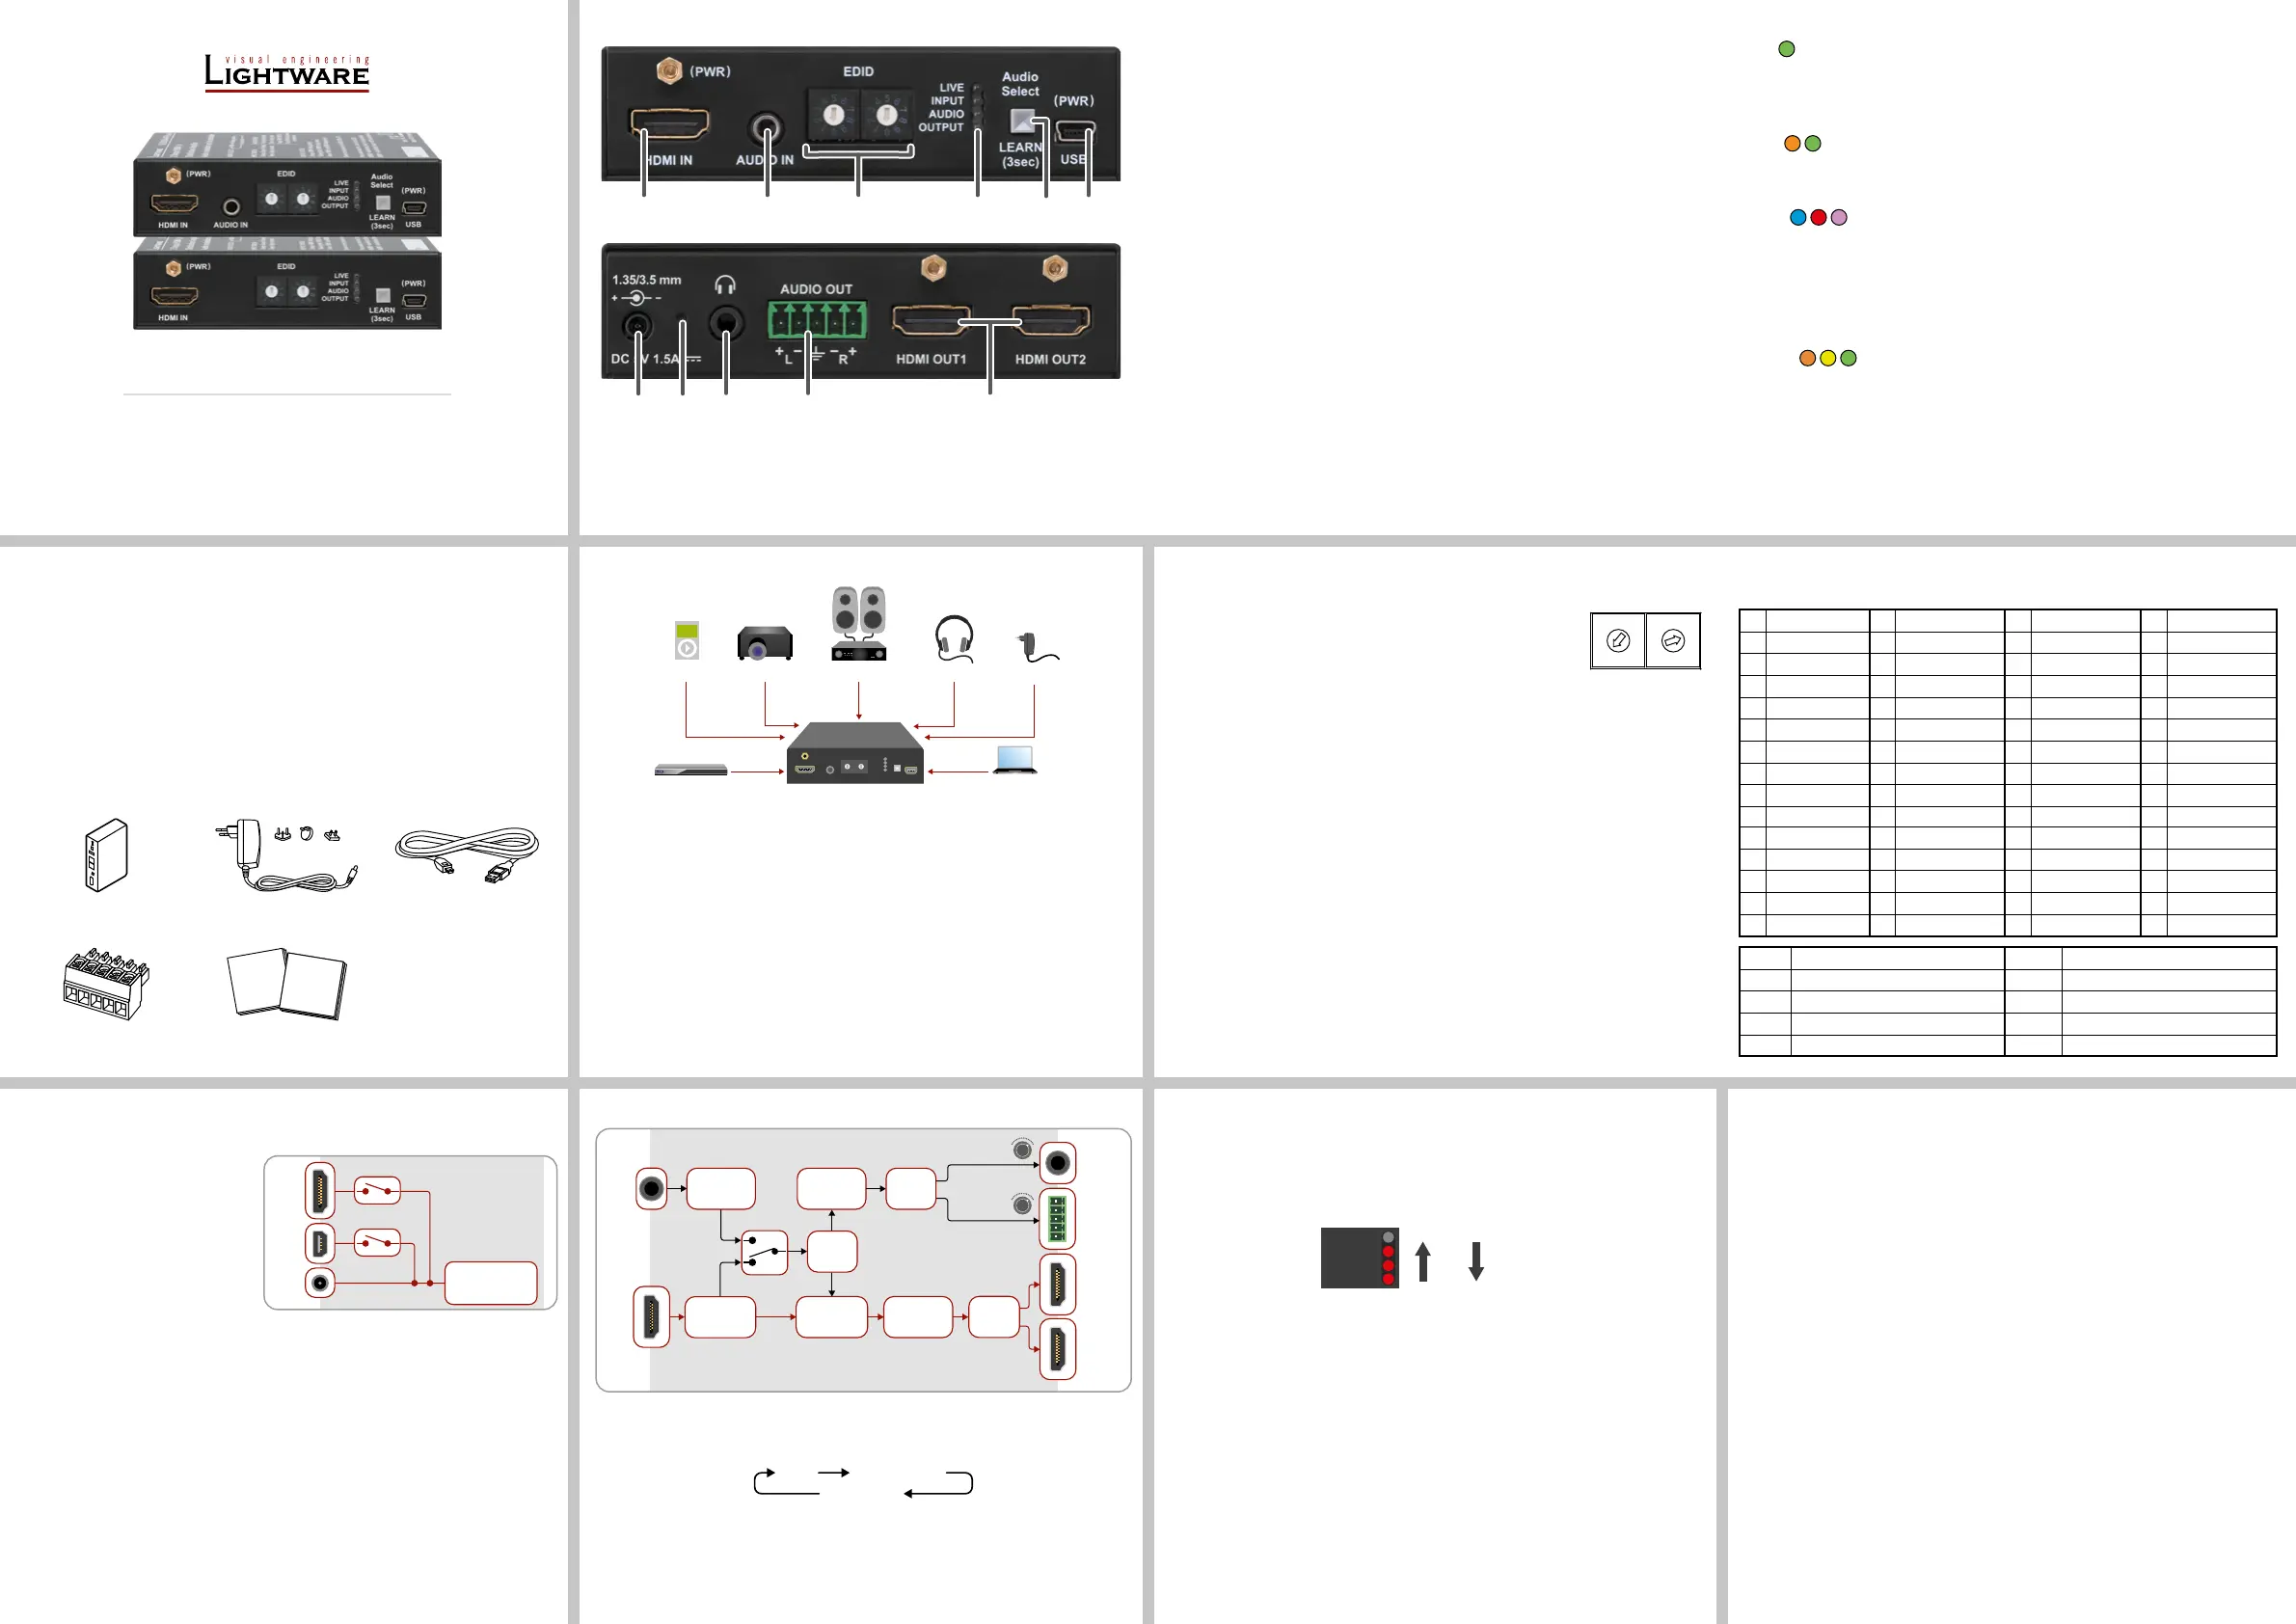
Front and Rear Views
1
HDMI InputHDMI input port for sources and for supplying the device with
power (depends on source capabilities). The applied cable
shall not be more than 20 m (4Kp30) or 30 m (1080p60).
2
Audio Input3.5 mm jack connector for assymetric analog audio signal.
3
Rotary SwitchesSelecting one of the EDID memory addresses.
4
Status LEDsThe LEDs display information about the signal states.
5
Learn Button
(Audio Select)
Store the EDID of the sink on HDMI OUT1, start the device in
Bootload mode, or toggle between the audio sources.
6
USB ControlUSB mini-B type connector to access special settings,
perform a rmware upgrade, and supply the unit with power.
7
DC InputInput for the supplied power adaptor.
8
Hidden ButtonButton for restarting the unit.
9
Phones3.5mm jack output connector which is the same as the
Analog Audio Output (Phoenix).
q
Audio Output5-pole Phoenix connector for balanced analog audio; the
signal is de-embedded from the HDMI outputs.
w
HDMI Outputs
(mirrored)
Identical video output ports. Connect an HDMI cable between
the sink and the unit.
Legend
Front Panel LEDs
LIVE
BLINKING (slow): the device is powered properly and operational.
BLINKING (fast): the device is in Bootload mode.
ON: shows the malfunction of the CPU; please restart the device.
INPUT
ON (orange): source is connected (5V detected).
ON (green): signal is present.
AUDIO
ON (blue): analog audio input is selected to be embedded in the video stream.
ON (red): HDMI, multichannel / compressed audio signal is detected.
ON (purple): HDMI, PCM 2 channel audio signal is detected.
BLINKING: autoselect is enabled.
OFF: no audio is transmitted.
OUTPUT
ON (orange): hotplug detected on HDMI OUT1.
ON (yellow): hotplug detected on HDMI OUT2.
ON (green): hotplug detected on HDMI OUT 1 and HDMI OUT 2.
DA2HDMI-4K-Plus does not contain Analog audio connectors.
Never use a third-party power supply but the supplied one or use Lightware’s rack-
mountable power supply unit with the appropriate DC-DC cable.
IDResolutionIDResolutionIDResolutionIDResolution
00Copy HDMI114640x480p59281920x1080i50_2423440x1440p24
01640x480p6015720x480p59291920x1080i60433440x1440p30
02800x600p6016720x576p50301920x1080i60442560x1600p60
031024x768p60171280x720p50311920x1080p24452560x2048p50
041280x768p50181280x720p60321920x1080p30463840x2160p24
051280x768p60191024x768p60331920x1080p50473840x2160p30
061280x1024p50201366x768p60341920x1080p60483840x2160p60
071280x1024p60211280x800p60351920x1080p60494096x2160p24
081600x1200p50221440x900p60362048x1080p60504096x2160p30
091600x1200p60231600x900p60372560x1080p60514096x2160p60
101920x1200p50241280x1024p50381600x1200p50523840x2400p24
111920x1200p60251280x1024p60391600x1200p60533840x2400p30
121440x480i60261440x1080p60401920x1200p6054720p60_3D
131440x576i50271920x1080i50_1412560x1440p60551080p60_3D
IDDescriptionIDDescription
56Universal DVI60Universal HDMI 4K PCM AUDIO
57Universal HDMI PCM AUDIO61Universal HDMI 4K ALL AUDIO
58Universal HDMI ALL AUDIO62-98User EDIDs
59Universal HDMI DC ALL AUDIO99Copy HDMI2
EDID Memory Structure
01-11: DVI EDIDs; 12-55: HDMI EDIDs
HDCP Management
The HDCP setting of the HDMI input port can be enabled/disabled on the front panel as follows:
1. Turn the EDID rotary switches to ‘01’ position.
2. Press the LEARN button and keep it pressed for three seconds.
3. The lower three LEDs give displays if the HDCP state is changed:
HDCP is enabled: LEDs are dark and light up sequentially.
HDCP is disabled: LEDs light and get dark sequentially.
EDID Emulation
Selecting an EDID
Turn the EDID address rotary switches to the desired position. Use a at
head screwdriver to change the address. The left switch sets the tens
value, the right switch gives the ones value of the EDID.
Avoid the use of keys, coins, knives and other sharp objects.
EDID Learning (OUTPUT LED)
The EDID of the sink connected to HDMI OUT 1 can be stored in the user EDID memory:
1. Turn the EDID rotary switches to the desired position (between #62 - #98).
2. Press the LEARN button and keep it pressed for three seconds.
3. The OUTPUT LED turns to dark for a second then provides feedback:
BLINKING (green): EDID learning is successful, the EDID is stored.
BLINKING (red): EDID learning is failed.
4. The LED turns to dark for a second, then shows the state(s) of the connected sink(s).
Please note that the EDIDs stored in the User EDID memory are deleted when the factory
default settings are restored.
Further EDID Options
The following functions are available when connecting to the device by LDC:
EDID learning or importing an EDID, deleting an EDID (from the user memory).
Exporting an EDID and saving it as a le.
Creating a custom EDID by using the EDID Editor or the Easy EDID Creator.
Port Diagram
Audio Selection (only on Plus-A variant)
Press the Audio select (LEARN) button to toggle the audio options:
The device is able to select an audio source automatically: activate the Autoselect mode by
the Audio select button. In this case the Analog input port has higher priority: if the Autoselect
mode is active and a 3.5mm Jack plug is connected to the Audio input port, it will be embedded
in the HDMI stream.
Powering Options
The device can be powered by any of the following ways:
Using the supplied power adaptor
(recommended).
Connect the device to a proper
USB port by the supplied cable.
Connecting an HDMI source to the
HDMI input port.
Make sure that the port is able to
supply 5V 500 mA current.
If the power adaptor is connected, it will supply the device independently from the HDMI/
USB ports. If the adaptor is disconnected from the DC input connector the device tries to
use a different power source (HDMI or USB) if it is enabled and connected. (If the adaptor is
unplugged from the AC socket but the DC plug is still connected, the device will be switched
off and cannot be changed to another power source. Unplug the DC cable from the device to
be powered by USB or HDMI.)
The USB and HDMI powering modes can be enabled/disabled via LDC software.
If you are not sure that your USB or HDMI port has enough power, disable the
powering over USB and HDMI by Lightware Device Controller software. If the supplied
power over USB or HDMI is not enough the device will switch off. In the case of any
strange behavior of the device, please disconnect the USB and HDMi cables and
connect the 5V DC adaptor.
Installation
1
Connect the desired source to the HDMI input port.
2
Optionally connect an audio source to the Audio input port.
3
Connect one or two sink device(s) to the HDMI output port(s).
4
Optionally connect an audio device (e.g. amplier) to the Phoenix Audio outputport.
5
Optionally connect a headphone to the 3.5 mm Jack Audio output port.
6
Optionally connect a laptop or PC to the USB port and run LDC software.
7
Connect rstly the power cord of the supplied adaptor to the DC input, then secondly
to the AC power socket.
Safety and
warranty
info
Quick
Start
Guide
31
7
546
w
9q
2
8
0
1
2
3
4
5
6
7
8
9
0
1
2
3
4
5
6
7
8
9
Autoselect
HDMI
Analog audio
Audio
cable
Audio
cable
4
Audio
cable
5
HDMI
Power amplifierHeadphonePower adaptorProjector
37
2
HDMIBlu-ray playerLaptop
Music player
1
USB
6
Audio
in
HDMI
in
Phones
Analog
audio
out
HDMI
out1
HDMI
out2
Audio de-
embedder
Audio select
Audio
embedder
HDMI
splitter
A/D
converter
Analog
audio
Analog
audio
D/A
converter
Audio
splitter
Audio
splitter
Reclocker
USB
DC
Input
HDMI
Input
SW config
SW config
Power
Management
Produktspecifikationer
| Varumärke: | Lightware |
| Kategori: | AV extender |
| Modell: | DA2HDMI-4K-Plus |
Behöver du hjälp?
Om du behöver hjälp med Lightware DA2HDMI-4K-Plus ställ en fråga nedan och andra användare kommer att svara dig
AV extender Lightware Manualer

27 Oktober 2024
12 September 2024
12 September 2024
12 September 2024
12 September 2024
12 September 2024
12 September 2024
12 September 2024
12 September 2024
12 September 2024
AV extender Manualer
Nyaste AV extender Manualer
8 April 2025
1 April 2025
1 April 2025
1 April 2025
1 April 2025
1 April 2025
26 Februari 2025
25 Februari 2025
20 Februari 2025
20 Februari 2025