Midland LXT535VP3 Bruksanvisning
Läs gratis den bruksanvisning för Midland LXT535VP3 (4 sidor) i kategorin Radio. Guiden har ansetts hjälpsam av 18 personer och har ett genomsnittsbetyg på 4.7 stjärnor baserat på 4 recensioner. Har du en fråga om Midland LXT535VP3 eller vill du ställa frågor till andra användare av produkten? Ställ en fråga
Sida 1/4
Welcome to the world of Midland electronics
Congratulations on your purchase of a high quality MIDLAND
product. Your 2-way radio represents state-of-the-art high-tech
engineering. Designed for FRS (Family Radio Service) operation, this
compact package is big on performance. It is a quality piece of
electronic equipment, skillfully constructed with the finest
components. The circuitry is all solid-state and mounted on a rugged
printed circuit board. Your two-way radio is designed for reliable and
trouble-free performance for years to come.
Features
- 22 FRS Channel
- Call Alert
- Scan Function
- Roger Beep Tone
- Silent Operation
- Keypad Lock
- Power HI/LO Settings
- Auto Squelch
- Speaker / Microphone Jacks
- Battery Life Extender
- Battery Low Indicator
This device complies with Part 15 of the FCC Rules. Operation is
subject to the following two conditions: (1) this device does not
cause harmful interference, and (2) this radio must accept any
interference that may cause undesired operation.
To maintain compliance with FCC’s RF exposure guidelines, for
body-worn operation, this radio has been tested and meets the
FCC RF exposure guidelines when used with Midland Radio
Corp. accessories supplied or designated for this product. Use of
other accessories may not ensure compliance with FCC RF
exposure guidelines.
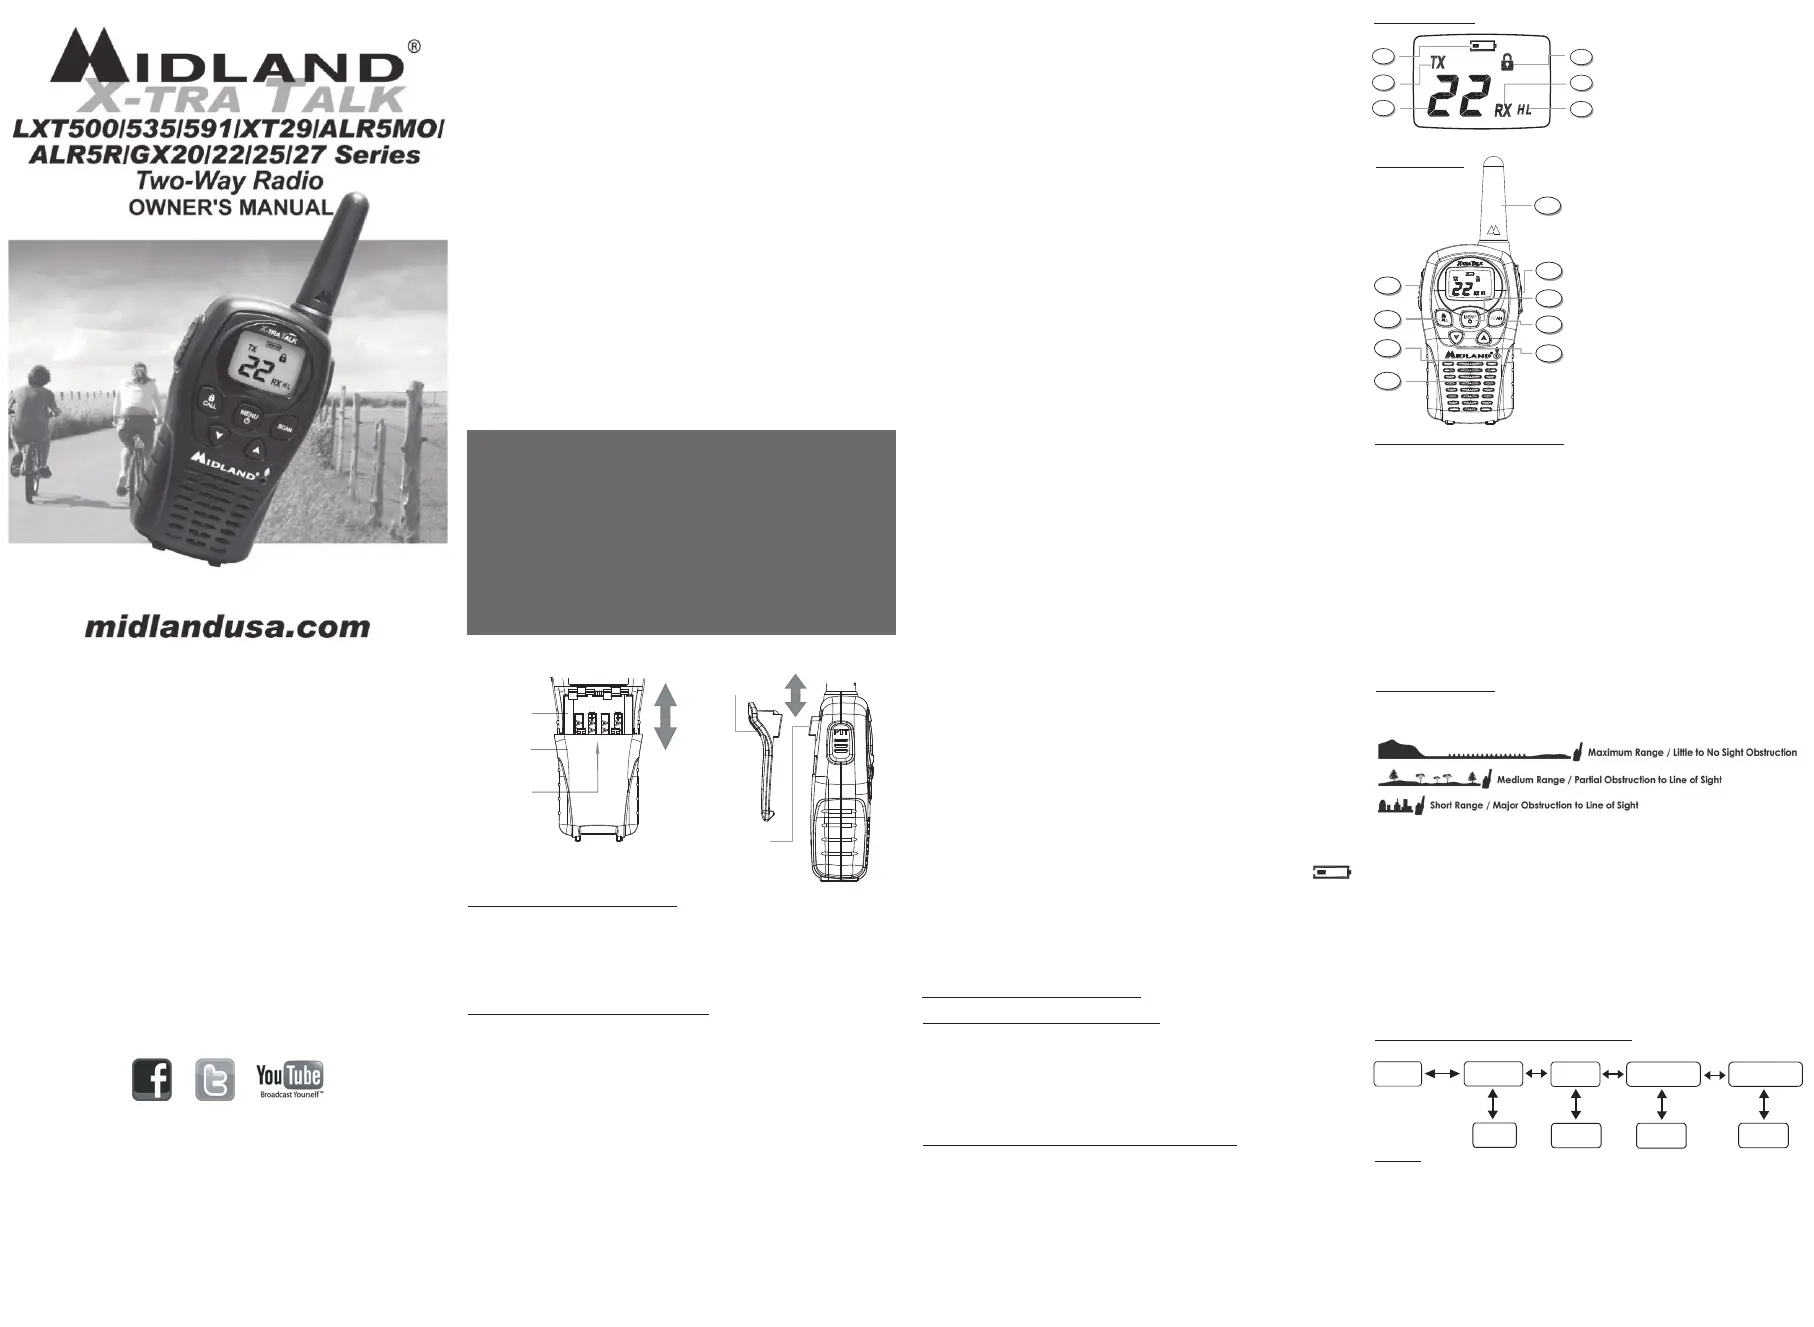
LCD DISPLAY
1. LOW BATTERY ICON– Indicates the
battery level is low.
2. TRANSMIT (TX) ICON– Indicates
radio is transmitting a signal.
3. CHANNEL NUMBER– Changes from
1~22 on FRS band.
4.KEY LOCK ICON – Indicates KEY
LOCK mode is on.
5. RECEIVE (RX) ICON– Indicates
radio is receiving a transmission.
6. TRANSMIT POWER LEVEL ICON–
Indicates TX Power setting (H/L)
1
CONTROLS
7. PTT Button– Press and hold to
transmit voice communication.
8. CALL/LOCK Button– Press to send
a CALL Alert signal. Press and hold to
turn KEY LOCK on/off.
9. MIC– Built-in microphone.
10. SPEAKER– Built-in speaker.
11. ANTENNA
12. EXTERNAL SPEAKER/MIC/CHG.
JACK
13. POWER / MENU Button– Press and
hold for at least 3 seconds to turn the
radio on/off. Press momentarily to
access Menu mode.
14. SCAN Button– Press to enter SCAN
mode.
15. UP
s
and DOWN
t
Buttons–
Make adjustments in MENU mode.
14
13
12
10
9
8
7
6
5
4
3
2
11
BATTERY INSTALLATION
Your radio operates with either a NiMH battery pack or optional 4 AAA
alkaline batteries. The belt clip should be removed to ease installation or
removal of the batteries.
To install the batteries:
1. With the back of the radio facing you, remove the belt clip (see
diagram on the next page) for easy access, then remove the Battery
Cover by pressing down on the top center and sliding it down from the
radio.
2. Insert 4 AAA batteries observing the polarity as shown. Installing
the batteries incorrectly will prevent the unit from operating or may
damage the unit.
3. Return the Battery Cover by sliding it up on the radio. Replace the
belt clip, making sure it locks into place.
15
MIDLAND RADIO CORPORATION
5900 Parretta Drive
Kansas City, MO 64120
Call 816.241.8500
We’d love to hear from you! Let us know what you
think of your new Midland product on
or by visiting us at
midlandusa.com
Note: Features & Specifications are subject to change without
notice. MIDLAND is not responsible for unintentional errors or
omissions on its packaging.
BATTERY
COMPARTMENT
BATTERY
COMPARTMENT
COVER
Press here and
push down to open
BELT CLIP
LOCK TAB
BELT CLIP
LATCH
INSTALLING THE BELT CLIP
To install the BELT CLIP, slide the clip up into the slot on the back of
the radio until the BELT CLIP LATCHclicks. To remove the BELT
CLIP, press the LOCK TABup, then gently pull the belt clip down
toward the bottom of the radio.
CHARGING THE BATTERY PACK
Your radio is equipped to use a rechargeable NiMH battery pack
which can be recharged with the optional desktop charger (as
described below). The radio can also be charged by inserting the AC
adapter into the radio charge jack. Initial charge time is 24 hours.
Charge time is about 12 hours thereafter. For maximum battery life,
we recommend charging the battery pack when the low battery icon
comes on. Remove the radios from the charger when the charge time
expires.
To charge using a Desktop Charger:
1.Place the rechargeable battery packs in the radios.
2. Connect the AC adapter into an AC wall outlet.
3. Insert the AC adapter plug (or DC Cigarette Lighter adapter if
charging in vehicle) into the desktop charger jack.
4. Place the units into the desktop charger slot and note that the LED
indicator with REDcolor will light up, indicating charging function.
In order to ensure that the battery pack is fully charged, it is
recommended that the battery pack be charged for at least 12
hours with the radio turned OFF.
1. Only use our NiMH battery pack and AC adapter.
2. Do not attempt to charge alkaline batteries or any batteries
or battery packs other than the one indicated in the manual.
This may cause leakage and damage to the radio.
3. For long term storage of the radio, turn the radio OFF and
remove the batteries from the radio.
LOW BATTERY LEVEL INDICATOR
When the battery voltage gets low, the LOW BATTERY ICON
will blink along with the message “bt Lo” on the display. When using
the rechargeable battery pack, the low battery icon will indicate that
you are very close to the batteries being exhausted. When using AAA
Alakaline batteries, the low battery icon means you have about 50%
of battery life remaining.
!
POWER ON/OFF AND VOLUME
Press the POWER/MENU button for at least 3 seconds to turn the
radio on/off. During Power On, the radio will beep 3 times with
different tones, the LCD will display all icons for 1 second and the
LCD display will indicate the last channel selected.
To increase/decrease the volume level, press the
s\t
buttons
during RX or STANDBYmode.
TRANSMITTING AND RECEIVING A CALL
To communicate, all radios in your group must be set to the same
channel.
1. For maximum clarity, hold the radio at least 1 inch (2.5 cm) from
your mouth.
2. Press and hold the PTTbutton and speak in a normal voice
into the microphone. The TXicon will appear continuously on
the LCD display while transmitting.
3. To receive a call, release the PTTbutton. The RXicon will appear
on the display when your radio is receiving a transmission.
OPERATING YOUR RADIO
ABOUT RANGE
Your LXT Series radios are designed to give you maximum range
under optimum conditions.
Optimum Conditions are:
lOver water
lOpen rural areas without obstructions
lFlat areas where you can see the other person
To ensure you get maximum range:
lBe sure to use fresh or fully charged batteries - low batteries will
cause low power conditions.
lBe sure to set your radio to use Hi power.
LXT Series QUICK REFERENCE CHART
SCAN
Your radios can scan all 22 channels for activity. To enter, quickly
press the SCANbutton. Repeat the same procedure to exit. Your
radio will rapidly scan each of the 22 channels and stop on any active
channel for 4 seconds before resuming scan.
When you press the PTTbutton to transmit on an active channel, the
scanning function will stop and remain on the active channel. To
resume scanning, quickly press the SCANbutton.
MENU
Channel
1~22
Roger Beep
On/Off
Power
H/L
Silent Operation
On/Off
Rev J
IMPORTANT NOTICE
Exposure To Radio Frequency Energy
Your Midland radio is designed to comply with the following national and
international standards and guidelines regarding exposure of human
beings to radio frequency electromagnetic energy:
- United States Federal Communications Commission, Code of Federal
Regulations: 47 CFR part 2 sub-part J
- American National Standards Institute (ANSI)/Institute of Electrical &
Electronic Engineers (IEEE) C95. 1-1992
- Institute of Electrical and Electronic Engineers (IEEE) C95. 1-1999
Edition
- National Council on Radiation Protection and Measurements (NCRP) of
the United States, Report 86, 1986
- International Commission on Non-lonizing Radiation Protection
(ICNIRP) 1998
To control your exposure and ensure compliance with the general
population or uncontrolled environment exposure limits, transmit no more
than 50% of the time. The radio generates measurable RF energy
exposure only when transmitting.
Body-Worn Operation
If you wear the radio on your body when transmitting always use Midland-
supplied or approved belt clip, holster, case, or body harness for this
product. Use of any accessories not supplied or approved by Midland may
exceed FCC/Health Canada RF exposure guidelines. If you do not use
any accessories supplied or approved by Midland, ensure the radio and
its antenna are at least 1 inch (2.5cm) from your body when
transmitting.
Produktspecifikationer
| Varumärke: | Midland |
| Kategori: | Radio |
| Modell: | LXT535VP3 |
| Vikt: | 90.7 g |
| Maximal räckvidd: | 38624 m |
| Batterityp: | AAA |
| Antal kanaler (totalt): | 22 kanaler |
| Antal batterier: | 4 |
| Produktstorlek (BxDxH): | 57.15 x 44.45 x 152.4 mm |
| Batterier medföljer: | Ja |
| Arbetsfrekvens: | 462.550 - 467.7125 MHz |
| Indikator för låg batterinivå: | Ja |
| Uppladdningsbara: | Ja |
| Bälteshållare: | Ja |
Behöver du hjälp?
Om du behöver hjälp med Midland LXT535VP3 ställ en fråga nedan och andra användare kommer att svara dig
Radio Midland Manualer

2 Oktober 2025
1 Oktober 2025
1 Oktober 2025
1 Oktober 2025
1 Oktober 2025
1 Oktober 2025
1 Oktober 2025
30 September 2025
30 September 2025
30 September 2025
Radio Manualer
Nyaste Radio Manualer
30 Mars 2026
28 Mars 2026
22 Mars 2026
19 Mars 2026
16 Mars 2026
16 Mars 2026
12 Mars 2026
12 Mars 2026
11 Mars 2026
5 Mars 2026