MJX T53 Bruksanvisning
Läs gratis den bruksanvisning för MJX T53 (7 sidor) i kategorin Leksaker. Guiden har ansetts hjälpsam av 46 personer och har ett genomsnittsbetyg på 4.9 stjärnor baserat på 8 recensioner. Har du en fråga om MJX T53 eller vill du ställa frågor till andra användare av produkten? Ställ en fråga
Sida 1/7
Ages 14+
Introduction
Safety Guidelines
Thank you for purchasing this product, please read this maunal carefully before use and
retain it for future reference.
1.Coaxical-rolor design,built-in gyro and unique function of digital speed setting and
operation of the helicopter.It is the best choice for beginner.
2.By using of latest infrared auto connection technology, up to two helicopters can be
operated simultaneously with high stability.
3.Full charged battery can support the helicopter flys about 9 mins.
4.Tripple circuit protections make the flight more safer and improve the service life of the
helicopter.
5.The helicopter has Videography and Photography function.
1. Please read this instruction manual carefully before playing and operate the product
according to the manual.
2. Keep the small accessories away from the kids to avoid accident.
3. Keep batteries away from fire or high temperature environment.
4. When flying the helicopter, keep it 1 ~ 2 meters away from user or others to avoid
injury due to collision.
5. Not to decompose or modify the product which may cause malfunction or accident.
6. Fly the helicopter within your eye vision for easy and safety control.
7. Need adult supervision when this helicopter is being played by children.
8. Only batteries of the same or equivalent type as recommended are to be used.
9. Insert batteries with correct polarity.
10. Non rechargeable batteries are not to be charged.
11. Do not mix old and new batteries.
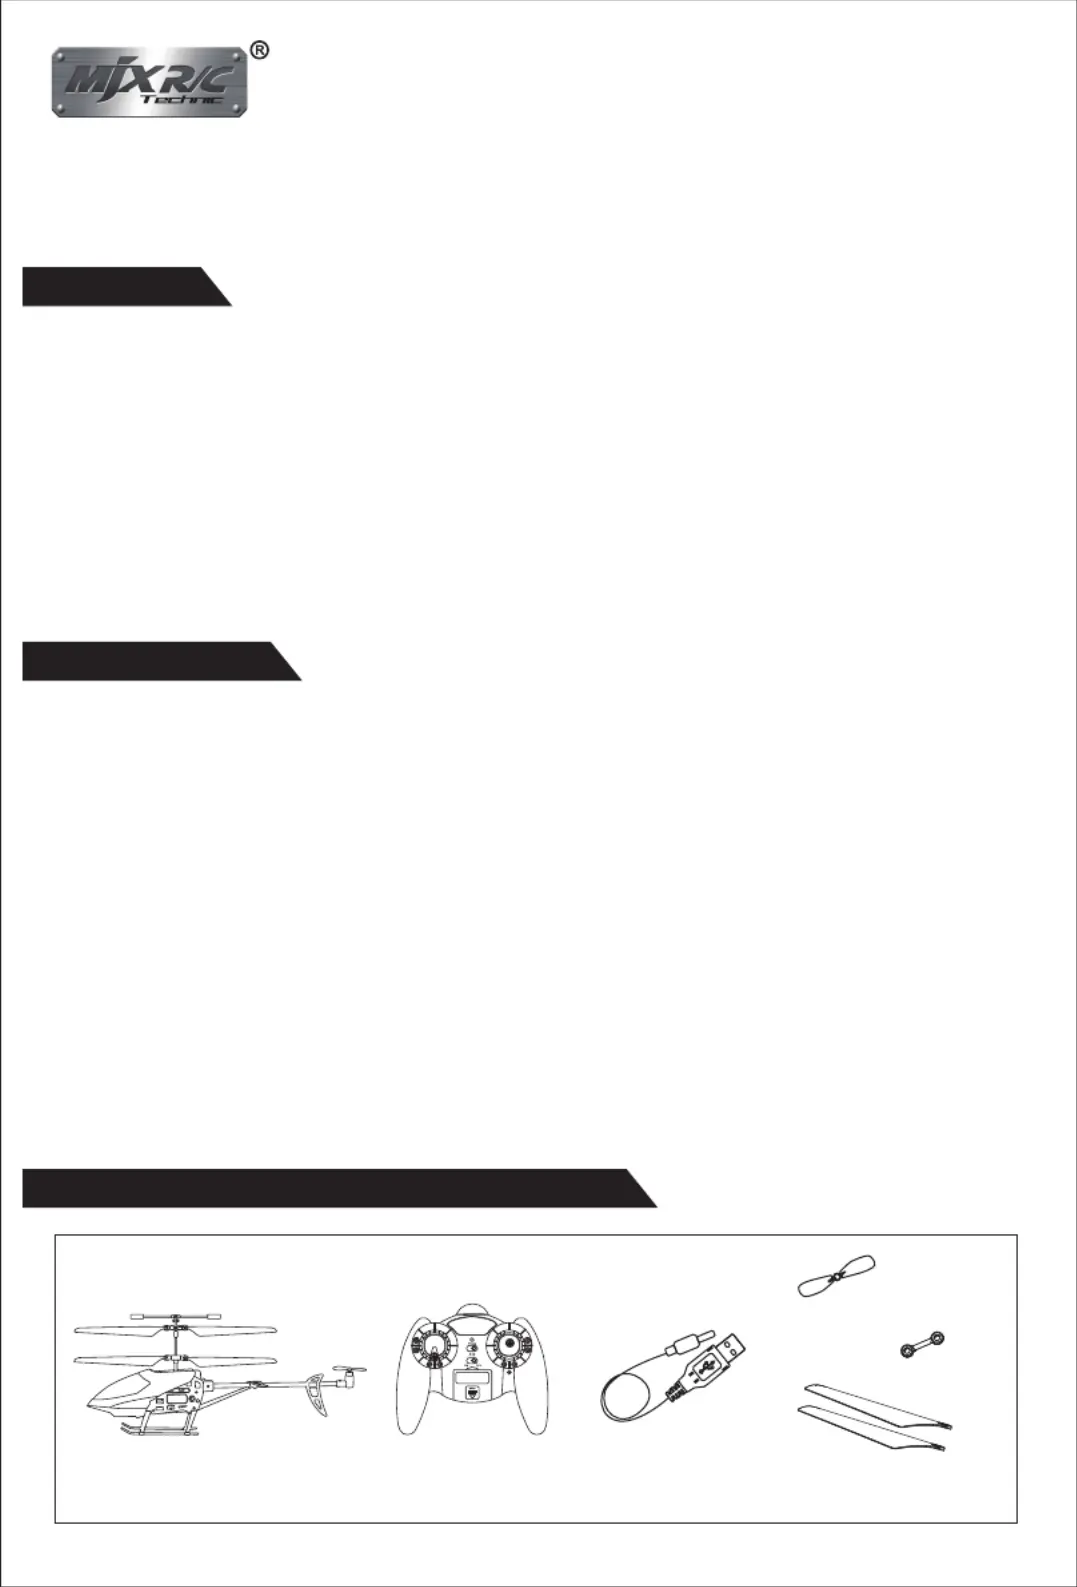
Product / Spare Parts Included in This Packaging
3-CHANNEL DIGITAL PROPORTIONAL R/C COAXIAL HELICOPTER MODEL
T-SERIES
Remote Control
Tail rotor
rotor blade
connect buckle
USB Charger
Helicopter
ITEM NO.T53/T653
Produktspecifikationer
| Varumärke: | MJX |
| Kategori: | Leksaker |
| Modell: | T53 |
| Färg på produkten: | Zwart |
| Årlig-energiförbrukning: | 39.4 kWu |
| Förpackningens vikt: | 4850 g |
| Energieffektivitetsklass (gammal): | B |
| Användarmanual: | Ja |
| Blåtand: | Nee |
| Skärm diagonal: | 22 " |
| Upplösning: | 1366 x 768 Pixels |
| Original bildförhållande: | 16:9 |
| Ljudformat som stöds: | AAC, HE-AAC, LPCM, MP3 |
| Videoformat som stöds: | AVI, DAT, H.264, M-JPEG, MKV, MP4, MPEG1, MPEG2, MPEG4, VOB |
| Ethernet LAN: | Nee |
| Videolägen som stöds: | 1080i, 1080p, 480i, 480p, 576i, 576p, 720i, 720p |
| Betraktningsvinkel, horisontell: | 178 ° |
| Betraktningsvinkel, vertikal: | 178 ° |
| Integrerad minneskortläsare: | Nee |
| Ljudsystem: | NICAM Stereo, Dolby Digital Plus |
| Ljusstyrka: | 300 cd/m² |
| Förpackningsmått (BxDxH): | 655 x 125 x 425 mm |
| Antal USB 2.0-portar: | 1 |
| Antal HDMI-portar: | 2 |
| Kompositvideoingång: | 1 |
| DVI-port: | Nee |
| Inbyggda högtalare: | Ja |
| Genomsnittlig effekt: | 5 W |
| Strömförbrukning (i standby): | 0.3 W |
| Strömförbrukning (max): | 45 W |
| Antal högtalare: | 2 |
| Hörlursutgångar: | 1 |
| Analog signalformat: | NTSC, NTSC 4.43, PAL BG, PAL DK, PAL I, SECAM B/G, SECAM D/K, SECAM L |
| HD typ: | HD |
| 3D: | Nee |
| Bildformat som stöds: | JPG |
| Respons tid: | 9 ms |
| Grafikupplösningar som stöds: | 1366 х 768 |
| VESA montering: | Ja |
| Panelmonteringsgränssnitt: | 75 x 75 mm |
| Kontrastförhållande (dynamisk): | 3000000:1 |
| Djup (utan bas): | 35 mm |
| Höjd (utan bas): | 341 mm |
| Bredd (utan bas): | 530 mm |
| Vikt (utan bas): | 3850 g |
| PC-ingang (D-Sub): | Ja |
| Common Interface Plus (CI+): | Ja |
| Digitalt signalformat: | DVB-C, DVB-T |
| Enhetsbredd (med stativ): | 530 mm |
| Djupenhet (med stativ): | 159 mm |
| Enhetshöjd (med stativ): | 467 mm |
| Vikt (med stativ): | 4200 g |
| Skrivbordsställ: | Ja |
| Lokal nedbländning: | Ja |
| Brusreducering: | Ja |
| Möjlighet att justera skärmmått: | 4:3 |
| Text-TV: | Ja |
| Elektronisk TV-guide: | Ja |
| 24p: | Ja |
| Spelläge: | Ja |
| Smarta lägen: | Dynamic, Game, Movie, Standard |
| LED backlight-type: | Edge-LED |
| Teletekst: | 1000 pagina's |
| Lämplig för WiFi: | Nee |
| Antal SCART-portar: | 1 |
| Föräldratillsyn: | Ja |
| Antal kanaler: | 9999 kanalen |
| Kamfilter: | 3D |
| Strömförbrukning (genomsnitt): | 27 W |
| Synlig skärmdiameter: | 55 cm |
| Fjärrkontroll ingår: | Ja |
| Wifi: | Nee |
| AC-ingångsspänning: | 220 - 240 V |
| AC-ingångsfrekvens: | 50 - 60 Hz |
| Batterier-ingår: | Ja |
Behöver du hjälp?
Om du behöver hjälp med MJX T53 ställ en fråga nedan och andra användare kommer att svara dig
Leksaker MJX Manualer

4 April 2025
4 April 2025
3 April 2025
14 Mars 2025
9 Mars 2025
7 Februari 2025
4 Februari 2025
1 Februari 2025
12 Januari 2025
12 Januari 2025
Leksaker Manualer
Nyaste Leksaker Manualer
9 April 2025
9 April 2025
9 April 2025
9 April 2025
9 April 2025
9 April 2025
9 April 2025
9 April 2025
8 April 2025