PCE Instruments PCE-5000 Bruksanvisning

Läs nedan 📖 manual på svenska för PCE Instruments PCE-5000 (20 sidor) i kategorin Mätutrustning. Denna guide var användbar för 15 personer och betygsatt med 4.6 stjärnor i genomsnitt av 8 användare

Sida 1/20
PCE Americas Inc.
1201 Jupiter Park Drive
Suite 8
Jupiter
FL-33458
USA
From outside US: +1
Tel: (561) 320-9162
Fax: (561) 320-9176
info@pce-americas.com
PCE Instruments UK Ltd.
Unit 11
Southpoint Business Park
Ensign way
Hampshire / Southampton
United Kingdom, SO31 4RF
From outside UK: +44
Tel: (0) 2380 98703 0
Fax: (0) 2380 98703 9
info@pce-instruments.co.uk
www.pce-instruments.com/english
www.pce-instruments.com
Manual
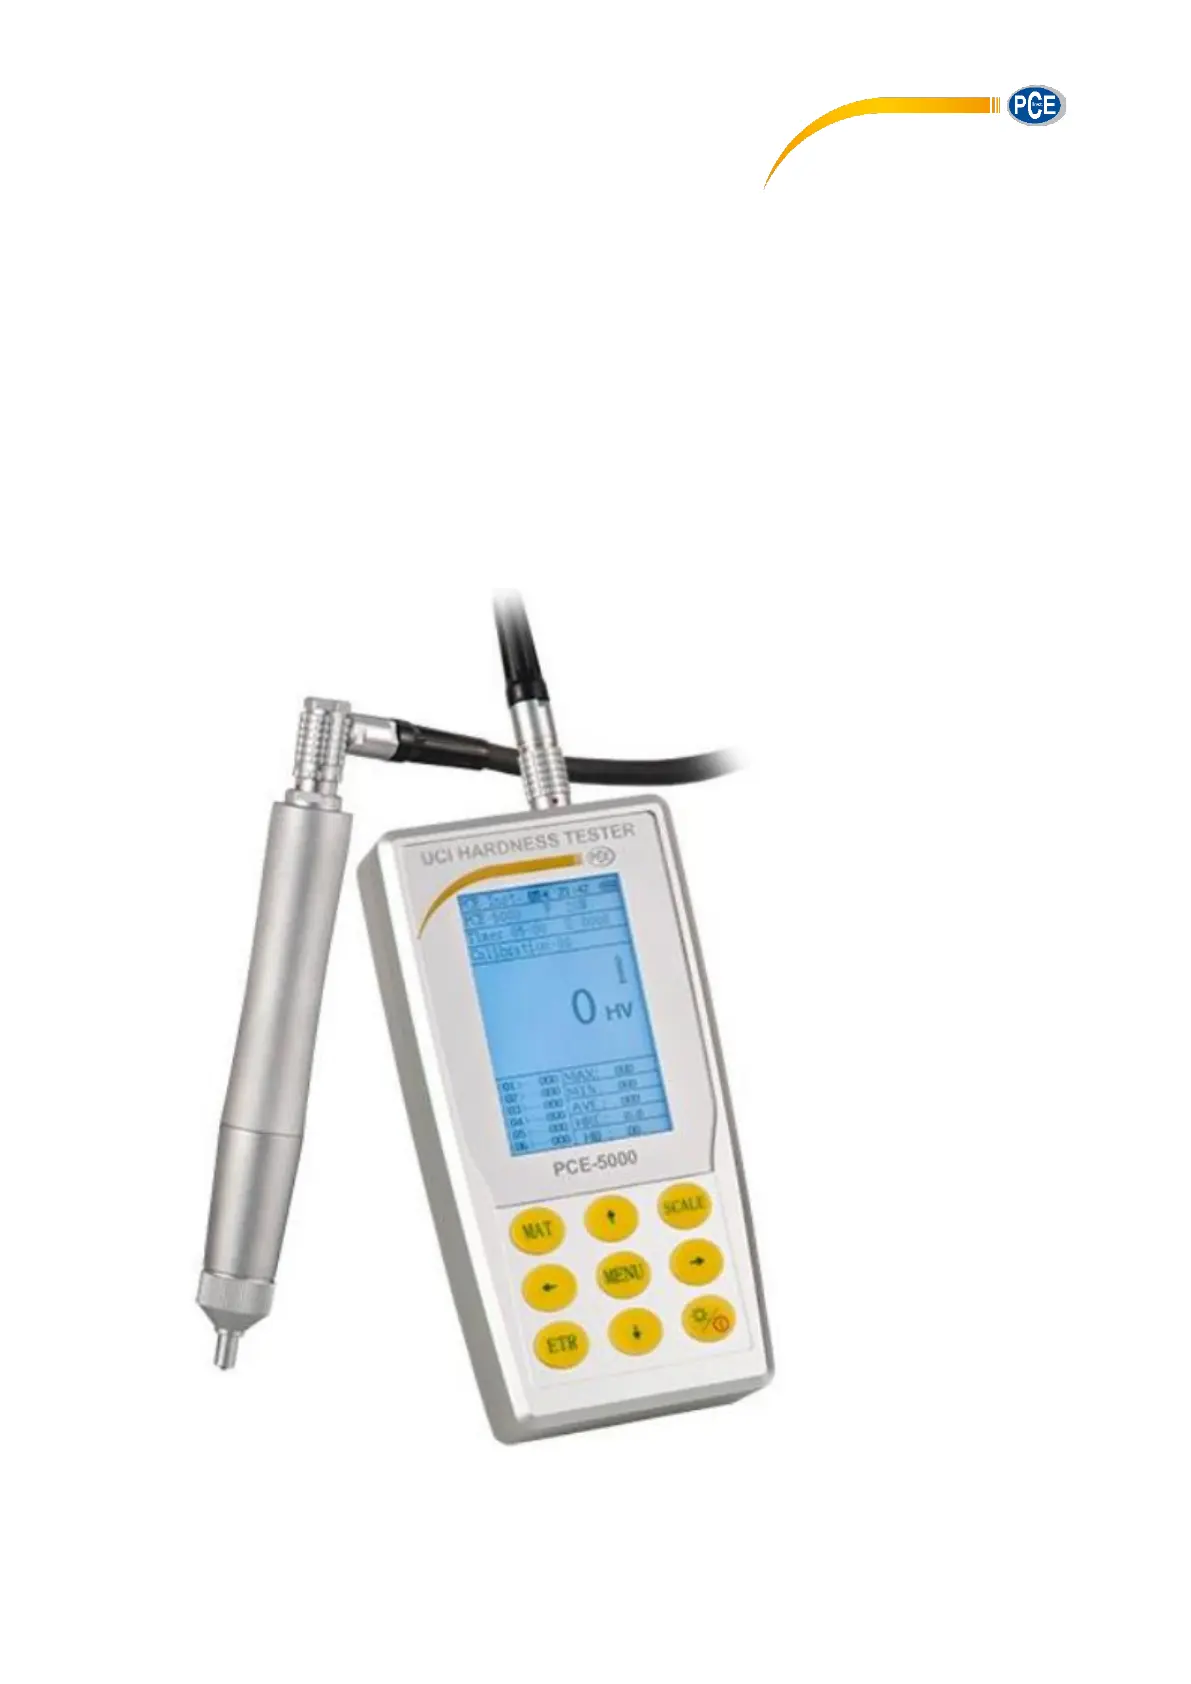
Ultrasonic Hardness Tester PCE-5000
Version 1.3
Date of creation: 16.02.2015
Date of last change: 06.01.2021
Manual
2
Contents
1 Introduction ............................................................................................................. 3
2 Safety notes ............................................................................................................. 3
3 Specications .......................................................................................................... 5
3.1 Technical Specications ............................................................................................................. 5
4 Delivery content ...................................................................................................... 6
4.1 Optional accessories .................................................................................................................. 6
5 System description ................................................................................................. 7
5.1 Main structure and basic principle .............................................................................................. 7
5.2 Control elements 8........................................................................................................................
5.3 Display ........................................................................................................................................ 9
5.4 Measurement probe ................................................................................................................. 10
6 Battery .................................................................................................................... 13
7 Operation ............................................................................................................... 14
7.1 Initial operation ......................................................................................................................... 14
7.2 Measurement ............................................................................................................................ 14
8 Settings .................................................................................................................. 16
8.1 Test setup ................................................................................................................................. 16
8.2 System setup ............................................................................................................................ 17
8.2.1 Language option .................................................................................................................. 17
8.2.2 Sound .................................................................................................................................. 17
8.2.3 Battery manager .................................................................................................................. 17
8.2.4 Display ................................................................................................................................. 17
8.2.5 Date ..................................................................................................................................... 17
8.2.6 Restore default .................................................................................................................... 17
8.3 Save setup ................................................................................................................................ 17
8.3.1 Autosave .............................................................................................................................. 17
8.3.2 Result display ...................................................................................................................... 17
8.3.3 On-line operation ................................................................................................................. 17
8.3.4 Part deletion ........................................................................................................................ 17
8.3.5 All deletion ........................................................................................................................... 17
8.4 18 Print setup . ................................................................................................................................
9 Calibration ............................................................................................................. 18
9.1 Reasons to calibrate ................................................................................................................. 18
9.2 Preparations ............................................................................................................................. 18
9.3 Calibration procedure ............................................................................................................... 18
9.3.1 Calibration with two calibration standards ........................................................................... 18
9.3.2 Calibration with one calibration standard ............................................................................ 18
9.3.3 Batch-Mode ......................................................................................................................... 19
10 Disposal ................................................................................................................. 20
11 Contact ................................................................................................................... 20
11.1 PCE Instruments UK ................................................................................................................ 20
11.2 PCE Americas .......................................................................................................................... 20
Manual
3
1 Introduction
Thank you for purchasing an ultrasonic hardness tester from PCE Instruments.
The ultrasonic durometer is a device, based on a patent led in 1961. Therefore the hardness
measurement is performed through a diamond placed on a spring. Due to its design and measurement
method, the ultrasonic durometer allows a simple and non-destructive analysis of metallic objects. The
ultrasonic durometer enables measurements on various construction parts, since it is programmed to
measure with dierent SI-units, the most common of which are the hardness scales according to
Rockwell, Brinell and Vickers. Featuring a RS-232-interface the ultrasonic durometer PCE-5000 can be
connected to a computer in order to read out and print out the measured data. The ultrasonic durometer
allows a detailed overview of all the data, since it can record even the thresholds as well as mean values.
The mean value is automatically generated as soon as more than one measurement is performed with
the ultrasonic durometer PCE-5000. Its design allows reaching even locations that would be otherwise
hard to reach, and it allows reviewing and reading the values comfortably at its graphic display. Due to an
option to calibrate, the ultrasonic durometer can be always calibrated by the user at any time. A
calibration might be necessary, if for example the last measurement was more than three months back, or
when the environment is signicantly dierent from before, if the ultrasonic sensor has already performed
a major amount of measurements, or if the measurement of a dened calibration object shows a
divergent.
Range of use
- Hardness measurements of the anged edge and gear root stamping, mold, sheet, surface
hardened tooth and gear groove
- Hardness tests central axes thin-walled pipes and vessels of ,
- Hardness testing of tires and turbine rotor
- Hardness tests cutting blades of
- Hardness testing of welded parts
- Hardness tests of certain opening depths convex depressions, irregular levels ,
- Hardness tests of most ferrous and non-ferrous metals and other alloys in industrial production.
2 Safety notes
Please read this manual carefully and completely before you use the device for the rst time. The device
may only be used by qualied personnel and repaired by PCE Instruments personnel. There is no
warranty damages or injuries caused by non-observance of the manual. on
- The device may only be used approved temperature range in
- The opening of the case should only be done by qualied personnel of the PCE Instruments.
- The instrument should never be placed with the user interface (e.g. keyboard side on a table )
- You should not make technical changes the device on
- The appliance ould only be cleaned with a damp cloth / use only -neutral cleaner sh pH
- Do not shake the device since internal components may get damaged.
- Do not scratch objects with the diamond.
- Do not disassemble the unit. Otherwise the warranty will expire.
- Do not use the instrument under inammable air environment, otherwise it may take re or
explode.
The ultrasonic hardness tester a precision instrument that must be used with extreme care to avoid is
damage and associated measurement error.
Remove the diamond indenter mentioned above for about half a second after each measurement and
then make a new measurement. Otherwise, the device cann resonance between the indenter ot and a
single sample in a short time.
Please ensure that after each use, the device is always kept in the respective carrying case Avoid .
accidents collisions. and
Do not disconnect the probe from the main unit, since otherwise the device loses its functionality.
Do not use the product near ammable gas, as this could result in re or explosion.
Manual
4
Charger:
- Only use the original manufacturer’s battery
- Do not disassemble the battery
- When inserting the battery, make sure that it is properly seated and the poles were not mistaken
- Do never throw the battery into re and never bring it in intense heat
- Do not throw the battery into water and also do not touch the water
- If the battery should be deformed, do not use it
- Turn the power before removing changing the battery off or
- Before leaving our factory, the battery is inserted correctly, you do not make any changes unless
absolutely necessary
Recharger:
- Store the device in a dry state
- Avoid short circuits, they will destroy the device
- Do not touch the recharger with wet or damp hands otherwise there is a danger of an electric shock ;
Declaration:
- Without the prior written consent of the Company and subsidiaries, for all products that are
referring to the contents of this manual copies are distributed in any form stored in a retrieval , , or
system, or translated into other languages
- The Company reserves the right to change information on soft- and hardware without notice
- All eorts have been geared to grant the correctness and accuracy of the information contained
in this manual. If you still encounter any defects or errors, we strive to correct this in the next
edition
This user's handbook is published from PCE Instruments without any guarantee.
We expressly point to our general guarantee terms, they can be found in our general terms of business.
If you have any questions please ntact PCE Instruments. co
Manual
5
3 Specications
There are dierent kinds of methods for measurement of hardness:
Brinell, Rockwell, Vickers, Leeb, etc. are usually used.
Rockwell and Brinell test forc with larger test loads and large stamps what often leads to visible s e
damage to the material surface. The hardness-measuring of heavy work pieces, built- machinery and in
permanently assembled parts is therefore relatively dicult.
The ultrasonic hardness tester PCE-5000 uses the Ultrasonic Contact Impedance procedure to carry out
comparative hardness measurements for test pieces, with the advantages of a highly accurate, ecient,
portable and non-destructive measurement with simple operation.
3.1 Technical Specications
Measurement range
Accuracy
General technical data
Manual
6
4 Delivery content
1 x ultrasonic hardness tester PCE-5000 incl. battery
1 x testing probe 20 N (standard)
1 x probe cable
1 x USB cable
1 x charger
1 x calibration standard
1 x screwdriver
1 x protective cap (silicone)
1 x RS-232 interface cable
1 x robust carry case
1 x user manual
4.1 Optional accessories
Probes
There are dierent probes depending on the testing forces available :
- 3 N
- 5 N
- 8 N
- 10 N
Supporting rings
Supporting rings serve to stabilize the measurement tip on the surface to be tested.
- PCE-SRZK
- PCE-SRZG
- PCE-SRF
Test stand
The test stand PCE-HSS increases the accuracy and repeatability of hardness measurements.
Manual
7
5 System description
5.1 Main structure and basic principle
Front and back view of the ultrasonic hardness tester
1 2
6 3
4
5
1. 4-pin socket
2. 8-pin socket
3. Power button
4. USB-interface
5. Operation panel
6. Display
Manual
10
5.4 Measurement probe
8-pin socket
Vickers diamond
Note:
The standard probe is preset to 20 N. Other probes are available as optional accessory.
Manual
11
Ultrasonic indenter and recesses
During
measurements the inspection stamp entrudes minimally within the material. The indentation depth (H)
and the mean value of the dialog lengths (d) of the various probes of the ultrasonic hardness tester can
be reduced with increasing value.
Material hardness (HV)
Depth (µm)
800
10
600
11
300
16
Material hardness (HV)
Diagonal line of the impression of the inspection
stamp
800
68
600
79
300
111
Note: The table only shows the values for the 20 N probe.
Minimum thickness of the tested object
Despite the low penetration depth the workpiece needs to have a minimum thickness so that the
instrument is not damaged. The minimum thickness of the material should at least ten times higher be
than the penetration depth.
Penetration depth h:
= 0,062 𝐹
𝐻𝑉
F: preset test force
HV: Vickers hardness of the material
Minimum thickness t: t 10 h
Manual
12
Note: The table only shows the values for the 20 N probe.
Condition of the surface
The applied test force (i.e. the selected UCI probe) must not only match the application but also the
surface quality and roughness of the material. While smooth, homogeneous surfaces with low test loads
can be measured, rougher surfaces and coarse-grained require measurements with high test loads.
However, the surface must always be free of contaminants (oil, dust, etc.) and rust.
Dimensions and weight of the part to be tested
From the above analysis, all probes request coating layer or surface layer less than 1 mm. The hardness
value will change if there is resonance. The highest value of vibration is the elastic oscillation, where
some actions can be made in order to restrain these. To do so the piece has to be put on thicker metal.
Rubber and oil can restrain elastic waves. It is recommended to use pieces that have a thickness of 2…3
mm and a size, which is not less than 5 x 5 mm.
Also the weight of the material is important. Depending on the weight certain preparations have to be
made:
Weight
>300 g
100 … 300 g
10 … 100 g
Action
Measurement can be
made under normal
conditions
Use supporting ring
Couple to heavy
component
Manual
13
6 Battery
The main unit includes a rechargeable battery (charger, 4.2 V, 4800 mAh). You can nd the battery lid on
the back of the device. When the battery is flat the symbol in the upper right corner from “ “appears
the main menu, to remind you to charge the battery in time. Plug one end of the charger into the left
socket of the instrument and insert the plug into a 230 V outlet and charge the device completely. After 8
hours, the device is fully charged; The minimum charging time is two hours. When the device is fully
charged, “ “ is displayed in the upper right corner of the screen.
Battery lid
Manual
14
7 Operation
7.1 Initial operation
Connect the angle plug of the 8-pin data cable to the 8-pin connector of the probe together. If you hear a
clicking noise, the device is in the correct position. Now connect the other end of the 8-pin data cable to
the 8-pin connector of the ultrasonic hardness tester. Match with the positions of the groove and put them
together. When you hear a clicking sound, the connections are correct.
7.2 Measurement
To perform a measurement, follow these steps:
1. so that the power supply is Press “Power” , and move the “ON/OFF” switch to “ON”,
turned on. You will reach the main menu then.
2. - -button. The Press the “Scale” Button to select the measurement scale and press the “ETR”
measurement mode will start then. After that the symbol is displayed.
3. Hold the probe with both hands vertikal to the test object. Press down the inspection atamp until
the measurement tip is not visible anymore and the protective ring is lying at on the test
material.
Manual
15
4. Hold the probe for about 2 seconds in this position until the measurement is complete. The
device then sends a signal, which states that the measurement is complete and the measured
values can be read from the display. The rst reading is not included in the determination of the
average value.
Note:
- Normally ve measurements, made within 645 mm² sufce to get usable results. If the test
material is very inhomogeneous you should make more than ve measurements to get usable
results.
- In case you changed the amount of the single measurements in the settings, you need to stick to
that setting. Otherwise the measurement is not completed.
- The ultrasonic hardness meter is a highly precise instrument. Take care to always hold the probe
with two hands in the vertical position. Do not put the probe under dierent pressure and take
care that no impacts occur during measurements. When lifting the probe pay attention that you
do not scratch the material with the diamond.
- Check the accuracy and the repeatability regularly. Use the calibration standard which is
delivered with the instrument. To check the characteristics you need to perform 5 measurements
as described above and compare the results that are noted on the calibration standard. If the
deviations should be too big, you need to calibrate the instrument.
Manual
16
8 Settings
Press the menu-button to get to the main menu. There are the following options:
- Test setup
- System setup
- Save setup
- Print setup
Choose the required submenu and confirm with “Enter”.
8.1 Test setup
Calibration
Here you can see all calibrations for the dierent materials that you have made. Choose the calibration
you need by using the arrow buttons and confirm with the “MAT” key to use the calibration. There will be
a checkmark in front of the chosen option.
If you need to delete a If you calibration go to the calibration to be deleted and press the “SCALE” key.
choose “YES” in the confirmation screen and press “ENTER”, the calibration will be deleted. By choosing
“NO” the procedure will be cancelled.
If you wish detailed information on the calibrations, choose the one you need to know more about and
press “ENTER”. You will be redirected to the information screen, where you can view the measured and
entered data. By pressing the “SCALE” key you can rename the calibrations. Use arrow and “ENTER”
keys to conrm the entered data.
Note: When in measurement mode you can also get into this mode by pressing the “MAT” key.
Hardness scale
Here you can choose the measurement unit, in which the measurement data should be displayed by
default.
Choose between: HB, HRC, HV, HRA, HRB and MPA. By pressing the “SCALE” key you can also choose
between ASTM and DIN.
Choose the correct unit by using the arrow keys and confirm with “ENTER”.
Test number
Here you can set how many single measurements have to be made during one measuring process. Use
the left and right arrow keys to increase or decrease the number and confirm with “ENTER”.
Calibration se tup
See chapter “Calibration”.
Error permit
Here you can set the upper and lower error tolerances. Use the high and low arrow keys to switch
between input elds. By using the left and right arrow keys you can increase or decrease the chosen
value. Confirm with the “ENTER” key.
Batch mode
Here you can activate / deactivate the batch mode. Choose your option and confirm with “ENTER”.
Test time
Here you can set the test time. Use the left or right arrow key to increase or decrease the value.
Manual
17
8.2 System setup
8.2.1 Language option
Here you can choose the language of the instrument. You may choose between English, Chinese,
Portuguese, Turkish and German. Use the arrow keys to choose and the “ENTER” key to confirm.
8.2.2 Sound
Here you can choose what sounds the instruments is supposed to make. Make your choice with the
arrow keys and confirm with “ENTER”.
8.2.3 Battery manager
You have got two options here. If “ON” is ticked, the instrument switches itself off after 30 minutes of
inactivity. If the option “OFF” is ticked, the instrument changes to Standby-mode in case of inactivity.
Make your choice by using the arrow keys and confirm with “ENTER”.
8.2.4 Display
Here the contrast of the display can be set. Use the right / left arrow keys to move the slide control.
Confirm your choice with “ENTER”.
8.2.5 Date
You can set time and date here. The following settings can be made: year, month, day, hour, minute and
weekday. Choose the correct eld with the arrow-up and arrow-down keys and put in the correct settings,
using the left and right arrow keys. Confirm you r entered data using the “ENTER” key.
8.2.6 Restore default
Here you can restore the factory settings. Please enter the password (standard: ”888888”) and press
“ENTER”. Then press “ENTER” again to confirm the reset. Press the “MENU” key to cancel.
Note: All data is going to be deleted. This includes calibration details, settings and measured data.
8.3 Save setup
8.3.1 Autosave
Here the automatic storage function can be activated or deactivated. You one option and conrm by
pressing “ENTER”.
8.3.2 Result display
Here you can review the saved data. The values are assorted by their numbers. With the / down keys up
you can scroll through the values. By pressing “ENTER” you can open one slot to get detailed
information.
If you need information on one specific slot number, pressSCALE”. A search window will appear. Insert
the number you are looking for using the arrow keys and confirm your choice with “ENTER”.
8.3.3 -line operation On
Here you can activate the data transmission to a PC. Choose an option by using the arrow keys and
con rm with “ENTER”.
8.3.4 Part deletion
Here you can choose and delete the storage slots. Use the arrow keys to choose the storage slot and
press “ENTER” to choose one slot. If you have chosen all slots, press “SCALE” and confirm by choosing
“YES” and pressing “ENTER” afterwards.
8.3.5 All deletion
Here you can delete all measured data. Press “ENTER” to confirm and “MENU” to cancel.
Note: This procedure may take some minutes.
Manual
18
8.4 Print setup
Here you can print out all measured data or certain data slot. This works just as deletion or part-deletion
works.
9 Calibration
9.1 Reasons to calibrate
- If the readings are stable in the process of reviewing the durometer with the reference block, but
the nominal value of the reference hardness block is dierent.
- After a long storage (more than 3 month)
- After intense using (more than 200.000 measures with the probe
- When operating conditions have changed considerably (ambient temperature, humidity)
9.2 Preparations
For a Rockwell C (HRC) calibration you need two dierent calibration standards:
- 25 ± 5 HRC
- 65 ± 5 HRC
Note: If you do not use the whole measuring range of Rockwell C (e.g. only from 20 … 40 HRC) you may
also use a 25 ± 5 and 45 ± 5 HRC calibration standards. The same goes for Vickers.
Note: In special cases, only one block per calibration is necessary.
9.3 Calibration procedure
9.3.1 Calibration with two calibration standards
Press “MENU” in the main menu. Move to “test setup” and choose the “Calibration setup”. Insert the
password (“888888” is the preset standard) and press “ENTER”. You will now see the following display:
Choose by using the arrow keys one free storage slot. Then press “MAT”. Now you need to perform six
measurements on the soft calibration standard. After doing so the mean value will be shown at “TEST L”. -
Press “MAT” again and the right-arrow key afterwards. Now you have to make six measurements on the
harder block. The mean value will be displayed at “TEST H”.-
Now press the “MENU” key to enter the nominal value of the calibration standards. Use the arrow keys to
do so. With the “SCALE” key you can set how much the value should be increased or decreased. Press
“MENU” to finish the calibration. The new settings are saved and will be set automatically.
Note: If there is an arrow upwards or downwards displayed during the calibration, the measured value is
above or below the hardness scale.
9.3.2 Calibration with one calibration standard
The calibration with only one calibration standard is similar to the calibration with two standards. The
dierence is that - -you do not calibrate the “TEST H” part. Press the “MENU” key after “TEST L” calibration
and enter the nominal value. Finish the calibration by pressing “MENU” again.
Manual
19
9.3.3 Batch-Mode
Within the calibration settings, you can also enter the tolerance thresholds. If you have entered the upper
and lowest value, the instrument shows if the measured value is within that area every time you measure.
If the value is within that area the instrument shows “PASS”. If the value is not within that area it will
display “NG”.
To set the tolerances, use the arrow down key after you have set the “TEST L” and “TEST H” values. You - -
will now get to the points “UP” and “DOWN”. Up stands for the upper threshold, DOWN the lower value.
To set the values is made equal to setting “TEST L and “TEST H”. - -
Manual
20
10 Disposal
For the disposal of batteries, the 2006 directive of the European Parliament applies. Due to the /66/EC
contained pollutants, batteries must not be disposed of as household waste. They must be given to
collection points designed for that purpose.
In order to comply with the EU directive 2012/19/EU we take our devices back. We either re-use them or
give them to a recycling company which disposes of the devices in line with law.
If you have any questions, please contact PCE Instruments.
11 Contact
If you have any questions about our range of products or measuring instruments please contact PCE
Instruments.
11.1 PCE Instruments UK
By post:
PCE Instruments UK Ltd.
Unit 1 Southpoint Business Park 1
Ensign Way, Southampton
Hampshire
United Kingdom, SO31 4RF
By phone:
02380 987 035
11.2 PCE Americas
By post:
PCE Americas Inc.
1201 Jupiter Park Drive
Suite 8
Jupiter
33458 FL
USA
By phone:
561 320 9162

Produktspecifikationer

Varumärke: PCE Instruments
Kategori: Mätutrustning
Modell: PCE-5000

Behöver du hjälp?

Om du behöver hjälp med PCE Instruments PCE-5000 ställ en fråga nedan och andra användare kommer att svara dig