Philips Series 500 S560 Bruksanvisning

Philips Rakapparat Series 500 S560

Läs gratis den bruksanvisning för Philips Series 500 S560 (12 sidor) i kategorin Rakapparat. Guiden har ansetts hjälpsam av 13 personer och har ett genomsnittsbetyg på 5.0 stjärnor baserat på 7 recensioner. Har du en fråga om Philips Series 500 S560 eller vill du ställa frågor till andra användare av produkten? Ställ en fråga

Sida 1/12
ENGLISH
Introduction
Congratulations on your purchase and
welcome to Philips! To fully benet from
the support that Philips offers, register your
product at www.philips.com/welcome.
Important
Read this user manual carefully before you
use the appliance and save it for future
reference.
Danger
- Keep the adapter dry (Fig. 1).
Warning
- The adapter contains a transformer.
Do not cut off the adapter to replace
it with another plug, as this causes a
hazardous situation.
- The appliance is not intended for use
by persons (including children) with
reduced physical, sensory or mental
capabilities, or lack of experience and
knowledge, unless they have been given
supervision or instruction concerning
use of the appliance by a person
responsible for their safety.
- Children should be supervised to
ensure that they do not play with the
appliance.
- Always unplug the appliance before
you clean it under the tap.
Caution
- Never use water hotter than 80°C to
rinse the appliance.
- Do not use the appliance, adapter or
any other part if it is damaged, as this
may cause injury. Always replace a
damaged adapter or part with one of
the original type.
- Never use compressed air, scouring
pads, abrasive cleaning agents or
aggressive liquids such as petrol or
acetone to clean the appliance.
- Water may leak from the socket at the
bottom of the shaver when you rinse
it. This is normal and not dangerous
because all electronics are enclosed in
a sealed power unit inside the shaver.
Compliance with standards
- This shaver is waterproof and complies
with the internationally approved
safety regulations. It is suitable for use
in the bath or shower and for cleaning
under the tap. For safety reasons, the
shaver can therefore only be used
cordlessly (Fig. 2).
- This Philips appliance complies with all
applicable standards and regulations
regarding exposure to electromagnetic
elds.
General
- The adapter is equipped with an
automatic voltage selector and is
suitable for mains voltages ranging from
100 to 240 volts.
- The adapter transforms 100-240 volts
to a safe low voltage of less than 24
volts.
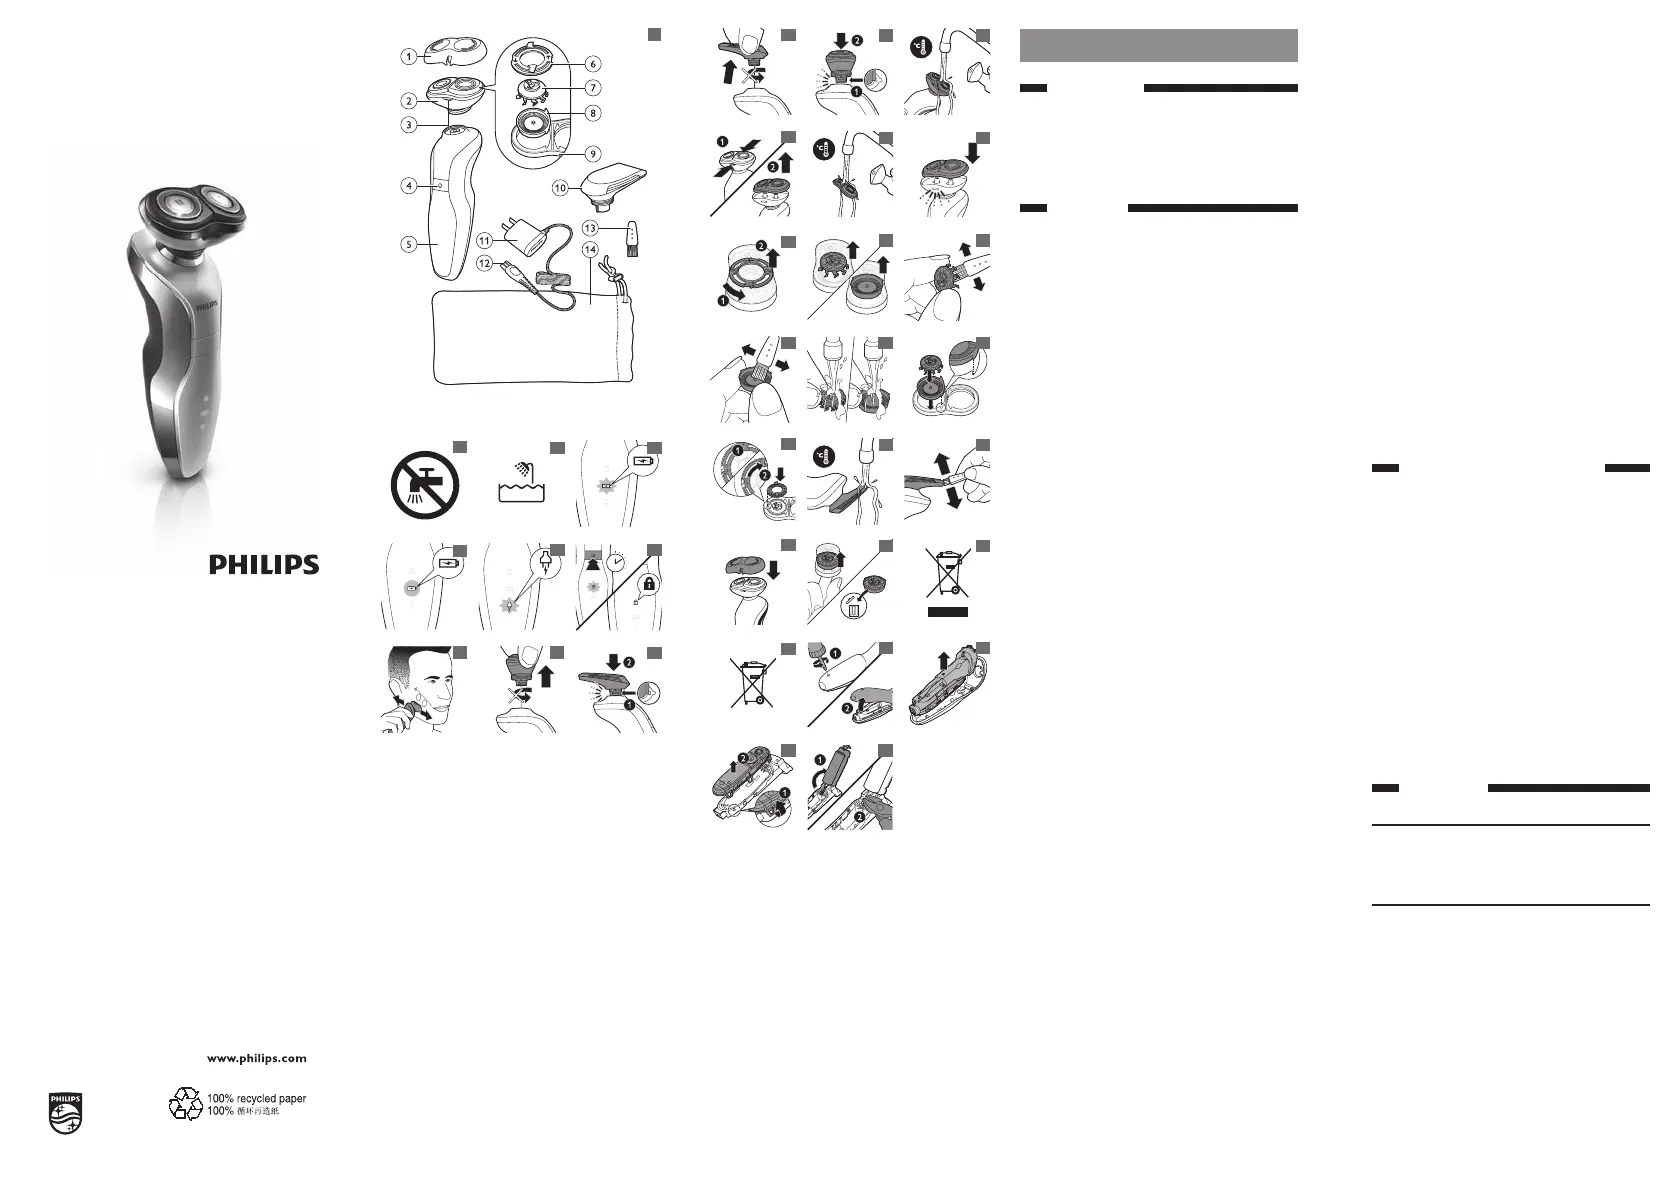
General description (Fig. 3)
1 Protection cap
2 Shaving unit with shaving head holder
3 Shaving head holder release button
4 On/off button
5 Display
6 Retaining ring
7 Cutter
8 Guard
9 Shaving head holder
10 Trimmer
11 Adapter
12 Small plug
13 Cleaning brush
14 Storage pouch
The display
’Charging’ indication
- When the shaver is charging, the
battery symbol ashes (Fig. 4).
’Battery fully charged’ indication
- When the battery is fully charged,
the battery symbol lights up
continuously (Fig. 5).
- If you leave the shaver connected to
the mains, the light goes out after 30
minutes.
4222.002.5700.1
S560
Register your product and get support at
www.philips.com/welcome
3
1
2 4
5
6 7
8 9
10
11
12 13
14
15 16
17
18 19
20 21
22
23
24 25
26
27 28
29
30 31
32 33
’Battery low’ indication
- When the battery is almost empty, the
plug symbol starts ashing (Fig. 6).
- When you switch off the shaver, the
plug symbol continues to ash for a
few more seconds.
Travel lock
You can lock the shaver when you are going
to travel. The travel lock prevents the shaver
from being switched on by accident.
Note: The travel lock cannot be activated
when the shaver is connected to the mains.
Activating the travel lock
1 Press and hold the on/off button until
the travel lock symbol stops ashing
and the motor stops running (Fig. 7).
The travel lock is now activated.
Note: If you release the on/off button before
the travel lock symbol stops ashing, the travel
lock is not activated.
Deactivating the travel lock
1 Press and hold the on/off button until
the travel lock symbol stops ashing
and the motor starts running.
The shaver is now ready for use again.
Note: When you start charging, the travel lock
is deactivated automatically.
Charging
It takes approx. 60 minutes to fully charge
the battery.
When you charge the shaver for the rst
time or after a long period of disuse, let it
charge for 90 minutes.
A fully charged shaver provides up to
40 shaving minutes.
If you have a heavy beard, the shaver may
provide less than 40 shaving minutes. The
number of shaving minutes may also vary
over time, depending on your shaving
behaviour, cleaning habits and beard type.
Charging
Do not charge the shaver in a closed
pouch or in the packaging.
1 Put the small plug in the shaver.
2 Put the adapter in the wall socket.
, The battery symbol on the shaver
ashes to show that the shaver is
charging (see chapter ‘The display’).
Note: When you remove the adapter from the
wall socket and leave the small plug in the
shaver, the shaver may not work for a few
seconds.
Using the shaver
Note: You cannot use the shaver while it is
connected to the mains.
Shaving
Skin adaptation period
Your rst shaves may not bring you the
result you expect and your skin may even
become slightly irritated. This is normal.
Your skin and beard need time to adapt to
any new shaving system.
We advise you to shave regularly (at least
3 times a week) for a period of 3 weeks to
allow your skin to adapt to the new shaver.
During this period, use your new electric
shaver exclusively and do not use other
shaving methods. If you use different shaving
methods, it is more difcult for your skin to
adapt to the new shaving system.
1 Press the on/off button to switch on
the shaver.
2 Move the shaving heads over your
skin. Make both straight and circular
movements (Fig. 8).
3 Press the on/off button to switch off
the shaver.
4 Clean the shaver after every shave
(see chapter ‘Cleaning and
maintenance’).
Wet shaving
You can also use this shaver on a wet face
with shaving foam or shaving gel.
To shave with shaving foam or shaving gel,
follow the steps below:
1 Apply some water to your skin.
2 Apply shaving foam or shaving gel to
your skin.
3 Rinse the shaving unit under the tap
to ensure that the shaving unit glides
smoothly over your skin.
4 Press the on/off button to switch on
the shaver.
5 Move the shaving heads over your
skin. Make both straight and circular
movements.
Note: Rinse the shaver under the tap regularly
to ensure that it continues to glide smoothly
over your skin.
6 Dry your face and thoroughly rinse
the shaver with a sufcient amount
of water after every shave. Make sure
you rinse all foam or shaving gel off
the shaver (see also chapter ‘Cleaning
and maintenance’).
Trimming
You can use the trimmer to groom
your sideburns and moustache.
1 Pull the shaving unit straight off the
shaver (Fig. 9).
Note: Do not twist the shaving unit while you
pull it off the shaver.
2 Insert the lug of the trimmer into the
slot in the top of the shaver (1). Then
press down the trimmer (2) to attach
it to the shaver (‘click’) (Fig. 10).
3 Press the on/off button to switch
on the trimmer. You can now start
trimming.
4 Press the on/off button to switch off
the trimmer.
5 Pull the trimmer straight off the
shaver (Fig. 11).
Note: Do not twist the trimmer while you pull
it off the shaver.
6 Insert the lug of the shaving unit into
the slot in the top of the shaver (1).
Then press down the shaving unit (2)
to attach it to the shaver
(‘click’) (Fig. 12).
Cleaning and maintenance
Never use compressed air, scouring pads,
abrasive cleaning agents or aggressive
liquids such as petrol or acetone to clean
the appliance and its accessories.
- Clean the shaver after every shave.
- Clean the shaving heads frequently
with Philips Shaving Head Cleaning
Spray (HQ110) for optimal shaving
performance.
- You can clean the outside of the
shaver with a damp cloth. Do not clean
the shaving unit with a cloth.
Cleaning the shaving unit
Be careful with hot water. Always check if
the water is not too hot, to prevent your
hands from getting burnt.
1 Switch off the shaver.
2 Rinse the shaving unit under a hot tap
for some time (Fig. 13).
Note: You can also clean the shaving unit with
the cleaning brush supplied.
3 After rinsing the appliance under the
tap, hold it upright for 10-15 seconds
to allow water to run out of the
bottom.
4 Press the release buttons on the
shaving unit (1) and pull the shaving
head holder off the shaving unit
(2). (Fig. 14)
5 Rinse the shaving head holder under a
hot tap for 30 seconds (Fig. 15).
Note: You can also clean the shaving head
holder with the cleaning brush supplied.
6 Carefully shake off excess water and
let the shaving head holder dry.
Never dry the shaving head holder with
a towel or tissue, as this may damage the
shaving heads.
7 Reattach the shaving head holder
to the shaving unit (‘click’) (Fig. 16).
Extra-thorough cleaning method
1 Switch off the shaver.
2 Press the release buttons on the
shaving unit (1) and pull the shaving
head holder off the shaving unit
(2) (Fig. 14).
3 Turn the retaining ring anticlockwise
(1) and lift it off the shaving head
(2) (Fig. 17).
Repeat this process for the other retaining
ring.
4 Remove the shaving heads from the
shaving head holder. Each shaving
head consists of a cutter and
guard. (Fig. 18)
Note: Do not clean more than one cutter and
guard at a time, since they are all matching
sets. If you accidentally put a cutter in the
wrong shaving guard, it may take several
weeks before optimal shaving performance
is restored.
5 Clean the cutter with the cleaning
brush supplied (Fig. 19).
6 Clean the inside of the guard. (Fig. 20)
7 After cleaning with the brush, clean
the cutter and guard under the
tap (Fig. 21).
8 Place the cutter back into the guard.
9 Put the shaving heads back into the
shaving head holder (Fig. 22).
Note: Make sure the projections of the
shaving heads t exactly into the recesses.
10 Place the retaining ring on the shaving
head (1) and turn it clockwise (2) to
reattach the retaining ring (Fig. 23).
The retaining ring is xed properly if the
two wings of the retaining ring are located
exactly under the projections of the shaving
head holder.
Repeat this process for the other retaining
ring.
Note: The shaving heads and retaining ring
should be rmly set in place before closing the
shaving unit.
11 Reattach the shaving head holder to
the shaving unit (‘click’). (Fig. 16)
Note: If the shaving unit does not close
smoothly, check if you have positioned the
shaving heads properly and if the retaining
rings are xed properly.
Cleaning the trimmer
Clean the trimmer after every use.
Cleaning the trimmer under
the tap.
1 Switch on the appliance with the
trimmer attached.
2 Rinse the trimmer under a hot tap for
some time (Fig. 24).
3 After cleaning, switch off the appliance.
4 After rinsing the appliance under the
tap, hold it upright for 10-15 seconds
to allow water to run out of the
bottom.
1 Undo the screw in the back panel of
the shaver with a screwdriver (1) and
remove the back panel (2) (Fig. 30).
2 Bend the hooks aside and remove the
power unit (Fig. 31).
3 Break the snap hooks (1) and remove
the front panel of the power unit (2)
(Fig. 32).
4 Take out the battery holder (1) and
cut the battery tags with a pair of
cutting pliers (2) (Fig. 33).
5 Remove the rechargeable battery.
Guarantee and support
If you need information or support, please
visit www.philips.com/support or read
the separate worldwide guarantee leaet.
Guarantee restrictions
The shaving heads (cutters and guards)
are not covered by the terms of the
international guarantee because they are
subject to wear.
Troubleshooting
This chapter summarises the most common
problems you could encounter with the
appliance. If you are unable to solve the
problem with the information below, visit
www.philips.com/support for a list of
frequently asked questions or contact the
Consumer Care Centre in your country.
Problem Possible
cause
Solution
The
shaver
does not
shave as
well as it
used to.
The shaving
heads are
damaged
or worn.
Replace the
shaving heads
(see chapter
‘Replacement’).
The shaving
heads are
dirty.
Clean the
cutters and
guards with
the cleaning
brush supplied
(see chapter
‘Cleaning and
maintenance’,
section ‘Extra-
thorough clean-
ing method’).
Cleaning the trimmer with the
cleaning brush supplied.
1 Switch off the trimmer.
2 Clean the trimmer with the cleaning
brush. Brush up and down along the
trimmer teeth. (Fig. 25)
Tip: For optimal trimmer performance,
lubricate the trimmer teeth frequently
with Philips Shaving Head Cleaning Spray
(HQ110).
Storage
Note: Make sure the shaving unit is dry before
you store the shaver.
1 Put the protection cap on the shaver
after use to prevent damage and to
avoid dirt accumulation in the shaving
heads (Fig. 26).
2 Store the shaver in the
pouch supplied.
Replacement
For maximum shaving performance, we
advise you to replace the shaving heads
every two years. Replace damaged shaving
heads right away.
Only replace the shaving heads with original
SH30 Philips shaving heads. See also chapter
‘Ordering accessories’.
1 Switch off the shaver.
2 Press the release buttons on the
shaving unit and pull the shaving head
holder off the shaving unit (Fig. 14).
3 Turn the retaining ring (1)
anticlockwise (2) and lift it off the
shaving head (3) (Fig. 17).
Repeat this process for the other retaining
ring.
4 Remove the shavings heads from the
shaving head holder and throw them
away (Fig. 27).
5 Place new shaving heads in the
holder (Fig. 22).
Note: Make sure the projections of the
shaving heads t exactly into the recesses.
6 Place the retaining ring on the shaving
head (1) and turn it clockwise (2) to
reattach the retaining ring (Fig. 23).
The retaining ring is xed properly if the
two wings of the retaining ring are located
exactly under the projections of the shaving
head holder.
Repeat this process for the other retaining
ring.
7 Reattach the shaving head holder to
the shaving unit (‘click’) (Fig. 16).
Note: If the shaving unit does not close
smoothly, check if you have positioned the
shaving heads properly and if the retaining
rings are xed properly.
Ordering accessories
To buy accessories or spare parts, visit
www.shop.philips.com/service or go
to your Philips dealer. You can also contact
the Philips Consumer Care Centre in your
country.
The following accessories are available:
- SH30 Philips shaving heads
- RQ575 Philips cleansing brush
- HQ110 Philips Shaving Head Cleaning
Spray
Recycling
- Do not throw away the appliance
with the normal household waste at
the end of its life, but hand it in at an
ofcial collection point for recycling.
By doing this, you help to preserve the
environment (Fig. 28).
- The built-in rechargeable shaver battery
contains substances that may pollute
the environment. Always remove the
battery before you discard or hand in
the shaver at an ofcial collection point.
Dispose of the battery at an ofcial
collection point for batteries. If you
have trouble removing the battery, you
can also take the appliance to a Philips
service centre. The staff of this centre
will remove the battery for you and will
dispose of it in an environmentally safe
way (Fig. 29).
Removing the rechargeable
shaver battery
Only remove the rechargeable battery
when you discard the shaver. Make sure
the rechargeable battery is completely
empty when you remove it.
Be careful, the battery strips are sharp.
Problem Possible
cause
Solution
When you
remove
the adapter
from the
wall socket
and leave
the small
plug in the
shaver, the
shaver does
not work
for a few
seconds.
Remove the
small plug from
the shaver.
The
shaver
does not
work,
even
though
it is con-
nected to
the mains.
This shaver
is not
designed
to be used
directly
from the
mains.
Remove the
adapter from
the wall socket
and the small
plug from the
shaver. You can
now switch
on the shaver
again.
My
skin is
irritated
after
shaving.
Your skin
needs time
to get
used to
the Philips
shaving
system.
Skin irritation
during the rst
2-3 weeks of
use is possible.
After this period,
the skin irritation
usually disap-
pears.
The shaving
heads are
damaged
or worn.
Replace the
shaving heads
(see chapter
‘Replacement’).
The
rotation
speed of
the shav-
ing heads
is lower
than
usual.
Too much
dirt has
collected in
the shaving
heads.
Clean the
shaving heads.
See chapter
‘Cleaning and
maintenance’.
The re-
chargeable
battery is
low.
Recharge the
battery. See
chapter ‘Charg-
ing’.
Problem Possible
cause
Solution
Long hairs
obstruct
the shaving
heads.
Clean the
cutters and
guards with
the cleaning
brush supplied
(see chapter
‘Cleaning and
maintenance’,
section ‘Extra-
thorough clean-
ing method’).
Shaving
foam or
shaving gel
has accu-
mulated in
the shaving
heads.
Rinse the
shaving heads
thoroughly
with a suf-
cient amount
of water.
The
shaver
does not
work
when I
press the
on/off
button.
The re-
chargeable
battery is
empty.
Recharge the
battery (see
chapter ‘Charg-
ing’).
The travel
lock is
activated.
To deactivate
the travel lock,
press and
hold the on/
off button until
the travel lock
symbol stops
ashing and the
motor starts
running.
The tem-
perature of
the shaver
is too high.
In this case,
the shaver
does not
work.
Let the shaver
cool down. As
soon as the
temperature of
the shaver has
dropped suf-
ciently, you can
switch on the
shaver again.


Produktspecifikationer

Varumärke: Philips
Kategori: Rakapparat
Modell: Series 500 S560

Behöver du hjälp?

Om du behöver hjälp med Philips Series 500 S560 ställ en fråga nedan och andra användare kommer att svara dig