Powerfix IAN 43014 Bruksanvisning
Powerfix Inte kategoriserad IAN 43014
Läs gratis den bruksanvisning för Powerfix IAN 43014 (2 sidor) i kategorin Inte kategoriserad. Guiden har ansetts hjälpsam av 18 personer och har ett genomsnittsbetyg på 4.2 stjärnor baserat på 4 recensioner. Har du en fråga om Powerfix IAN 43014 eller vill du ställa frågor till andra användare av produkten? Ställ en fråga
Sida 1/2
GB/IE
GB/IEGB/IEGB/IEGB/IEGB/IE
GB/IEGB/IE
Vaihe 3
Taivuta teräksiset ripustuskulmat lattapihdeillä. Mittaa sitten
kehyksen syvyys X (katso kuva 3). Lisää mitattuun syvyyteen
1 mm ja merkitse mitta ripustuskulmaan (katso kuva 3).
Taivuta ripustuskulma mahdollisimman lähelle lattapihtejä ja
90° kulmassa ylöspäin kuten kuvassa 3 näytetään.
Vaihe 4
Lyhennä harjatiivistettä
G
2 x mittaan H+40 mm sekä
2 x mittaan B+7 mm sekä työnnä harjatiiviste
G
profiilissa
oleviin uriin
C1
C2
(katso kuva 4 / a).
Vaihe 5
Aseta teräksiset ripustuskulmat
E1
ja
E2
kuvan 4 / b mukaisesti
kulmakappaleisiin
A
.
Huomautus: huomioi, että asetat teräksisten ripustuskulmien
E1
pitkät kyljet ylempiin kulmakappaleisiin
A
.
Vaihe 6
Yhdistä alumiiniprofiilit
C1
ja
C2
kulmakappaleisiin
A
(katso
kuva 5). Huomioi alumiiniprofiilien
C1
ja
C2
oikea asetus.
Työnnä liittäessäsi myös harjatiiviste
G
kulmakappaleisiin
A
.
Vinkki: käytä tarvittaessa kumivasaraa
A
.
Vaihe 7
Lyhennä 2 kiinnityslistaa
F1
alumiiniprofiilin mittaiseksi
C1
H – 12 mm (katso kuva 6).
aliarvioivat useimmiten vaaratilanteet. Pidä siksi lapset
aina poissa tuotteen lähettyviltä. Tuote ei ole lelu.
VARO! LOUKKAANTUMISVAARA! Varmista, että
kaikki osat ovat ehjiä ja että ne on asennettu asianmukai-
sesti. Väärä asennustapa voi aiheuttaa loukkaantumisia.
Vialliset osat voivat vaikuttaa turvallisuuteen ja laitteen
toimintaan.
VAROITUS! HENGENVAARA! Älä nojaa asennuksen,
irrotuksen tai puhdistuksen aikana liian pitkälle ulos
ikkunasta.
Asennus
Varmista ennen asennusta, että tuote soveltuu ikkunaasi.
Tarkista myös, että ikkunankehys ei ylitä maksimimittoja.
VARO! LOUKKAANTUMISVAARA! Asennukseen
tarvitset sahan, mattoveitsen ja porakoneen (vain ulkoasennuk-
seen). Lue myös tarvittavien työkalujen käyttöohjeet.
Vaihe 1
Mittaa ensin ikkunankehyksen korkeus (H) ja leveys (B)
(sisämitat) (katso kuva 1).
Vaihe 2
Vähennä mitatusta korkeudesta (H) 1,2 cm ja mitatusta levey-
destä (B) 3,3 cm sekä lyhennä alumiiniprofiilit
C1
ja
C2
mitat-
tuihin arvoihin (katso kuva 2). Tasoita sahausreunat viilalla.
Toimituksen sisältö
Huomautus: Pidä pakkausta purkaessasi huoli siitä, ettet
heitä vahingossa pois oleellisia asennustarvikkeita. Tarkista
välittömästi toimituksen purkamisen jälkeen, että toimitus on
täydellinen ja tuote sekä sen osat ovat moitteettomassa kun-
nossa. Älä missään tapauksessa asenna tuotetta, jos toimitus
ei ole täydellinen.
A
4 kulmakappaletta
B
1 lasikuituverkko „PerfectView“
C1
2 alumiiniprofiilia 1145 mm
C2
2 alumiiniprofiilia 1940 mm
D
2 vetoläppää
E1
2 teräksistä pitkäkylkistä ripustuskulmaa
E2
2 teräksistä lyhytkylkistä ripustuskulmaa
F1
2 kiinnityslistaa 1150 mm
F2
2 kiinnityslistaa 1950 mm
G
1 harjatiiviste
H1
2 ulkopuolen pitkäkylkistä ripustuskulmaa
H2
2 ulkopuolen lyhytkylkistä ripustuskulmaa
I
4 pyöreäpääruuvia
1 asennusohje
Turvallisuusohjeet
HENGENVAARA JA
LOUKKAANTUMISVAARA LAPSILLE!
Älä koskaan jätä lapsia ilman valvontaa pakka-
usmateriaalin ja tuotteen läheisyyteen. Pakkausmateriaa-
liin liittyy aina tukehtumis- ja kuristumisvaara. Lapset
Hyönteissuoja ikkunaan
Johdanto
Onnittelumme! Olet hankkinut itsellesi korkealaatui-
sen tuotteen. Tutustu tuotteeseen ennen kuin asennat
sen. Lue seuraavat asennus- ja turvaohjeet huolellisesti.
Käytä tuotetta ainoastaan ohjeen mukaan ja siinä mainittuihin
tarkoituksiin. Säilytä käyttöohje huolellisesti. Liitä kaikki ohjeet
tuotteen mukaan, jos annat sen eteenpäin.
Määräystenmukainen käyttö
Tämä tuote on tarkoitettu yksityisasuntoihin suojaamaan hyön-
teisiltä kuten esimerkiksi kärpäsiltä. Tuotteen muu käyttö tai sen
muuttaminen on määräystenvastaista ja voi johtaa henkilöva-
hinkoihin ja / tai tuotteen vahingoittumiseen. Valmistaja ei ota
vastuuta vahingoista, jotka johtuvat määräystenvastaisesta
käytöstä. Tuotetta ei ole tarkoitettu ammattimaiseen käyttöön.
Osien kuvaus
Tekniset tiedot
maksimikoko ikkunapuitteen asennussarja: 100 x 100 cm
suurin sisämitat ikkunapuitteen: 94 x 114 cm0
FIFIFIFI
Manufacturer / Service
Smartmaxx GmbH
Inselstraße 27
D-04103 Leipzig
Hotline: +49 (0) 341 99 99 43 79
Email: offi[email protected]
IAN 43014
When inquiring about your product, please have your receipt
and product number (e.g. IAN 12345) ready as your proof
of purchase.
Cleaning and Care
Never use corrosive or abrasive cleaning agents.
j Clean the fibreglass fabric and frame with a lint-free,
slightly damp cloth.
j Regularly remove and thoroughly clean the insect screen.
j If necessary, use a mild cleaning agent.
Disposal
The packaging is made from eco-friendly materials.
Dispose of packaging through municipal recycling
containers.
Contact your local refuse disposal authority for more details
of how to dispose of your worn-out product.
Declaration of conformity
This product complies with the requirements of the relevant
European and national guidelines. This is confirmed by the CE
mark. The relevant declarations are held by the manufacturer.
Installation video
www.smartmaxx.info
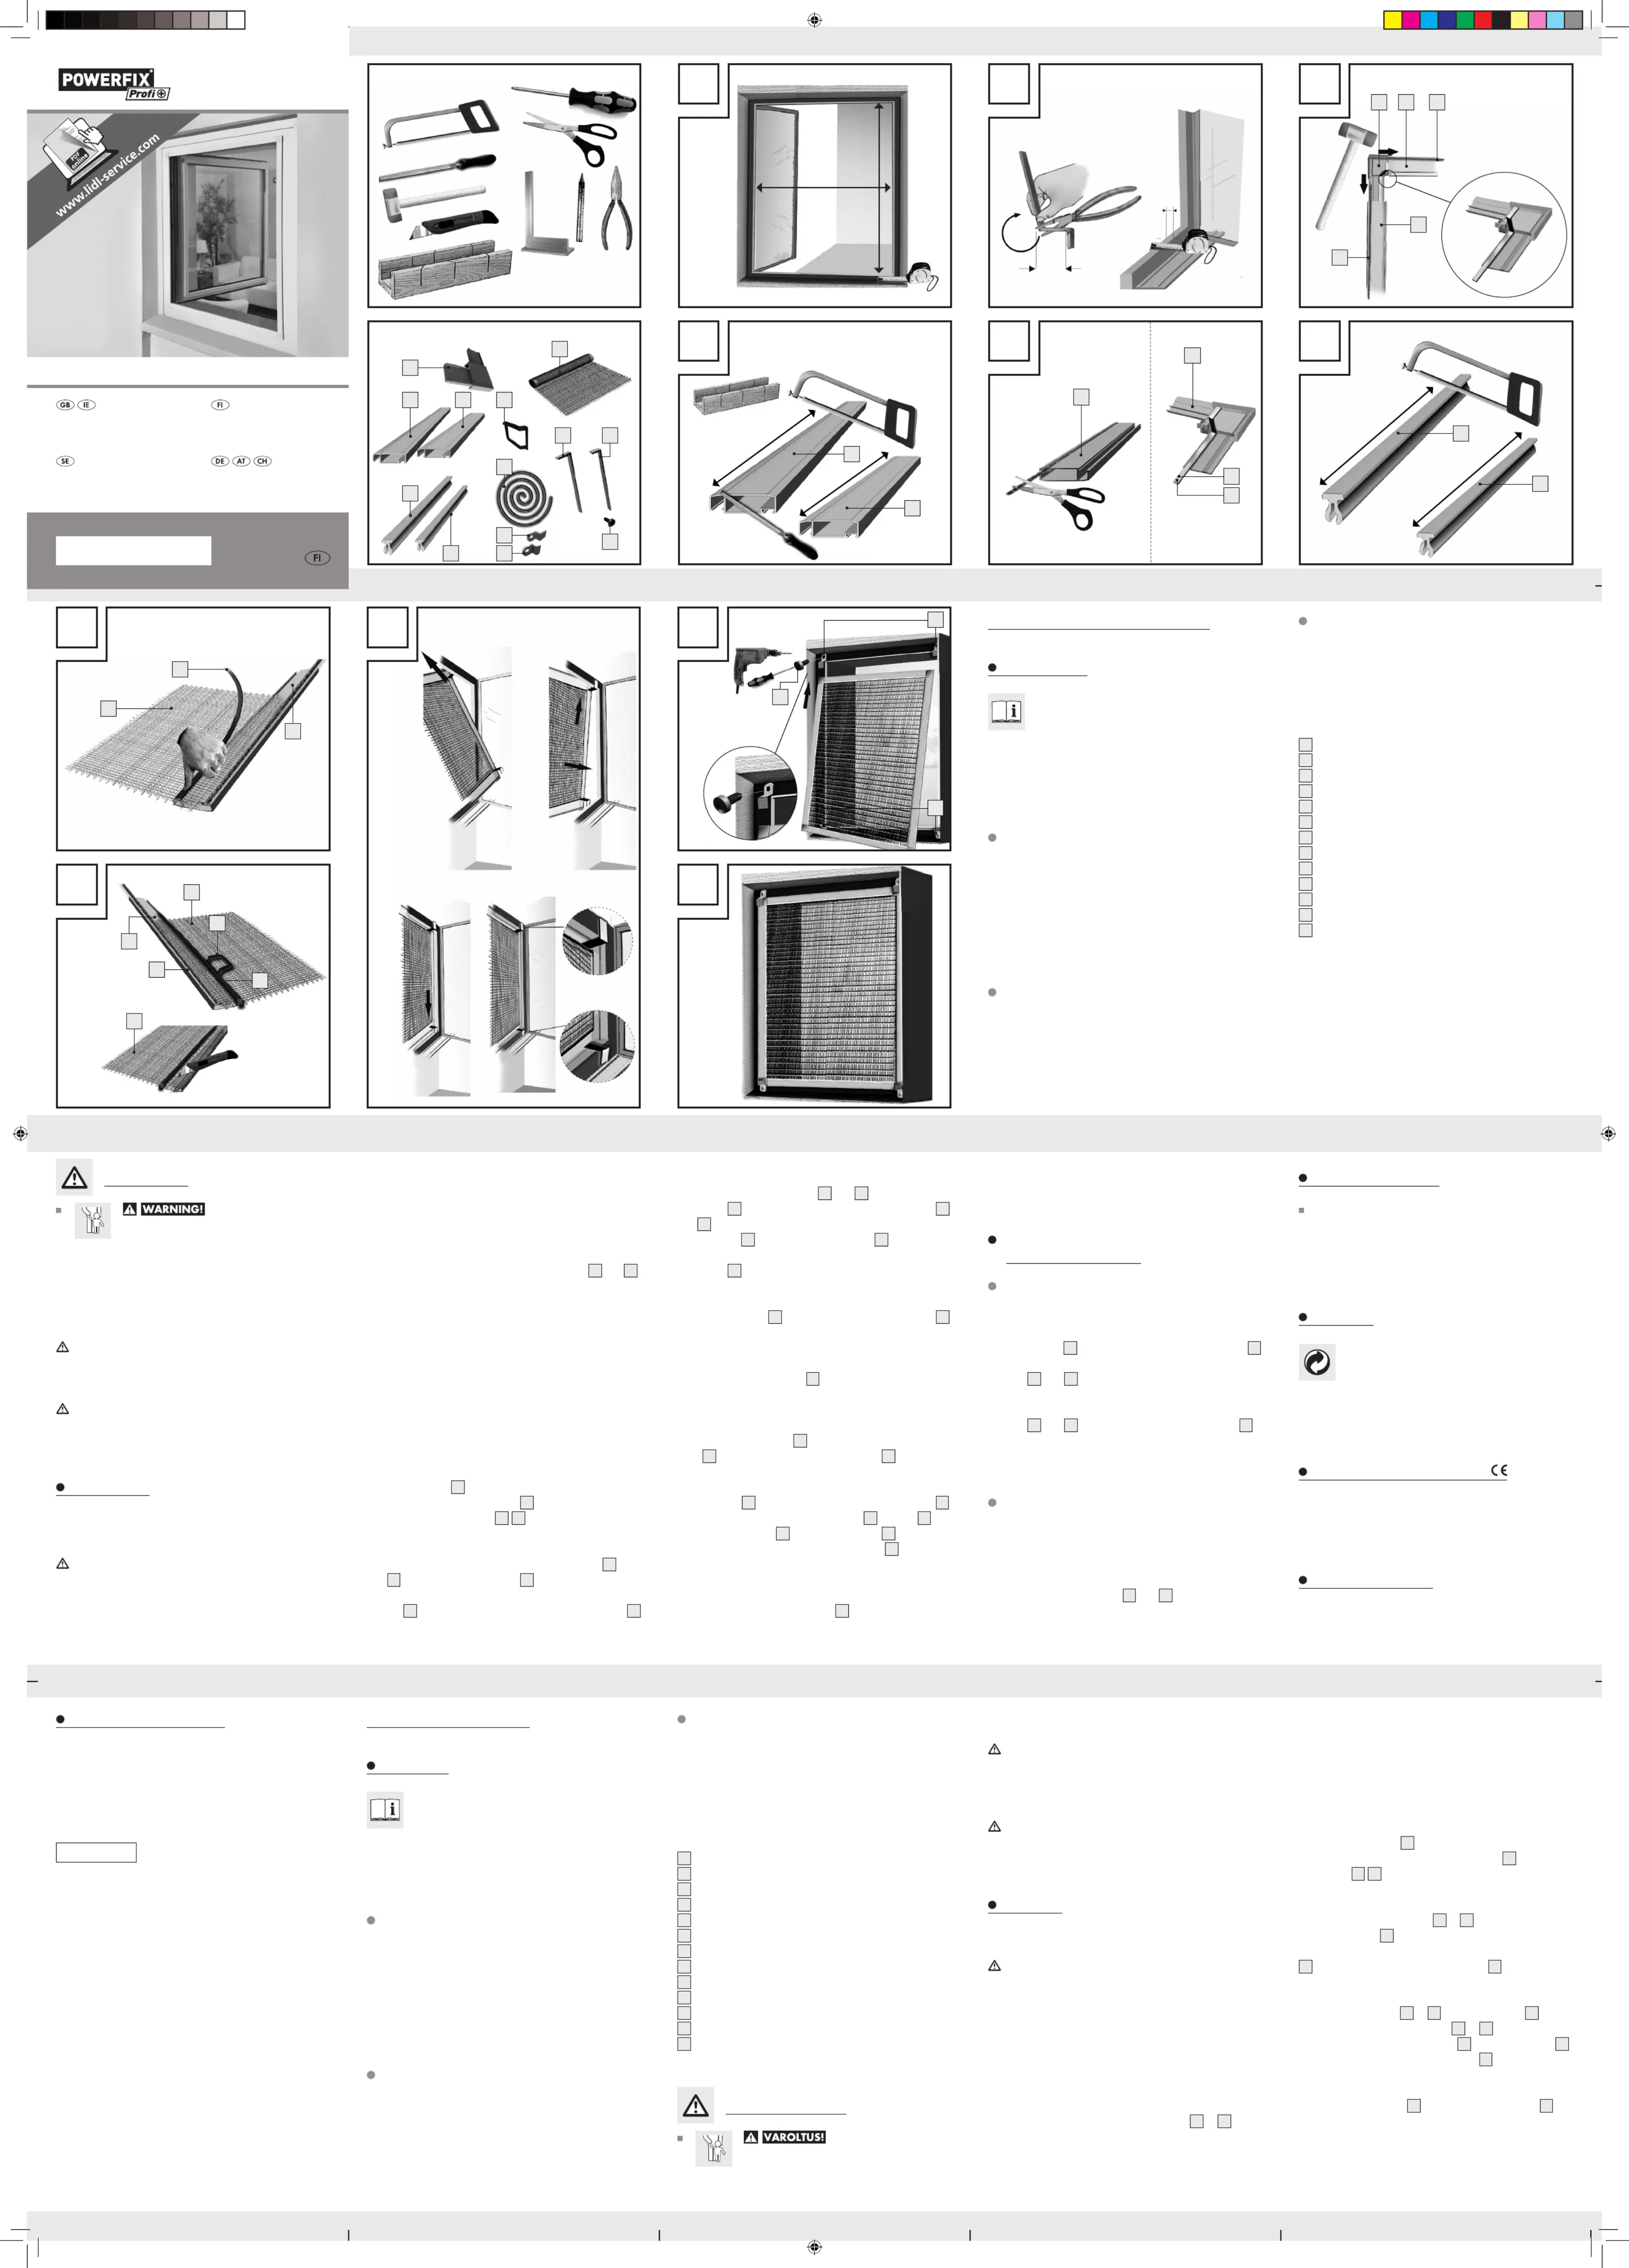
Step 12
Insert the insect screen window (see Figs. 9).
Other installation options:
external installation
Mounting to the window frame
Follow steps 1 to 2 of chapter „inside mounting“, then steps
4 and 6 to 12. of chapter „inside mounting“. Attach the sus-
pension brackets
H1
to the top, and the suspension bracket
H2
to the bottom of the frame. Hold the frame with suspension
brackets
H1
and
H2
against the window from the outside and
mark the drill holes (see Fig. 10). If possible have someone help
you with this step. Drill the holes and install the suspension
brackets
H1
and
H2
to the exterior wall using the screws
I
(see Fig. 10).
Insert the insect screen window (see Figs.11).
Inside mounting
Obtain wall plugs for the surface (wood, concrete, masonry,
etc.). Assemble the insect screen as described in chapter
„Mounting to the window frame“, first adjusting the measure-
ments to the structural conditions of your window opening.
Install the suspension brackets
H1
and
H2
to the window
opening and attach the insect screen.
Step 6
Connect the aluminium sections
C1
and
C2
using the corner
connectors
A
(see Fig. 5). Be sure the aluminium sections
C1
and
C2
are positioned correctly. When connecting, also slide
the brush seal
G
into the corner connectors
A
.
Tip: if necessary, use a rubber mallet to pound in the corner
connectors
A
.
Step 7
Trim the 2 click strips
F1
to the size of the aluminium section
C1
h – 12 mm (see Fig. 6).
Step 8
Trim the other two click strips
F2
to the size w –20 mm
(see Fig. 6).
Step 9
Place the fibreglass fabric
B
over the frame and use the click
strips
F2
to secure it to the aluminium sections
C2
(see Fig. 7).
Step 10
Insert the tabs
D
into the centre of the aluminium sections
C1
per Fig. 8 and secure the fibreglass fabric
B
and tab
D
to
the aluminium profiles
F1
using the click strips
C1
.
Note: repeatedly smooth the fibreglass fabric
B
whilst
installing in the frame to prevent creases.
Step 11
Trim off the surplus fibreglass fabric
B
using the carpet knife
(see Fig. 8).
Step 1
First measure the height (h) and width (w) of the window
frame (inside measurement) (see Fig. 1).
Step 2
Deduct 1.2 cm from the measured height (h) and 3.3 from the
measured width (w) and cut the aluminium sections
C1
and
C2
to the measures sizes (see Fig. 2). Use a file to smooth the cut
edges.
Step 3
Use a pair of flat nose pliers to bend the stainless steel univer-
sal suspension bracket. To do so, measure the frame depth X
(see Fig. 3). Add 1 mm to the measured depth and transfer
the size to the universal suspension bracket (see Fig. 3). Then
bend the suspension bracket as close as possible upward, if
possible to a 90° angle, using the flat nose pliers as shown in
Fig. 3.
Step 4
Trim the brush seal
G
2 x to the size h+40 mm and 2 x to
w+7 mm and slide the brush seal
G
into the designated
grooves on the metal section
C1
C2
(see Fig. 4 / a).
Step 5
Insert the stainless steel universal suspension brackets
E1
and
E2
into the corner connectors
A
per Figure 4 / b.
Note: be sure to insert the stainless steel universal suspension
brackets
E1
with the long shanks into the top corner connectors
A
.
Safety notes
DANGER TO LIFE AND
RISK OF ACCIDENTS FOR INFANTS AND
CHILDREN! Never leave children unattended
with the packaging material or the product. The packaging
material presents a suffocation hazard and there is a risk
of loss of life from strangulation. Children frequently un-
derestimate the dangers. Please keep children away from
the device at all times. The product is not a toy and must
not be used as such.
CAUTION! DANGER OF INJURY! Please verify no
parts are damaged and that all parts are correctly assem-
bled. Incorrect assembly could lead to injury. Damaged
parts could impact safety and function.
WARNING! RISK OF FATAL INJURIES! Do not lean
too far out of the window during product installation,
removal or cleaning.
Installation
Verify your window is suitable for this product prior to installation.
Also verify your window frame does not exceed the maximum
size.
CAUTION! DANGER OF INJURY! Installation requires
a saw, carpet knife and an electric drill (only for external
installation). Be sure to refer to the instructions for use of the
respective tools.
Scope of delivery
Note: Be careful not to inadvertently throw away any assem-
bly materials whilst unpacking. Check that all the items are
present and that the product and all its parts have no defects
immediately after unpacking. Do not assemble the product if
any of the included items listed below are missing.
A
4 Corner connectors
B
1 Fibreglass fabric „PerfectView“
C1
2 Aluminium profiles 1145 mm
C2
2 Aluminium profiles 1940 mm
D
2 Tabs
E1
2 Stainless steel universal suspension bracket with long shank
E2
2 Stainless steel universal suspension bracket with short shank
F1
2 Click strips 1150 mm
F2
2 Click strips 1950 mm
G
1 Brush seal
H1
2 Outside suspension bracket long shank
H2
2 Outside suspension bracket short shank
I
4 Round-head screws
1 Installation instructions
Aluminium Window Insect Screen
Introduction
Congratulations! You have bought a high-quality
product. Familiarise yourself with the product prior
to assembly. Carefully read the following assembly
instructions and safety advice. Only use the product as de-
scribed and for the indicated purpose. Keep these instructions
in a safe place. Please include all documentation when pass-
ing this product on to others.
Intended use
This article is designed to provide protection against insects
such as flies and is intended for indoor use only. Any use other
than previously described or any product modification is pro-
hibited and can result in injuries and / or product damage. The
manufacturer is not liable for damage caused by improper
use. The product is not intended for commercial use.
Parts description
Technical data
maximum kit dimensions: 100 x 120 cm
maximum inside dimensions
of the window frame: 94 x 114 cm0
You need · Tarvitset Du behöver · · Sie benötigen:
Contents · Sisältö · Innehåll · Inhalt:
135
7910
246
811
GAC2
B
F2
F1
G
C2
B
B
C1
D
H
B
X + 1mm
90°
C1
C2
G
A
B
C1C2
E1
I
H2
H1
A
4 x
2 x
2 x
1 x
2 x2 x
D
2 x
2 x
F1
2 x
G
1 x
F2
2 x
4 x
E2
2 x
E1
E2
C1
G
F1
F2
ALUMINIUM WINDOW INSECT SCREEN
B – 33 mm
H – 12 mm
H – 12 mm
B – 20 mm
a
cd
b
I
H1
H2
ab
X
A
LUMINIUM WINDOW
INSECT SCREEN
Assembly and safety advice
INSEKTSNÄT FÖR
FÖNSTER, ALUMINIUM
Monterings- och säkerhetsanvisningar
IAN 43014
QA 277
ALU-INSEKTEN-
SCHUTZ-FENSTER
Montage- und Sicherheitshinweise
HYÖNTEISSUOJA
IKKUNAAN
Asennus- ja turvaohjeet
43014_pow_Alu_Insektenschutz_klein_LB3_FI.indd 105.08.13 14:10
Produktspecifikationer
| Varumärke: | Powerfix |
| Kategori: | Inte kategoriserad |
| Modell: | IAN 43014 |
Behöver du hjälp?
Om du behöver hjälp med Powerfix IAN 43014 ställ en fråga nedan och andra användare kommer att svara dig
Inte kategoriserad Powerfix Manualer

31 December 2025
19 Oktober 2024
18 Oktober 2024
17 Oktober 2024
10 Oktober 2024
9 Oktober 2024
7 Oktober 2024
5 Oktober 2024
4 Oktober 2024
3 Oktober 2024
Inte kategoriserad Manualer
Nyaste Inte kategoriserad Manualer
9 April 2025
9 April 2025
9 April 2025
9 April 2025
9 April 2025
9 April 2025
9 April 2025
9 April 2025
9 April 2025
9 April 2025