Rane NM 84 Bruksanvisning
Rane blandningskonsoler NM 84
Läs gratis den bruksanvisning för Rane NM 84 (19 sidor) i kategorin blandningskonsoler. Guiden har ansetts hjälpsam av 16 personer och har ett genomsnittsbetyg på 4.0 stjärnor baserat på 4 recensioner. Har du en fråga om Rane NM 84 eller vill du ställa frågor till andra användare av produkten? Ställ en fråga
Sida 1/19
Manual-1
OPERATORS MANUALNM 84
NETWORK PREAMPLIFIER
WEAR PARTS:
This product contains no wear parts.
CobraNet is a trademark of Peak Audio, Inc.
Quick Start
Why is it that the hardest thing about writing the Quick Start is the opening line? What I want to say is, First, design the
network. Only thats hard to say with a straight face but if you are going to jump right into this thing without reading allof
our hard work, then thats where you begin. By designing a network. Okay, that works...lets move on.
Adedicated network for CobraNet audio is recommended, but not required when using switched networks. The NM 84s
CobraNet technology utilizes standard 100Base-T Ethernet hardware. For CobraNet and network design assistance and a list of
other CobraNet licensed and tested devices, visit
www.peakaudio.com/cobranet
. Also see Ranes ethernet link collection:
www.rane.com/ethernet.htm
.
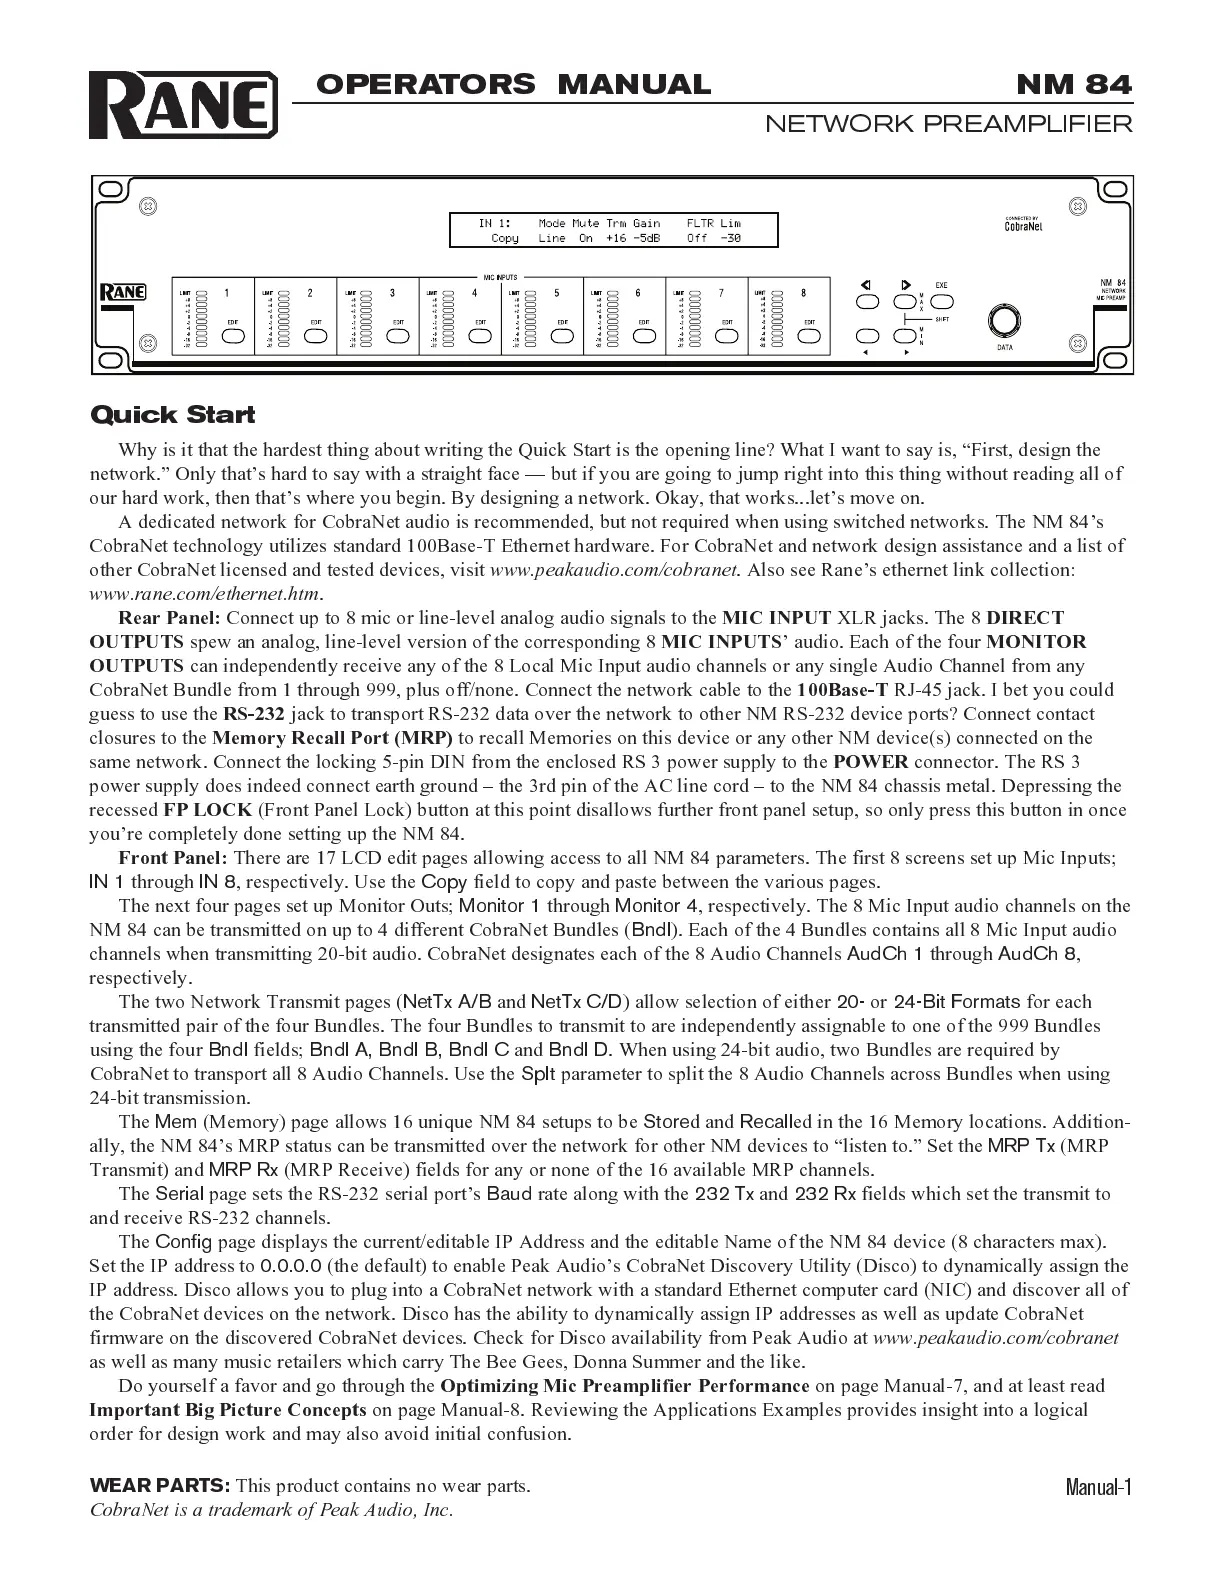
Rear Panel:
Connect up to 8 mic or line-level analog audio signals to the
MIC INPUT
XLR jacks. The 8
DIRECT
OUTPUTS
spew an analog, line-level version of the corresponding 8
MIC INPUTS
audio. Each of the four
MONITOR
OUTPUTS
can independently receive any of the 8 Local Mic Input audio channels or any single Audio Channel from any
CobraNet Bundle from 1 through 999, plus off/none. Connect the network cable to the
100Base-T
RJ-45 jack. I bet you could
guess to use the
RS-232
jack to transport RS-232 data over the network to other NM RS-232 device ports? Connect contact
closures to the
Memory Recall Port (MRP)
to recall Memories on this device or any other NM device(s) connected on the
same network. Connect the locking 5-pin DIN from the enclosed RS 3 power supply to the
POWER
connector. The RS 3
power supply does indeed connect earth ground the 3rd pin of the AC line cord to the NM 84 chassis metal. Depressing the
recessed
FP LOCK
(Front Panel Lock) button at this point disallows further front panel setup, so only press this button in once
youre completely done setting up the NM 84.
Front Panel:
There are 17 LCD edit pages allowing access to all NM 84 parameters. The first 8 screens set up Mic Inputs;
IN 1
through
IN 8
, respectively. Use the
Copy
field to copy and paste between the various pages.
The next four pages set up Monitor Outs;
Monitor 1
through
Monitor 4
, respectively. The 8 Mic Input audio channels on the
NM 84 can be transmitted on up to 4 different CobraNet Bundles (
Bndl
). Each of the 4 Bundles contains all 8 Mic Input audio
channels when transmitting 20-bit audio. CobraNet designates each of the 8 Audio Channels
AudCh 1
through
AudCh 8
,
respectively.
The two Network Transmit pages (
NetTx A/B
and
NetTx C/D
) allow selection of either
20-
or
24-Bit
Formats
for each
transmitted pair of the four Bundles. The four Bundles to transmit to are independently assignable to one of the 999 Bundles
using the four
Bndl
fields;
Bndl A, Bndl B, Bndl C
and
Bndl D
. When using 24-bit audio, two Bundles are required by
CobraNet to transport all 8 Audio Channels. Use the
Splt
parameter to split the 8 Audio Channels across Bundles when using
24-bit transmission.
The
Mem
(Memory) page allows 16 unique NM 84 setups to be
Store
d and
Recall
ed in the 16 Memory locations. Addition-
ally, the NM 84s MRP status can be transmitted over the network for other NM devices to listen to. Set the
MRP Tx
(MRP
Transmit) and
MRP Rx
(MRP Receive) fields for any or none of the 16 available MRP channels.
The
Serial
page sets the RS-232 serial ports
Baud
rate along with the
232 Tx
and
232 Rx
fields which set the transmit to
and receive RS-232 channels.
The
Config
page displays the current/editable IP Address and the editable Name of the NM 84 device (8 characters max).
Set the IP address to
0.0.0.0
(the default) to enable Peak Audios CobraNet Discovery Utility (Disco) to dynamically assign the
IP address. Disco allows you to plug into a CobraNet network with a standard Ethernet computer card (NIC) and discover all of
the CobraNet devices on the network. Disco has the ability to dynamically assign IP addresses as well as update CobraNet
firmware on the discovered CobraNet devices. Check for Disco availability from Peak Audio at
www.peakaudio.com/cobranet
as well as many music retailers which carry The Bee Gees, Donna Summer and the like.
Do yourself a favor and go through the
Optimizing Mic Preamplifier Performance
on page Manual-7, and at least read
Important Big Picture Concepts
on page Manual-8. Reviewing the Applications Examples provides insight into a logical
order for design work and may also avoid initial confusion.
Produktspecifikationer
| Varumärke: | Rane |
| Kategori: | blandningskonsoler |
| Modell: | NM 84 |
Behöver du hjälp?
Om du behöver hjälp med Rane NM 84 ställ en fråga nedan och andra användare kommer att svara dig
blandningskonsoler Rane Manualer

12 September 2025
11 September 2025
10 September 2025
10 September 2025
10 September 2025
10 September 2025
10 September 2025
10 September 2025
10 September 2025
10 September 2025
blandningskonsoler Manualer
Nyaste blandningskonsoler Manualer
3 April 2026
2 April 2026
31 Mars 2026
29 Mars 2026
28 Mars 2026
19 Mars 2026
18 Mars 2026
14 Mars 2026
10 Mars 2026
25 Februari 2026