Roberts Concerto 3 Bruksanvisning
Läs gratis den bruksanvisning för Roberts Concerto 3 (3 sidor) i kategorin Radio. Guiden har ansetts hjälpsam av 15 personer och har ett genomsnittsbetyg på 4.4 stjärnor baserat på 2 recensioner. Har du en fråga om Roberts Concerto 3 eller vill du ställa frågor till andra användare av produkten? Ställ en fråga
Sida 1/3
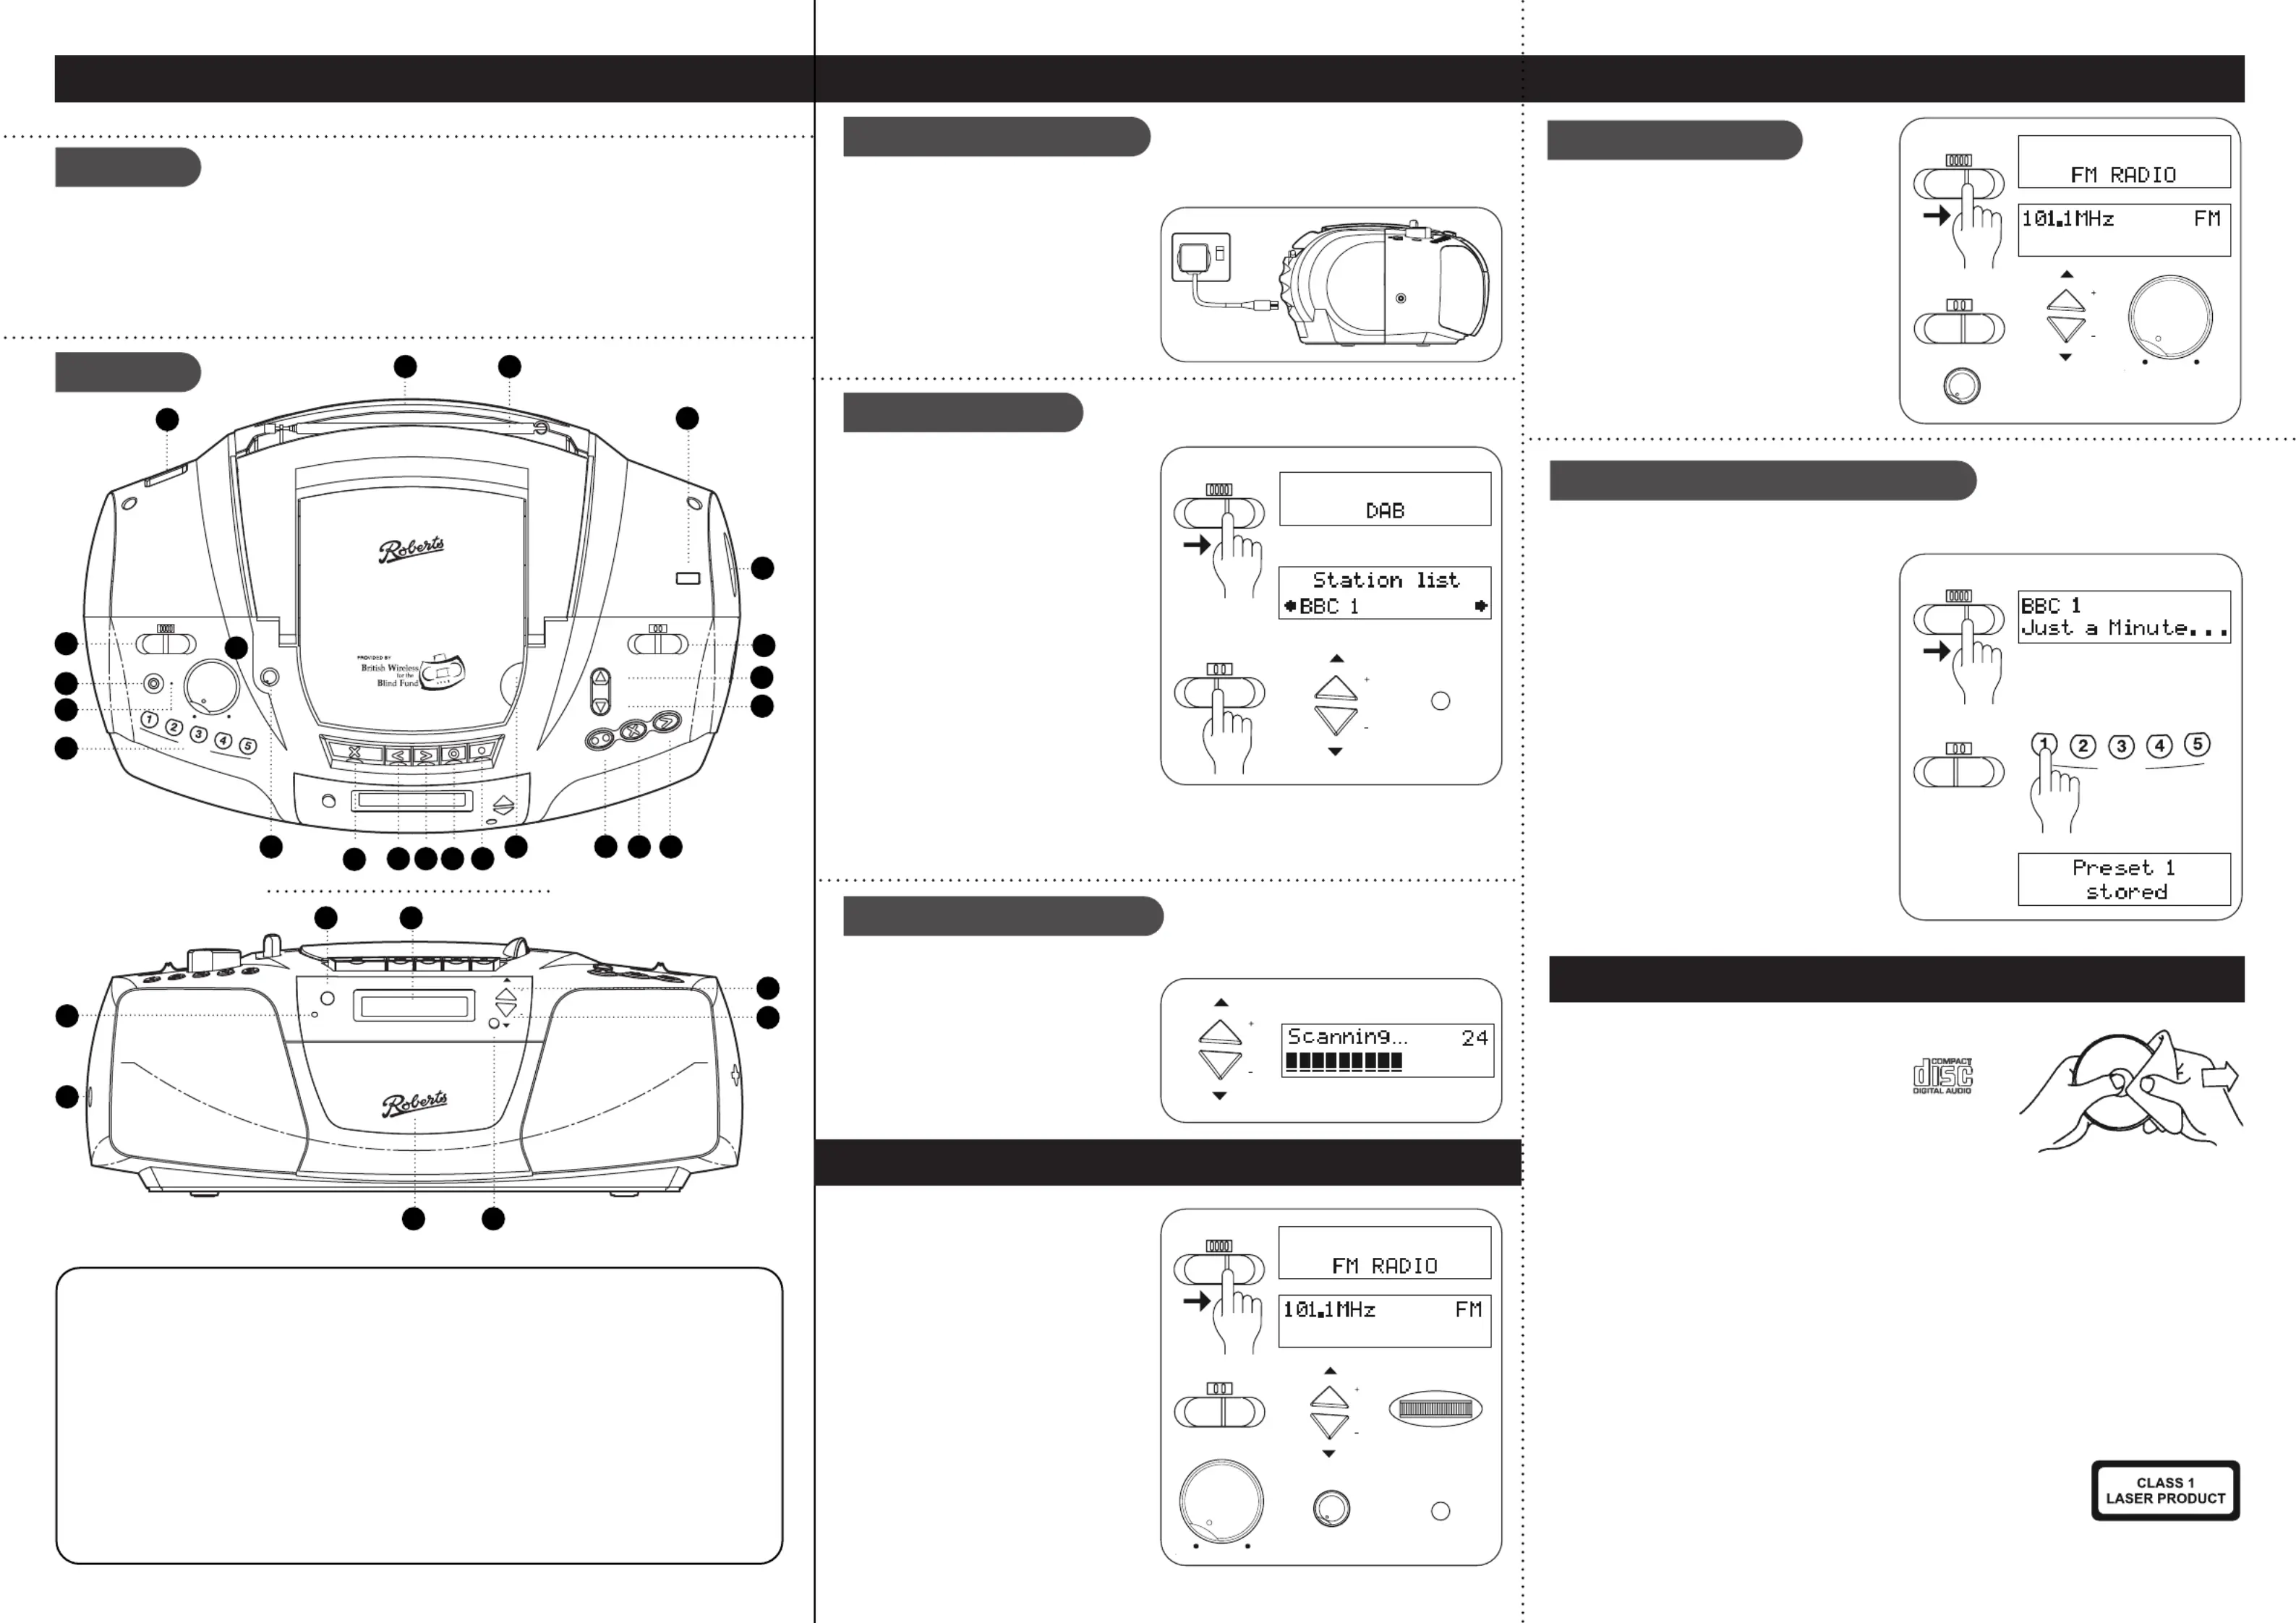
1 Carefully, extend the .telescopic aerial
2 Slide the switch to .Function‘Radio’
3 Slide the switch to .DAB / FM‘FM’
4 Press and hold downeither the Tuning
Up Down or buttonsfor more than 0.5
seconds to commence scan. An audible
tone will be heard indicating that the radio
is tuning. The tone will increase in pitch for
tuning up and decrease for tuning down.
The audible tone volume can be adjusted
using the Tuning assist volume control on
the right hand side of the unit.
5 You radio will scan the selected waveband,
sound a beep tone and stop automatically
when it nds a station of sucient strength.
6 Adjust the VolumeTone and controls.
•To reduce any hiss switch to mono mode.
Apply a long press on the Select / FM
modebutton to toggle mono / stereo mode.
You may store your preferred DAB and FM radio stations to the preset station memories. Presets are
remembered in the event of a power failure.
To store a station preset
1 Slide the switch to . Function‘Radio’
2 Slide the switch to or and DAB / FM‘DAB’‘FM’
tune to the required station.
3 Apply a long press on the required Preset
button 1 - 5. The display shows e.g. ‘Preset 1
stored’. A beep will be heard. The station will
be stored under the chosen preset. Stored
presets, maybe overwritten by following the
above procedure.
To recall a station preset
1 Slide the switch to .Function‘Radio’
2 Slide the switch to or .DAB / FM‘DAB’‘FM’
3 Momentarily, press the requiredPreset button
1 - 5. Your radio will tune to the station stored
in preset memory.
Radio cassette recorder, mains lead, demo CD, quick start guide and safety/warranty leaet.
Features
continued overleaf...
STEP 1 - Plug in & play DAB radio
Manual tune - FM radio
What is in the Box?
B - Play DAB radio
C - Scan for DAB stations
A - Connect to the mains
Manual tuning - FM
Preset radio stations - 5 DAB, 5 FM
•DAB / DAB+ / FM wavebands
•CD / USB bookmark remembers last played position
•MP3 / WMA playback via CD and USB
•CD syncro record - one button press starts cassette and CD
•Large easy to read LCD display with zoom function
•High visibility yellow controls
Please read the safety leaet provided before connecting your unit to the mains.
1 Place your CD radio cassette recorder on
a at surface.
2 Plug the mains lead into the mains power
socketensuring that the plug is pushed
fully into the socket.
3 Plug the other end of the mains lead into
a wall socket and switch on the socket.
The mains LED will light and the clock
will set.
1 Carefully, fully extend then angle the
telescopic aerial.
2 Slide the switch to the Function‘Radio’
position. To switch o slide to ‘O’.
3 Slide the switch to .DAB / FM‘DAB’
If this is the rst time the radio is used a
scan of the Band III DAB channels will
be carried out. If the radio is used before
the last used station will be selected. If
no signals are found it may be necessary
to relocate your unit to a position giving
better reception.
4 Press the buttons to Tuning Up orDown
scroll through the list of available stations.
5 Press the button to tune to the Select
chosen station. Adjust the .Volume
•Some radio stations may have one or more additional broadcasts associated with them. If
these are available they will appear immediately after the main station.
As time passes new stations may become available. To nd new stations proceed as follows:
1 Apply a long press on the Local Scan
button. The display will show ‘Scanning’.
2 To carry out a full scan, apply a long press
on the button. The display will Full Scan
show .‘Scanning’
•As new radio stations are found the station
counter will increase and the radio stations
will be added to the list stored in the radio.
Tone control1
Preset buttons 1 - 52
Internal microphone3
External mic socket4
Function switch5
Mains socket6
Volume control7
Battery compartment8
9 Telescopic aerial
10 USB socket
11 Tuning assist volume control
12 DAB / FM switch
13 Track / Search Up button
14 Track / Search Down button
15 Play / Pause button
16 Stop / Tuner Reset button
17 Repeat / Intro button
18 Raised lip for CD access
19 Record key
20 Play key
21 Rewind key
22 Fastforward key
23 Stop / Eject key
24 Zoom button
25 LCD display
26 Tuning / Album up / local
scan button
27 Tuning / Album down / full
scan button
28 Select / FM mode button
29 Cassette door
30 Headphone socket
31 Mains indicator light
ON
Controls
Zoom
Tuning
Album
Album
Tuning
Full
Scan
Local
Scan
Select / FM mode
Mains
2425
26
2829
30
31
27
• Audible tone to conrm station found
and preset memory
•10 one touch station presets
•Rotory volume and tone control
•Ext mic and headphone sockets
•AC mains socket
•Batteries 8 x C size (LR14) not included
S
t
o
p
/
E
j
e
c
t
Concerto 3
USB
USBCD
Off /
Tape
Radio
VOLUME
Tone
Preset Stations
Ext. Mic
Mic
Min.Max .
Min.Max.
DAB FM
Up
Track / Search
Down
RepeatStop /
Tuner Reset
Play / Pause
F
.
F
o
r
w
a
r
d
R
e
c
o
r
d
P
l
a
y
R
e
w
i
n
d
6
7
89
10
11
12
13
14
17
15
1618
19
202122
1
2
3
5
4
23
USBCD
Off /
Tape
Radio
DAB FM
Tuning
Album
Album
Tuning
Full
Scan
Local
Scan
Select / FM mode
STEP 2 - Play FM radio
STEP 3 - Compact discs
VOLUME
Min.Max .
Tone
Min.Max.
Tuning
Album
Album
Tuning
Full
Scan
Local
Scan
Tuning Assist Volume
1 Carefully, fully extend then angle the
telescopic aerial.
2 Slide the switch to the Function‘Radio’
position.
3 Slide the switch to .DAB / FM‘FM’
4 Press the buttons to Tuning Up or Down
tune to a station. The frequency will change
in steps of 50kHz.
5 Adjust the VolumeTone and controls.
It is recommended that the DAB band be used
wherever possible as better results in terms
of quality and freedom from interference will
usually be obtained than on the FM band.
Use only Digital Audio CDs which have the symbol.
Never write on a CD or attach any sticker to the CD.
Always hold the CD at the edge and store it in its box
after use with the label facing up.
To remove dust and dirt, breathe on the CD and wipe it with a soft,
lint-free cloth in a straight line from the centre towards the edge.
Cleaning agents may damage the CD. Do not expose the CD to rain, moisture, sand, or to excessive
heat. (e.g. from heating equipment or in motor cars parked in the sun).
Your CD player can playback CD-DA format audio CD-R/CD-RW discs that have been nalised* upon
completion of recording. Your CD player may fail to playback some CD-R/CD-RW discs due to poor
recording of the CD-R/CD-RW disc.*Finalising enables a CD-R/CD-RW disc to playback on audio CD
players such as your Concerto 3.
CLASS 1 LASER PRODUCTmeans that the laser's construction makes it
inherently safe so that the legally prescribed maximum permissible radiation
values can never be exceeded. Using any equipment or devices other Caution:
than those described and specied in these operating instructions, or tampering
with the unit in any way, can result in dangerous exposure to radiation.
For operation of your CD player please see overleaf.
The Concerto 3 is able to play CD-R and CD-RW discs containing MP3 or WMA les. The CD cassette
recorder reads MP3 and WMA les with a maximum of 255 les per folder. An MP3 or WMA CD may
not contain more than 512 les or albums in total. MP3 or WMA les must be created with an audio
sample rate of 44.1kHz (this is normal for les created from CD audio content). Both MP3 and WMA
les may be recorded on to the same media.
When you are making audio CDs, observe all legal guidelines and ensure that the copyright of third
parties is not infringed.
Tuning
Album
Album
Tuning
Full
Scan
Local
Scan
USBCD
Off /
Tape
Radio
DAB FM
Select / FM mode
DAB FM
USBCD
Off /
Tape
Radio
Tuning
Album
Album
Tuning
Full
Scan
Local
Scan
VOLUME
Min.Max .
Tone
Min.Max.
Preset Stations
DAB FM
USBCD
Off /
Tape
Radio
Produktspecifikationer
| Varumärke: | Roberts |
| Kategori: | Radio |
| Modell: | Concerto 3 |
Behöver du hjälp?
Om du behöver hjälp med Roberts Concerto 3 ställ en fråga nedan och andra användare kommer att svara dig
Radio Roberts Manualer

29 Juli 2025
28 Juli 2025
28 Juli 2025
28 Juli 2025
27 Juli 2025
27 Juli 2025
27 Juli 2025
27 Juli 2025
27 Juli 2025
27 Juli 2025
Radio Manualer
Nyaste Radio Manualer
30 Mars 2026
28 Mars 2026
22 Mars 2026
19 Mars 2026
16 Mars 2026
16 Mars 2026
12 Mars 2026
12 Mars 2026
11 Mars 2026
5 Mars 2026