Roberts Stream 67L Bruksanvisning
Läs nedan 📖 manual på svenska för Roberts Stream 67L (3 sidor) i kategorin Radio. Denna guide var användbar för 2 personer och betygsatt med 4.5 stjärnor i genomsnitt av 2 användare
Sida 1/3

Before you can use your smart audio system you need to have the following:
• For FM/DAB: A suitible location for good radio reception
• For Streaming / Internet Radio : a good WiFi signal or ethernet connection (802.11b, g, n or a)
connected to your broadband Internet service provider. You will need the security details to connect
the Stream67L to your WiFi network. Password will not be required for a wired connection.
• For App control: An Android or Apple device with the UNDOK app installed.
AC In
100-240V ~
W66 zH06 / zH05
Aux In
WiFi
Antenna
DAB/FM
Antenna
Ethernet
5V 1A
2 3 5 6
7
89
101112
4
13 14
16 15
1
1718
1920
21
22
23
24
25
18
26 26
27 27
To stream music or listen to radio from the Internet you must connect your system to your WiFi or use
a wired network connection. The Network setup process allows you to do this:
1 Choose ‘YES’ to keep the unit connected to the network when
in Standby. This will allow remote control software to switch on
your audio system when needed.
2 A list of the available WiFi networks will then be displayed. If no
networks are found then your audio system may be too far from
your router.
3 Rotate the Tuning control to navigate the list of available
networks and highlight your own Network Name. If your Network
Name is not found, then check the router is functioning and that
the audio system can in good signal range.
4 If your Network Name (sometimes called SSID) is displayed
with “[WPS]” (WiFi Protected Setup), then press the Tuning
control and a WPS menu will be displayed, otherwise press the
Tuning control and proceed to step 6.
5 Choose one of the WPS menu options as required for your
router (WPS may be via push button, or using an identication
number):
‘Push Button’ - the display prompts you to press the WPS button
on your router and then the control on the unit. The two Tuning
devices should then connect automatically. Proceed to step 10.
‘PIN’ - the display shows an identication number which you
must enter into your router using a web browser (refer to your
router’s user documentation). You should then press the Tuning
control on the unit. Proceed to step 9.
‘Skip WPS’ – if you wish to enter your password or if your
password was previously entered.
6 If you are prompted to enter a password (or key), enter each
character by rotating the control to highlight it, then Tuning
pressing the control. If you are not prompted for a Tuning
password then proceed to step 9.
7 The three controls on the right-hand side of the password key
screen have special functions. You can quickly access these by
pressing the button and then using the control as Info Tuning
needed:
Select ‘BKSP’ - Select to erase a character (long press to clear).
Select - When the complete password has been entered.‘OK’
Select ‘CANCEL’ - To cancel and re-run the Network Wizard.
8 After the nal character of the password has been entered,
highlight the symbol and press the control. ‘OK’ Tuning
9 The screen will show ‘Connecting..’ and then ‘Setup wizard
completed’. Press the control to exit the setup wizard. Tuning
The audio system should now be able to connect to the network.
Your audio system will display the Main mode menu.
Smart Audio System, mains lead, remote control with 2 x AAA batteries, quick start guide, safety/warranty
guide. Please scan the QR code on the product for the FULL User Guide online.
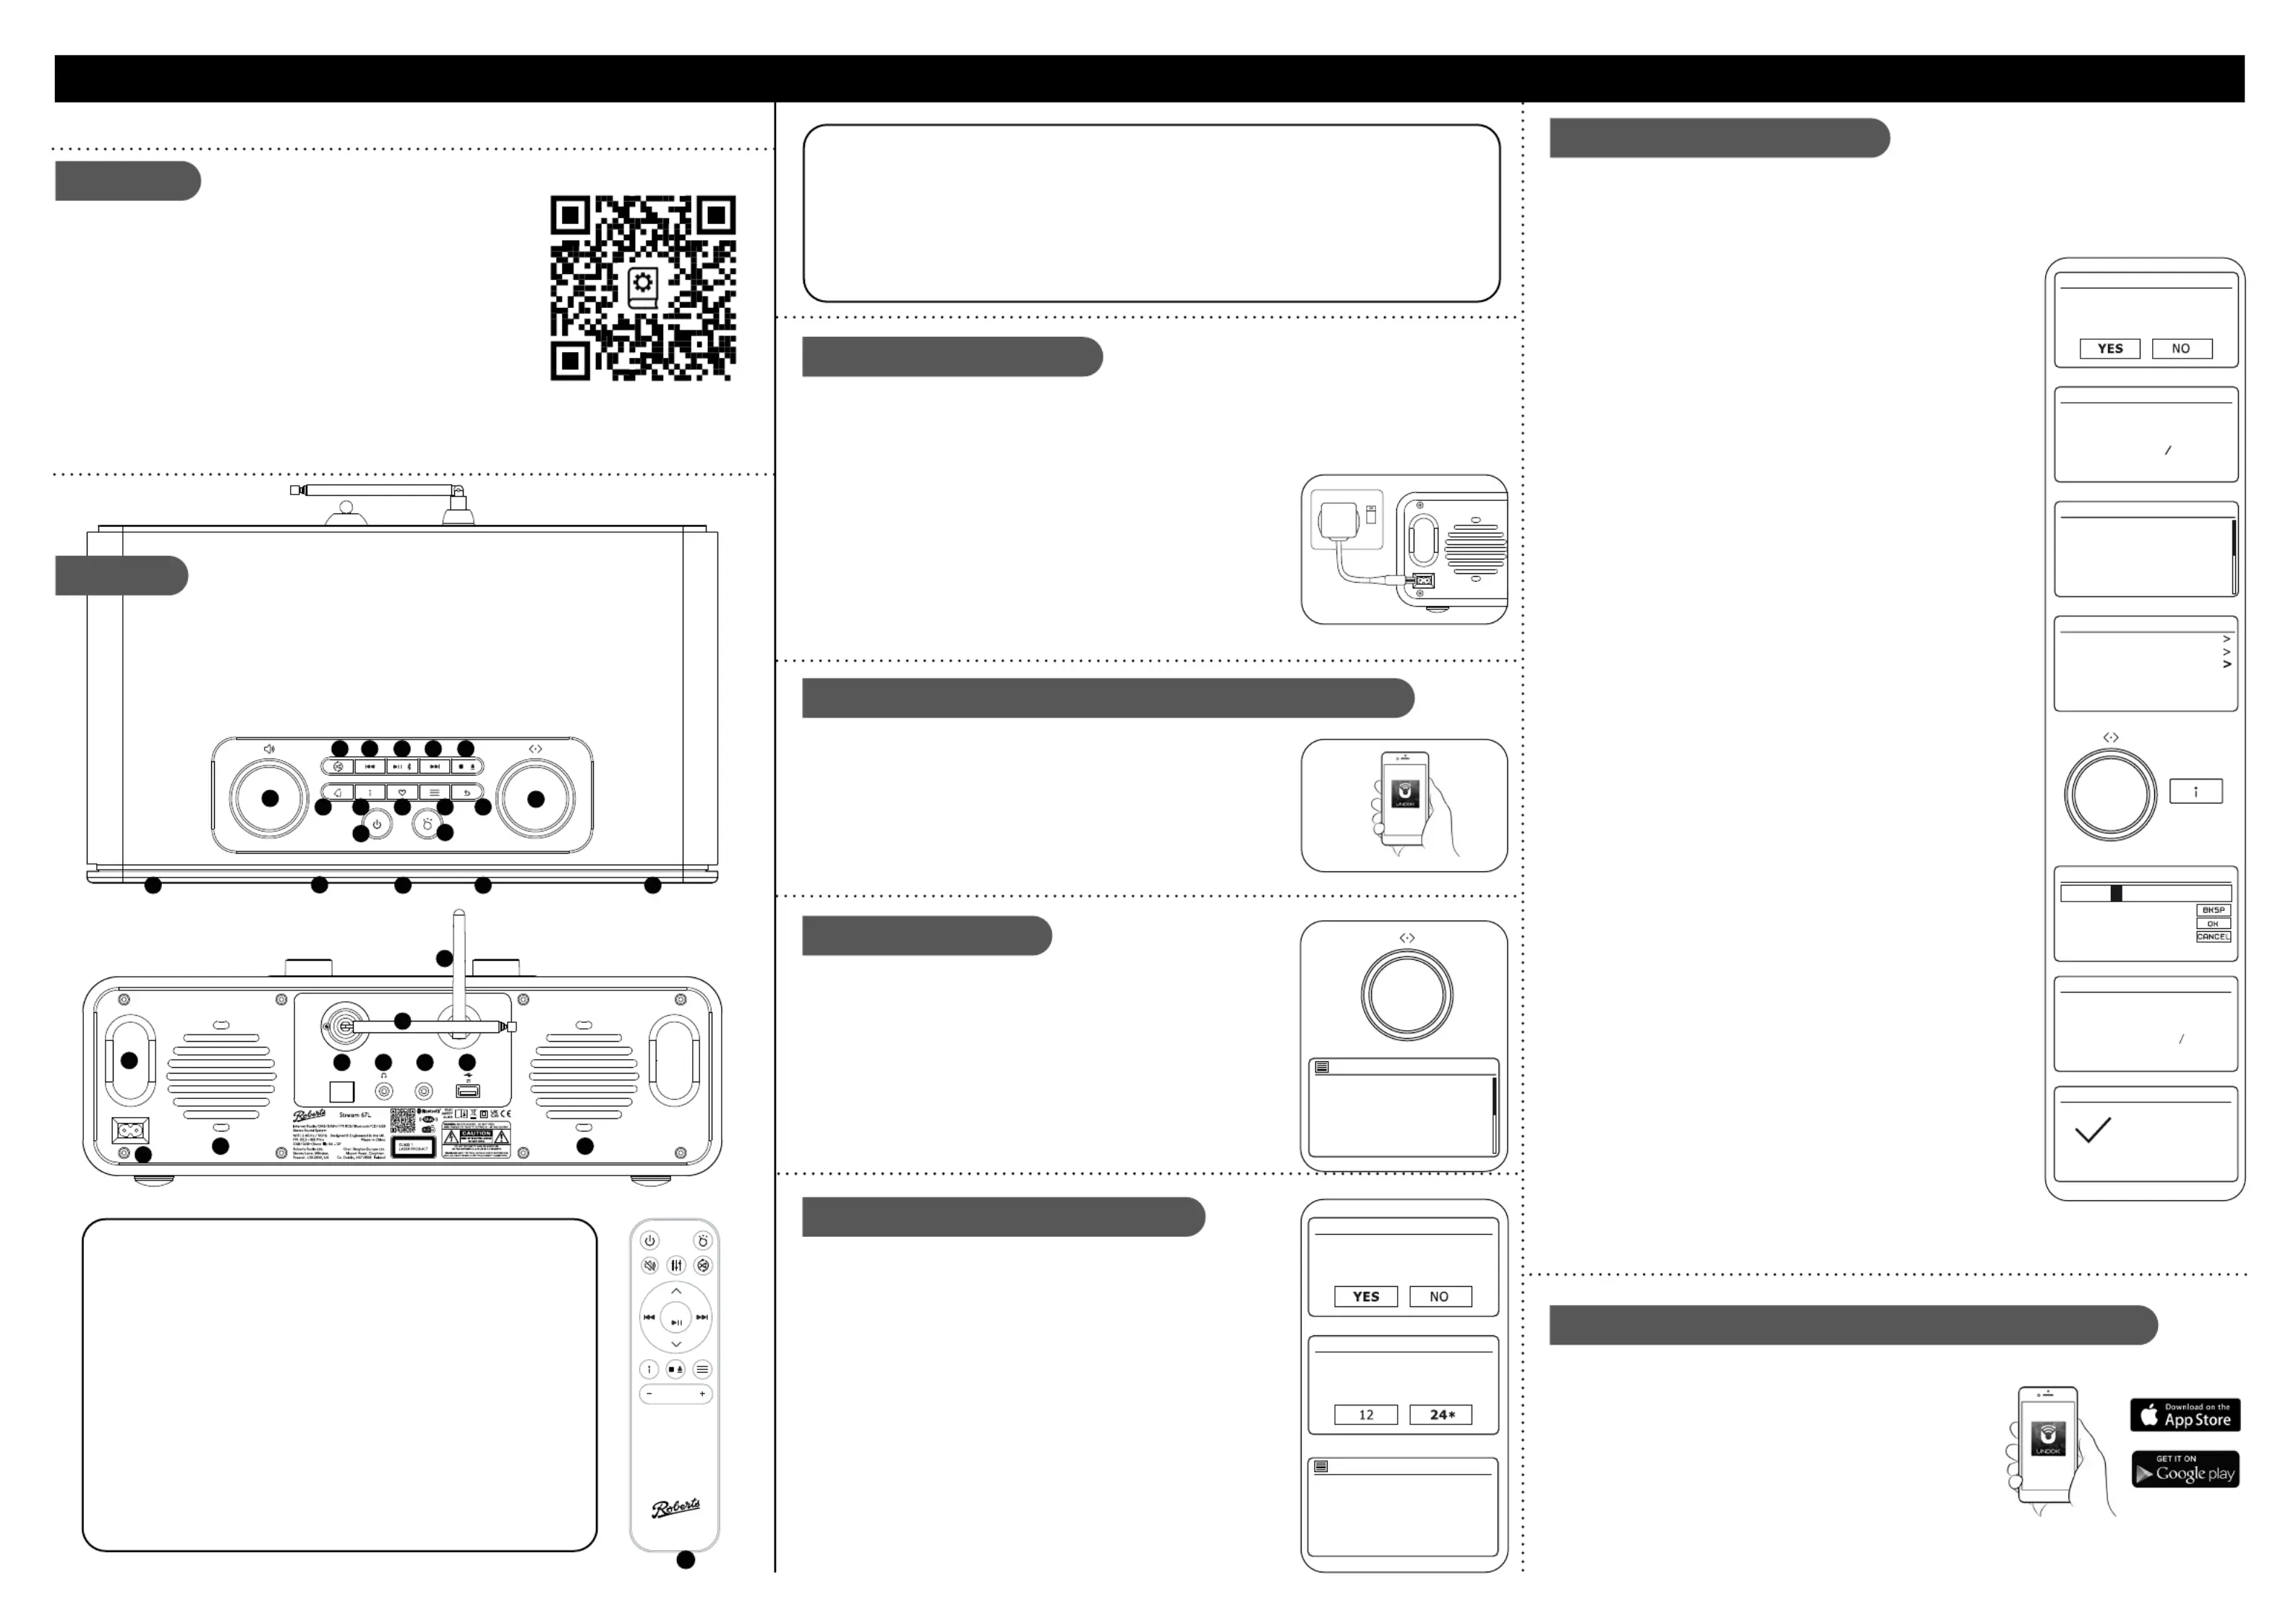
Features
Controls
STEP 1 - Connect to the mains & setup your smart audio systemWhat is in the Box?
E - Connect to your network
F - Use the UNDOK app to setup your audio system
• Internet / DAB+ / FM radio
• Streaming: Spotify, Deezer, Amazon Prime music
• Bluetooth
• CD, CD MP3 / CD WMA compatibility
• Play MP3 or WMA les via USB
• Two mid-treble speakers, two bass speakers (with ported chambers)
• Control via the UNDOK smartphone app (for Apple iOS and Android)
• 10 DAB, 10 FM presets and 40 Internet radio presets
• WiFi and Ethernet connection (Dual-band WiFi and Ethernet)
• 5 equaliser proles plus User EQ mode
• Clock and dual alarm (wake to Radio / CD / buzzer)
• USB charging of smartphone, tablet or similar devices
• Auxiliary input and headphone socket for private listening
A - Connect to the mains
Please read the safety leaet provided before connecting your smart audio system to the mains.
The mains plug is used as the disconnect device, The socket-outlet shall be installed near the equipment
and shall be easily accessible.
1 Place your audio system on a at surface.
2 Plug the mains lead into the on the back of the unit.mains socket
3 If you wish to use a wired connection, plug the Ethernet cable into
the socket at the back of the unit.
4 Plug the mains lead into a wall socket and switch on the socket.
5 The display on the audio system will show a start up screen for a
few seconds. If this is the rst time that you use your audio system
(or after a Factory Reset) the display will show the language menu.
AC In
100-240V ~
W66 zH06 / zH05
1 If you wish to setup your audio system using the UNDOK app
download and install the UNDOK app on to your Android
or iOS device.
2 Follow the on-screen instructions or see the full user guide
on-line (scan the QR code on this documnet with your phone).
• If you already have the UNDOK app installed on your device
ensure that you have the latest version.
Volume1
2 Repeat / Shufe
Previous (RW)3
Play/Pause / BT Pair4
Next (FF)5
Stop / Eject6
Tuning / Select / Snooze7
Back 8
9 Menu
10 Preset
11 Info / Dimmer
12 Alarm
13 On / Standby / Sleep
14 Mode
15 IR sensor
16 Display
17 CD slot
18 Mid treble speakers
19 USB playback / charge
20 Auxiliary input
21 Headphone socket
22 Ethernet socket
23 Power input
24 DAB / FM telescopic aerial
25 WiFi antenna
26 Sub-bass speakers x 2
27 Bass reex ports x 2
28 Remote control
D - Select clock and time settings
1 The audio system will show a setup wizard. With highlighted ‘YES’
press the control to begin setting up your product.Tuning/Select
• Note: If you wish to go back within a menu or if you make an error
at any time, please use the button.Back
2 Choose either the or clock display.12 24 hour
3 A menu allowing you to specify the auto-update option for the clock
will be shown. will be the best for most users.Update from network
4 Choose the for your region.timezone
5 Choose a option. This is also known as Summer/daylight saving
Winter time (or BST/GMT in the UK).
C - Select language
By default your audio system will display all menus and messages in
English.
1 Rotate the control to highlight the desired language.Tuning/Select
2 Press the control to enter the selection.Tuning/Select
• Your audio system will display a privacy policy. Please read the
privacy policy and then press the control to accept Tuning/Select
the policy.
English
Dansk
Nederlands
Français
Deutsch
Italiano
Language
*
Your audio system may be congured using either the display and
buttons UNDOK app. First-time users are on the unit or using the
recommended to use the audio system’s controls.
1 If you wish to use to setup your unit, .UNDOK skip to step F now
2 If you would like to setup using the audio system’s controls follow
the setup procedure below and choose the desired language.
B - Setup using the audio system or the UNDOK app
Setup wizard
Start now?
Date/Time
12/24 hour format
Auto update
Update from DAB
Update from FM
Update from Network
No update *
Scan for full instructions.
Select
28
Jones family
[WPS] Paul’s network
Smith
Brown
[Rescan]
[Manual config]
SSID
*
Network settings
Keep network connected?
Network settings
Network wizard
Scanning...
Push Button
PIN
Skip WPS
WPS Menu
Key:
0 1 2 3 4 5 6
7 8 9 . _ - @
, a b c d e
f g h i j k l
m n o p q r s
123-jones
Setup wizard
Setup wizard
completed
Press ‘SELECT’ to exit
Network settings
Please wait
Connecting...

Use restriction:This device is authorised in the following countries for indoor
use only when used with 5GHz Wi-Fi (5150 to 5350MHz; channels 36 to 64):
AT BE BG CH CY CZ DE
DK EE EL ES FI FR HR
HU IE IS IT LI LULT
LV MT NL NO PL PT RO
RS SE SI SK TR UK (NI)
Please read the safety leaet provided before
using batteries.
1 Remove the battery cover on the rear of your
remote control by pulling the small slot on the
side of the remote body.
2 Insert 2 x AAA size batteries into the spaces in the
compartment. Take care to ensure the batteries
are inserted in the right direction as shown inside.
3 Replace the cover. If the remote is not to be used
for an extended period of time it is recommended
that the batteries are removed.
Caution: Replace batteries only with the same
or equivalent type. Danger of explosion if the
batteries are incorrectly replaced.
STEP 2 - Navigating your smart audio system
STEP 3 - Operating your smart audio system
Other information
Circuit features
Bluetooth
1 Ensure Bluetooth is enabled on your smart device.
2 Press Mode to select Bluetooth mode on your audio system.
3 The Bluetooth indicator will ash and your audio system
will show that it is . On your smart device select ‘discoverable’
‘Stream 67L’. Once the connection is established the indicator
will remain steady. You may now play your music.
4 To connect a different device, apply a long press on the
Bluetooth Pair button on your audio system. Your audio system
will become discoverable by other devices.
ROBERTS RADIO LIMITED
www.robertsradio.com
© 2022 Roberts Radio Limited
Issue 1
2022-06-13
Smart Audio System with Bluetooth, USB and Streaming Services
Please read this guide and safety/warranty guide before use.
Stream 67L
Specications
Power requirements
Mains 100 - 240V 50/60Hz
Remote control batteries 2 x AAA size
USB output 5V / 1A
Connectivity
Wired Ethernet 10/100M bits/sec via RJ-45 connector
WiFi 802.11 b, g, n or a supported with WEP
and WPA / WPA2 encryption
3.5mm Headphone socket, 3.5mm Aux In.
Aerial System WiFi antenna, DAB/FM Telescopic aerial
Bluetooth standards A2DP, AVRCP, Bluetooth codecs supported SBC Bluetooth EDR
EIRP POWER (MAX.) - 10.26dBm
Frequency coverage FM 87.5 - 108MHz, DAB 174.928 - 239.200MHz
Bluetooth 5.0 frequencies 2.402 - 2.480GHz
Operating temperature range +5°C to +40°C
Product markings This symbol indicates AC voltage.
This symbol indicates Class II equipment.
Remote control battery replacement
Internet radio - Listen to internet radio
DAB radio - Listen to DAB radio
FM radio - Listen to FM radio
CD - Play music from CD
Auxiliary input - Connect to other devices
Spotify - Play music from Spotify
Amazon Music - Play music from Amazon Music
Deezer - Play music from Deezer
Bluetooth - Stream music using your smart device
USB - Play music from USB
System reset
If you wish to completely reset your audio system to its initial state perform
a factory reset. Press . Choose Menu ‘System settings’, ‘Factory Reset’
then . All user entered settings will be erased.‘YES’
Media playback controls
Control media playback using the previous, next, play/pause or
stop buttons. : These features are dependent on the music Note
being played and will not always be available.
System settings
You can access ‘System settings’ from the current menu. The system settings include Equaliser, Subwoofer, Streaming audio quality, Network, Time/Date,
Brightness, Inactive standby, Language, Factory reset, Software update, Setup wizard, Info and Privacy policy.
Preset radio stations
Play CD / CD MP3 / WMA discs
Play Internet, DAB or FM radio
USB Player
Play your music collection from a USB memory device.
Choose ‘USB playback’ to playback a USB memory device.
The USB socket can also be used to charge your smartphone, tablet or similar devices.
Internet - You can search for a radio station or podcast by location, genre or by the
station name. You can also store preset stations or add a station to your favourites list.
DAB - Carefully, extend the telescopic aerial. A scan of the Band III DAB channels
will be carried out. Rotate the control to access the full station list. Press the Tuning
Tuning control to select the highlighted radio station.
FM - Extend the telescopic aerial. Rotate the Tuning control clockwise or anti-clockwise
and then press the control to scan low to high or high to low frequency. Tuning
Remote Control System Buttons
A short press will switch your audio system On or to Standby.
A long press will access the sleep timer (on the unit) when playing.
A short press will cancel an active alarm.
Choose a listening mode:
1 Pressing Mode gives you access to each
of the operating modes. Press again or turn
the select control to select a new mode.
Push the tuning dial to select a mode and
return to the main screen.
2 Press Menu to access the full menu for
the current operating mode.
Select music mode
Compatible with 2.4 GHz and 5 GHz WiFi bands.
5 GHz Wi-Fi function: 5150-5350MHz, 5470-5725MHz and 5725-5875MHz
The name plate is located on the rear of the audio system.
The company reserves the right to amend the specication without notice.
Designed & Engineered in the UK
Made in China
In order to minimise its energy consumption when not in use, your audio
system will go into standby if it detects that it is no longer being used. By
default this period is set to 8 hours but you may change it if you wish. With
your audio system switched on, press , choose then Menu ‘System settings’
‘Inactive Standby’ and then choose from 2, 4, 6, 8 hours or Off. Your audio
system will go into standby after the selected time has expired.
Your radio has 40 Internet radio, 10 DAB and 10 FM presets which can be set
to store a radio station or (for Internet radio, a podcast).
1 Tune to the required radio station. Apply a long press on the button Preset
‘Save to preset’ will be displayed. Use the Tuning control to scroll to an
unused preset or a preset you wish to change. Press Tuning to store.
2 To recall a preset station, choose Internet, DAB or FM mode. Give a short
press on the button ‘Recall from preset’ will be displayed. Use the Preset
Tuning control to select the desired preset station.
Your audio system can playback standard CDs and CD-R/CD-RW discs with
standard audio or compatible audio les. Use only full size standard CDs. Mini
CDs (8cm diameter) are not compatible with the player and may jam the CD
mechanism.
1 Press Mode to switch the unit to CD mode.
2 To eject or reload a CD give a long press on the CD button.Stop/Eject
3 Press the button to start playing the disc. Adjust the volume. Play/Pause
To pause or resume playback press .Play/Pause
4 To stop playback press the CD button.Stop/Eject
5 While the CD is playing select skip tracks with the and Previous Next
buttons.
6 When playing an MP3/WMA disc you can skip to another folder using
the Up or Down buttons on the remote control. Pressing Menu will allow
access to the browse le option.
7 Use the button to alter the playback order or repeat Repeat/Shufe
behaviour.
2.4GHz WiFi EIRP POWER (MAX.) 19.76dBm
5GHz WiFi EIRP POWER (MAX.) 18.89dBm
Select
A short press will access each operating mode in turn.
Turn the tuning dial to skip through the modes more quickly.
A short press will access or exit the current menu system.
A short press will display information relating to the music being played.
Long press to adjust the brightness of the display (short press when in standby to adjust brightness).
A short press will change alarm status when the unit is in standby or playing.
A long press will access alarm settings when the unit is in standby or playing.
Rotate clockwise or anti-clockwise to scroll menu items or Left / Up / Right / Down buttons on remote control.
A short press on Tuning/Select or the select button (remote control) will select highlighted menu items.
A short press on Tuning/Select or the select button (remote control) will access snooze when an alarm sounds.
Press the Back button (or menu on remote) to go back to a higher level menu or if an error is made.
Select
Produktspecifikationer
Varumärke: | Roberts |
Kategori: | Radio |
Modell: | Stream 67L |
Behöver du hjälp?
Om du behöver hjälp med Roberts Stream 67L ställ en fråga nedan och andra användare kommer att svara dig
Radio Roberts Manualer

24 Februari 2025

31 December 2025

21 December 2024

24 Oktober 2024

13 Oktober 2024

5 Oktober 2024

29 September 2024

23 September 2024

19 September 2024

10 September 2024
Radio Manualer
- Radio Sony
- Radio Xiaomi
- Radio Bosch
- Radio AEG
- Radio Philips
- Radio Panasonic
- Radio Daewoo
- Radio DeWalt
- Radio Garmin
- Radio Grundig
- Radio JVC
- Radio JBL
- Radio Kenwood
- Radio Karcher
- Radio Motorola
- Radio Medion
- Radio Pioneer
- Radio Quigg
- Radio Topcom
- Radio Toshiba
- Radio Yamaha
- Radio Adler
- Radio Aiwa
- Radio Albrecht
- Radio Alecto
- Radio Akai
- Radio Acoustic Energy
- Radio Alpine
- Radio Aluratek
- Radio Argon
- Radio Icy Box
- Radio Brennenstuhl
- Radio OneConcept
- Radio Lexibook
- Radio Ozito
- Radio Sharp
- Radio Telefunken
- Radio Silvercrest
- Radio Makita
- Radio Hitachi
- Radio Nedis
- Radio Thomson
- Radio Black And Decker
- Radio Tristar
- Radio Lenco
- Radio Pyle
- Radio Vonroc
- Radio Audizio
- Radio Stanley
- Radio Manta
- Radio Tevion
- Radio GPO
- Radio Caliber
- Radio Timex
- Radio OK
- Radio Hyundai
- Radio Sonoro
- Radio Matsui
- Radio Hilti
- Radio Renkforce
- Radio ECG
- Radio Moulinex
- Radio Ryobi
- Radio Bush
- Radio Swan
- Radio RCA
- Radio Clatronic
- Radio Lowrance
- Radio Sencor
- Radio GPX
- Radio Festool
- Radio Blaupunkt
- Radio Metabo
- Radio Logitech
- Radio Manhattan
- Radio Exibel
- Radio Logik
- Radio Audio-Technica
- Radio Milwaukee
- Radio Hikoki
- Radio Telestar
- Radio EMOS
- Radio Salora
- Radio Denver
- Radio Imperial
- Radio Schneider
- Radio Sanyo
- Radio Vitek
- Radio Einhell
- Radio Hama
- Radio Soundmaster
- Radio Brigmton
- Radio Denon
- Radio Sunstech
- Radio Sennheiser
- Radio Maginon
- Radio Midland
- Radio Emerson
- Radio GlobalTronics
- Radio Technisat
- Radio La Crosse Technology
- Radio GoGEN
- Radio Rockford Fosgate
- Radio Marquant
- Radio Technics
- Radio Nordmende
- Radio AudioAffairs
- Radio Krüger And Matz
- Radio Binatone
- Radio Steren
- Radio Kicker
- Radio Bose
- Radio Audiosonic
- Radio Clarion
- Radio Proline
- Radio Coby
- Radio Crosley
- Radio Envivo
- Radio Muse
- Radio Teufel
- Radio Mac Audio
- Radio Bigben Interactive
- Radio Craftsman
- Radio Kathrein
- Radio Olympia
- Radio Pure
- Radio Powerplus
- Radio Porter-Cable
- Radio Uniden
- Radio Audiovox
- Radio Ion
- Radio Cotech
- Radio Yaesu
- Radio Tesco
- Radio Artsound
- Radio Dual
- Radio Boss
- Radio Terris
- Radio Oricom
- Radio Camry
- Radio Cobra
- Radio MB Quart
- Radio NGS
- Radio Switel
- Radio Bigben
- Radio Auna
- Radio Sunwind
- Radio Laser
- Radio Alba
- Radio Clas Ohlson
- Radio Naxa
- Radio Viper
- Radio Lexon
- Radio Sven
- Radio Futaba
- Radio Ricatech
- Radio Konig
- Radio Delta
- Radio Boston Acoustics
- Radio Icom
- Radio Mpman
- Radio Sweex
- Radio Ices
- Radio Trevi
- Radio Sogo
- Radio JL Audio
- Radio Zebra
- Radio Technaxx
- Radio Nikkei
- Radio PerfectPro
- Radio Peaq
- Radio Audac
- Radio Nevir
- Radio Freecom
- Radio Navman
- Radio Hertz
- Radio Jensen
- Radio Omnitronic
- Radio Roadstar
- Radio Gira
- Radio Scott
- Radio Jung
- Radio Tronic
- Radio Sangean
- Radio Basetech
- Radio Dnt
- Radio Balance
- Radio MT Logic
- Radio Audio Pro
- Radio Kunft
- Radio Cambridge
- Radio Difrnce
- Radio HQ
- Radio Be Cool
- Radio Noveen
- Radio Irradio
- Radio Karcher Audio
- Radio Easy Home
- Radio CRUX
- Radio Fusion
- Radio PAC
- Radio Terratec
- Radio IHome
- Radio August
- Radio Infinity
- Radio AIC
- Radio Ruarkaudio
- Radio Tivoli Audio
- Radio Go Green
- Radio ILive
- Radio Wolfgang
- Radio Victrola
- Radio Revo
- Radio Linn
- Radio Numan
- Radio Elta
- Radio Iluv
- Radio Monitor Audio
- Radio TELEX
- Radio Multiplex
- Radio Tangent
- Radio Furrion
- Radio SPC
- Radio Stabo
- Radio Clint
- Radio Soundstream
- Radio Xoro
- Radio Zolid
- Radio Sagemcom
- Radio Block
- Radio Power Dynamics
- Radio Berker
- Radio Woxter
- Radio Xhdata
- Radio Dreamgear
- Radio View Quest
- Radio Monacor
- Radio Noxon
- Radio Orava
- Radio Geneva
- Radio Brionvega
- Radio Ferguson
- Radio Wet Sounds
- Radio Eissound
- Radio DAP Audio
- Radio Dcybel
- Radio Oregon Scientific
- Radio Tecsun
- Radio Reflexion
- Radio JGC
- Radio Duronic
- Radio Scansonic
- Radio TFA Dostmann
- Radio Audisse
- Radio Tivoli
- Radio ETON
- Radio Kruger Matz
- Radio Vimar
- Radio Lenoxx
- Radio H-Tronic
- Radio Equity
- Radio Intertechno
- Radio Schwaiger
- Radio EKO
- Radio Pinell
- Radio Videologic
- Radio Mtx Audio
- Radio Aquatic AV
- Radio Roswell
- Radio Intek
- Radio Digitalbox
- Radio Whistler
- Radio Xact
- Radio Ruark Audio
- Radio Magnavox
- Radio Digitech
- Radio GME
- Radio NUVO
- Radio Graphite
- Radio Narex
- Radio Tiny Audio
- Radio Sirius
- Radio R-MUSIC
- Radio Klein Tools
- Radio E-bench
- Radio Konig Electronic
- Radio Peha
- Radio SiriusXM
- Radio Sanwa
- Radio SW-Stahl
- Radio Sailor
- Radio SSV Works
- Radio Microlab
- Radio QFX
- Radio Voxx
- Radio SACK It
- Radio BasicXL
- Radio Roth
- Radio Majestic
- Radio Ices Electronics
- Radio AmpliVox
- Radio Memphis Audio
- Radio AMX
- Radio Elbe
- Radio GBS Elettronica
- Radio Sang
- Radio Gewiss
- Radio Lutron
- Radio Axxess
- Radio Majority
- Radio Retekess
- Radio Wintal
- Radio Acoustic Solutions
- Radio Atlantis Land
- Radio Ranger
- Radio BLUEPALM
- Radio MAAS
- Radio Weather X
- Radio Data-Tronix
- Radio Aconatic
- Radio Mebby
- Radio Yamazen
- Radio Blonder Tongue
- Radio MOOOV
- Radio RoadKing
Nyaste Radio Manualer

2 April 2025

2 April 2025

2 April 2025

1 April 2025

1 April 2025

31 Mars 2025

29 Mars 2025

26 Mars 2025

24 Mars 2025

14 Mars 2025