Satco S39062 Bruksanvisning
Satco ej kategoriserat S39062
Läs gratis den bruksanvisning för Satco S39062 (2 sidor) i kategorin ej kategoriserat. Guiden har ansetts hjälpsam av 4 personer och har ett genomsnittsbetyg på 4.3 stjärnor baserat på 6 recensioner. Har du en fråga om Satco S39062 eller vill du ställa frågor till andra användare av produkten? Ställ en fråga
Sida 1/2
156 (DIA) X 60 (H) mm in format S16-L2 (For models S39059, S39061,
LED EDGE LIT DIRECT
WIRE DOWNLIGHTS
Models:
S39059, S39061, S39062, S39063
Satco Products, Inc.
Brentwood, NY 11717
•
Installation requires knowledge of electrical systems.
If not qualied, do not attempt installation. Contact a
qualied electrician.
•
Do not use if xture housing is damaged.
•
To reduce risk of re and over-heating, conrm all
connections are secure.
•
TURN OFF the electrical power before proceeding.
•
Direct Wire Downlights must be installed in accordance
to the dimensions and features shown in the installation
instructions.
•
These downlights are rated for IC or NON-IC installations.
•
These products are approved for use in damp locations.
•
The Direct Wire Downlights are dimmable. Please visit
our website www.Satco.com for dimmer compatibility list.
•
To prevent wiring damage or abrasion, do not expose
wiring to edges of sheet metal or other sharp objects.
•
Do not make or alter any openings in the wire housing
or make any modications to the electrical components.
•
Do not alter, relocate or remove wiring, lamp holders,
power supply or any other electrical component with
the xtures.
INSTALLATION AND SAFETY INSTRUCTIONS
IMPORTANT: Read before installing xture. Retain for future reference.
© Copyright 2019 Satco Products, Inc. 05/19
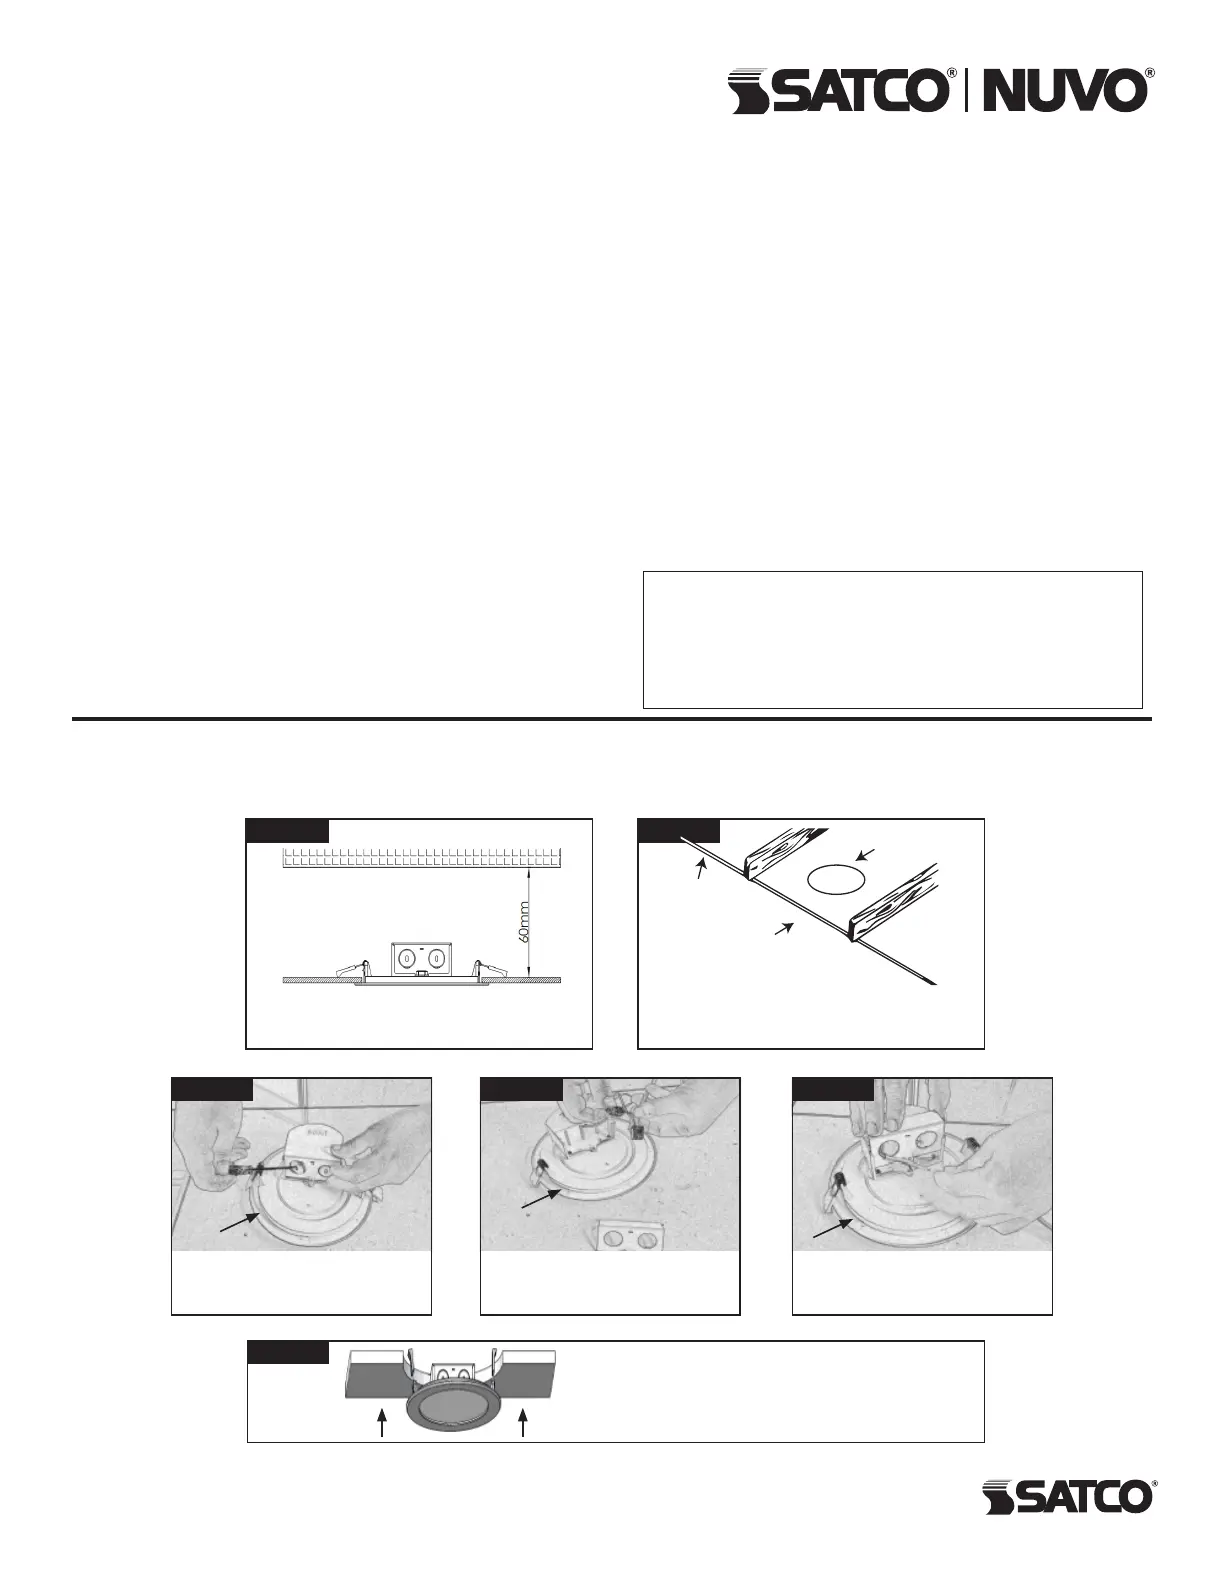
INSTALLATION INSTRUCTIONS
NOTE: Before installing these products or doing any maintenance, make sure to turn OFF the power supply and check the
through branch wiring marking.
Make electrical connections as per
local code requirements.
Cut the required size hole in the ceiling. Ensure to
avoid wires and obstructions when choosing the
hole location.
Replace wiring compartment door.
Ensure it is closed securely.
Open the wiring compartment door.
Remove knock-outs as needed using
a screwdriver.
Hold spring clips in upright position. Guide xture into hole
until spring clips pull xture rmly up against the ceiling.
Allow adequate space in ceiling cavity for heat
dissipation. Height of cavity should be at least
60mm.
For Round Airtight Stickers
For Round Airtight Stickers
For Round Airtight Stickers
STEP 1
STEP 6
STEP 3STEP 4STEP 5
STEP 2
Minimum Lamp Compartment Dimensions:
S39062, S39063)
107 (DIA) X 60 (H) mm in format S16-L2 (For models S39055, S39056,
S39057, S39058)
WARNING: Risk of Fire or Electric Shock
Use Drywall Saw
Ceiling
Hole
S11716, S11717, S11718, S11719
220 (DIA) X 60 (H) mm in format S16-L2 (For models S11716, S11717,
S11718, S11719)
S39055, S39056, S39057, S39058
Produktspecifikationer
| Varumärke: | Satco |
| Kategori: | ej kategoriserat |
| Modell: | S39062 |
Behöver du hjälp?
Om du behöver hjälp med Satco S39062 ställ en fråga nedan och andra användare kommer att svara dig
ej kategoriserat Satco Manualer

3 April 2026
3 April 2026
3 April 2026
3 April 2026
3 April 2026
3 April 2026
3 April 2026
3 April 2026
3 April 2026
3 April 2026
ej kategoriserat Manualer
Nyaste ej kategoriserat Manualer
3 April 2026
3 April 2026
3 April 2026
3 April 2026
3 April 2026
3 April 2026
3 April 2026
3 April 2026
3 April 2026