Scosche PSM21009 Bruksanvisning
Scosche Inte kategoriserad PSM21009
Läs gratis den bruksanvisning för Scosche PSM21009 (2 sidor) i kategorin Inte kategoriserad. Guiden har ansetts hjälpsam av 22 personer och har ett genomsnittsbetyg på 4.4 stjärnor baserat på 4 recensioner. Har du en fråga om Scosche PSM21009 eller vill du ställa frågor till andra användare av produkten? Ställ en fråga
Sida 1/2
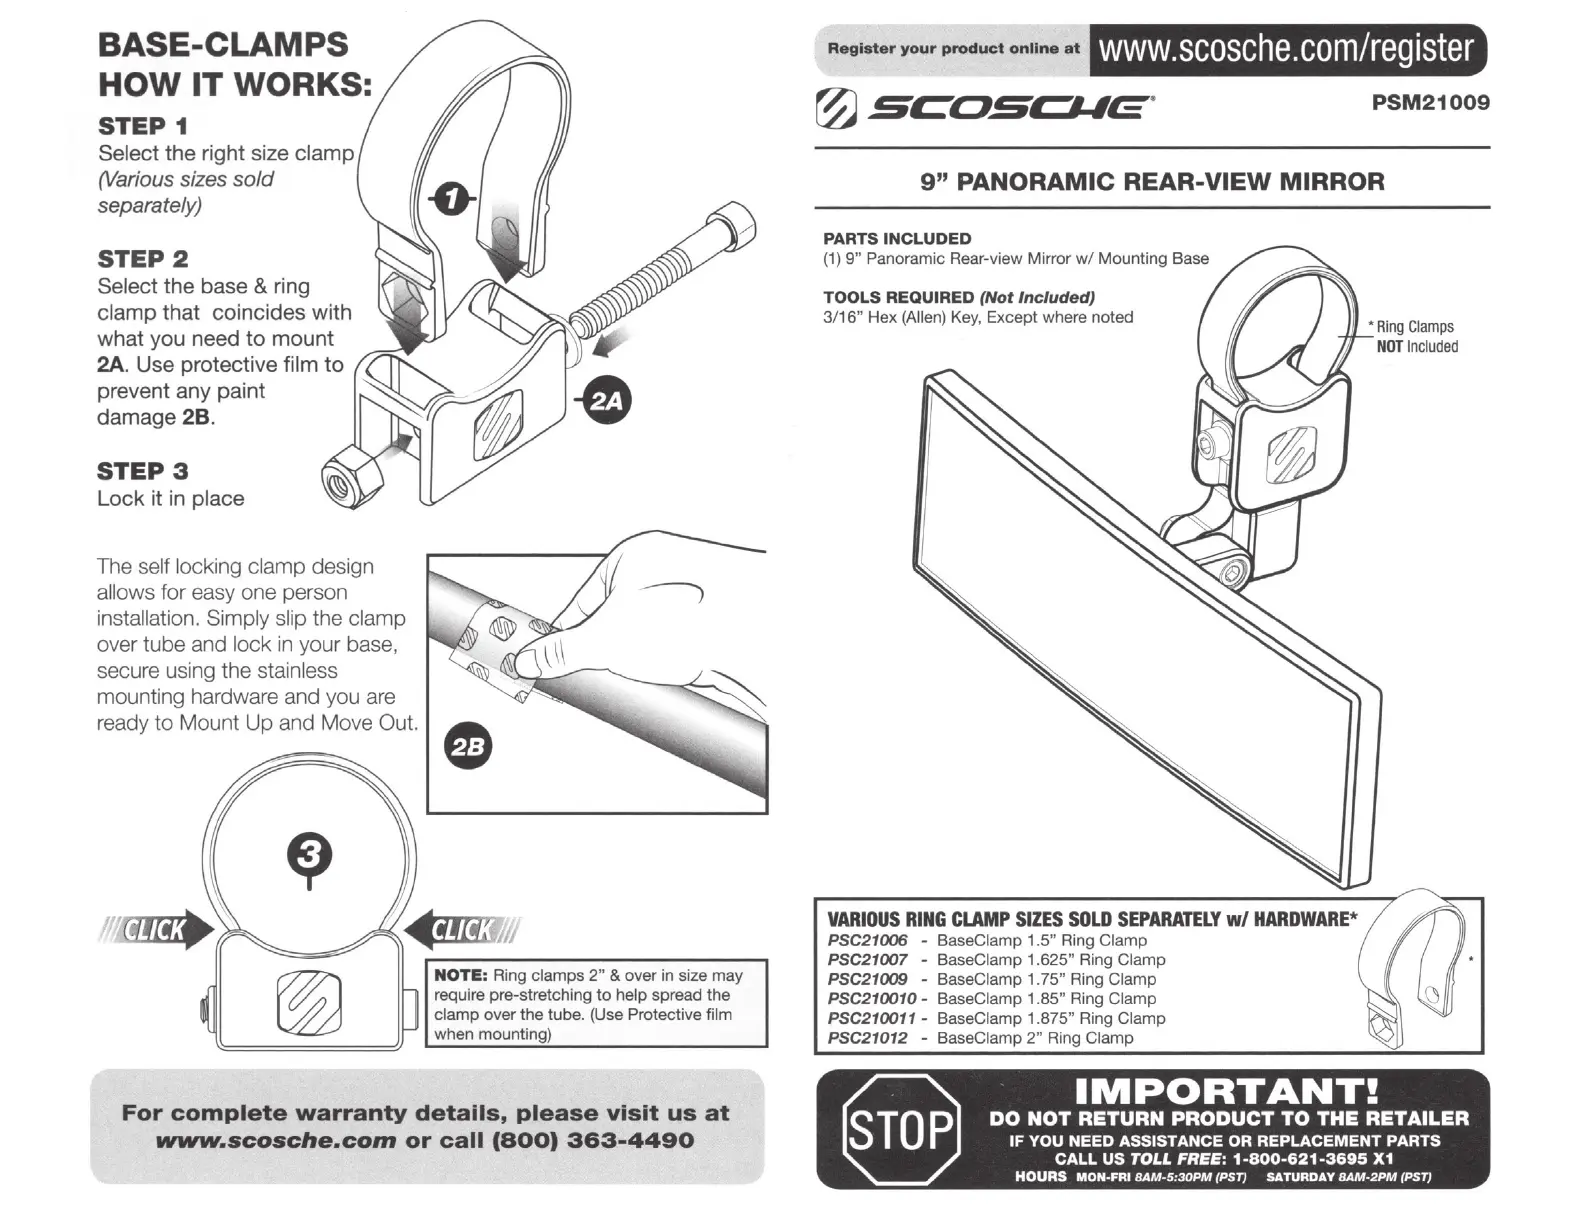
BASE-CLAMPS
HOW
IT
WORKS:
STEP
1
Select the right size clamp
(Various sizes
sold
separately)
STEP2
Select
the
base & ring
clamp
that
coincides with
what you need
to
mount
2A. Use protective film
to
prevent any paint
damage
28
.
STEP3
Lock
it in place
The self locking clamp design
allows for easy one person
installation. Simply slip the clamp
over tube and lock
in
your base,
secure using the stainless
mounting hardware and you are
ready
to
Mount
Up
and Move Out.
NOTE:
Ring clamps
2"
& over
in
size may
require pre-stretching
to
help spread the
clamp over the tube. (Use Protective film
when mounting)
For
complete
warranty
details,
please
visit
us
at
www.scosche.com
or
call
(800)
363-4490
Register
your
product
online
at
www.scosche.com/register
PSM21009
9"
PANORAMIC REAR-VIEW MIRROR
PARTS
INCLUDED
(1)
9"
Panoramic Rear-view Mirror w/ Mounting Base
TOOLS
REQUIRED
(Not
Included)
3/16" Hex (Allen) Key, Except where noted
VARIOUS
RING
CLAMP
SIZES
SOLD
SEPARATELY
w/
HARDWARE*
PSC21006 -BaseCiamp 1.5" Ring Clamp
PSC21007 -BaseCiamp 1.625" Ring Clamp
PSC21009 -BaseCiamp 1.75" Ring Clamp
PSC210010 -BaseCiamp 1.85" Ring Clamp
PSC210011 -BaseCiamp 1.875" Ring Clamp
PSC21012 -BaseCiamp
2"
Ring Clamp
Produktspecifikationer
| Varumärke: | Scosche |
| Kategori: | Inte kategoriserad |
| Modell: | PSM21009 |
Behöver du hjälp?
Om du behöver hjälp med Scosche PSM21009 ställ en fråga nedan och andra användare kommer att svara dig
Inte kategoriserad Scosche Manualer

20 Mars 2025
22 Februari 2025
10 September 2024
10 September 2024
9 September 2024
9 September 2024
9 September 2024
9 September 2024
9 September 2024
9 September 2024
Inte kategoriserad Manualer
Nyaste Inte kategoriserad Manualer
9 April 2025
9 April 2025
9 April 2025
9 April 2025
9 April 2025
9 April 2025
9 April 2025
9 April 2025
9 April 2025
9 April 2025