Sedona S30CART Bruksanvisning
Sedona Inte kategoriserad S30CART
Läs gratis den bruksanvisning för Sedona S30CART (3 sidor) i kategorin Inte kategoriserad. Guiden har ansetts hjälpsam av 28 personer och har ett genomsnittsbetyg på 4.5 stjärnor baserat på 8 recensioner. Har du en fråga om Sedona S30CART eller vill du ställa frågor till andra användare av produkten? Ställ en fråga
Sida 1/3
Assembly Instructions:
SEDONA L400CART
L500CART
& L600CART
Lynx Freestanding Cart
Model L400CART, L500CART &L600CART
Lynx Grills, Inc., 6023 E. Bandini Blvd. Commerce, CA 90040 Phone:(323)838‐1770 Fax:(323)838‐1778|www.lynxgrills.com
Document 33807 Rev C 02/08/13
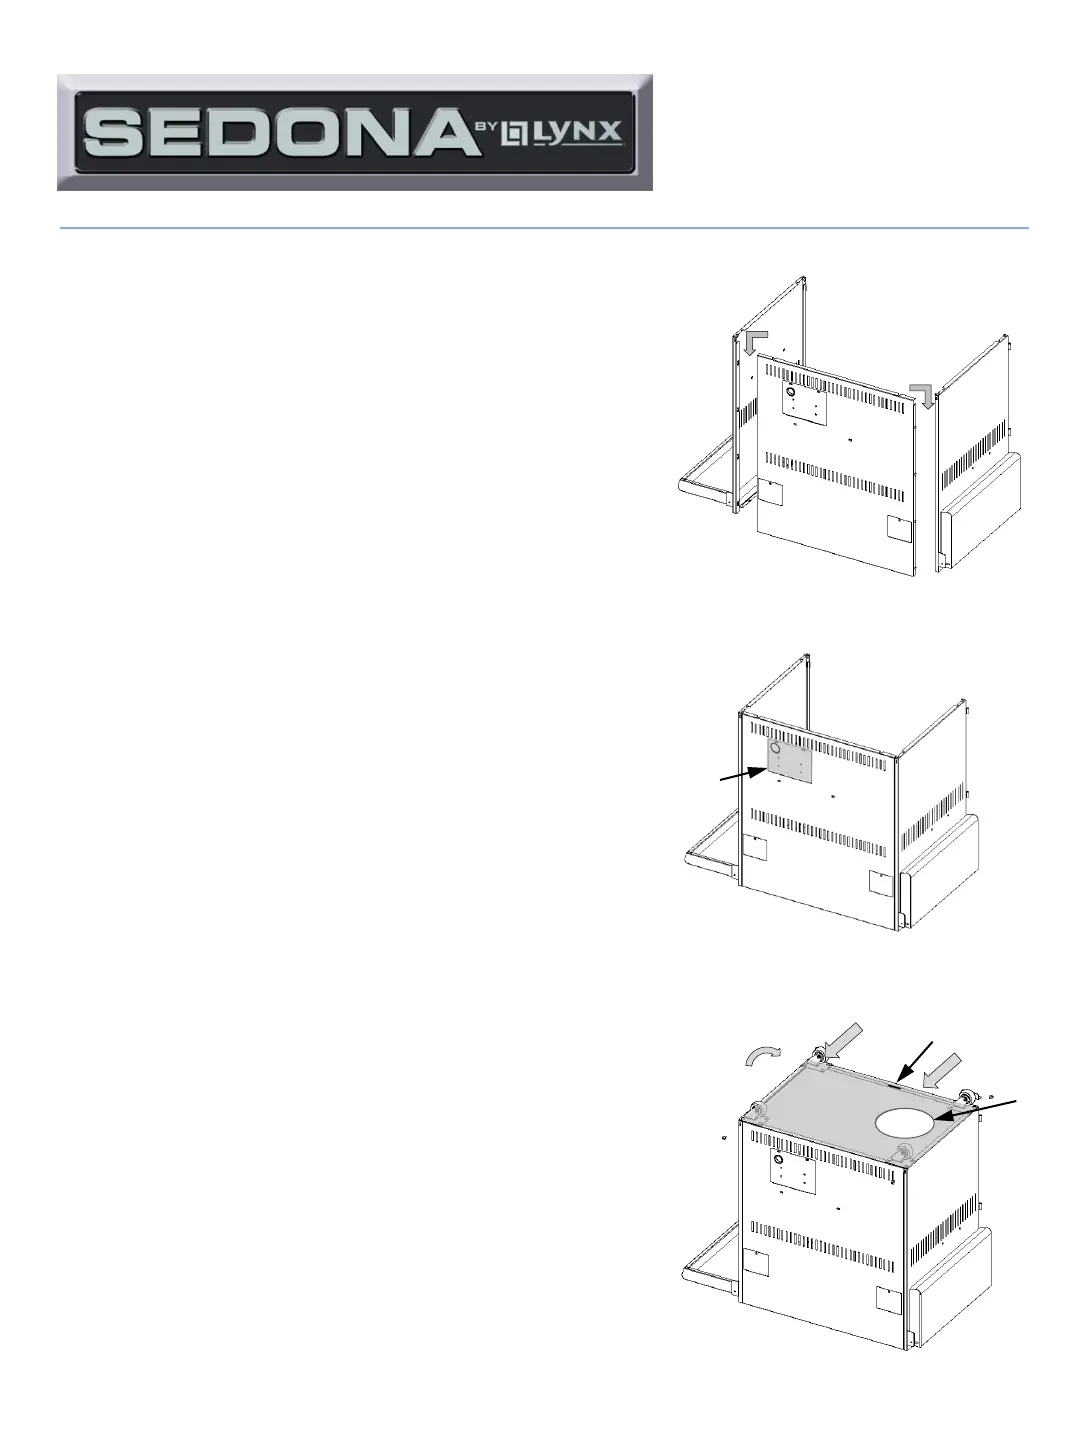
Step 1.
Step 2.
Step 3.
Step 1.
After opening and identifying the components, select the back
panel assembly and either the right or left side panel assembly.
Orient the parts as shown in the illustration for step 1.
Note that these parts are upside down with the shelves at the
floor. Hook the right or left side to the back into the four keyways
located on the edge. When attached all four keyways should be
engaged and the back and side flush to the top.
Repeat this step for the opposite side panel.
Step 2.
With the cart oriented upside down, locate the 4 - #8 screws and
nuts and mount the electrical transformer to the access plate
shown in the illustration for this step. It may be done at the end of
the assembly but is somewhat easier to access at this stage.
Step 3.
Refer to the figure for step 3 and insert the base assembly into the
cavity at the back corners of the cabinet. Check that the tank hole
is positioned as shown and the magnet is located on the open side.
Splay the two sides out slightly and enclose them over the front of
the base. The sides and back have pockets that fit over the casters
for clearance. Use 4 of the ¼-20 x ½ screw at each corner to lock
the assembly in place.
Access
Plate
magnet
tank
hole
Screw
4 places
Introduction:
Your Freestanding Cart comes with all of the components necessary
to assemble a cart for the SEDONA Series of Lynx Grills.
The SEDONA CART series is comprised of 8 sub assemblies:
1.Back Panel Assembly
2.Right Side Panel Assembly with Shelf
3.Left Side Panel Assembly with Shelf
4.Base Assembly with Wheels
5.Inner Shelf Assembly
6.Cross Brace Assembly
7.Right Door
8.Left Door
In addition there are 14 screws (1/4 -20 x ½) to assemble the
cart and grill and 4 screws with nuts (#8-32 x 3/8) to attach the
transformer assembly supplied with the Grill.
Produktspecifikationer
| Varumärke: | Sedona |
| Kategori: | Inte kategoriserad |
| Modell: | S30CART |
Behöver du hjälp?
Om du behöver hjälp med Sedona S30CART ställ en fråga nedan och andra användare kommer att svara dig
Inte kategoriserad Sedona Manualer

27 December 2024
18 September 2024
18 September 2024
18 September 2024
18 September 2024
18 September 2024
18 September 2024
18 September 2024
18 September 2024
18 September 2024
Inte kategoriserad Manualer
Nyaste Inte kategoriserad Manualer
9 April 2025
9 April 2025
9 April 2025
9 April 2025
9 April 2025
9 April 2025
9 April 2025
9 April 2025
9 April 2025
9 April 2025