Smartwares CIP-39902 Bruksanvisning
Smartwares
övervakningskamera
CIP-39902
Läs gratis den bruksanvisning för Smartwares CIP-39902 (8 sidor) i kategorin övervakningskamera. Guiden har ansetts hjälpsam av 2 personer och har ett genomsnittsbetyg på 4.4 stjärnor baserat på 1.5 recensioner. Har du en fråga om Smartwares CIP-39902 eller vill du ställa frågor till andra användare av produkten? Ställ en fråga
Sida 1/8

CIP-39902 | Outdoor Light
with Camera
EN | Instruction manual
NL | Gebruiksaanwijzing
FR | Mode d’emploi
DE | Bedienungsanleitung
PL | Instrukcja obsługi
CS | Návod na použití
SK | Návod na použitie
ES | Manual de usuario
IT | Manuele utente
DK | Brugervejledning
EN Instruction manual
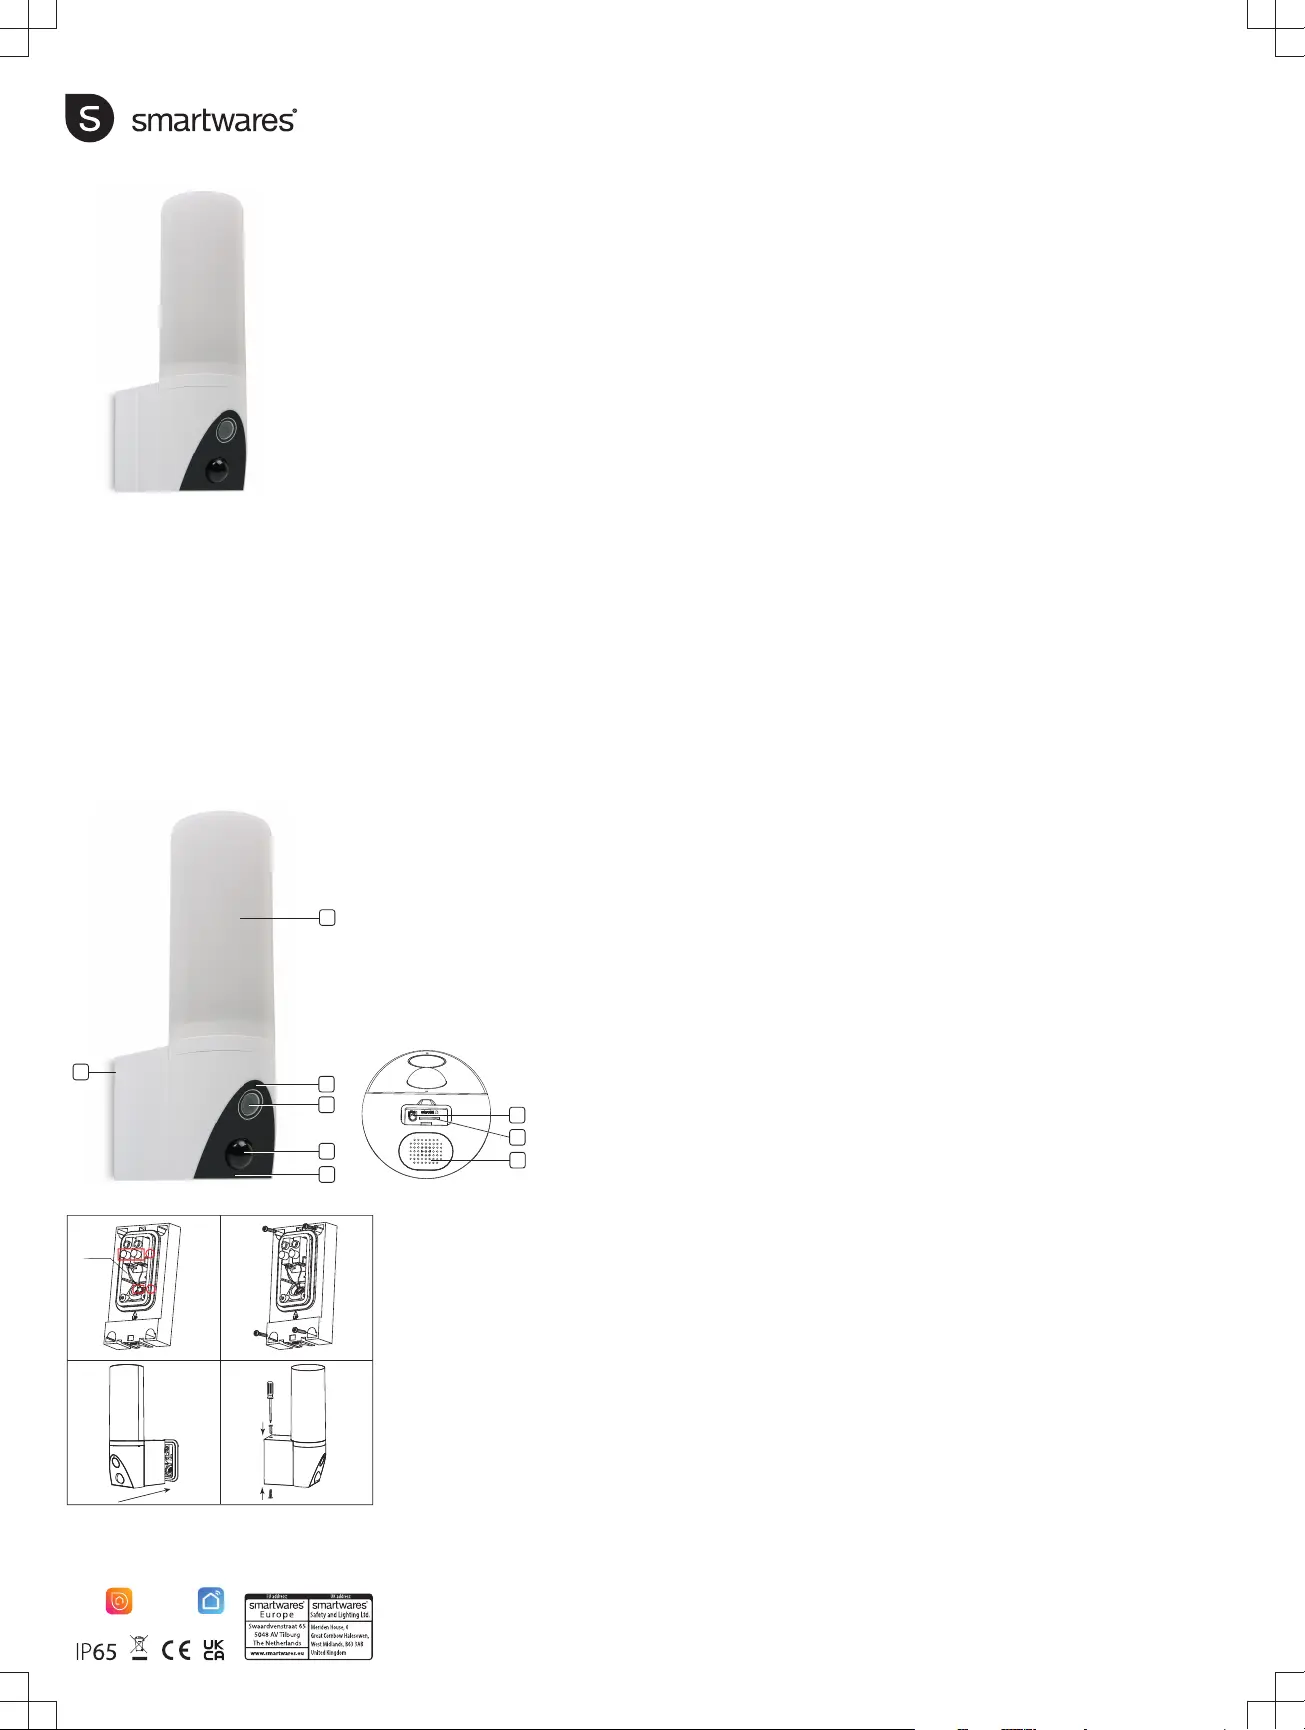
PARTS DESCRIPTION
1. LED light
2. Microphone
3. Lens
4. PIR sensor
5. Led indicator
6. Back plate
7. Reset button
8. Speaker
9. Micro-SD card slot
BEFORE THE FIRST USE
Optional: Inserting a MicroSD card (not
included)
• First make sure your camera is not connected
to the power source. Insert your Micro-SD card
all the way in the MicroSD card slot on the
camera. Only use a class 10 MicroSD card
(max 128GB).
• A MicroSD card is required for recording
footage.
Download the app
• Download the Connected at Home app from
the App store or Google Playstore.
• Alternatively, you can also use the Smart Life
app.
INSTALLATION
• Choose a location to place your camera and
check if there is a strong 2,4 GHz Wi-fi signal.
• Turn off the power breaker in your fuse box.
• Remove the back plate from the camera by
loosening and removing the screws. (D)
• Lead the power cables from the wall through
the hole in the back plate.
• Loosen the screws (A) (1) and connect the
power cables to the terminal then tighten the
screws. (A) (1) Make sure that the cables are
installed within the housing. (B) (2)
Note: To prevent damage, before drilling, make
sure that there are no wires or pipes located in the
wall.
• Drill holes and mount the back plate to the wall
using the screws provided. (B)
• Attach the camera to the back plate (C) and fix
it using the screws supplied. (D)
• When the camera is installed turn on the power
breaker in your fuse box.
• The camera will now start booting. This will
take about 1 minute. Wait until the LED
indicator flashes red rapidly.
• Open the Connected at Home or Smartlife app.
• Follow the on-screen registration process or log
in with existing account.
Adding the camera
• Open the App and press “Add device” or the +
button to add the camera.
• For Connected at home app choose
“Guardian”.
• For Smartlife app choose Smart camera (Wi-
Fi).
• Click on "Next” on your smartphone then input
your Wi-Fi's password, click "Next" again and
follow the instructions in the App.
• Note: Only 2,4 GHz Wi-Fi network is
supported.
LIGHT CONTROL VIA THE APP
On/ Off / Brightness
• You can turn the light on and off or adjust the
brightness. Open the menu in the App and
press ‘Light’ then use the On/Off button.
Activate light when motion is detected
• In the App settings, turn on the PIR and set the
Night mode to Auto. When it is dark, the light
will go on whenever motion is detected.
• Default - The light will stay on for 60 seconds
when motion is detected, you can modify the
timing in the settings, go to ‘Light’ → ‘Time-
delay’.
Timer
• You can have the light go on/off using the
timer. Open the app and go to ‘Light’ → ‘Timer’
and press Add.
• Set 2 timers, one for the light to go ON and one
for the light to go OFF. You can also set this
schedule for certain days.
Two-way Audio
• The camera uses the built-in speaker and
microphone for two- way communication via
the App.
Optional: You can adjust the horizontal angle of
the camera between 0 to 120 degrees using the
App. Open the menu in the app, go to “Direction”
and use the arrows to set the camera angle.
TRACKING MODE
When the camera detects a movement in tracking
mode, it will rotate and follow the movement. To
activate the tracking mode, go to Settings in the
App and turn on “Motion Tracking”.
TROUBLESHOOTING
Reset
If needed, you can reset your camera by pressing
and holding the reset button for at least 6 seconds.
Note: One device can only be paired with one App
account at a time, if the device has already been
paired with another account, then it can’t be paired
to a new account.
• The device can be removed from the app
account by deleting it from the app.
Camera LED indicator information
• Solid red light on: Network unstable
• Blinking red light: Wait for network connection.
• Solid blue light on: Camera is working correctly
MORE INFORMATION
For more instructions and information, please visit
our website, www.smartwares.eu and search for
"CIP-39902".
NL Gebruiksaanwijzing
BESCHRIJVING VAN DE ONDERDELEN
1. Ledlamp
2. Microfoon
3. Lens
4. PIR-sensor
5. Led-indicator
6. Achterplaat
7. Resetknop
8. Luidspreker
9. MicroSD-kaartsleuf
VOORAFGAAND AAN HET EERSTE
GEBRUIK
Optioneel: Een MicroSD-kaart plaatsen (niet
meegeleverd)
Technical data:
Wireless technology: Wi-Fi
Frequency: 2.4 GHz
Max. Radio Transmission Power: 18,50dBm
IP65
Power: AC 100~240V
Smartlife app
Connected at Home app
Led light:
Lumen: 1000
3500K
10 Watt
RA: <80
Lifetime: 50.000 hours
狣狢狢d狤狦狢<
')
狣
狤
(A) (B)
(C) (D)
1
2
3
4
5
6
7
8
9
PARTS DESCRIPTION / ONDERDELENBESCHRIJVING / DESCRIPTION DES PIÈCES /
TEILEBESCHREIBUNG / OPIS CZĘŚCI / POPIS SOUČÁSTÍ / POPIS SÚČASTÍ /
DESCRIPCIÓN DE LAS PIEZAS / DESCRIZIONE DELLE PARTI / BESKRIVELSE AF DELE
(EN) NON-REPLACEABLE LIGHT SOURCE (NL) NIET-VERVANGBARE LICHTBRON
(FR) SOURCE LUMINEUSE NON REMPLAÇABLE (DE) NICHT AUSWECHSELBARES
LEUCHTMITTEL (PL) NIEWYMIENNE ŹRÓDŁO ŚWIATŁA (CS) NEVYMĚNITELNÝ SVĚTELNÝ
ZDROJ (SK) NEVYMENITEĽNÝ SVETELNÝ ZDROJ (ES) FUENTE DE LUZ NO REEMPLAZABLE
(IT) SORGENTE LUMINOSA NON SOSTITUIBILE (DK) IKKE-UDSKIFTELIG LYSKILDE

• Zorg er eerst voor dat uw camera niet op de
stroombron is aangesloten. Schuif uw MicroSD-kaart
helemaal in de MicroSD-kaartsleuf van de camera.
Gebruik alleen een klasse 10 MicroSD-kaart (max
128 GB).
• Een MicroSD-kaart is vereist voor het maken van
filmopnames.
De app downloaden
• Download de Connected at Home app van de App
store of Google Playstore.
• U kunt ook de Smart Life-app gebruiken.
INSTALLATIE
• Kies een locatie om uw camera te plaatsen en
controleer of er een sterk 2,4 GHz wifisignaal
aanwezig is.
• Schakel de vermogensschakelaar in uw
zekeringskast uit.
• Verwijder de achterplaat van de camera door de
schroeven los te draaien en te verwijderen. (D)
• Leid de stroomkabels vanuit de muur door de
opening in de achterplaat.
• Draai de schroeven (A) (1) los en sluit de
stroomkabels op de klemmenkast aan, draai daarna
de schroeven vast. (A) (1) Zorg ervoor dat de kabels
binnen de behuizing worden geïnstalleerd. (B) (2)
Let op: om schade te voorkomen, vóór het boren
controleren of er zich geen kabels of leidingen in de
muur bevinden.
• Boor gaten en monteer de achterplaat op de muur
met behulp van de meegeleverde schroeven. (B)
• Bevestig de camera op de achterplaat (C) en zet
deze vast met gebruik van de meegeleverde
schroeven. (D)
• Wanneer de camera is geïnstalleerd, de
vermogensschakelaar in uw zekeringskast
inschakelen.
• De camera zal nu beginnen op te starten. Dit duurt
ongeveer 1 minuut. Wacht totdat de led-indicator
snel rood knippert.
• Open de Connected at Home app of Smartlife app.
• Volg het registratieproces op het scherm of log in
met bestaande account.
De camera toevoegen
• Open de app en druk op "Apparaat toevoegen" of de
+ knop om de camera toe te voegen.
• Kies voor Connected at home app "Guardian".
• Voor Smartlife app selecteer Smart-camera (wifi).
• Klik op "Volgende" op uw smartphone, voer daarna
uw wifi-wachtwoord in, klik opnieuw op "Volgende"
en volg de instructies in de app.
• Let op: alleen 2,4 GHz wifi-netwerk wordt
ondersteund.
LICHTBESTURING VIA DE APP
On/ Off / Helderheid
• U kunt het licht in- en uitschakelen of de helderheid
afstellen. Open het menu in de app en druk op
‘Licht’, gebruik daarna de On/Off-knop.
Activeer licht wanneer beweging wordt
waargenomen
• Schakel in de app-instellingen de PIR in en stel de
nachtmodus in op Auto. Wanneer het donker is, gaat
het licht aan iedere keer als er beweging wordt
gedetecteerd.
• Standaard - Het licht blijft 60 seconden aan,
wanneer beweging wordt gedetecteerd; u kunt de
timing wijzigen in de instellingen, ga naar 'Licht' →
'Tijd-vertraging'.
Timer
• U kunt het licht aan/uit laten gaan met gebruik van
de timer. Open de app en ga naar 'Licht' → 'Timer'
en druk op Toevoegen.
• Stel 2 timers in, één om het licht AAN te laten gaan
en één om het licht UIT te laten gaan. U kunt dit
schema ook voor bepaalde dagen instellen.
Twee-weg audio
• De camera gebruikt de ingebouwde luidspreker en
microfoon voor twee-weg communicatie via de app.
Optioneel: U kunt de horizontale hoek van de camera
afstellen tussen 0 tot 120 graden met gebruik van de
app. Open het menu in de app, ga naar "Richting" en
gebruik de pijlen om de camerahoek in te stellen.
VOLGMODUS
Wanneer de camera in de volgmodus een beweging
detecteert, zal deze draaien en de beweging volgen. Ga
naar Instellingen in de app en zet 'Beweging volgen' aan
om de volgmodus te activeren.
PROBLEMEN OPLOSSEN
Reset
U kunt de camera indien nodig resetten door de
resetknop ten minste 6seconden ingedrukt te houden.
Opmerking: Er kan één apparaat tegelijk worden
gekoppeld met één app-account. Als het apparaat al is
gekoppeld aan een ander account, kan het niet worden
gekoppeld aan een nieuw account.
• U kunt het apparaat uit het app-account verwijderen
door het in de app te verwijderen.
Informatie over indicatieled van camera
• Permanent rood licht aan: netwerk onstabiel
• Knipperend rood licht: wachten op
netwerkverbinding.
• Permanent blauw licht aan: camera functioneert
correct
MEER INFORMATIE
Ga naar onze website voor meer instructies en
informatie, www.smartwares.eu en zoek naar
"CIP-39902".
FR Manuel d'instructions
DESCRIPTION DES PIÈCES
1. Lumière LED
2. Microphone
3. Objectif
4. Capteur PIR
5. Témoin LED
6. Panneau arrière
7. Bouton de réinitialisation
8. Haut-parleur
9. Emplacement pour carte Micro-SD
AVANT LA PREMIÈRE UTILISATION
En option: Installation d'une carte MicroSD (non
incluse)
• Assurez-vous d'abord que votre caméra n'est pas
connectée au secteur. Insérez votre carte Micro-SD
à fond dans l'emplacement pour carte Micro-SD de
la caméra . Utilisez uniquement une carte MicroSD
de classe 10 (128 Go maximum).
• Une carte MicroSD est obligatoire pour enregistrer
une vidéo.
Téléchargement d'app
• Téléchargez l'application Connected at Home
depuis l'Appstore ou le Google Playstore.
• Vous pouvez également utiliser l'application Smart
Life.
INSTALLATION
• Choisissez un endroit où placer votre caméra et
vérifiez la présence d'un signal Wi-fi stable de 2, 4
GHz.
• Coupez le disjoncteur sur votre tableau électrique.
• Retirez le panneau arrière de l'appareil en
desserrant et en retirant les vis. (D)
• Faites passer les câbles d'alimentation au mur par le
trou du panneau arrière.
• Desserrez les vis (A) (1) et connectez les câbles
d'alimentation au terminal puis serrez les vis. (A) (1)
Assurez-vous que les câbles sont installés dans le
boîtier. (B) (2)
Remarque : Pour éviter tout dommage, avant de percer,
vérifiez qu'il n'y a pas de câbles ou de tuyaux situés dans
le mur.
• Percez des trous et fixez le panneau arrière au mur
à l'aide des vis fournies. (B)
• Attachez la caméra au panneau arrière (C) et fixez-
la à l'aide des vis fournies. (D)
• Une fois la caméra installée, allumez le disjoncteur
sur votre tableau électrique.
• La caméra va démarrer. Le démarrage prend
environ 1minute. Attendez jusqu’à ce que le voyant
LED rouge clignote rapidement.
• Ouvrez l’application Connected at Home ou
Smartlife.
• Suivez la procédure d'enregistrement à l'écran ou
connectez-vous avec votre compte existant.
Ajouter la caméra
• Ouvrez l'application et appuyez sur "Ajouter un
périphérique" ou sur le bouton + pour ajouter la
caméra.
• Pour l'application Connected at home, choisissez
"Guardian".
• Pour l'application Smartlife, choisissez Smart
Camera (Wi-fi)
• Cliquez sur "Suivant" sur votre smartphone puis
saisissez le mot de passe de votre Wi-Fi, cliquez à
nouveau sur "Suivant" et suivez les instructions de
l'application.
• Remarque : Seul le réseau Wi-Fi 2,4 GHz est pris
en charge.
CONTRÔLE DE LA LUMIÈRE VIA
L'APPLICATION
Marche/ Arrêt / Luminosité
• Vous pouvez allumer et éteindre la lumière ou régler
la luminosité. Ouvrez le menu dans l'application et
appuyez sur "Lumière" puis utilisez le bouton
Marche/Arrêt.
Activation de la lumière en cas de détection de
mouvement
• Dans les paramètres de l'application, activez la
fonction PIR et réglez le mode Nuit sur Auto. Dans
l'obscurité, la lumière s'allume dès qu'un mouvement
est détecté.
• Par défaut - La lumière reste allumée pendant 60
secondes lorsqu'un mouvement est détecté, vous
pouvez modifier le délai dans les paramètres, allez
dans 'Lumière' → 'Délai de temporisation'.
Minuterie
• Vous pouvez allumer et éteindre la lumière à l'aide
de la minuterie. Ouvrez l'application et allez dans "
Lumière " → " Minuterie " et appuyez sur Ajouter.
• Réglez les 2 minuteries, une pour que la lumière
s'allume et une pour qu'elle s'éteigne. Vous pouvez
également programmer le calendrier pour certains
jours.
Audio bidirectionnel
• La caméra utilise le haut-parleur et le microphone
intégrés pour permettre une communication
bidirectionnelle via l'application.
Produktspecifikationer
Varumärke: | Smartwares |
Kategori: | övervakningskamera |
Modell: | CIP-39902 |
Mobila operativsystem som stöds: | Android |
Wi-Fi: | Ja |
Maximal upplösning: | 2304 x 1296 pixlar |
Antal kameror: | 1 |
Inbyggda högtalare: | Ja |
Inbyggd mikrofon: | Ja |
Modell: | IP-säkerhetskamera |
Färgtemperatur: | 3000 K |
Produktens färg: | Vit |
Strömförbrukning (vanlig): | 10 W |
AC-inspänning: | 230 V |
Internationellt skydd (IP) kod: | IP65 |
Video rörelsedetektor: | Ja |
Placeringar som kan användas: | Utomhus |
Anslutningsteknologi: | Trådlös |
Monteringssätt: | Vägg |
Mörkerseende: | Ja |
Totalt megapixel: | - MP |
Strömkälla av typen: | AC |
Växelström Frekvens: | 50-60 hz |
Objektivets betraktningsvinkel, horisontell: | 135 ° |
Detekteringsavstånd: | 50 m |
Behöver du hjälp?
Om du behöver hjälp med Smartwares CIP-39902 ställ en fråga nedan och andra användare kommer att svara dig
övervakningskamera Smartwares Manualer
19 September 2025
19 September 2025
19 September 2025
19 September 2025
19 September 2025
19 September 2025
19 September 2025
19 September 2025
19 September 2025
18 September 2025
övervakningskamera Manualer
- Pyle
- Siedle
- Infortrend
- Toshiba
- Trebs
- Blow
- IMILAB
- August
- Petcube
- Acti
- Friedland
- IDIS
- Provision ISR
- Aigis
- Milestone Systems
Nyaste övervakningskamera Manualer
19 September 2025
19 September 2025
19 September 2025
19 September 2025
18 September 2025
12 September 2025
10 September 2025
10 September 2025
10 September 2025
10 September 2025