Stanley S100 Bruksanvisning
Läs gratis den bruksanvisning för Stanley S100 (50 sidor) i kategorin Inte kategoriserad. Guiden har ansetts hjälpsam av 19 personer och har ett genomsnittsbetyg på 4.9 stjärnor baserat på 8 recensioner. Har du en fråga om Stanley S100 eller vill du ställa frågor till andra användare av produkten? Ställ en fråga
Sida 1/50
9
REV A 08STHT77403
S100
2
11
>
3
sec
sec
9
23
67
11
>
≤
3
sec
sec
45
3
sec
sec
1
77403
1
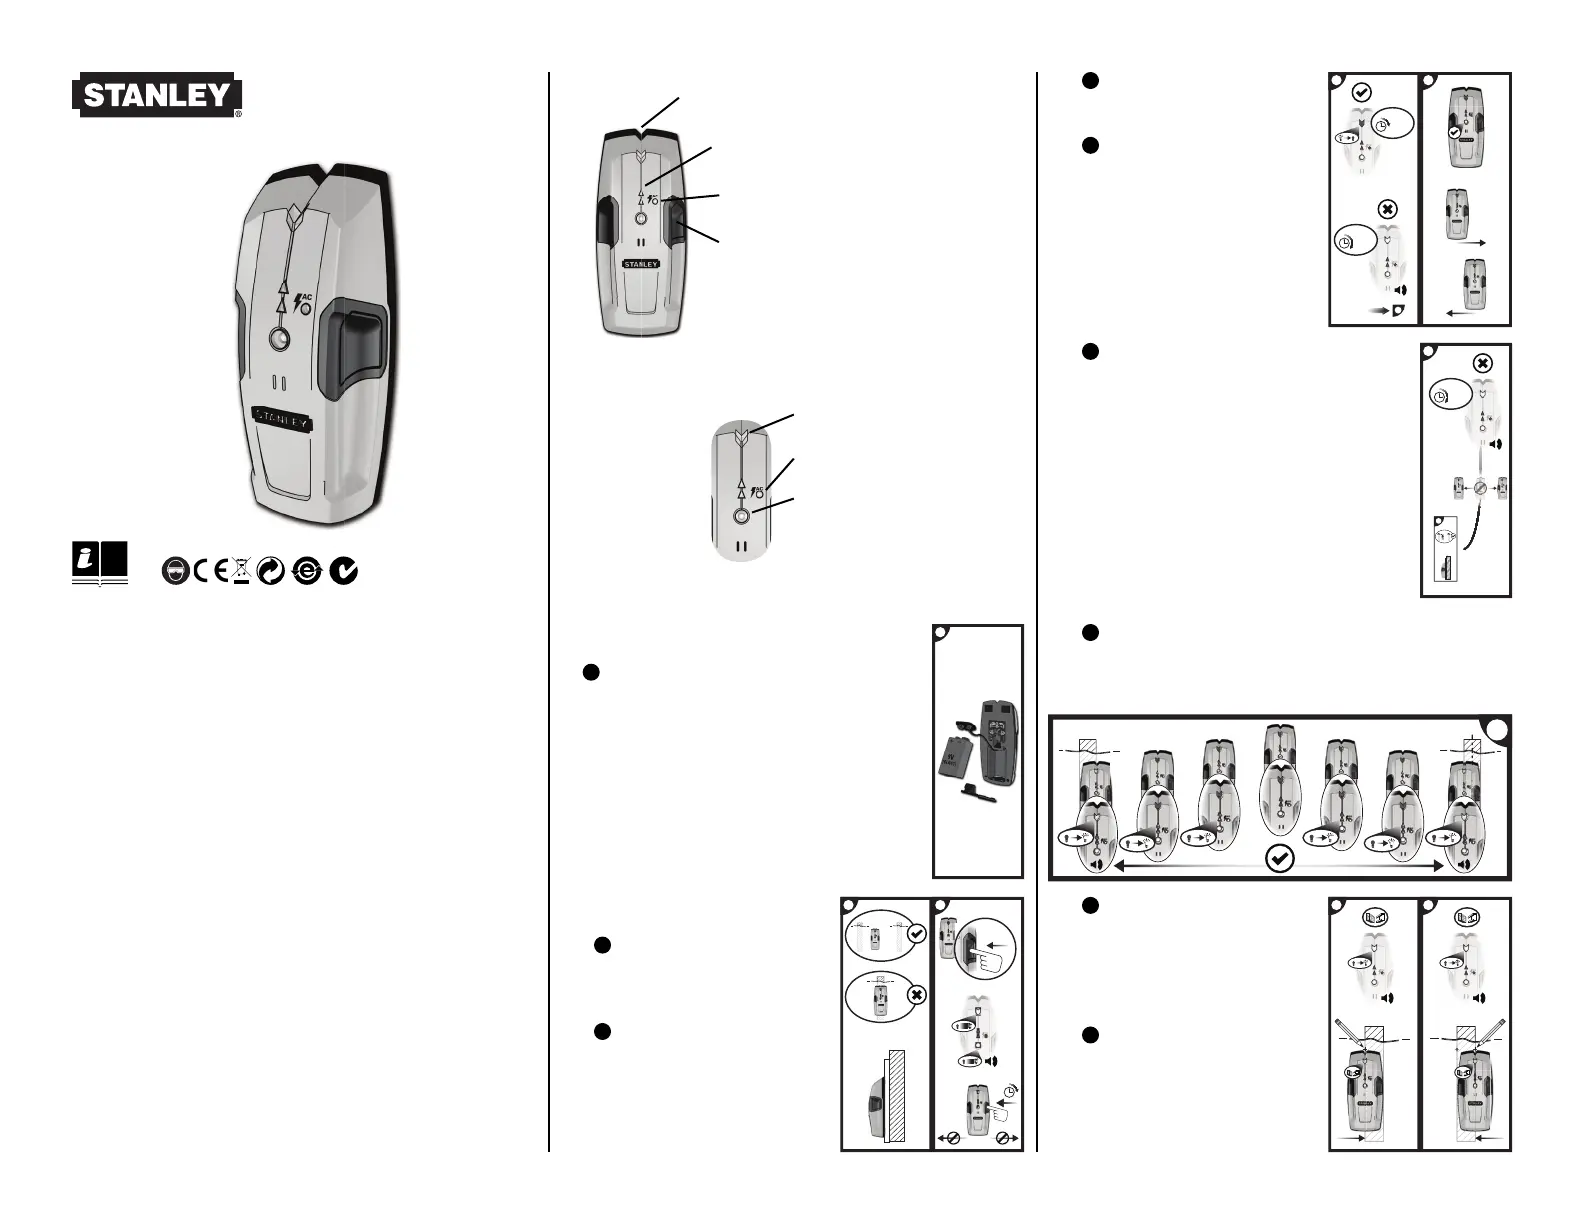
Stanley Stud Sensor 100
The Stud Sensor 100 uses electronic signals to locate the edges of
studs, joists or live AC wires through drywall or other common building
materials. Once the edge of a stud has been detected, the Stud Sensor
100 displays red LED’s and sounds an audible tone. A marking channel
allows you to easily note the stud edges on the wall.
Note: Read all instructions prior to operating the Stud Sensor 100 and
DO NOT remove any labels from the tool.
WARNING:
Protect Your Eyes, Wear Safety Goggles.
Usage
Detecting Wood / Metal Studs
2
Hold the Stud Sensor 100 fl at
against the surface, making fi rm
contact.
3
Press in and hold the activation
button. The green and top red LED
will light.
Note:The unit cannot be moved
before calibration is complete.
6
When it detects the stud edge,
the top LED will go on and an
audible tone will sound. Use the
marking channel located at the top
of the unit to mark the stud edge.
7
Repeat the above steps from
the other side of the stud. Coming
from the opposite direction, mark
the other edge of the stud.
OPERATING INSTRUCTIONS
Battery
1
Open door on back of unit and connect a 9 volt
battery (not included) to clip. Put battery back into
case and close back battery door.
Note: Recommend to replace a new 9 volt
battery when low battery - fl ashing green LED.
11
If the red LED stays lit, move the Stud
Sensor 100 to a different location and try again.
Releasing the activation button will turn off the
sensor.
Note:While calibrating, the Stud Sensor 100
must not be placed directly over a stud, dense
material such as metal, or over a wet or newly
painted area, or it will not properly calibrate.
9
Slide the Stud Sensor 100 slowly across the surface in a straight
line. As it detects a stud, the red LED’s will go on.
• Marking Channel
• Live Wire Warning LED
• LED Display
• Activation Button
• Self-Calibration Complete /
Low Battery Indicator
4
When the red LED goes off, the
unit is calibrated.
5
Keep holding the activation
button during all of the following
procedures.
Note: Once the Activation button
is released, the unit shuts off.
• Live Wire Detected
• STUD Detected
Produktspecifikationer
| Varumärke: | Stanley |
| Kategori: | Inte kategoriserad |
| Modell: | S100 |
| Färg på produkten: | Zilver |
| Vikt: | 1000 g |
| Bredd: | 200 mm |
| Djup: | 156 mm |
| Höjd: | 45 mm |
| Snäll: | Effectprocessor |
| Medföljande kablar: | USB |
| Snabbstartsguide: | Ja |
| MIDI in: | Ja |
| Korrekt användning: | Concert/studio |
| Hörlurarna avstängda: | Ja |
| Frekvensomfång: | 20 - 20000 Hz |
| AC-ingångsspänning: | 100-240 V |
| AC-ingångsfrekvens: | 50 - 60 Hz |
| Strömförbrukning (typiskt): | 14 W |
| AUX ut: | Ja |
| Slå effekter: | Delay, Flanger, Pan, Trans |
Behöver du hjälp?
Om du behöver hjälp med Stanley S100 ställ en fråga nedan och andra användare kommer att svara dig
Inte kategoriserad Stanley Manualer

28 Mars 2025
3 Oktober 2024
26 September 2024
26 September 2024
26 September 2024
23 September 2024
20 September 2024
20 September 2024
19 September 2024
9 September 2024
Inte kategoriserad Manualer
Nyaste Inte kategoriserad Manualer
9 April 2025
9 April 2025
9 April 2025
9 April 2025
9 April 2025
9 April 2025
9 April 2025
9 April 2025
9 April 2025
9 April 2025