StarTech.com PEX10GSFP Bruksanvisning
StarTech.com Nätverkskort/adapter PEX10GSFP
Läs gratis den bruksanvisning för StarTech.com PEX10GSFP (2 sidor) i kategorin Nätverkskort/adapter. Guiden har ansetts hjälpsam av 17 personer och har ett genomsnittsbetyg på 4.4 stjärnor baserat på 2 recensioner. Har du en fråga om StarTech.com PEX10GSFP eller vill du ställa frågor till andra användare av produkten? Ställ en fråga
Sida 1/2
Quick-Start Guide
To view manuals, FAQs, videos, drivers, downloads, technical drawings, and more, visit www.startech.com/support.
Manual Revision: March 10, 2022 11:40 AM
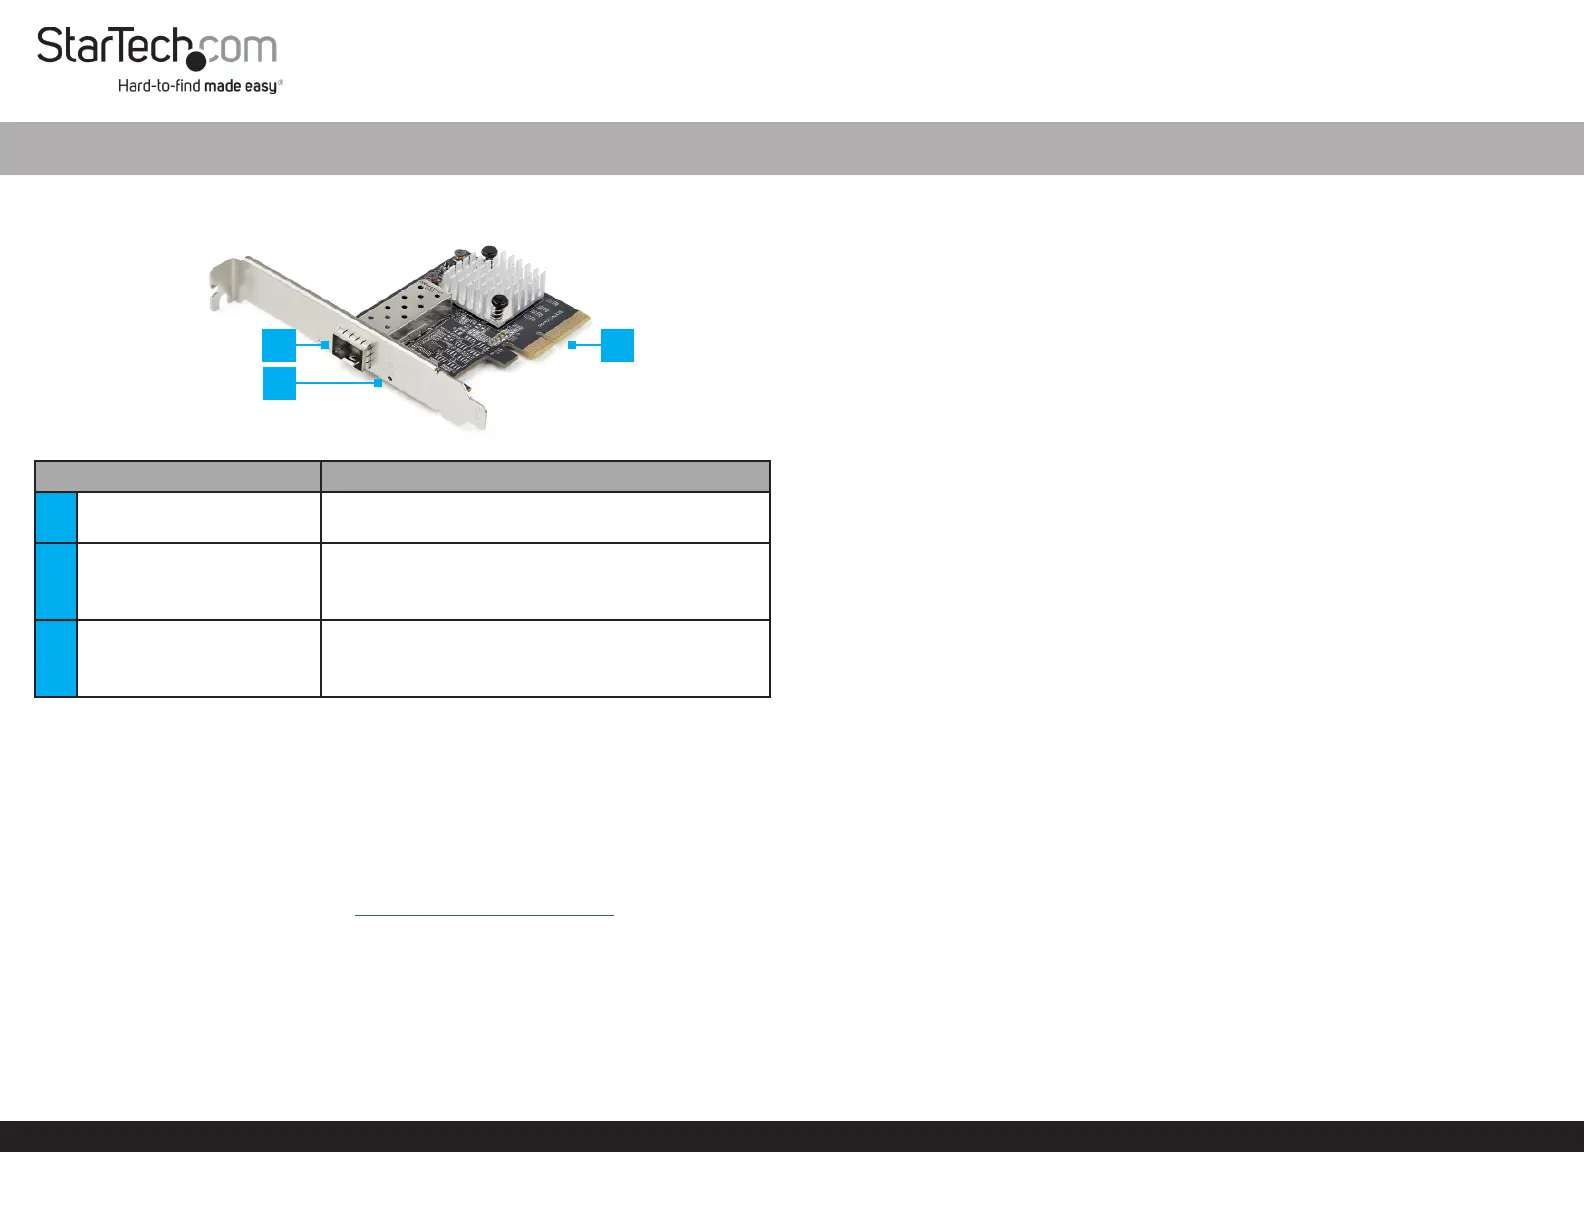
Product Diagram (PEX10GSFP)
ComponentFunction
1SFP+ Slot
• Connect a 10G SFP+ Transceiver Module to the
PCI Express Card.
2Link/Activity LED
• Solid Green: A link to a Network Device has
been established.
• Flashing Green: Indicates network activity.
3
PCI Express Connector
(x4)
• Used to connect the PCI Express Card to the
Host Computer.
• Gen 3 connection.
Package Contents
• Network Card x 1
• Low-Prole Bracket x 1
• Quick-Start Guide x 1
Requirements
For the latest requirements, please visit www.startech.com/PEX10GSFP
• PCI Express enabled computer with an available PCI Express p1-x4 slot
• 10G SFP+ Transceiver Module
1 Port PCI Express 10GbE SFP+ Network Adapter Card
Hardware Installation
Installing the Low Prole Bracket
By default the Full Prole Bracket is attached to the PCI Express Card. Depending
on your system conguration you may need to remove the Full Prole Bracket and
replace it with the Low Prole Bracket (included).
1. Using a Small Phillips Head Screwdriver, remove the two Bracket Screws securing
the Full Prole Bracket to the PCI Express Card.
2. Align the Screw Holes on the PCI Express Card with the Screw Holes on the Low
Prole Bracket. Making sure the PCI Express Card is sitting on-top of the Screw
Holes on the Low Prole Bracket.
3. Insert the Bracket Screws through the PCI Express Card and into the Screw Holes
on the Low Prole Bracket.
4. Using the Small Phillips Head Screwdriver, tighten the Bracket Screws, being
careful not to over-tighten.
Installing the PCI Express Card
Static Electricity can severely damage PCI Express Cards. Ensure that you are
adequately Grounded before you open your Computer Case or touch the PCI
Express Card. You should wear an Anti-Static Strap or use an Anti-Static Mat when
installing any computer component. If an Anti-Static Strap isn’t available, discharge
any built-up static electricity by touching a large Grounded Metal Surface for several
seconds. Only handle the PCI Express Card by its edges and don’t touch the gold
connectors.
1. Turn o the Host Computer and any Peripherals Devices connected to the
computer (e.g. printers, external hard drives, etc.).
2. Unplug the Power Cable from on the back of the Host Computer and disconnect all
Peripheral Devices.
3. Remove the Cover from the Host Computer Case (refer to the documentation that
came with the Host Computer for further details).
4. Locate an open PCI Express p1-x4 Slot and remove the metal cover plate on the rear of
the Computer Case (See documentation for your computer system for details).
Note: This card will work in PCI Express Slots of additional lanes (e.g. x8, or x16
slots).
5. Gently insert the PCI Express Card into an open PCI Express Slot and fasten the
Bracket to the rear of the Computer Case.
6. Place the Cover back onto the Computer Case.
1
2
3
Produktspecifikationer
| Varumärke: | StarTech.com |
| Kategori: | Nätverkskort/adapter |
| Modell: | PEX10GSFP |
| Vikt: | 55 g |
| Bredd: | 18 mm |
| Djup: | 94 mm |
| Höjd: | 35 mm |
| Förpackningens bredd: | 210 mm |
| Gränssnitt: | Fiber |
| Snabbinstallationsguide: | Ja |
| Värdgränssnitt: | PCI Express |
| Maximal dataöverföringshastighet: | 20000 Mbit/s |
| Monteringsfästen ingår: | Ja |
| Full duplex: | Ja |
| Komponent för: | PC |
| PCI-version: | 3.0 |
| Produktens färg: | Svart |
| Låddjup: | 145 mm |
| Vikt inkl. förpackning: | 145 g |
| Ytterförpackningens höjd: | 235 mm |
| Produkter per ytterförpackning: | 20 styck |
| Ytterförpackningens längd: | 355 mm |
| Ytterförpackningens bredd: | 310 mm |
| Windows-operativsystem som stöds: | Ja |
| Mac-operativsystem som stöds: | Ja |
| Temperatur vid drift: | 5 - 50 ° C |
| Temperaturintervall (förvaring): | -20 - 60 ° C |
| Intervall för relativ operativ luftfuktighet: | 20 - 80 % |
| Hållbarhetscertifiering: | CE, RoHS |
| Anslutningsteknologi: | Kabel |
| Kommunikationsstandarder: | IEEE 802.1Q, IEEE 802.3ad, IEEE 802.3x |
| Linux operativsystem som stöds: | Ja |
| Harmonized System (HS)-kod: | 85176990 |
| Intern: | Ja |
| Kretsar: | Aquantia AQC100S |
| Jumboramar: | 9000 |
| Jumbo Frames stöd: | Ja |
| Flödeskontroll: | Ja |
| VLAN-märkning: | Ja |
| Fiberoptiska kontakten: | SFP+ |
| Fiberlägets struktur: | Multi-mode, Single-mode |
Behöver du hjälp?
Om du behöver hjälp med StarTech.com PEX10GSFP ställ en fråga nedan och andra användare kommer att svara dig
Nätverkskort/adapter StarTech.com Manualer

15 Januari 2025
14 Januari 2025
30 December 2025
30 December 2025
29 December 2024
29 December 2024
29 December 2024
17 December 2024
23 Oktober 2024
3 Oktober 2024
Nätverkskort/adapter Manualer
Nyaste Nätverkskort/adapter Manualer
8 April 2025
3 April 2025
3 April 2025
2 April 2025
2 April 2025
1 April 2025
30 Mars 2025
29 Mars 2025
14 Mars 2025
14 Mars 2025