StarTech.com PEX40GQSFPI Bruksanvisning
StarTech.com Nätverkskort/adapter PEX40GQSFPI
Läs gratis den bruksanvisning för StarTech.com PEX40GQSFPI (2 sidor) i kategorin Nätverkskort/adapter. Guiden har ansetts hjälpsam av 15 personer och har ett genomsnittsbetyg på 4.0 stjärnor baserat på 6 recensioner. Har du en fråga om StarTech.com PEX40GQSFPI eller vill du ställa frågor till andra användare av produkten? Ställ en fråga
Sida 1/2
Quick-Start Guide
To view manuals, FAQs, videos, drivers, downloads, technical drawings, and more, visit www.startech.com/support.
Manual Revision: December 17, 2018 11:00 AM
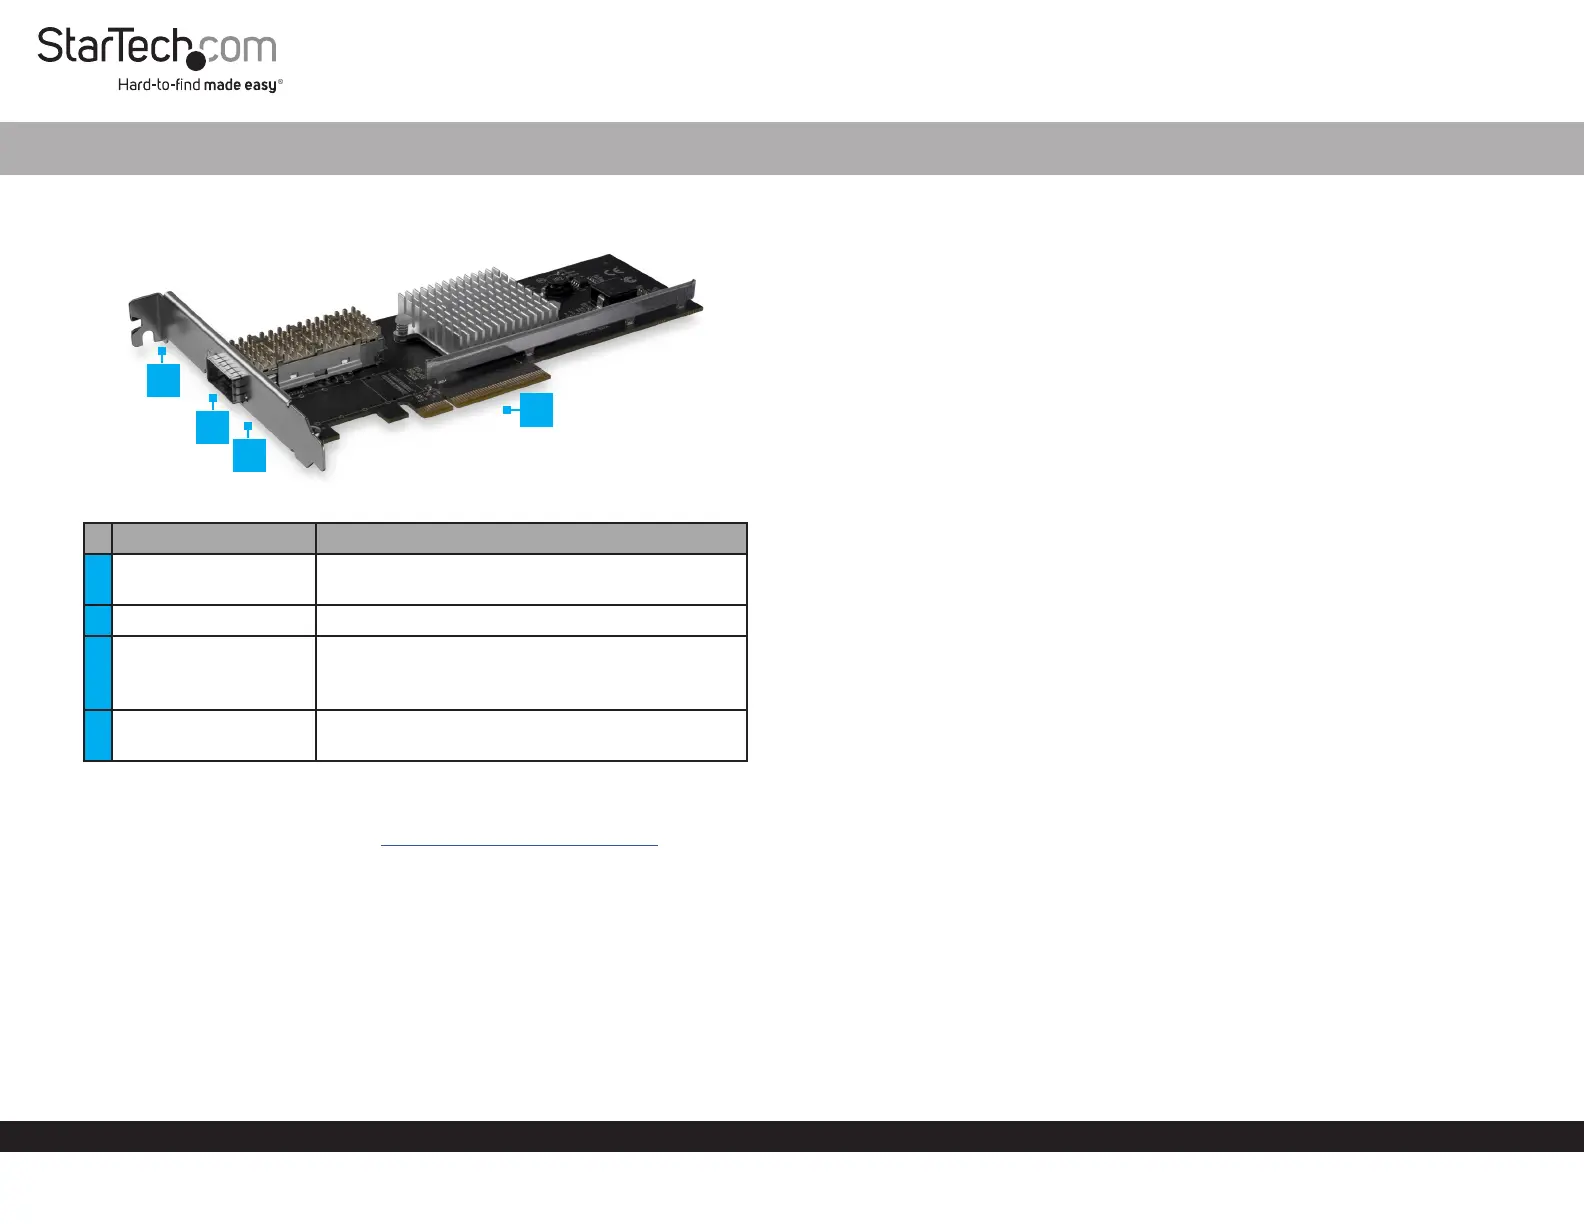
Product Diagram (PEX40GQSFPI)
PortFunction
1Mounting Bracket
• Used to mount the Network Card in a full-
prole computer system.
2QSFP+Slot• Used to connect a Network Device.
3Link LED/Activity LED
• Solid Green: The Network Card is connected
to a Network.
• Flashing: Indicates activity.
4PCIe p1-x8 Connector
• Used to connect the Network Card to a
Computer.
Requirements
For the latest requirements, please visit www.startech.com/PEX40GQSFPI.
• PCI Express® Enabled Computer with an PCI Express Slot (x 8 or x 16)
• One 40G QSFP+ Transceiver Module (sold separately)
• Module or Direct Attach Cable (sold separately)
• Operating Systems:
• Windows® 10, 8.1, 8, and 7
• Windows Server® 2016, 2008 R2, 2012
• Linux® Kernel 2.6.32 to 4.1.1.x (64-bit) LTS Versions
• Phillips Head Screwdriver
1-Port QSFP+ Server Network Card | PCIe
(Optional) Installing the Low Prole Bracket
To mount the Network Card in a low-prole computer system, replace the pre-installed
Full-Prole Mounting Bracket with the included Low-Prole Mounting Bracket.
1. Use a Phillips Head Screwdriver to remove the Bracket Screws (2) from the
Network Card.
2. Remove the Full-Prole Bracket from the Network Card.
3. Line up the Low-Prole Bracket with the Bracket Holes on the back of the
Network Card.
4. Insert the Bracket Screws (2) that you removed in Step 1 and tighten them in place.
Installing the Network Card
Note: Network cards can be severely damaged by static electricity. Make sure that
you’re properly grounded before you open your computer case or touch the PCIe card.
1. Turn o the Computer and any connected Devices (e.g. printers, etc.).
2. Disconnect any connected Devices and unplug the power cable from the
Computer.
3. Open the Computer Case. For more information, consult the user manual that came
with the Computer.
4. Locate a PCI Express p1-x8 or x16 Slot and remove the corresponding metal cover
plate from the back of the Computer Case.
5. Gently insert the PCIe p1-x8 Connector on the Network Card into the PCI Express
Slot on the Computer.
6. Use a Computer Case Screw (sold separately) to fasten the Bracket on the Network
Card to the back of the Computer Case.
7. Place the cover back onto your Computer Case.
8. Insert a 40G QSFP+ Transceiver Module into the QSFP+ slot on the Network Card.
2
3
4
1
Produktspecifikationer
| Varumärke: | StarTech.com |
| Kategori: | Nätverkskort/adapter |
| Modell: | PEX40GQSFPI |
| Vikt: | 112 g |
| Bredd: | 121 mm |
| Djup: | 181 mm |
| Höjd: | 20 mm |
| Förpackningens bredd: | 114 mm |
| LED-indikatorer: | Ja |
| Snabbstartsguide: | Ja |
| Gränssnitt: | Fiber |
| Värdgränssnitt: | PCI Express |
| Maximal dataöverföringshastighet: | 40000 Mbit/s |
| Serveroperativsystem som stöds: | Windows Server 2008 R2, Windows Server 2012, Windows Server 2012 R2, Windows Server 2016 |
| Produktens färg: | Svart |
| Låddjup: | 207 mm |
| Vikt inkl. förpackning: | 242 g |
| Ytterförpackningens höjd: | 320 mm |
| Produkter per ytterförpackning: | 40 styck |
| Ytterförpackningens längd: | 440 mm |
| Ytterförpackningens bredd: | 420 mm |
| Temperatur vid drift: | 0 - 57 ° C |
| Temperaturintervall (förvaring): | -20 - 85 ° C |
| Intervall för relativ operativ luftfuktighet: | 5 - 95 % |
| Hållbarhetscertifiering: | CE, RoHS |
| Anslutningsteknologi: | Kabel |
| Kommunikationsstandarder: | IEEE 802.1Q, IEEE 802.3ad, IEEE 802.3ba, IEEE 802.3x |
| Harmonized System (HS)-kod: | 85176990 |
| Intern: | Ja |
| Kretsar: | Intel® XL710-BM1 |
| Jumboramar: | 9000 |
| Jumbo Frames stöd: | Ja |
| Flödeskontroll: | Ja |
| VLAN-märkning: | Ja |
| Fiberoptiska kontakten: | QSFP+ |
| Fiberportar kvantitet: | 1 |
| Täckplåt, låg profil: | Ja |
Behöver du hjälp?
Om du behöver hjälp med StarTech.com PEX40GQSFPI ställ en fråga nedan och andra användare kommer att svara dig
Nätverkskort/adapter StarTech.com Manualer

15 Januari 2025
14 Januari 2025
30 December 2025
30 December 2025
29 December 2024
29 December 2024
29 December 2024
17 December 2024
23 Oktober 2024
3 Oktober 2024
Nätverkskort/adapter Manualer
Nyaste Nätverkskort/adapter Manualer
8 April 2025
3 April 2025
3 April 2025
2 April 2025
2 April 2025
1 April 2025
30 Mars 2025
29 Mars 2025
14 Mars 2025
14 Mars 2025