Techno Line MA 10430 Bruksanvisning
Techno Line Väderstation MA 10430
Läs gratis den bruksanvisning för Techno Line MA 10430 (4 sidor) i kategorin Väderstation. Guiden har ansetts hjälpsam av 13 personer och har ett genomsnittsbetyg på 4.9 stjärnor baserat på 7 recensioner. Har du en fråga om Techno Line MA 10430 eller vill du ställa frågor till andra användare av produkten? Ställ en fråga
Sida 1/4
LCD-
Bildschirm
Funktionstasten
SET-Taste
+-Taste
MIN/MAX-Taste
RESET-taste
Uhrzeit
Raumtemperatur /
Luftfeuchtigkeit
Wettervorhersage
Wettertendenz
Außensender Übertragungssymbol
Außentemperatur
blinkend
blinkend
Stunde blinkend
Minute blinkend
MOBILE ALERTS MA 10430
Betriebsanleitung
MERKMALE:
Die Wetterstation
x
xFunkgesteuerte DCF-Uhrzeit mit manueller Einstelloption
xZeitzoneneinstellung ± 12 Std.
xEinstellung Zeitsignalempfang EIN / AUS
x24 Stundenanzeige
xTemperaturanzeige in Celsius (°C)
xInnen- und Außentemperaturanzeige mit Speicherung der MIN / MAX Werte
xInnenluftfeuchteanzeige
xRückstellmöglichkeit aller MIN / MAX Speicherwerte
xWettervorhersage mit Wettertendenzanzeige
xKabellose Übertragung mit 868 MHz
xSignalempfang Intervall alle 32 Sekunden
xBatterietiefstandanzeige
xTischaufstellung oder Wandmontage
Thermo-Hygro-Außensender
xFernübertragung der Außenbereichsmesswerte zur
Wetterstation per 868 MHz-Signal
xGehäuse wandmontierbar
xMontage bitte an einem geschützten Ort zur Vermeidung von
Beeinflussung durch Regen oder direkte Sonneneinstrahlung
GRUNDEINSTELLUNG
Hinweis: Diese Wetterstation empfängt nur einen Außensender.
1.Legen Sie zuerst die Batterien in den Außensender ein ( siehe dazu „Einlegen und
Ersetzen der Batterien im Thermo-Hygro-Außensender“)
2.Legen Sie innerhalb von 30 Sekunden nach Aktivierung des Außensenders die
Batterien in die Wetterstation ein (siehe dazu „Einlegen und Ersetzten der Batterien
in der Wetterstation“). Sobald die Batterien eingelegt sind, werden alle Segmente der
LCD-Anzeige kurz aufleuchten. Im Anschluss werden die Raumtemperatur und –
luftfeuchtigkeit sowie die Zeit als 00:00 zur Anzeige kommen. Werden diese
Informationen nicht innerhalb von 60 Sekunden auf dem LCD-Bildschirm angezeigt, so
müssen alle Batterien für mindestens 60 Sekunden entnommen und dann neu
eingesetzt werden. Kommen die Raumdaten wie gewünscht zur Anzeige, so kann mit
dem nächsten Schritt fortgefahren werden.
3.Nachdem alle Batterien eingelegt sind, wird die Wetterstation beginnen, Daten vom
Außensender zu empfangen. Es sollten nun die die Temperatur- und
Luftfeuchtigkeitsdaten des Außenbereichs auf der Wetterstation zur Anzeige kommen.
Ist dies nicht innerhalb von 2 Minuten der Fall, so müssen die Batterien aus beiden
Geräteeinheiten entnommen werden und die Grundeinstellung ist ab Schritt 1 erneut
durchzuführen.
4.Zur Sicherstellung einer guten 868 MHz-Datenübertragung sollte die Entfernung
zwischen der Wetterstation und dem Außensender nicht mehr als 100m betragen
(siehe Hinweise zu „Platzierung“ und „868 MHz-Empfang“).
5.Nachdem die Testphase für den Empfang der Außenbereichsdaten beendet ist, beginnt
das DCF-Sendemastsymbol in der oberen linken Ecke des Uhrzeit Bildschirms zu
blinken. Dies zeigt an, dass die Uhr das DCF-Signal erkannt hat und versucht, es zu
empfangen. Wird das Zeitcodesignal empfangen, bleibt die Anzeige des DCF-Symbols
permanent sichtbar und die Uhrzeit wird angezeigt.
EINLEGEN UND ERSETZEN DER BATTERIEN IN DER WETTERSTATION
Die Wetterstation arbeitet mit Batterien vom Typ 2x AAA, IEC LR3, 1.5V. Zur Installation und
zum Ersetzen der Batterien folgen Sie bitte den Schritten unten:
1.Öffnen Sie das Batteriefach, indem Sie den Daumen in die Aussparung drücken und
den Batteriefachdeckel anheben.
2.Batterien unter Beachtung korrekten Polarität (siehe Markierung) einlegen.
3.Batteriefachdeckel wieder einsetzen.
EINLEGEN UND ERSETZEN DER BATTERIEN IM THERMO-HYGRO-
AUSSENSENDER
Der Außensender arbeitet mit Batterien vom Typ 2x AA, IEC LR6, 1.5V. Zur Installation und
zum Ersetzen der Batterien folgen Sie bitte den Schritten unten:
1.Entfernen Sie den Batteriefachdeckel, indem Sie ihm mit dem Daumen nach oben
schieben.
2.Batterien unter Beachtung der korrekten Polarität (siehe Markierungen im Batteriefach)
einlegen.
3.Batteriefachdeckel wieder einsetzen und nach unten schieben.
Hinweis:
Im Falle eines Batteriewechsels bei einer der Einheiten müssen alle Einheiten gemäß
Abschnitt „Grundeinstellung“ neu eingestellt werden. Dies ist nötig, da der Außensender bei
Inbetriebnahme einen Zufallssischerheitscode an die Wetterstation sendet, der von dieser
innerhalb der ersten 30 Sekunden nach Inbetriebnahme empfangen und gespeichert werden
muss.
GERÄT ZU MOBILE-ALERTS HINZUFÜGEN
(MOBILE-ALERTS Gateway für diese Funktion erforderlich, separat erhältlich)
Öffnen Sie die MOBILE-ALERTS App, es wird die Übersicht angezeigt. Tippen Sie auf
„Neuen Sender hinzufügen“ und scannen Sie den QR Code auf der Rückseite des MA 10430.
Legen Sie anschließend eine Bezeichnung für den Sender fest. Zur Einstellung eines Names
wählen Sie den Sender durch Antippen aus und tippen Sie dann links neben den Bereich des
Stiftsymbols oben rechts.
Hinweis:
Es werden ausschließlich die Daten für Innen- und Außentemperatur sowie Innenluftfeuchte
an Mobile-Alerts übertragen.
FUNKGESTEUERTER ZEITEMPFANG
Die Zeitbasis für die Funkgesteuerte Zeitanzeige ist eine Cäsium-Atom-Funkuhr, die von der
Physikalisch Technischen Bundesanstalt in Braunschweig betrieben wird und die über eine
Abweichung von weniger als einer Sekunde in einer Mio. Jahren verfügt. Diese Zeit wird
codiert und als DCF-77-Frequenzsignal (77,5 kHz) von einem Sender in Mainflingen bei
Frankfurt über einen Sendebereich von etwa 1.500km ausgestrahlt. Ihre Wetterstation
empfängt dieses Signal, wandelt es um und zeigt Ihnen unabhängig von Sommer oder Winter
stets die exakte Zeit.
Die Empfangsqualität des Signals ist überwiegend von den geografischen und baulichen
Gegebenheiten abhängig. Im Normalfall sollten in einem Radius von 1.500km um Frankfurt
keine Empfangsprobleme auftreten.
Der DCF-Signalempfang findet zweimal täglich um 2:00 und 3:00 Uhr morgens statt. Ist auch
der Empfang um 3:00 Uhr nicht erfolgreich, so findet bis 6:00 Uhr früh oder bis zum
erfolgreichen empfang jeweils zur vollen Stunde ein weiterer Empfangsversuch statt. Bleibt
auch der Empfangsversuch um 6:00 Uhr erfolglos, so findet der nächste Empfangsversuch
erst wieder am nächsten Morgen um 2:00 Uhr statt.
Blinkt das Symbol, wird aber keine Uhrzeit eingestellt oder erscheint das DCF-Symbol gar
nicht, so beachten Sie bitte folgende Punkte:
xEs wird empfohlen, einen Mindestabstand von 1,5 – 2 Meter zu eventuell störenden
Geräten wie Computerbildschirmen, Fernsehgeräten, usw. einzuhalten.
xIn Stahlbetonbauten (Kellern, Hochhäusern, etc.) ist das empfangende Signal
zwangsläufig schwächer. In Extremfällen wird empfohlen, das Gerät in Fensternähe
und / oder mit der Vorder- oder Rückseite in Richtung des DCF-77-Senders in Frankfurt
auszurichten.
xNachts sind die atomsphärischen Störungen gewöhnlich geringer und ein Empfang ist
in den meisten Fällen möglich. Ein einziger Empfang pro Tag genügt, um die
Genauigkeitsabweichung unter 1 Sekunde zu halten.
FUNKTIONSTASTEN
Wetterstation:
Die Wetterstation verfügt über 4 leicht bedienbare Funktionstasten:
SET Taste
xDrücken und halten Sie die Taste für 2 Sekunden zum Eintritt in folgende manuelle
Einstellmodi: Zeitzone, Zeitsignalempfang Ein / Aus (ON / OFF) und manuelle
Zeiteinstellung
+ Taste (plus)
xZur Erhöhung / Änderung der Werte in den Einstellmodi
MIN / MAX Taste
xZur Umschaltung zwischen den MIN / MAX Temperaturen des Raum- und
Außenbereichs
RESET Taste
xDrücken und halten Sie die Taste für 3 Sekunden zur Rückstellung aller gespeicherten
MIN / MAX Temperaturen
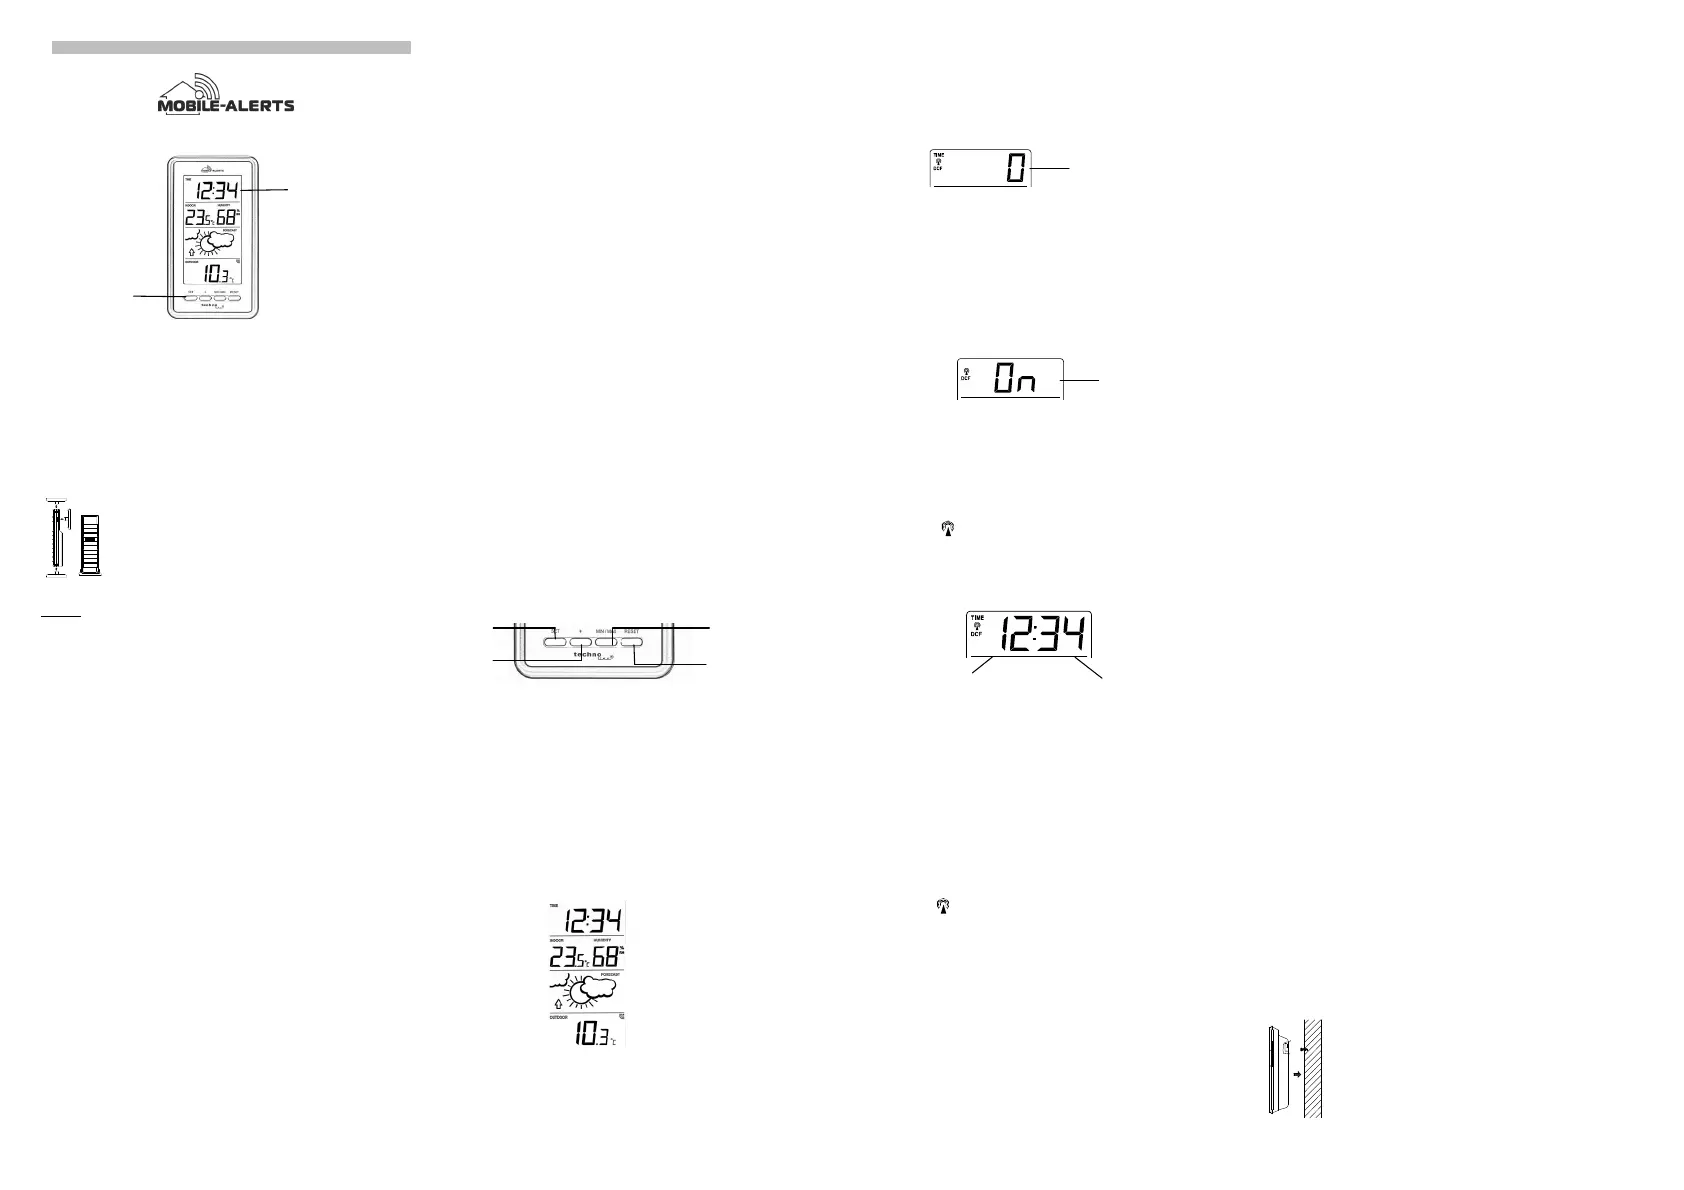
LCD-BILDSCHIRM
Der LCD-Bildschirm ist in 4 Sektionen aufgeteilt. Diese dienen zur Anzeige der Informationen
für die Uhrzeit, die Innenbereichsdaten, die Wettervorhersage und die Außenbereichsdaten.
*Wird das Signal von der Wetterstation erfolgreich empfangen, so ist das Symbol für die
Außenbereichsdaten sichtbar (nicht sichtbar bei erfolglosem Empfang). Dadurch kann der
Benutzer auch leicht erkennen, ob der letzte Empfangsversuch erfolgreich (Symbol Ein) oder
erfolgslos war (Symbol Aus).
MANUELLE EINSTELLUNGEN
Die folgenden manuellen Einstellungen können durch Drücken und Halten der SET-Taste für
3 Sekunden geändert werden:
xZeitzoneneinstellung
xEinstellung Zeitsignalempfang EIN / AUS
xManuelle Zeiteinstellung
ZEITZONENEINSTELLUNG
Die voreingestellte Zeitzone der Wetterstation ist „0“. Einstellung einer anderen Zeitzone:
1.Der Stand der aktuell eingestellten Zeitzone beginnt zu blinken.
2.Benutzen Sie die + oder MIN/ MAX Taste zur Einstellung der gewünschten Zeitzone.
Der Einstellbereich reicht von -12 Std. bis +12 Std. in 1-stündigen Intervallen.
3.Drücken Sie zur Bestätigung der Einstellung und zum Eintritt in die EINSTELLUNG
ZEITSIGNALEMPFANG EIN / AUS die SET- Taste.
EINSTELLUNG ZEITSIGNALEMPFANG EIN / AUS
In Gegenden, in denen ein Empfang des DCF-77 Zeitsignals nicht oder nur schwierig
möglich ist, kann dessen Empfang abgeschaltet werden. Die Uhr arbeitet dann wie eine
normale Quarzuhr (Voreinstellung „1“ = EIN).
1.Die Anzeige „ON“ beginnt auf dem LCD-Bildschirm zu blinken.
2.Benutzen Sie die + Taste, um die Zeitempfangsfunktion auszuschalten.
3.Drücken Sie zur Bestätigung der Einstellung und zum Eintritt in die manuelle
Zeiteinstellung die SET-Taste.
Hinweis:
xIst die Zeitempfangsfunktion manuell auf AUS geschaltet, so wird die Uhr keinen
Empfangsversuch für das DCF-Zeitsignal vornehmen. Ein Empfangsversuch findet erst
wieder statt, wenn die Zeitempfangsfunktion auf EIN geschaltet wird.
xZeitempfang “ “ und “DCF”-Symbole werden auf dem LCD-Bildschirm nicht
angezeigt.
MANUELLE ZEITEINSTELLUNG
Falls es der Wetterstation nicht möglich ist, das DCF-Signal zu empfangen (Störungen,
Signalreichweite, etc.), so kann die Uhrzeit wie folgt auch manuell eingestellt werden. Die Uhr
läuft dann wie eine normale Quarzuhr.
1.Die Stundenstellen beginnen zu blinken.
2.Benutzen Sie zur Einstellung der Stunden die + Taste. Stetiges Halten der Taste
verursacht schnelleres Weiterschalten der Zahlen.
3.Drücken Sie zur Einstellung der Minuten erneut die SET-Taste. Die Minutenstellen
beginnen zu blinken.
4.Benutzen Sie zur Einstellung der Minuten die + oder MIN / MAX Taste. Stetiges Halten
der Taste verursacht schnelleres Weiterschalten der Zahlen.
5.Drücken Sie zur Bestätigung und zum Verlassen der manuellen Einstellungen die SET
Taste.
Hinweis:
xTrotz manueller Zeiteinstellung wird die Wetterstation weiter versuchen, das DCF-
Zeitsignal zu empfangen. Findet ein Empfang statt, so wird die manuell eingestellte Zeit
mit der empfangenen Zeit überschrieben. Während der Empfangsversuche blinkt das
DCF-Sendemastsymbol. Bleibt der Empfangsversuch erfolglos, so erlischt das
Sendemastsymbol, bis am nächsten Tag ein erneuter Empfangsversuch stattfindet.
xZeitempfang„ “ und „DCF“-Symbole werden nach manueller Zeiteinstellung auf
dem LDC-Bildschirm nicht angezeigt.
WETTERVORHERSAGESYMBOLE
Die Wettervorhersagesymbole in der zweiten Sektion des LCD-Bildschirms werden in einer
der folgenden Kombinationen angezeigt:
Bei plötzlichen oder größeren Schwankungen des Luftdrucks werden die Anzeigesymbole
aktualisiert, um die Wetterveränderung anzuzeigen. Ändern sich die Anzeigesymbole nicht,
dann hat sich entweder der Luftdruck nicht geändert oder die Änderung ist so langsam
eingetreten, dass sie von der Wetterstation nicht registriert werden konnte. Wenn die
Anzeigesymbole Sonne oder Regen anzeigen, verändert sich die Anzeige auch dann nicht,
wenn sich das Wetter bessert (Anzeige sonnig) oder verschlechtert (Anzeige regnerisch), da
die Anzeigesymbole bereits die beiden Extremsituationen darstellen.
Die Anzeigesymbole zeigen eine Wetterbesserung oder –verschlechterung an, was aber
nicht unbedingt, wie durch die Symbole angegeben, Sonne oder Regen bedeutet. Ist z.B. das
aktuelle Wetter wolkig und es wird Regen angezeigt, deutet dies nicht auf eine Fehlfunktion
des Gerätes hin, sondern gibt an, dass der Luftdruck gesunken und eine
Wetterverschlechterung zu erwarten ist, wobei es sich aber nicht unbedingt um Regen
handeln muss.
Hinweis:
Nach der Grundeinstellung sollten die Wettervorhersagen für die ersten 12-24 Stunden nicht
beachtet werden, da die Station erst über diesen Zeitraum auf konstanter Höhe über dem
Meeresspiegel Luftdruckdaten sammeln muss, um eine genauere Vorhersage treffen zu
können.
Wie bei jeder Wettervorhersage kann auch bei dieser Wetterstation keine absolute
Genauigkeit garantiert werden. In Abhängigkeit von den unterschiedlichen Einsatzorten, für
die das Gerät entwickelt wurde, ist mit einer Vorhersagegenauigkeit von etwa 75% zu
rechnen. So wird das Gerät in den Gegenden mit häufig plötzlich wechselnden Wetterlagen
(z.B. von sonnig zu regnerisch) genauer arbeiten als in Gegenden mit geringen und seltenen
Wetteränderungen (z.B. meist sonnig).
Wird die Wetterstation von einem Ort an einen anderen verlegt, der bedeutend höher oder
tiefer liegt als der ursprüngliche Standort (z.B. vom Erdgeschoss in die oberen Stockwerke
eines Hauses), so sollten die während der ersten 12-24 Stunden angezeigten Werte ignoriert
werden. Dadurch wird gewährleistet, dass die Wetterstation die Verlegung nicht als Änderung
des Luftdrucks wahrnimmt, wenn es sich in Wirklichkeit nur um eine Änderung der Höhe des
Standorts handelt.
Die Wettervorhersage und–tendenz wird nicht auf MOBILE-ALERTs übertragen! Sie
kann ausschließlich auf dem Display abgelesen werden.
WETTERTENDENZANZEIGE
Die Wettertendenzanzeigen in Pfeilform ( diese befinden sich links neben den
Wettersymbolen) arbeiten im Zusammenhang mit den Wettervorhersagesymbolen. Zeigt ein
Pfeil nach oben, bedeutet dies einen Luftdruckanstieg und somit eine zu erwartende
Wetterbesserung. Zeigt ein Pfeil nach unten, sinkt der Luftdruck und eine
Wetterverschlechterung ist zu erwarten.
Zieht man dies in Betracht, kann man ersehen, wie sich das Wetter verändert hat und welche
Veränderungen zu erwarten sind. Zeigt die Tendenzanzeige z.B. nach unten bei
gleichzeitiger Anzeige der Symbole von Sonne und Wolken (wolkig mit sonnigen
Abschnitten), dann fand die letzte registrierte Wetteränderung während einer sonnigen
Periode statt (nur das Symbol sonnig). Da die Tendenzanzeige nach unten zeigt, folgt daraus
für die nächste Wetteränderung das Symbol Wolken mit Regen.
Hinweis:
Hat die Wettertendenzanzeige eine erste Luftdruckänderung registriert, dann bleibt sie
ständig auf dem LCD-Bildschirm sichtbar.
ZUR ANSICHT DER MIN / MAX-TEMPERATUREN
Drücken Sie zur sequentiellen Darstellung der MIN / MAX- Raum- und Außentemperaturwerte
mehrfach die MIN / MAX-Taste.
RÜCKSTELLUNG DER MIN / MAX-TEMPERATURDATEN
Drücken und halten Sie zur Rückstellung aller gespeicherten Raum- und Außentemperaturen
auf deren aktuelle Werte für 3 Sekunden die MIN / MAX-Taste.
HINWEIS ZUM THERMO-HYGRO-AUSSENSENDER
Der Sendebereich der Thermo-Hygro-Außensender kann durch die Umgebungstemperatur
beeinflusst werden. Bei kalten Temperaturen kann sie die Sendeentfernung vermindern.
Ebenso ist eine Verminderung der Batterieleistung möglich. Beachten Sie dies bitte bei der
Platzierung der Außensender.
868 MHz-EMPFANGSTEST
Werden die Temperatur- und Luftfeutigkeitsdaten des Außenbereichs nicht innerhalb von 30
Sekunden nach der Grundeinstellung korrekt empfangen (oder die Außenbereichsanzeige in
der Außenbereichssektion der Wetterstation zeigt im normalen Anzeigemodus ständig „- -.-“),
so prüfen sie bitte folgende Punkte:
1.Der Abstand von Wetterstation und Außensender zu Störquellen wie z.B.
Computermonitoren oder Fernsehgeräten sollte mindestens 2 Meter betragen.
2.Vermeiden Sie, den/die Thermo-Hygro-Außensender direkt an oder in die Nähe von
metallischen Fensterrahmen zu platzieren.
3.Die Benutzung anderer, auf derselben Frequenz (868 MHz) arbeitender Geräte wie
z.B. Kopfhörer oder Lautsprecher kann die korrekte Signalübertragung verhindern.
Störungen des Empfangs können auch von Nachbarn verursacht werden, die auf
derselben Frequenz (868 MHz) arbeitende Geräte betreiben.
Hinweis:
Erfolgt eine korrekte Übertragung des 868 MHz-Signals, so sollten die Batteriefächer von
Wetterstation und Außensendern nicht mehr geöffnet werden. Es könnten sich dadurch die
Batterien aus den Kontakten lösen und damit eine unerwünschte Rückstellung herbeiführen.
Sollte dies trotzdem versehentlich vorkommen, so müssen zur Vermeidung von
Übertragungsproblemen alle Einheiten neu eingestellt werden (siehe „Grundeinstellung“).
Die maximale Sendeentfernung von Thermo-Hygro-Außensender zur Wetterstation beträt im
freien Feld etwa 100 Meter. Dies ist jedoch von Umgebungsbedingungen und deren
Einflüssen abhängig. Ist trotz Beachtung dieser Faktoren kein Empfang möglich, so müssen
alle Einheiten neu eingestellt werden (siehe „Grundeinstellung“).
PLATZIERUNG DER WETTERSTATION:
Die Wetterstation bietet die Option von Tischaufstellung oder Wandmontage. Bitte stellen Sie
vor der Wandmontage sicher, dass die Außenbereichsdaten an der gewünschten
Montagestelle korrekt empfangen werden können.
Wandmontage Wandmontage wie folgt:
1.Schraube (nicht im Lieferumfang) an der gewünschten Stelle in die
Wand drehen. Dabei den Schraubenkopf etwa 5 mm von der Wand
abstehen lassen.
2.Wetterstation mit der Aufhängeöse an der Rückseite an der
Schraube einhängen. Nach unten ziehen und darauf achten, dass die
Wetterstation sicher an der Schraube einrastet.
Sonnig
Bewölkt mit sonnigen
Abschnitten
Abschnitten
Regnerisch
Produktspecifikationer
| Varumärke: | Techno Line |
| Kategori: | Väderstation |
| Modell: | MA 10430 |
Behöver du hjälp?
Om du behöver hjälp med Techno Line MA 10430 ställ en fråga nedan och andra användare kommer att svara dig
Väderstation Techno Line Manualer

5 Januari 2025
28 December 2024
28 December 2024
28 December 2024
28 December 2024
28 December 2024
28 December 2024
28 December 2024
28 December 2024
28 December 2024
Väderstation Manualer
Nyaste Väderstation Manualer
2 April 2025
27 Mars 2025
27 Mars 2025
5 Mars 2025
27 Februari 2025
15 Februari 2025
5 Februari 2025
27 Januari 2025
27 Januari 2025
12 Januari 2025