Techno Line MA10920 Bruksanvisning
Techno Line Väderstation MA10920
Läs gratis den bruksanvisning för Techno Line MA10920 (4 sidor) i kategorin Väderstation. Guiden har ansetts hjälpsam av 25 personer och har ett genomsnittsbetyg på 4.4 stjärnor baserat på 3 recensioner. Har du en fråga om Techno Line MA10920 eller vill du ställa frågor till andra användare av produkten? Ställ en fråga
Sida 1/4
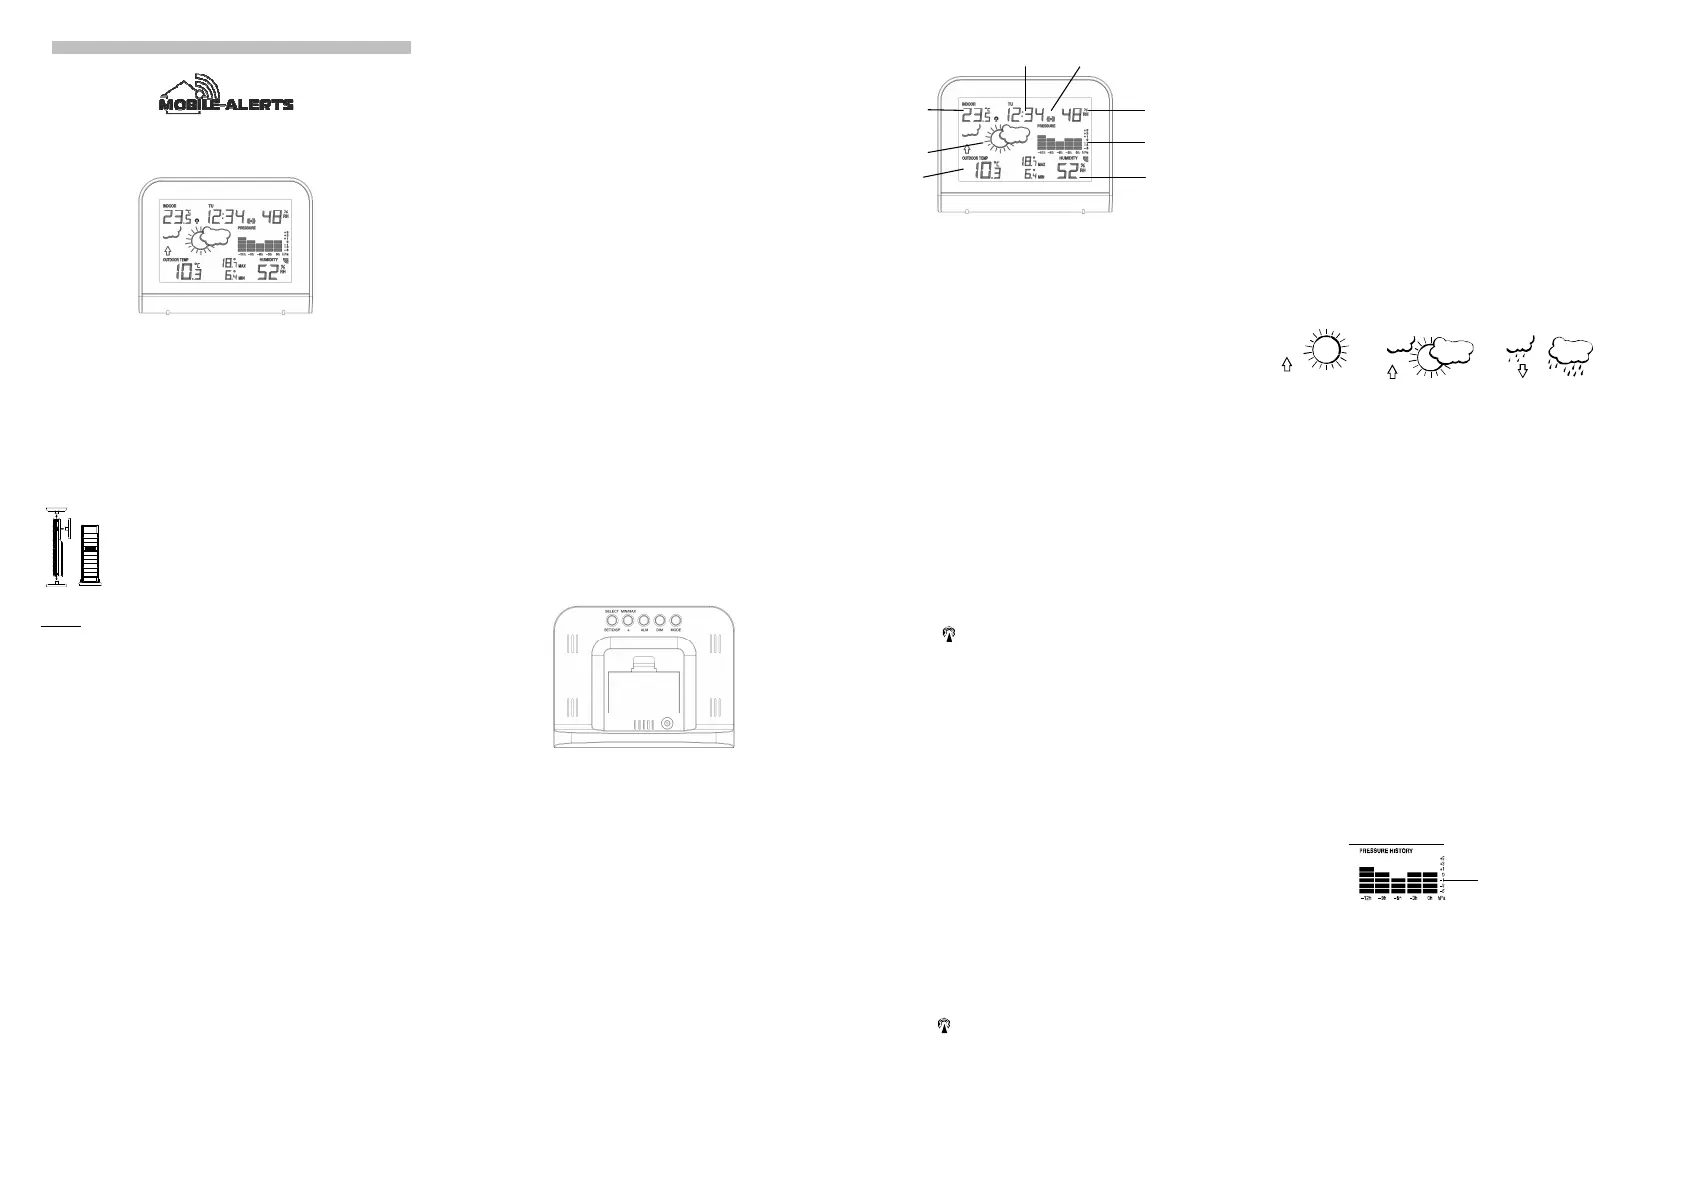
Außenluft-
feuchtigkeit
Wettervorhersage
Uhrzeit Alarmsymbol
MOBILE ALERTS MA 10920
Betriebsanleitung
MERKMALE:
Die Wetterstation
•Funkgesteuerte DCF-Uhrzeit mit manueller Einstelloption
•Zeitzoneneinstellung ± 12 Std.
•Einstellung Zeitsignalempfang EIN / AUS
•24 Stundenanzeige
•Temperaturanzeige in Celsius (°C)
•Innen- und Außentemperaturanzeige mit Speicherung der MIN / MAX Werte
•Innen- und Außenluftfeuchteanzeige
•Rückstellmöglichkeit aller MIN / MAX Speicherwerte
•Wettervorhersage mit Tendenzanzeige
•Weckalarm
•Kabellose Übertragung mit 868 MHz
•Signalempfangsintervall alle 4 Sekunden
•Batterietiefstandanzeige für Außensender
•Tischaufstellung
Thermo-Hygro-Außensender
•
Fernübertragung der Außenbereichsmesswerte zur
Wetterstation per 868 MHz-Signal
•
Gehäuse wandmontierbar
•
Montage bitte an einem geschützten Ort zur Vermeidung von
Beeinflussung durch Regen oder direkte Sonneneinstrahlung
GRUNDEINSTELLUNG
Hinweis: Diese Wetterstation empfängt nur einen Außensender.
1. Legen Sie zuerst die Batterien in den Außensender ein ( siehe dazu „Einlegen und
Ersetzen der Batterien im Thermo-Hygro-Außensender“)
2. Stecken Sie innerhalb von 30 Sekunden nach Aktivierung des Außensenders den
Netzteilstecker in die Wetterstation ein (siehe dazu „Einlegen und Ersetzen der
Batterien/Netzteil“). Sobald die Station mit dem Strom verbunden wurde, werden alle
Segmente der LCD-Anzeige kurz aufleuchten. Im Anschluss werden die
Raumtemperatur und –luftfeuchtigkeit sowie die Zeit als 00:00 zur Anzeige kommen.
Werden diese Informationen nicht innerhalb von 60 Sekunden auf dem LCD angezeigt,
muss die Station zurückgesetzt werden. Drücken und Halten Sie die SET-Taste, bis die
Zeitzone blinkt. Drücken Sie dann 7 mal kurz die SET-Taste, bis „rSt“ angezeigt wird.
Drücken und halten Sie nun die +/RESET-Taste, bis „rSt“ nicht mehr blinkt. Der Reset
wird nun durchgeführt. Kommen die Raumdaten wie gewünscht zur Anzeige, kann mit
dem nächsten Schritt fortgefahren werden.
3. Nachdem alle Batterien eingelegt sind, beginnt die Wetterstation, Daten vom
Außensender zu empfangen. Es sollten nun die Temperatur- und
Luftfeuchtigkeitsdaten des Außenbereichs auf der Wetterstation zur Anzeige kommen.
Ist dies nicht innerhalb von 2 Minuten der Fall, müssen die Batterien aus dem Sender
entnommen werden und die Grundeinstellung ist ab Schritt 1 erneut durchzuführen.
4. Zur Sicherstellung einer guten 868 MHz-Datenübertragung sollte die Entfernung
zwischen der Wetterstation und dem Außensender nicht mehr als 100m betragen
(siehe Hinweise zu „Platzierung“ und „868 MHz-Empfang“).
5. Nachdem die Testphase für den Empfang der Außenbereichsdaten beendet ist, beginnt
das DCF-Sendemastsymbol oberhalb der Uhrzeit zu blinken. Dies zeigt an, dass die
Uhr das DCF-Signal erkannt hat und beginnt die Uhrzeit zu empfangen. Wird das
Zeitcodesignal empfangen, bleibt die Anzeige des DCF-Symbols permanent sichtbar
und die aktuelle Uhrzeit wird angezeigt.
EINLEGEN UND ERSETZEN DER BATTERIEN IN DIE WETTERSTATION
Die Wetterstation arbeitet mit Batterien vom Typ 2x AA, IEC LR6, 1.5V. Die Batterien sind
jedoch nur für Back-Up geeignet, damit bei Stromausfall Daten wie Alarm und Uhrzeit weiter
gespeichert bleiben. Der Bildschirm bleibt ohne Verwendung des Netzteils ausgeschaltet.
Zur Installation und zum Ersetzen der Batterien folgen Sie bitte den Schritten unten:
1. Entfernen Sie den Batteriefachdeckel.
2. Batterien unter Beachtung der korrekten Polarität (siehe Markierungen im Batteriefach)
einlegen.
3. Batteriefachdeckel wieder einsetzen.
EINLEGEN UND ERSETZEN DER BATTERIEN IM THERMO-HYGRO-
AUSSENSENDER
Der Außensender arbeitet mit Batterien vom Typ 2x AA, IEC LR6, 1.5V. Zur Installation und
zum Ersetzen der Batterien folgen Sie bitte den Schritten unten:
1. Entfernen Sie den Batteriefachdeckel, indem Sie ihm mit dem Daumen nach oben
schieben.
2. Batterien unter Beachtung der korrekten Polarität (siehe Markierungen im Batteriefach)
einlegen.
3. Batteriefachdeckel wieder einsetzen und nach unten schieben.
Hinweis:
Im Falle eines Batteriewechsels bei einer der Einheiten müssen alle Einheiten gemäß
Abschnitt „Grundeinstellung“ neu eingestellt werden. Dies ist nötig, da der Außensender bei
Inbetriebnahme einen Zufallssischerheitscode an die Wetterstation sendet, der von dieser
innerhalb der ersten 30 Sekunden nach Inbetriebnahme empfangen und gespeichert werden
muss. An der Station muss ein Reset, gemäß „Grundeinstellung“ Punkt 2, durchgeführt
werden.
GERÄT ZU MOBILE-ALERTS HINZUFÜGEN
(MOBILE-ALERTS Gateway für diese Funktion erforderlich, separat erhältlich)
Öffnen Sie die MOBILE-ALERTS App, es wird die Übersicht angezeigt. Tippen Sie auf
„Neuen Sender hinzufügen“ und scannen Sie den QR Code auf der Rückseite der MA10920.
Legen Sie anschließend eine Bezeichnung für den Sender fest. Zur Einstellung eines
Namens, wählen Sie den Sender durch Antippen aus und tippen Sie dann links neben den
Bereich des Stiftsymbols oben rechts.
Hinweis:
Es werden ausschließlich die Daten für Innen- und Außentemperatur sowie Innen- und
Außenluftfeuchte an Mobile-Alerts übertragen.
FUNKGESTEUERTER ZEITEMPFANG
Die Zeitbasis für die funkgesteuerte Zeitanzeige ist eine Cäsium-Atom-Funkuhr, die von der
Physikalisch Technischen Bundesanstalt in Braunschweig betrieben wird und die über eine
Abweichung von weniger als einer Sekunde in einer Mio. Jahren verfügt. Diese Zeit wird
codiert und als DCF-77-Frequenzsignal (77,5 kHz) von einem Sender in Mainflingen bei
Frankfurt über einen Sendebereich von etwa 1.500km ausgestrahlt. Ihre Wetterstation
empfängt dieses Signal, wandelt es um und zeigt Ihnen unabhängig von Sommer oder Winter
stets die exakte Zeit.
Die Empfangsqualität des Signals ist überwiegend von den geografischen und baulichen
Gegebenheiten abhängig. Im Normalfall sollten in einem Radius von 1.500km um Frankfurt
keine Empfangsprobleme auftreten.
Der DCF-Signalempfang findet zweimal täglich um 2:00 und 3:00 Uhr morgens statt. Ist auch
der Empfang um 3:00 Uhr nicht erfolgreich, so findet bis 6:00 Uhr früh oder bis zum
erfolgreichen empfang jeweils zur vollen Stunde ein weiterer Empfangsversuch statt. Bleibt
auch der Empfangsversuch um 6:00 Uhr erfolglos, so findet der nächste Empfangsversuch
erst wieder am nächsten Morgen um 2:00 Uhr statt.
Blinkt das Symbol, wird aber keine Uhrzeit eingestellt oder erscheint das DCF-Symbol gar
nicht, so beachten Sie bitte folgende Punkte:
•Es wird empfohlen, einen Mindestabstand von 1,5 – 2 Meter zu eventuell störenden
Geräten wie Computerbildschirmen, Fernsehgeräten, usw. einzuhalten.
•In Stahlbetonbauten (Kellern, Hochhäusern, etc.) ist das empfangende Signal
zwangsläufig schwächer. In Extremfällen wird empfohlen, das Gerät in Fensternähe
und / oder mit der Vorder- oder Rückseite in Richtung des DCF-77-Senders in Frankfurt
auszurichten.
•Nachts sind die atomsphärischen Störungen gewöhnlich geringer und ein Empfang ist
in den meisten Fällen möglich. Ein einziger Empfang pro Tag genügt, um die
Genauigkeitsabweichung unter 1 Sekunde zu halten.
FUNKTIONSTASTEN
Wetterstation:
Die Wetterstation verfügt über 5 Funktionstasten:
SELECT SET DISP-Taste
•Drücken Sie kurz, um die Anzeige zwischen Uhrzeit mit Innenluftfeuchte, Datum mit
Innenluftfeuchte oder Uhrzeit mit Sekunden umzuschalten
•Drücken Sie kurz, nachdem Farbmodus c2 ausgewählt wurde, um die Farbe zu
wechseln
•Drücken und halten Sie die Taste für 2 Sekunden zum Eintritt in folgende manuelle
Einstellmodi: Zeitzone, Zeitsignalempfang Ein / Aus (ON / OFF), Datum, manuelle
Zeiteinstellung und Resetfunktion
+ MIN / MAX-Taste
•Erhöhen Sie Einstellungen im Einstellmodus oder im Alarmmodus
•Kurz drücken, um zur Uhranzeige aus der Alarmanzeige zu wechseln
•Während der Uhrzeitanzeige kurz drücken, um zwischen Anzeige der MIN/MAX Werte
umzuschalten
• Halten Sie die Taste während der Uhrzeitanzeige 3 Sekunden gedrückt, um alle
MIN/MAX Temperaturwerte auf aktuelle Werte zurück zu setzen
ALM-Taste
•Kurz drücken, um zur Alarmanzeige von der Uhranzeige oder Datumsanzeige zu
wechseln
•Alarm während der Alarmanzeige aktivieren und deaktiveren
•Halten Sie die Taste für 2 Sekunden gedrückt, um den Alarm-Einstellmodus während
der Alarmanzeige einzutreten
DIM-Taste
•Kurz drücken zur Anpassung der Hintergrundbeleuchtung in der Reihenfolge, stark,
mittel und schwach. "D1" wird für stark angezeigt, "D2" wird für mittel angezeigt und
"D3" wird für schwach angezeigt.
MODE-Taste
•Kurz drücken, zum Umschalten des Licht-Farbmodus: Temperatur-Farbmodus,
Einzelfarben-Modus und Wechsel-Farbmodus. Anzeige "C1" für Temperatur-
Farbmodus, "C2" für Einzelfarben-Modus und "C3" für den Wechsel-Farbmodus
LCD-BILDSCHIRM
MANUELLE EINSTELLUNGEN
Die folgenden manuellen Einstellungen können durch Drücken und Halten der SET-Taste für
3 Sekunden geändert werden:
•Zeitzoneneinstellung
•Einstellung Zeitsignalempfang EIN / AUS
•Datumseinstellung
•Manuelle Zeiteinstellung
•Resetfunktion
ZEITZONENEINSTELLUNG
Die voreingestellte Zeitzone der Wetterstation ist „0“. Für Deutschland muß die
Zeitzoneneinstellung 0, für UK -1 betragen.
Einstellung einer anderen Zeitzone:
1. Der Stand der aktuell eingestellten Zeitzone beginnt zu blinken.
2. Benutzen Sie die +MIN / MAX-Taste zur Einstellung der gewünschten Zeitzone. Der
Einstellbereich reicht von -12 Std. bis +12 Std. in 1-stündigen Intervallen.
3. Drücken Sie zur Bestätigung der Einstellung und zum Eintritt in die EINSTELLUNG
ZEITSIGNALEMPFANG EIN / AUS die SET- Taste.
EINSTELLUNG ZEITSIGNALEMPFANG EIN / AUS
In Gegenden, in denen ein Empfang des DCF-77 Zeitsignals nicht oder nur schwierig
möglich ist, kann dessen Empfang abgeschaltet werden. Die Uhr arbeitet dann wie eine
normale Quarzuhr (Voreinstellung „ON“ = EIN).
1. Die Anzeige „ON“ beginnt auf dem LCD-Bildschirm zu blinken.
2. Benutzen Sie die + MIN/MAX-Taste, um die Zeitempfangsfunktion auszuschalten, OFF.
3. Drücken Sie zur Bestätigung der Einstellung und zum Eintritt in die manuelle
Datumseinstellung die SET-Taste.
Hinweis:
•Ist die Zeitempfangsfunktion manuell auf OFF geschaltet, wird die Uhr keinen
Empfangsversuch für das DCF-Zeitsignal vornehmen. Ein Empfangsversuch findet erst
wieder statt, wenn die Zeitempfangsfunktion auf ON geschaltet wird.
•
Zeitempfang “ “ und “DCF”-Symbole werden auf dem LCD-Bildschirm nicht
angezeigt.
MANUELLE DATUMSEINSTELLUNG
1. Das Jahr blinkt auf dem LCD, drücken Sie die + MIN / MAX-Taste, um das Jahr
einzustellen. Drücken Sie zur Bestätigung kurz die SET-Taste.
2. Der Monat blinkt auf dem LCD, drücken Sie die +MIN / MAX-Taste, um den Monat
einzustellen. Drücken Sie zur Bestätigung kurz die SET-Taste.
3. Der Tag blinkt auf dem LCD, drücken Sie die + MIN / MAX-Taste
um den Tag einzustellen. Drücken Sie zur Bestätigung und Eintritt in die manuelle
Zeiteinstellung kurz die SET-Taste.
MANUELLE ZEITEINSTELLUNG
Falls es der Wetterstation nicht möglich ist, das DCF-Signal zu empfangen (Störungen,
Signalreichweite, etc.), so kann die Uhrzeit wie folgt auch manuell eingestellt werden. Die Uhr
läuft dann wie eine normale Quarzuhr.
1. Die Stunde blinkt. Benutzen Sie zur Einstellung der Stunden die + MIN / MAX-Taste.
Stetiges Halten der Taste verursacht schnelleres Weiterschalten der Zahlen.
2. Drücken Sie zur Einstellung der Minuten erneut die SET-Taste. Die Minutenstellen
beginnen zu blinken. Benutzen Sie zur Einstellung der Minuten die + MIN / MAX-Taste.
Stetiges Halten der Taste verursacht schnelleres Weiterschalten der Zahlen.
3. Drücken Sie zur Bestätigung und zum Wechsel zur Resetfunktion die SET Taste.
Hinweis:
•Trotz manueller Zeiteinstellung wird die Wetterstation weiter versuchen, das DCF-
Zeitsignal zu empfangen. Findet ein Empfang statt, so wird die manuell eingestellte Zeit
mit der empfangenen Zeit überschrieben. Während der Empfangsversuche blinkt das
DCF-Sendemastsymbol. Bleibt der Empfangsversuch erfolglos, so erlischt das
Sendemastsymbol, bis am nächsten Tag ein erneuter Empfangsversuch stattfindet.
•Zeitempfang„ “ und „DCF“-Symbole werden nach manueller Zeiteinstellung auf
dem LDC-Bildschirm nicht angezeigt.
RESETFUNKTION
1. „rSt“ blinkt auf dem LCD.
2. Drücken und halten Sie nun die + MIN/MAX -Taste, bis „rSt“ nicht mehr blinkt. Der
Reset wird nun durchgeführt.
3. Falls Sie keinen Reset durchführen möchten, drücken Sie kurz die SET-Taste, um den
Einstellmodus zu verlassen.
EINSTELLUNG DES WECKALARMS
1. Drücken und halten Sie die ALM-Taste für etwa 3 Sekunden, bis die Anzeige der
Alarmzeit blinkt. ALM erscheint rechts neben der Uhrzeit.
2. Es blinken zuerst die Stundenstellen und das Alarmsymbol wird angezeigt. Stellen Sie
mit der +MIN/MAX-Taste die Stunden ein. Stetiges Halten der Taste verursacht
schnelleres Weiterschalten der Zahlen
3. Drücken Sie erneut die ALM-Taste, die Minutenstellen blinken. Stellen Sie dann mit der
+MIN/MAX-Taste die Minuten ein. Stetiges Halten der Taste verursacht schnelleres
Weiterschalten der Zahlen
4. Drücken Sie zur Bestätigung der Einstellung ein weiteres Mal die ALM-Taste
Hinweis:
Um die Alarmfunktion zu aktivieren oder zu deaktivieren, drücken Sie die ALM-Taste,
während der Alarmanzeige. Wenn das Alarmsymbol angezeigt wird, ist der Weckalarm
aktiviert.
Die Signaldauer des Weckalarms beträgt etwa 2 Minuten. Um den Weckalarm zu beenden,
drücken Sie jede beliebige Taste.
WETTERVORHERSAGESYMBOLE
Die Wettervorhersagesymbole in der zweiten Sektion des LCD-Bildschirms werden in einer
der folgenden Kombinationen angezeigt:
Bei plötzlichen oder größeren Schwankungen des Luftdrucks werden die Anzeigesymbole
aktualisiert, um die Wetterveränderung anzuzeigen. Ändern sich die Anzeigesymbole nicht,
dann hat sich entweder der Luftdruck nicht geändert oder die Änderung ist so langsam
eingetreten, dass sie von der Wetterstation nicht registriert werden konnte. Wenn die
Anzeigesymbole Sonne oder Regen anzeigen, verändert sich die Anzeige auch dann nicht,
wenn sich das Wetter bessert (Anzeige sonnig) oder verschlechtert (Anzeige regnerisch), da
die Anzeigesymbole bereits die beiden Extremsituationen darstellen.
Die Anzeigesymbole zeigen eine Wetterbesserung oder –verschlechterung an, was aber
nicht unbedingt, wie durch die Symbole angegeben, Sonne oder Regen bedeutet. Ist z.B. das
aktuelle Wetter wolkig und es wird Regen angezeigt, deutet dies nicht auf eine Fehlfunktion
des Gerätes hin, sondern gibt an, dass der Luftdruck gesunken und eine
Wetterverschlechterung zu erwarten ist, wobei es sich aber nicht unbedingt um Regen
handeln muss.
Hinweis:
Nach der Grundeinstellung sollten die Wettervorhersagen für die ersten 12-24 Stunden nicht
beachtet werden, da die Station erst über diesen Zeitraum auf konstanter Höhe über dem
Meeresspiegel Luftdruckdaten sammeln muss, um eine genauere Vorhersage treffen zu
können.
Wie bei jeder Wettervorhersage kann auch bei dieser Wetterstation keine absolute
Genauigkeit garantiert werden. In Abhängigkeit von den unterschiedlichen Einsatzorten, für
die das Gerät entwickelt wurde, ist mit einer Vorhersagegenauigkeit von etwa 75% zu
rechnen. So wird das Gerät in den Gegenden mit häufig plötzlich wechselnden Wetterlagen
(z.B. von sonnig zu regnerisch) genauer arbeiten als in Gegenden mit geringen und seltenen
Wetteränderungen (z.B. meist sonnig).
Wird die Wetterstation von einem Ort an einen anderen verlegt, der bedeutend höher oder
tiefer liegt als der ursprüngliche Standort (z.B. vom Erdgeschoss in die oberen Stockwerke
eines Hauses), so sollten die während der ersten 12-24 Stunden angezeigten Werte ignoriert
werden. Dadurch wird gewährleistet, dass die Wetterstation die Verlegung nicht als Änderung
des Luftdrucks wahrnimmt, wenn es sich nur um eine Änderung der Höhe des Standorts
handelt.
Die Wettervorhersage und –tendenz wird nicht auf MOBILE-ALERTS übertragen! Sie
kann ausschließlich auf dem Display abgelesen werden.
LUFTDRUCKHISTORIE
Die rechte Seite des LCD-Bildschirms zeigt die Balkengrafik der Luftdruckhistorie.
Die Balkengrafik zeigt den Trend der Luftdruckentwicklung über die letzten 12 Stunden in 5
Schritten: 0h, -3h, -6h, -9h und -12h. Der Zeitpunkt “0h” repräsentiert den gespeicherten
Luftdruckwert der aktuellen vollen Stunde. Die Balken stellen die Luftdruckwerte in “hPa” (0,
±1, ±3, ±5) zu den entsprechenden Zeitpunkten dar. Die “0” in der Skalenmitte entspricht dem
aktuellen Luftdruck und jede Abweichung (±1, ±3, ±5) zeigt an, wie hoch oder niedrig der
zurück liegende “hPa”-Wert im Vergleich zum aktuellen Luftdruck war.
Steigen die Balken an, so bedeutet dies eine durch steigenden Luftdruck verursachte
Wetterbesserung. Fallende Balken bedeuten sinkenden Luftdruck und damit eine vom
aktuellen Zeitpunkt “0h“ zu erwartende Wetterverschlechterung.
WETTERTENDENZANZEIGE
Die Wettertendenzanzeigen in Pfeilform ( diese befinden sich links neben den
Wettersymbolen) arbeiten im Zusammenhang mit den Wettervorhersagesymbolen. Zeigt ein
Pfeil nach oben, bedeutet dies einen Luftdruckanstieg und somit eine zu erwartende
Wetterbesserung. Zeigt ein Pfeil nach unten, sinkt der Luftdruck und eine
Wetterverschlechterung ist zu erwarten.
Zieht man dies in Betracht, kann man ersehen, wie sich das Wetter verändert hat und welche
Veränderungen zu erwarten sind. Zeigt die Tendenzanzeige z.B. nach unten bei
gleichzeitiger Anzeige der Symbole von Sonne und Wolken (wolkig mit sonnigen
Abschnitten), dann fand die letzte registrierte Wetteränderung während einer sonnigen
Sonnig
Bewölkt mit s
onnigen
Abschnitten
Regnerisch
Innentemperatur Innenluft-
feuchtigkeit
Außentemperatur
Luftdruck-
historie
Luftdrucktrend der
vergangenen 12 Stunden
Produktspecifikationer
| Varumärke: | Techno Line |
| Kategori: | Väderstation |
| Modell: | MA10920 |
| Färg på produkten: | Blue, Transparent |
| Bredd: | 850 mm |
| Höjd: | 1200 mm |
| Material: | Glas |
Behöver du hjälp?
Om du behöver hjälp med Techno Line MA10920 ställ en fråga nedan och andra användare kommer att svara dig
Väderstation Techno Line Manualer

5 Januari 2025
28 December 2024
28 December 2024
28 December 2024
28 December 2024
28 December 2024
28 December 2024
28 December 2024
28 December 2024
28 December 2024
Väderstation Manualer
Nyaste Väderstation Manualer
2 April 2025
27 Mars 2025
27 Mars 2025
5 Mars 2025
27 Februari 2025
15 Februari 2025
5 Februari 2025
27 Januari 2025
27 Januari 2025
12 Januari 2025