Techno Line WT 643 Bruksanvisning
Techno Line
Väderstation
WT 643
Läs gratis den bruksanvisning för Techno Line WT 643 (7 sidor) i kategorin Väderstation. Guiden har ansetts hjälpsam av 6 personer och har ett genomsnittsbetyg på 3.6 stjärnor baserat på 3.5 recensioner. Har du en fråga om Techno Line WT 643 eller vill du ställa frågor till andra användare av produkten? Ställ en fråga
Sida 1/7

WT643 Weather Station
Instruction Manual
The weather station desk clock combines the following functions:
– Time with Projection – Alarm – Calendar – Indoor and Outdoor Temperature
– Indoor and Outdoor Humidity – Weather Forecast
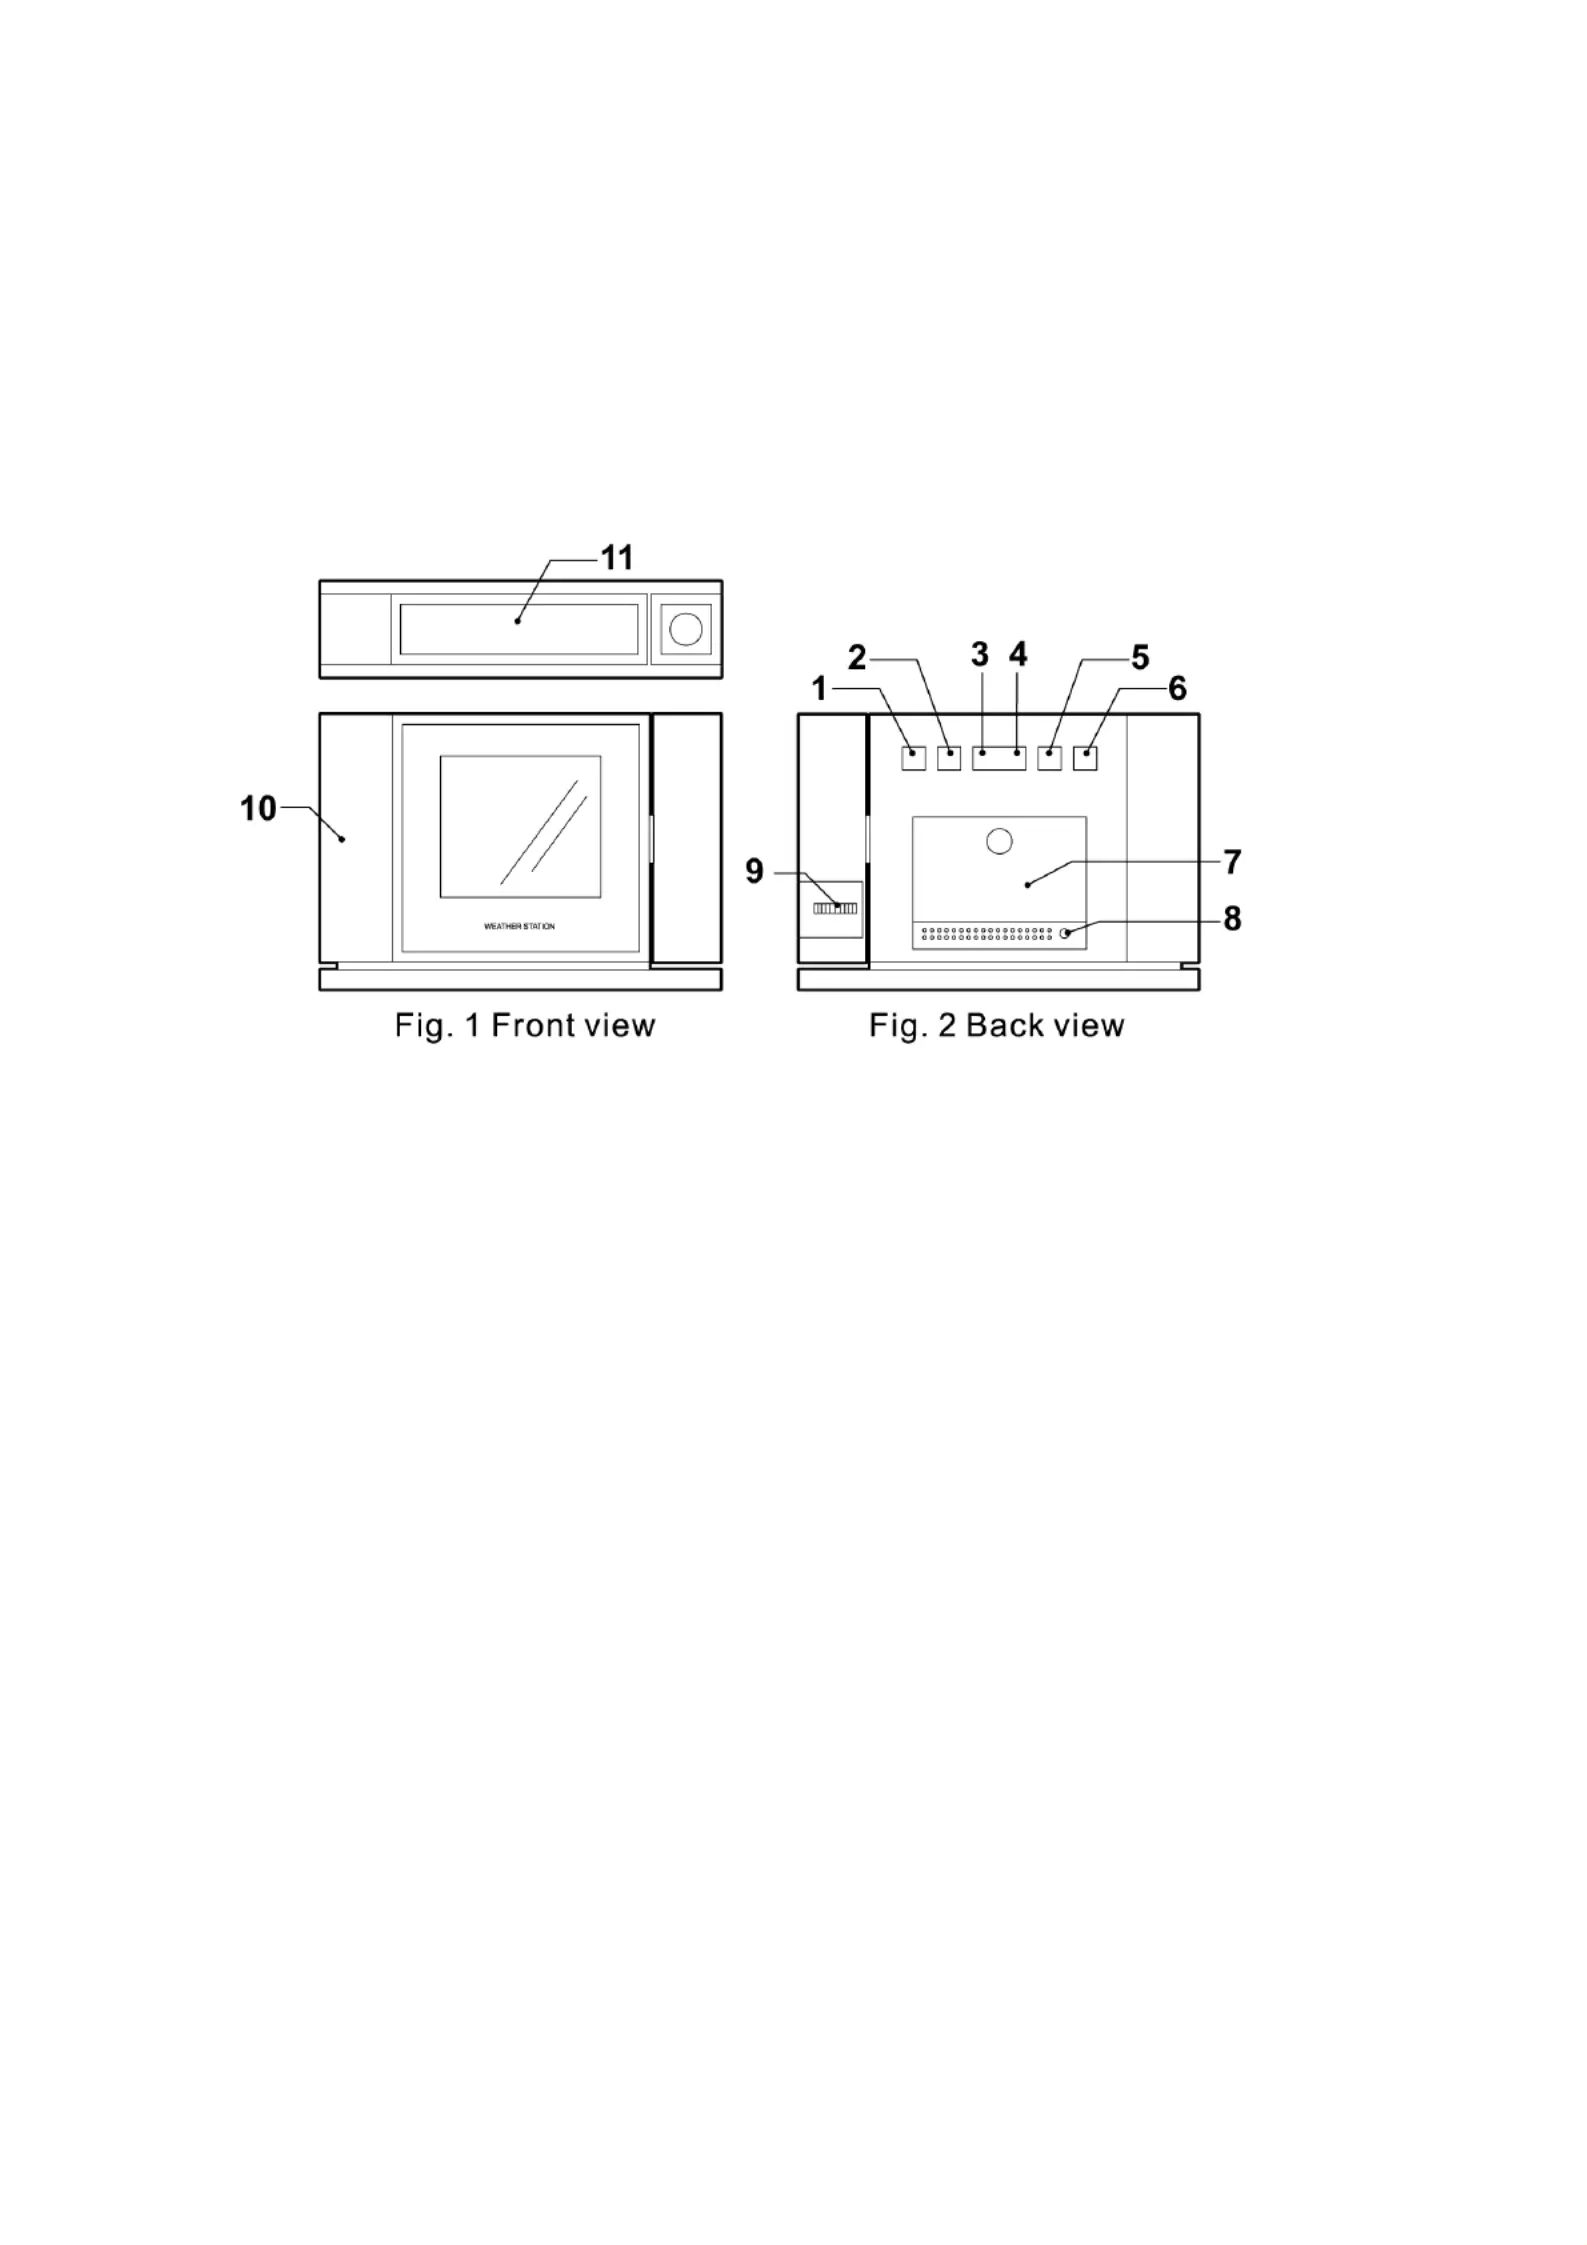
1. “MODE” button
2. “MIN / MAX” button
3. “▲ °C & F button ° ”
4. button “▼”
5. “SET / ALARM” button
6. “CHANNEL” button
7. BATTERY COMPARTMENT
8. AC/DC ADAPTER JACK
9. TIME PROJECTION FOCUS
10. CRYSTAL WEATHER FORECASTER
11. “SNOOZE / LIGHT” buttonButtons :
Getting started
Due to the heavy power consumption of the unit it is strongly recommended to
use the A/C adapter at all times.
1. Install the A/C adapter into the AC/DC ADAPTER JACK (8) hole
2. Install 3 x ‘AAA’ size batteries by sliding open the BATTERY
COMPARTMENT (7). Replace battery compartment door when finished.
See battery warnings below

3. When batteries are in use, the symbol of the battery will be shown on the
clock face when the batteries are low and need replacing.
4. The batteries in the unit will keep the time and other details working if and
when the A/C adapter is removed.
NOTE: If only batteries are being used one can illuminate the clock face for a
period of 20 seconds when the “ SNOOZE / LIGHT” button (11) is pressed.
When required, the unit can be reset to default setting by removing batteries
and / or A/C adapter and re-installing them.
The preset language is English (EN) after reset or after installation of batteries
and the date is Thursday (TH), 2009 January 1.
To set time:
1. Press and hold “SET / ALARM” button (5) for 2 seconds and the HOUR digits
will flash. Press C & F button (3) or button (4) to change “▲ ° ° ” “▼”
the
HOUR setting.
2. Press “SET / ALARM” button (5) again and the MINUTE digits will flash.
Press C & F button (3) or button (4) to change the “▲ ° ° ” “▼”
MINUTE setting.
3. Press “SET / ALARM” button (5) again to change the date/month month/date
setting. Press C & F button (3) or button (4) to change. “▲ ° ° ” “▼”
4. Press “SET / ALARM” button (5) again and the LANGUAGE digits will flash.
Press C & F button (3) or button (4) to change the “▲ ° ° ” “▼”
LANGUAGE
setting. (*See below for language settings)
5. Press “SET / ALARM” button (5) again and the YEAR digits will flash.
Press C & F button (3) or button (4) to change the YEAR “▲ ° ° ” “▼”
setting.
6. Press “SET / ALARM” button (5) again and the MONTH digits will flash.
Press C & F button (3) or button (4) to change the MONTH “▲ ° ° ” “▼”
setting.
7. Press “SET / ALARM” button (5) again and the DATE digits will flash.
Press C & F button (3) or button (4) to change the DATE “▲ ° ° ” “▼”
setting.
8. Press “SET / ALARM” button (5) again to change between 24-hour clock and
AM/PM. Press C & F button (3) or button (4) to change. “▲ ° ° ” “▼”
“ ”24H
indicates 24-hour clock. “12H” indicates AM / PM.

9. Press “SET / ALARM” button (5) to confirm.
*Language setting: -The unit is equipped with 7 languages for the screen display.
Toggle between these languages: EN for English; –GE for German; IT for Italian;
FR for French; NE for Dutch; ES for Spanish; and DA for Danish.
NOTE: The preset language is English (EN) after reset or after installation of
batteries and the date is Thursday (TH), 2009 January 1.
To set the alarm:
1. Press “MODE” button (1) once to display the alarm time. This will be indicated
by an “AL” symbol.
2. Press and hold “SET / ALARM” button (5) for 2 seconds and the HOUR digits
will flash. Press C & F button (3) or button (4) to change “▲ ° ° ” “▼”
the HOUR
setting.
3. Press “SET / ALARM” button (5) again and the MINUTE digits will flash.
Press C & F button (3) or button (4) to change the MINUTE “▲ ° ° ” “▼”
setting.
4. Toggle by pressing “MODE” button (1) between ‘Actual Time’ and ‘Alarm Time”
To turn alarm on and off:
1. Toggle by pressing “MODE” button (1) between current time and alarm time
until alarm time is displayed.
2. Press “SET / ALARM” button (5) once to turn on alarm. A symbol will be
shown. Press “SET / ALARM” button (5) again to turn off alarm.
3. The alarm will sound once the preset alarm time has been reached.
Press “SET / ALARM” button (5) to deactivate the alarm.
4. Press and hold the “SNOOZE / LIGHT” button (11) for approximately 3
seconds to activate snooze. The alarm will sound again after 5 minutes for 1
minute and 59 seconds.
Interpreting the weather forecast symbols
Produktspecifikationer
Varumärke: | Techno Line |
Kategori: | Väderstation |
Modell: | WT 643 |
Behöver du hjälp?
Om du behöver hjälp med Techno Line WT 643 ställ en fråga nedan och andra användare kommer att svara dig
Väderstation Techno Line Manualer
5 Januari 2025
28 December 2024
28 December 2024
28 December 2024
28 December 2024
28 December 2024
28 December 2024
28 December 2024
28 December 2024
28 December 2024
Väderstation Manualer
- Ytora
- Paget Trading
- EMOS SELECT
- EVE
- Daikin
- Brandson
- Vitek
- Technoline
- Brigmton
- ChiliTec
- Steinberg
- Blaupunkt
- Velleman
- Extech
- Alecto
Nyaste Väderstation Manualer
2 April 2025
27 Mars 2025
27 Mars 2025
5 Mars 2025
27 Februari 2025
15 Februari 2025
5 Februari 2025
27 Januari 2025
27 Januari 2025
12 Januari 2025