Thames & Kosmos Solar Cooking Science Bruksanvisning
Thames & Kosmos ej kategoriserat Solar Cooking Science
Läs gratis den bruksanvisning för Thames & Kosmos Solar Cooking Science (2 sidor) i kategorin ej kategoriserat. Guiden har ansetts hjälpsam av 23 personer och har ett genomsnittsbetyg på 4.4 stjärnor baserat på 3 recensioner. Har du en fråga om Thames & Kosmos Solar Cooking Science eller vill du ställa frågor till andra användare av produkten? Ställ en fråga
Sida 1/2
Instructions
Warning! — This set contains chemicals
that may be harmful if misused. Read cau-
tions on individual containers carefully. Not
to be used by children except under adult
supervision.
Only for use by children 8 years of age and
older. Use only under careful supervision
of adults who have familiarized themselves
with the kit’s written safety precautions.
Caution! — Read the instructions before
use, follow them, and keep them on hand
for reference.
Individual parts may have sharp points, corners,
or edges. Do not injure yourself!
Keep small children and animals away from the
experiments.
Store the kit out of the reach of small children.
Keep the packaging and instructions as they con-
tain important safety information.
First Edition © 2010 Franckh-Kosmos Verlags-GmbH & Co. KG, Stuttgart, Germany
This work, including all its parts, is copyright protected. Any use outside the
specific limits of the copyright law is prohibited and punishable by law without the
consent of the publisher. This applies specifically to reproductions, translations and
microfilming and the storage and processing in electronic systems and networks.
We do not guarantee that all material in this work is free from other copyright or
other protection.
Text and concept: Uwe Wandrey; Project manager: Manfred Berrer; Graphic Design:
designstudio www.c-r-1.de
First English Edition © 2010 Thames & Kosmos, LLC, Providence, RI
® Thames & Kosmos is a registered trademark of Thames & Kosmos, LLC.
Editing: Ted McGuire; Additional Graphics and Layout: Dan Freitas
Distributed in North America by Thames & Kosmos, LLC. Providence, RI 02903
Phone: 800-587-2872; Email: support@thamesandkosmos.com
Printed in Germany / Imprimé en Allemagne
Contents
Advice for Parents and Adults
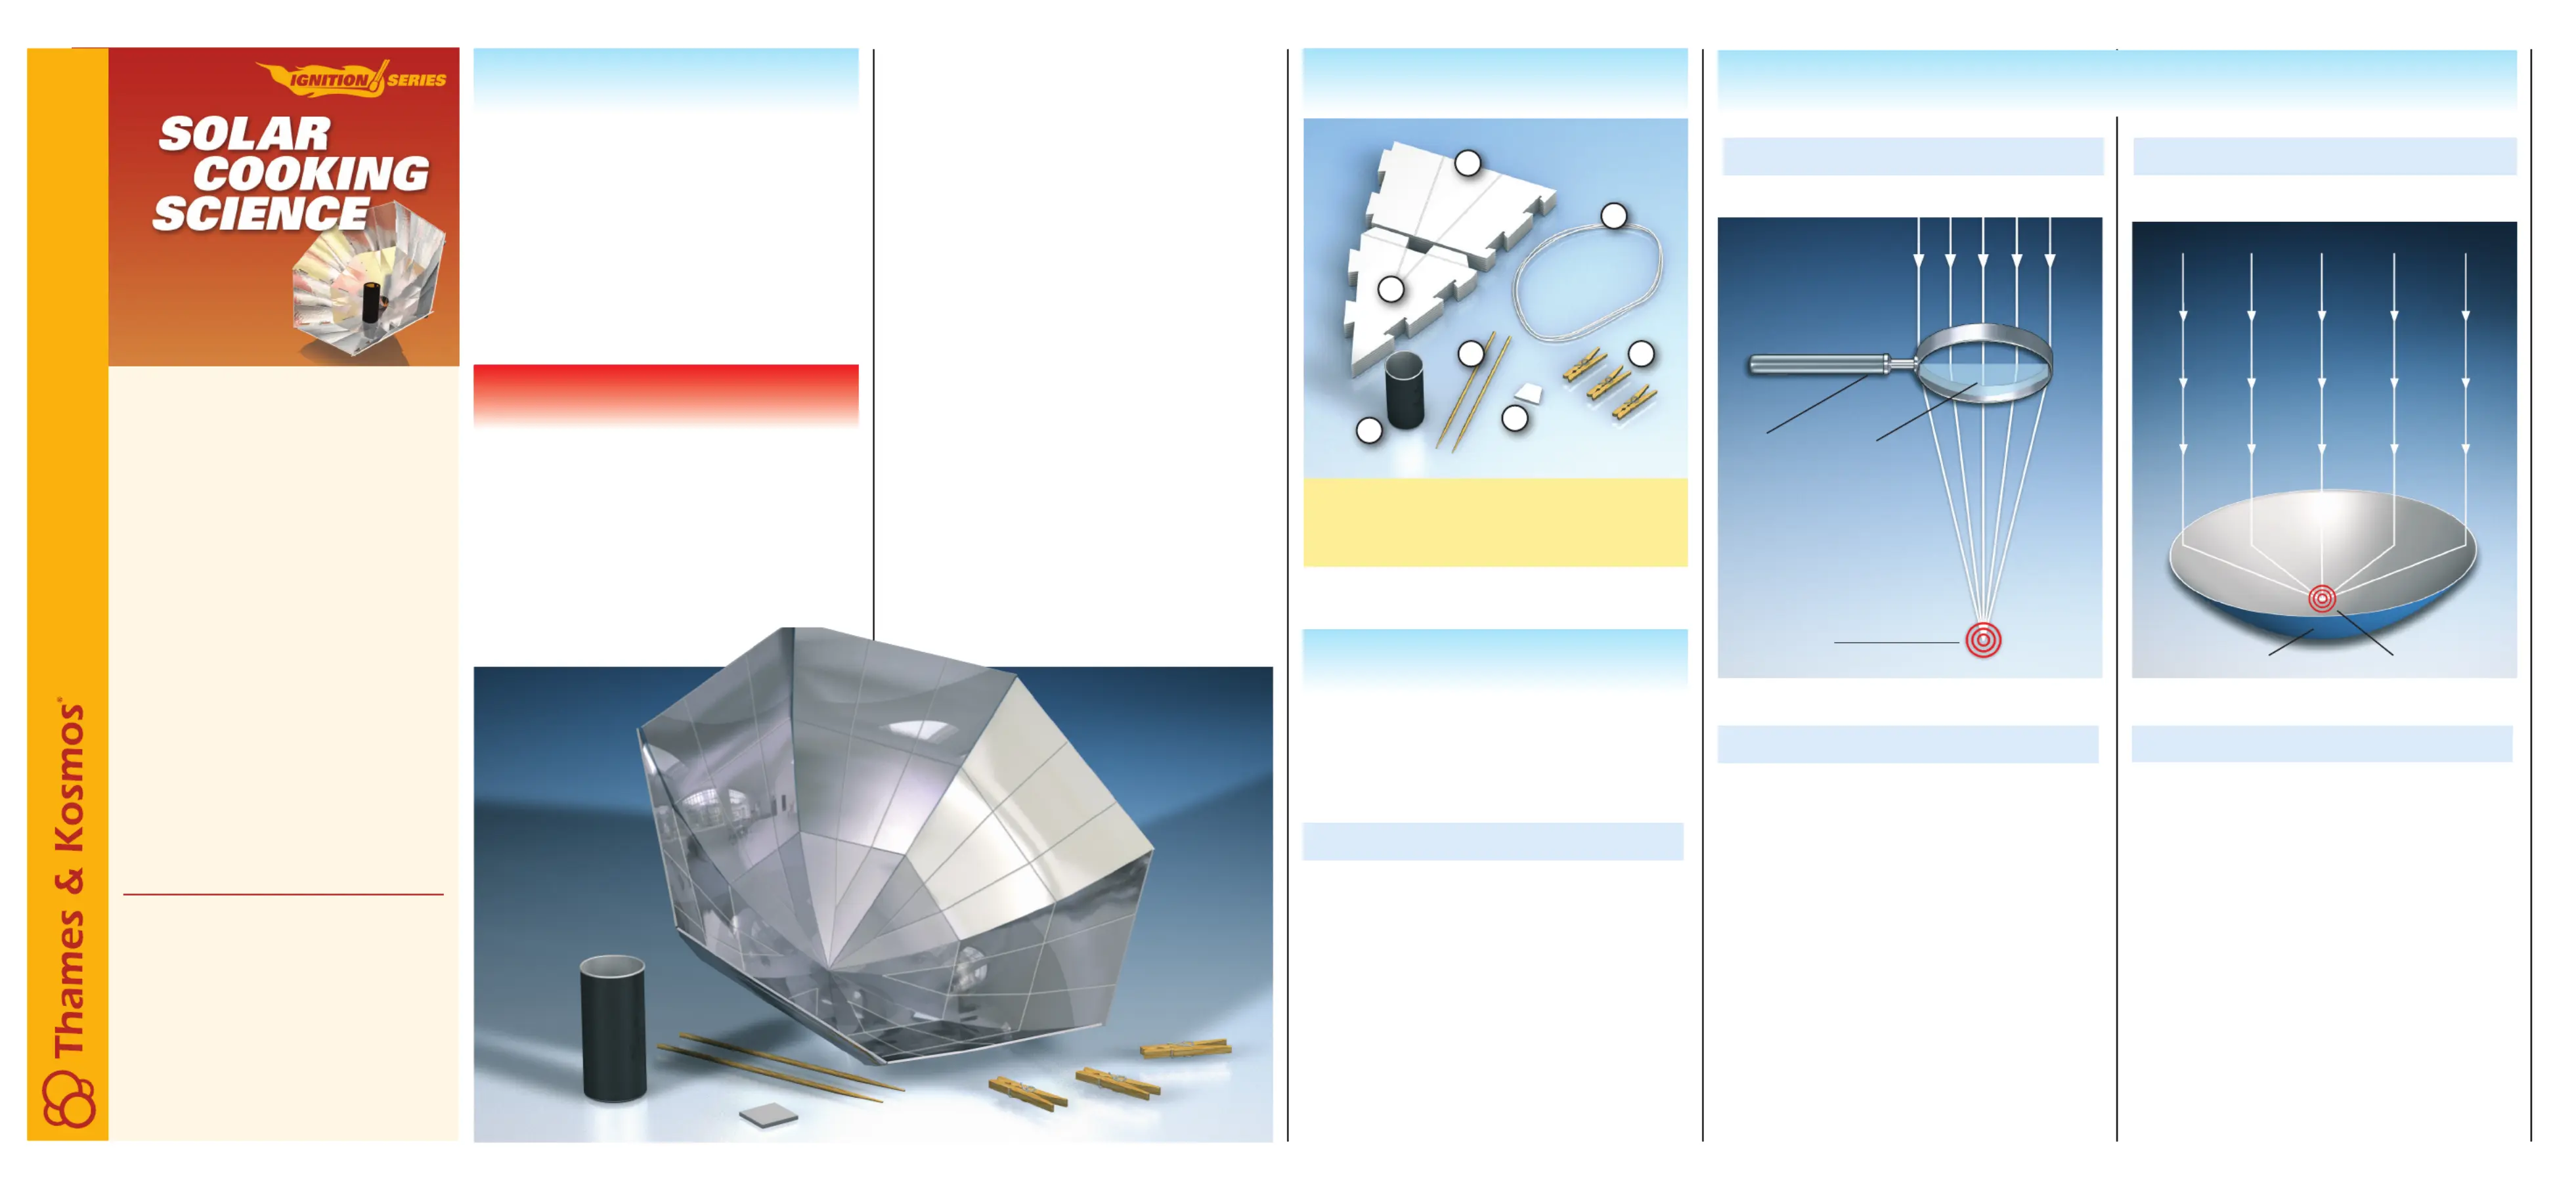
Concentration of Light Rays
1. 7 Triangular silver pieces
2. 7 Trapezoidal silver pieces
3. 1 Small cardboard part
4. 3 Wooden clips
5. 1 Cooking pot
6. 1 Rubber band
7. 2 Wooden skewers
8. 1 Instruction sheet
7
6
4
3
5
1
2
Before we start to assemble and use the solar cook-
er (also called solar collector), we will first explore
the scientific concepts behind the operation of the
solar cooker.
Catching Solar Energy
The sun is an incredibly powerful energy source. In
the sun, hydrogen atoms are combined together
into helium atoms. This process, known as nuclear
fusion, releases vast amounts of energy which are
radiated outward from the sun into space in the
form of electromagnetic energy, some of which we
can see as visible light and feel as heat.
Because of the distance between the sun and
Earth, the light rays that reach Earth are all almost
parallel to one another. To take full advantage of
these parallel light rays, you have to know how to
catch them.
Parallel rays of
light from the sun
Concentration of light
rays
passing through the lens
Magnifying
glass
Lens
Focal point
The Magnifying Glass
One way to concentrate the sun’s light and heat
radiation is to use a . With this magnifying glass
method, the rays passing through the lens are bent
toward a single point, called the . The focal point
illustration above shows how the parallel light is
focused by the lens of the magnifying glass to con-
verge at the focal point. The light and heat energy
is concentrated at the focal point. Through this con-
centration of energy, very high temperatures can
occur at the focal point. It can also get very bright
at the focal point.
The Parabolic Mirror
The direction of the sun’s rays can also be altered
with a curved mirror, so that the rays converge at
one focal point. The whole surface of the mirror
reflects the parallel light rays toward this single
point. As with the magnifying glass, it can get very
hot and very bright at the focal point. But in this
case, the focal point is right at the center of the
mirror instead of some distance below the magnify-
ing glass. Such a mirror is called a parabolic mirror
because its curved reflector is in the shape of a
parabola.
Conversely, if there was a light source (e.g. a
light bulb) at this focal point, its rays would be bent
and reflected outward in parallel. That is how the
reflectors for a flashlight and car headlights work.
These parabolic mirrors are called solar collec-
tors, and can be used as solar cookers. We will now
assemble the parts in this kit into a parabolic solar
cooker.
With a Parabolic MirrorWith a Magnifying Glass
Parallel rays of light from the sun
Parabolic mirrorFocal point
With this science kit, your child can experiment with
simple materials to assemble a solar cooker that
demonstrates how the energy of the sun can be
used for heating and cooking. In the world today,
solar energy is becoming an increasingly important
energy source. Solar power plants are expected to
provide us with environmentally friendly, zero emis-
sion energy in the near future. In large solar ther-
mal power plants, solar heated air spins turbines
to generate electric power. With this solar cooker,
children can see firsthand how solar energy works
in a simple, easy to comprehend device.
It is common to have questions about the safety of
a science kit. The experimental equipment in this
kit meets US and European Safety Standards. These
standards impose obligations on the manufacturer,
such as forbidding the use of any particularly dan-
gerous chemicals. The standards also stipulate that
adults should assist their children with advice and
assistance in their experiments. Tell your child spe-
cifically that he or she must follow all the instruc-
tions when experimenting. Before the experiment,
please discuss the warnings and safety rules with
your child.
Proper assembly and use of the solar cooker
must be overseen by an adult. We hope you and
your child have a lot of fun while experimenting
with the solar cooker!
WARNING! HOT SURFACES!
The cooking pot gets very hot during operation.
You must use the wooden clip, gloves, or oven mitts
when moving or filling the cooking pot.
Caution! Sharp Points — The enclosed wooden
skewers have sharp tips. Misuse may cause personal
injury.
Caution! — Do not stare directly at the sun or at
the concentrated sunlight reflecting off of the solar
cooker.
Caution! — Do not leave the solar cooker unattend-
ed. There is a risk of fire when exposed to sunlight.
This is particularly true in the vicinity of woods or
dry grassy fields! Disassemble the cooker after each
use.
Before experimenting, gather all the necessary
parts. In addition to the parts in the kit, you will
need all-purpose glue or a glue stick.
Safety Information
Solar Cooking Science Theory
Produktspecifikationer
| Varumärke: | Thames & Kosmos |
| Kategori: | ej kategoriserat |
| Modell: | Solar Cooking Science |
Behöver du hjälp?
Om du behöver hjälp med Thames & Kosmos Solar Cooking Science ställ en fråga nedan och andra användare kommer att svara dig
ej kategoriserat Thames & Kosmos Manualer

5 Februari 2026
3 Februari 2026
Thames & Kosmos Crystal Growing: Glow-in-the-Dark Bruksanvisning
3 Februari 2026 Thames & Kosmos Dragonkeepers Companion Booklet Bruksanvisning
2 Februari 2026 1 Februari 2026
1 Februari 2026
1 Februari 2026
1 Februari 2026
ej kategoriserat Manualer
Nyaste ej kategoriserat Manualer
3 April 2026
3 April 2026
3 April 2026
3 April 2026
3 April 2026
3 April 2026
3 April 2026
3 April 2026
3 April 2026