Uniden ADV10-2 Bruksanvisning
Läs gratis den bruksanvisning för Uniden ADV10-2 (1 sidor) i kategorin Radio. Guiden har ansetts hjälpsam av 15 personer och har ett genomsnittsbetyg på 4.8 stjärnor baserat på 9 recensioner. Har du en fråga om Uniden ADV10-2 eller vill du ställa frågor till andra användare av produkten? Ställ en fråga
Sida 1/1
15141312
111098
7654
321
© 2021UnidenAustralia Pty Limited. Printedin PRC.
UNIDENAUSTRALIA PTYLTD
Phone: 1300366895
Email: custservice@uniden.com.au
Procedurefor obtaining warrantyservice:Dependingon the countryin
which the Product was first purchased, if you believe that your Product does
not conformwith thiswarranty, youshoulddeliver the Product, togetherwith
satisfactoryevidenceof youroriginalpurchase(suchas alegiblecopyof
thesales docket) toUnidenat theaddress shownbelow.Youshouldcontact
Unidenregardinganycompensation that may bepayable for yourexpenses
incurredinmakingawarrantyclaim. Prior todelivery, werecommend that you
makeabackupcopy of any phonenumbers, images orotherdata storedon
your Product, in caseit islost ordamagedduringwarranty service.
Ourgoodscomewithguarantees that cannot beexcludedunder theAustralian
ConsumerLaw.Youareentitled toareplacement orrefund foramajor failure
and for compensation forany otherreasonably foreseeablelossordamage.
Youarealsoentitled tohave thegoods repairedorreplacedif thegoods fail to
beof acceptablequality and the failuredoes not amount toamajor failure.
Thiswarranty is inaddition toand sitsalongside yourrights undereither the
COMPETITIONANDCONSUMERACT2010(Australia)or theCONSUMER
GUARANTEESACT(New Zealand)as the casemay be, noneof which canbe
excluded.
Statement ofRemedy:If the Product is foundnot to conform to thiswarranty
as statedabove, theWarrantor, at its discretion, willeitherrepair thedefect or
replace the Product without anycharge forparts or service.Thiswarranty does
not includeany reimbursement orpayment of any consequentialdamages
claimed toarise froma Products failure to comply with thewarranty.
IMPORTANT: Satisfactoryevidence ofthe original purchase isrequired
for warrantyservice
Pleaserefer toourUnidenwebsite foranydetails orwarrantydurationsofferedin
addition to those containedbelow.
Warrantor:
ThewarrantorisUnidenAustralia PtyLimitedABN58001865498
(Uniden).
Terms ofWarranty:
UnidenAust warrants to theoriginalretailpurchaseronly
that theADV10 Series(the Product), willbe free fromdefects inmaterialsand
craftsmanship for thedurationof thewarrantyperiod, subject to thelimitationsand
exclusions set out below.
Warranty period:
This warranty to theoriginalretailpurchaserisonlyvalidin the
original country of purchase fora Product first purchasedeitherinAustraliaorNew
Zealandandwillexpireone(1)year from thedateof theoriginalretailsale.
If awarranty claimis made, thiswarrantywillnot apply if the Product is foundby
Uniden tobe:
(A)Damagedornot maintainedinareasonablemannerorasrecommended
in therelevant Uniden OwnersManual;
(B)
Modified, altered or used as part of any conversion kits, subassemblies or
any configurations not sold by Uniden;
(C)Improperlyinstalled contrary toinstructions containedin therelevant
Owners Manual
(D)Repairedby someoneother thananauthorizedUnidenRepairAgent in
relation toadefect ormalfunctioncoveredby thiswarranty; or
(E)Usedin conjunctionwithany equipment, parts orasystemnot
manufacturedby Uniden.
PartsCovered:
This warranty covers the Product andincludedaccessories.
User-generated Data:
This warrantydoesnot coverany claimedloss of or
damage touser-generateddata(includingbut without limitationphonenumbers,
addressesandimages) that maybe storedon your Product.
UNIDEN ADV10 Series UHF CB Transceiver
WARRANTY
WATER WARNING
Uniden does not represent this product to be waterproof.
Do not expose this product to immersion in water.
SPLASHPROOF LEVEL (IPX4)
This ADV10 radio, when covers and seals are fully closed, can
withstand water splashes to IPX4 level rating.
Always ensure the radio is fully dry before charging in the Dual
Drop-in charger.
Splashproof Information
NOTE
USER LICENSE INFORMATION
The citizen band radio service is licenced inAustralia byACMA
Radio-communications (Citizen Band Radio Stations) Class
Licence and in New Zealand by MBIE General User Licence
for Citizen Band Radio and operation is subject to conditions
contained in those licenses.
User License Information
NOTE
Always listen on a channel (or observe the receive signal level
meter) to ensure it is not already being used before transmitting.
Channels 5 and 35 are used for emergency channels.
CTCSS will not operate on these channels.
Please follow these guidelines for channel use inAustralia:
Channels 05 and 35 are Emergency Channels.
Channel 11 is a Calling Channel.
Channels 22 and 23 are for telemetry and telecommand
applications, channels 61, 62 and 63 are for future use andTX is
inhibited on these channels.
General communication is accepted on all other channels
with these guidelines:
Channel 40 - road channel (Australia).
Channels 01-08 (and 31-38), and Channels 41-48
(and 71-78) are repeater channels.
NOTE
Important information - 80 Channel UHF-CB channel expansion
To provide all users additional channel capacity within the UHF-CB
Band.TheACMA will change the majority of the current wideband 40
channel use to narrowband channel use.This allows for additional
channels to be added, up to 80 Channels.
This simply means that thenewnarrowbandradio youhavepurchased
will have more channels than older radios.Please refer to the guidelines
aboveand the channelchart for further channelinformation.
A list of currently authorised channels can also be obtained from the
ACMA website inAustralia and the MBIE website in New Zealand.
Interference / PoorAudio
When a new narrowband radio receives a signal from an older
wideband radio the speech may sound loud.
Narrowband radios operating on CH41 - CH80 may encounter
interference from a nearby wideband radios transmitting on high
power on an adjacent channel (frequency).
When an older wideband radio receives a signal from a new
narrowband radio the speech may sound quiet - the wideband radio
user simply adjusts their radio volume for best performance.
Theabove situationsarenot a fault of theradiobut a symptomof mixed
widebandandnarrowbandradios incurrent use. It isexpected that as
olderwidebandradios arephasedout thisissuewillbeeliminated.
UHF CHANNELS & FREQUENCIES
Key Lock ON/OFF
1. To lock the key pad:
Press and hold until the key lock indicator appears.
2. To unlock the key pad:
Press and hold until the key lock indicator disppears.
Key Beep ON/OFF
Press and hold the button while turning the radio ON to DOWN
switch the keypad tone ON or OFF.
Roger Beep ON/OFF
Roger Beep is a unique tone added to end a transmission.
Press and hold the button while turning the radio ON to turn UP
Roger Beep ON or OFF.
1. Press MENU seven times. r P setting flashes.
2. Press or to change the change the settingONor OFF.UPDOWN
3. Press to save.PTT
Eg. CH01isbeingusedin yourarea forrepeateruse.
Operation With the Aid of a Repeater
NOTE: You can only activate Duplex on Channels 01-08 and
41-48. When Duplex is ON for a repeater channel, the display
shows r1-r8 for Channels 01-08 and n1-n8 for Channels 41-48.
To Operate in Duplex Mode (Repeater Mode)
The Duplex function enables you to access local repeater
stations. UHF CB Repeaters are used to retransmit or relay your
signal. Repeaters will extend the range of your radio and
overcome the shielding effect caused by solid obstructions.
Dual (Channel) Watch
You can monitor a second channel along with the current
channel with this setting.
1. Press five times. CH appears on the display. MENU
The second channel to monitor will flash. (OF, 01 - 80)
If the setting is OF, then Dual Watch is disabled.
2. Press or to set the 2nd channel to monitor.UPDOWN
3. Press to save the setting and dual watch will be enabled. PTT
The second channel will be monitored intermittently.
3 = High Sensitivity (for noisy areas)
2 = Medium Sensitivity
1 = Low Sensitivity (for quieter areas)
Voice Operated Transmission (VOX)
Transmission is initiated by speaking into the microphone of the
radio instead of pushing the PTT button.
Press to turn VOX On or Off. appears on the display.VOXVOX
The VOX sensitivity level can be changed in the Menu.
1. Press four times. icon will display.MENUVOX
The current setting (1-3) will flash.
2. Press and button to select the sensitivity level.UPDOWN
3. Press to set the new setting.PTT
Setting and Transmitting Call Tones
Your radio can transmit different call tones (wake-up tone) to
other radios in your group so you can alert them that you want to
talk. To set a call tone:
1. Press the three times. CA appears on the display. MENU
The current call tone setting flashes.
2. Press or to change and hear the next call tone.UPDOWN
There are 20 call tones to choose from (1-20).
Set the call tone to 0 to disable the call tone feature.NOTE:
3. Press to set the new call tone. PTT
Press to transmit the call tone.CALL
NOTE: Current regulations require calling tones to be restricted
to one transmission per minute. If a second transmission is
attempted within one minute then an error tone will sound.
Scan Advance
If the radio stops scanning on a channel you do not want to listen
to, briefly press and release or to temporarily remove UPDOWN
that channel from scan and resume scanning. Removed chanels
are restored when the radio is powered off then on again.
Scanning Channels
Use scanning to monitor channels for transmissions or to find
someone in your group who has accidentally changed channels.
To start scanning:
1. Press and release . The indicator displays. SCANSCAN
2. Press and release again to disable scanning. SCAN
The indicator disappears. SCAN
When the radio detects channel activity, it stops scanning and
you can hear the transmission. To respond to the transmission,
press within 5 seconds,the channel will be confirmed.PTT
CTCSS and DCS Codes - Silent PIN
When you dont want to hear chatter from other users on a
channel, who are not part of your group, you can set a
Silent PIN (CTCSS or DCS code). The silent pin works to keep
your radio silent, unless someone is transmitting using the same
silent pin - so only share your pin setting with those in your
group. The ADV10 has 104 pins (codes) available (01~104).
The radios in your group must be set to the same Silent PIN
(CTCSS or DCS code). When communicating with other ADV
series radios you just select the same pin code. You can set a
different pin code for each channel using this procedure.
1. Set a desired channel to use a Silent PIN on (Ex. CH 01).
2. Press two times. The PIN (code) number flashes.MENU
3. Press or to select a setting;UPDOWN
- PIN 00 Setting is disabled (Off)
- PINs 01~38 (CTCSS codes 01~38)
- PINs 39~104 (DCS codes 39~104).
Ex. 1 shows Channel 01 with
Silent PIN 38 (CTCSS code #38)
Ex. 2 shows Channel 01with
Silent PIN 104 (DCS code #104)
4. Press to save the code setting.PTT
NOTE: Set to 00 to disable the feature for the current channel.
If you are communicating with non ADV series radios then let
them know the code type (CTCSS or DCS) and number your are
using.
Push to Talk Timeout Timer
To prevent accidental transmissions and save battery life, the
radio emits a continuous warning tone and stops transmitting if
you press for 60 continuous seconds.PTT
Checking the Channel Before Transmitting
For uninterrupted communication, do not talk on a channel if
someone else is currently talking on it. Indicates a signal is
being received.
If a Silent PIN (CTCSS or DCS code) is enabled, check for
activity on a channel before you talk, press and hold . If you MON
hear static, the channel is clear to use.
NOTE
For maximum range and extended the life of the
batteries, with your avoid touching the antenna
hand when transmitting.
Talking and Listening
To communicate, all radios in your group must be set to the
same Channel (and the same Silent PIN Code if it is set).
To talk, press and hold . Indicates transmission.PTT
The transmit power is 1.0 Watt or 0.5 Watt.
Hold the radio 5 to 7 cm away from your mouth when speaking.
When you are finished speaking, release to listen.PTT
Automatic SQUELCH
The ADV10 is equipped with an automatic squelch, which mutes
the speaker audio unless a strong enough signal is present. As
this is automatic, there is no user input required to adjust it.
Setting the Transmit Power
The ADV10 can be set to 1 Watt (HI) or 0.5 Watt (LO) transmit
power. displays when the level is high.HI
1. Press six times. The current level flashes.MENU
2. Press or button to select a desired channel.UPDOWN
3. Press to confirm and save the transmit power setting.PTT
Setting a Channel
The ADV10 uses the UHF-CB channels (CH01-CH80). See UHF
CHANNELS & FREQUENCIES, page 12 for channel usage.
1. Press one time. The current channel flashes.MENU
2. Press or button to select a desired channel.UPDOWN
3. Press to confirm and save the channel setting.PTT
One CHANNEL setting
Two CTCSS Code setting
Three Call Tone setting
Four VOX setting
Five Dual Watch (2nd Channel) setting
Six Transmit Power Level (Hi / Low)
Seven Duplex Mode (Repeater) setting
Open the MENU - Press MENU
Step through MENU - Press againMENU
Exit the MENU - Press PTT
MENU List
LED Flashlight (LAMP)
To use the built-in LED flashlight;
1. Press to turn the LED flashlight On or Off.LAMP
NOTE: The lamp function will work when radio power is Off.
Ex. lowest
volume
Ex. highest
volume
Setting the Volume
Press the button to increase the speaker volume.UP
Press the button to decrease the speaker volume.DOWN
The speaker volume setting is indicated by L.
The volume level range is from 1 (minimum) to 7 (maximum).
Volume level 0 is mute, indicated by .
Back Light
The ADV10 has an automatic display back light which remains
on for 5 seconds after a key press (all keys except key).PTT
The back light will work even if the keypad is locked but will not
work during low battery alert mode.
Turning Your Radio On and Off
Press and hold to turn the radio On or Off.
When turning on, the radio chirps
and the display briefly shows all
the display icons before showing
the current standby mode of your
radio.
OPERATION
Power Save
Your ADV10 Series has a unique circuit designed to dramatically
extend the life of the batteries. If there is no transmission nor an
incoming call within 5 seconds, your Radio switches to the
Power Save mode.The Radio is still able to receive transmis-
sions in this mode.
Low BatteryAlert
If the battery level becomes low, the unit will go into a Battery
Low Mode.TheTransmit Mode is disabled. Replace Alkaline
batteries immediately, or recharge NiMH rechargeable batteries
immediately to continue using the radio.
NOTE
Do not charge alkaline or non rechargeable batteries.
Plug the Micro-USB charge cable into the radios charge port
(single radio charging) or to the Dual Drop-in cradle, and the USB
end to a standard USB charge port, or USB port of an AC adaptor (not
included). Plug theAC adaptor into the wall outlet.
Before operating the radio, charge the rechargeable batteries
for 16 hours without interruption.
Do not transmit when the radio is charging.
The changing battery icon on the display indicates the battery is
charging.
Charging Rechargeable Batteries
Belt Clip
To attach:
Slide the belt clip down into the catch until it snaps into place.
To remove:
Pinch and hold belt clip latch and slide the belt clip up.
Battery bars indicate the battery level . When the battery
meter shows 1 bar, the device goes into low battery mode and
indicates low battery in the form of an alert tone.
NOTE
- Charge only at room temperatures.
- Only charge NiMH rechargeable batteries.
- Do not mix and use old/new/alkaline/NiMH batteries.
- Remove the batteries from the radio for storage.
- Batteries may corrode over time and cause
permanent damage to your devices.
- Charge rechargeable NiMH batteries once every
3 months when not in use.
Radio Battery Meter
3. Replace the battery cover and press down to secure.
Insert 3 AA NiMH
batteries,
Close the battery
cover firmly.
2. Install 3 AA NiMH rechargeable batteries as shown on the
inside of the battery compartment.
1. With the back of the radio facing you, locate the latch to
release the battery cover and remove the cover.
Install the 3 AA Alkaline batteries.
Installing Batteries
Lift the battery
cover latch up.
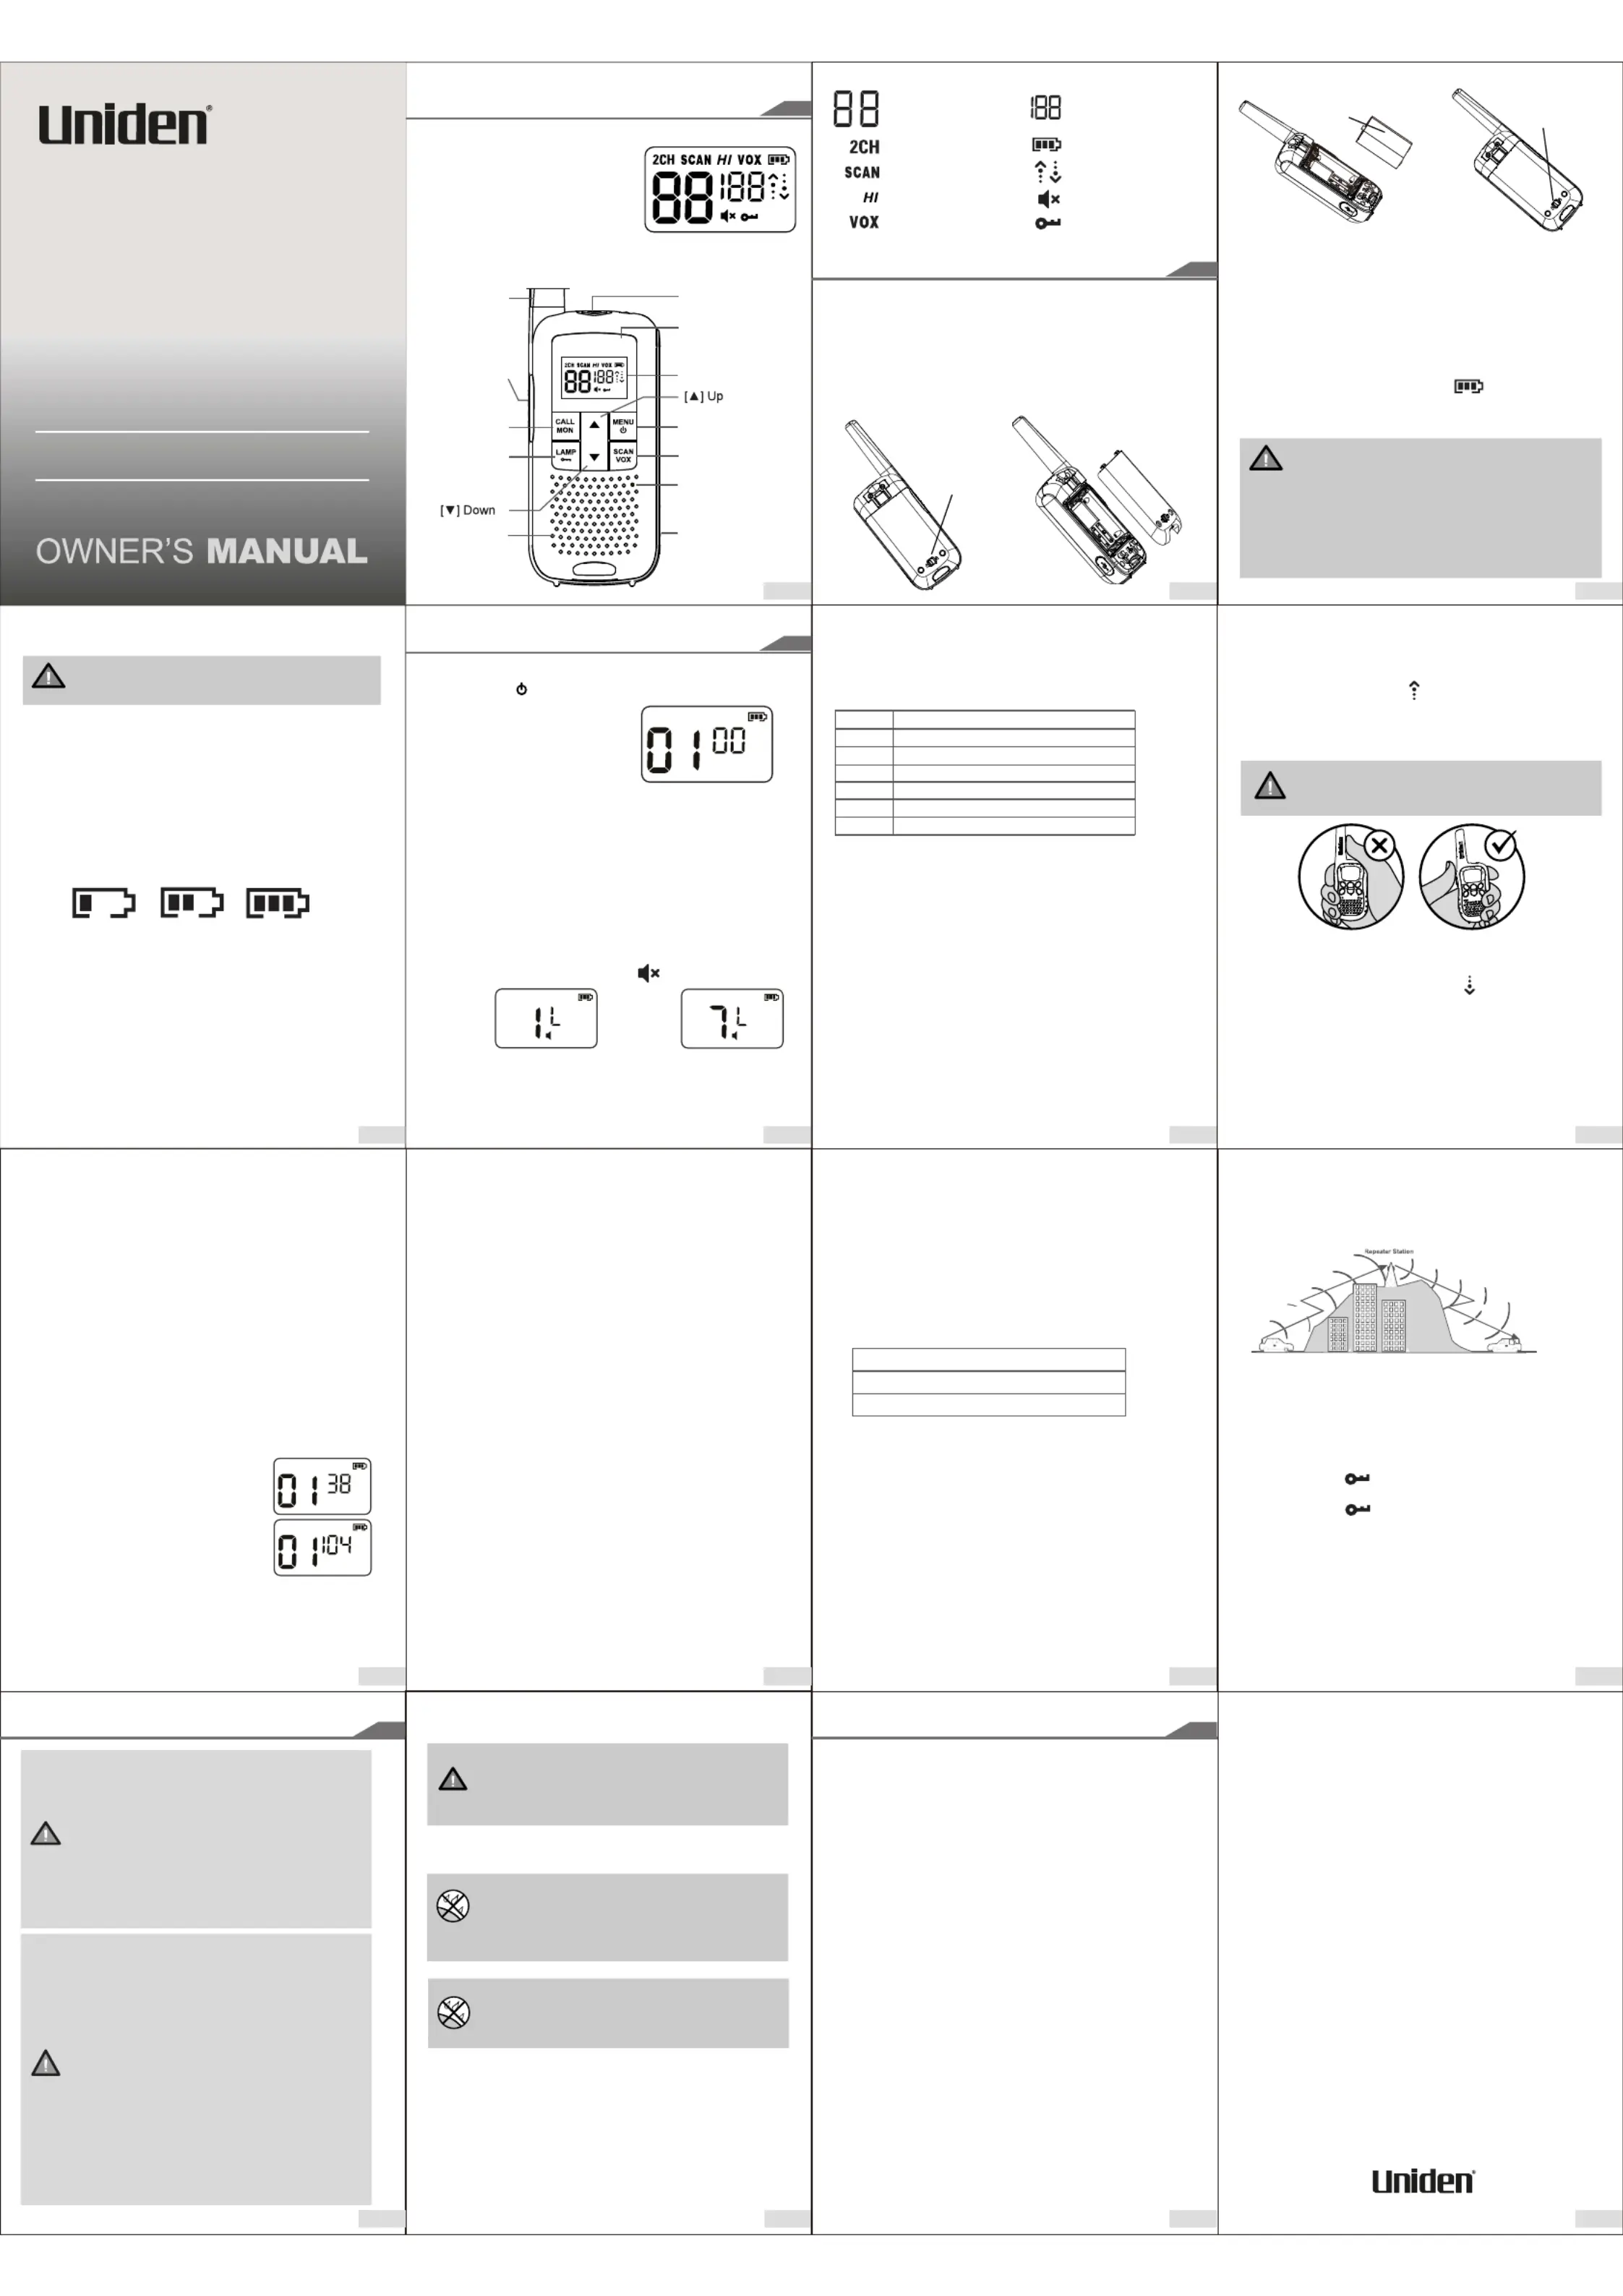
Battery Level
Key Lock is on
Scan is onTransmit Receive Icon
VOX is on
Silent PIN
(CTCSS or DCS Code)
for current Channel
Channel Number
Dual Channel is On
Volume Mute
Transmit Power is Hi
GETTING STARTED
Antenna
Push To Talk
(PTT)
Speaker
Microphone
Display
LED Flashlight
Scan / VOX On/Off
Menu / Power On/Off
Call Tone /
Monitor On/Off
Micro-USB
Charging Jack
Flashlight
/ Key Lock
Accessory Jack
Display Icons: See page 2
Included in your Package
ADV10 Series Radio*
Belt Clip*
3 AA Rechargeable Batteries*
Micro-USB charge cable^
Dual Drop-in Charge Cradle^
Operating Guide^
*Per radio, ^One only
CONTROLS & INDICATORS
For more exciting new products please visit our website:
Australia: www.uniden.com.au
ADV10 Series
UHF CB Transceiver
Produktspecifikationer
| Varumärke: | Uniden |
| Kategori: | Radio |
| Modell: | ADV10-2 |
Behöver du hjälp?
Om du behöver hjälp med Uniden ADV10-2 ställ en fråga nedan och andra användare kommer att svara dig
Radio Uniden Manualer

2 Februari 2026
2 Februari 2026
27 September 2025
27 September 2025
26 September 2025
26 September 2025
26 September 2025
26 September 2025
26 September 2025
26 September 2025
Radio Manualer
Nyaste Radio Manualer
30 Mars 2026
28 Mars 2026
22 Mars 2026
19 Mars 2026
16 Mars 2026
16 Mars 2026
12 Mars 2026
12 Mars 2026
11 Mars 2026
5 Mars 2026