ALM mmMidi Bruksanvisning
ALM Inte kategoriserad mmMidi
Läs gratis den bruksanvisning för ALM mmMidi (1 sidor) i kategorin Inte kategoriserad. Guiden har ansetts hjälpsam av 29 personer och har ett genomsnittsbetyg på 4.2 stjärnor baserat på 7 recensioner. Har du en fråga om ALM mmMidi eller vill du ställa frågor till andra användare av produkten? Ställ en fråga
Sida 1/1
The mmMidi is a simple & compact MIDI interface for your Eurorack synthesiser. It translates both MIDI clock and 2 Channels of MIDI note,
velocity and gate information to corresponding voltage control signals. The mmMidi is quick to set up and requires minimal configuration.
Easily MIDI control a couple of synth voices, sync clocks to MIDI clock and trigger drum or sample modules with the optional expander.
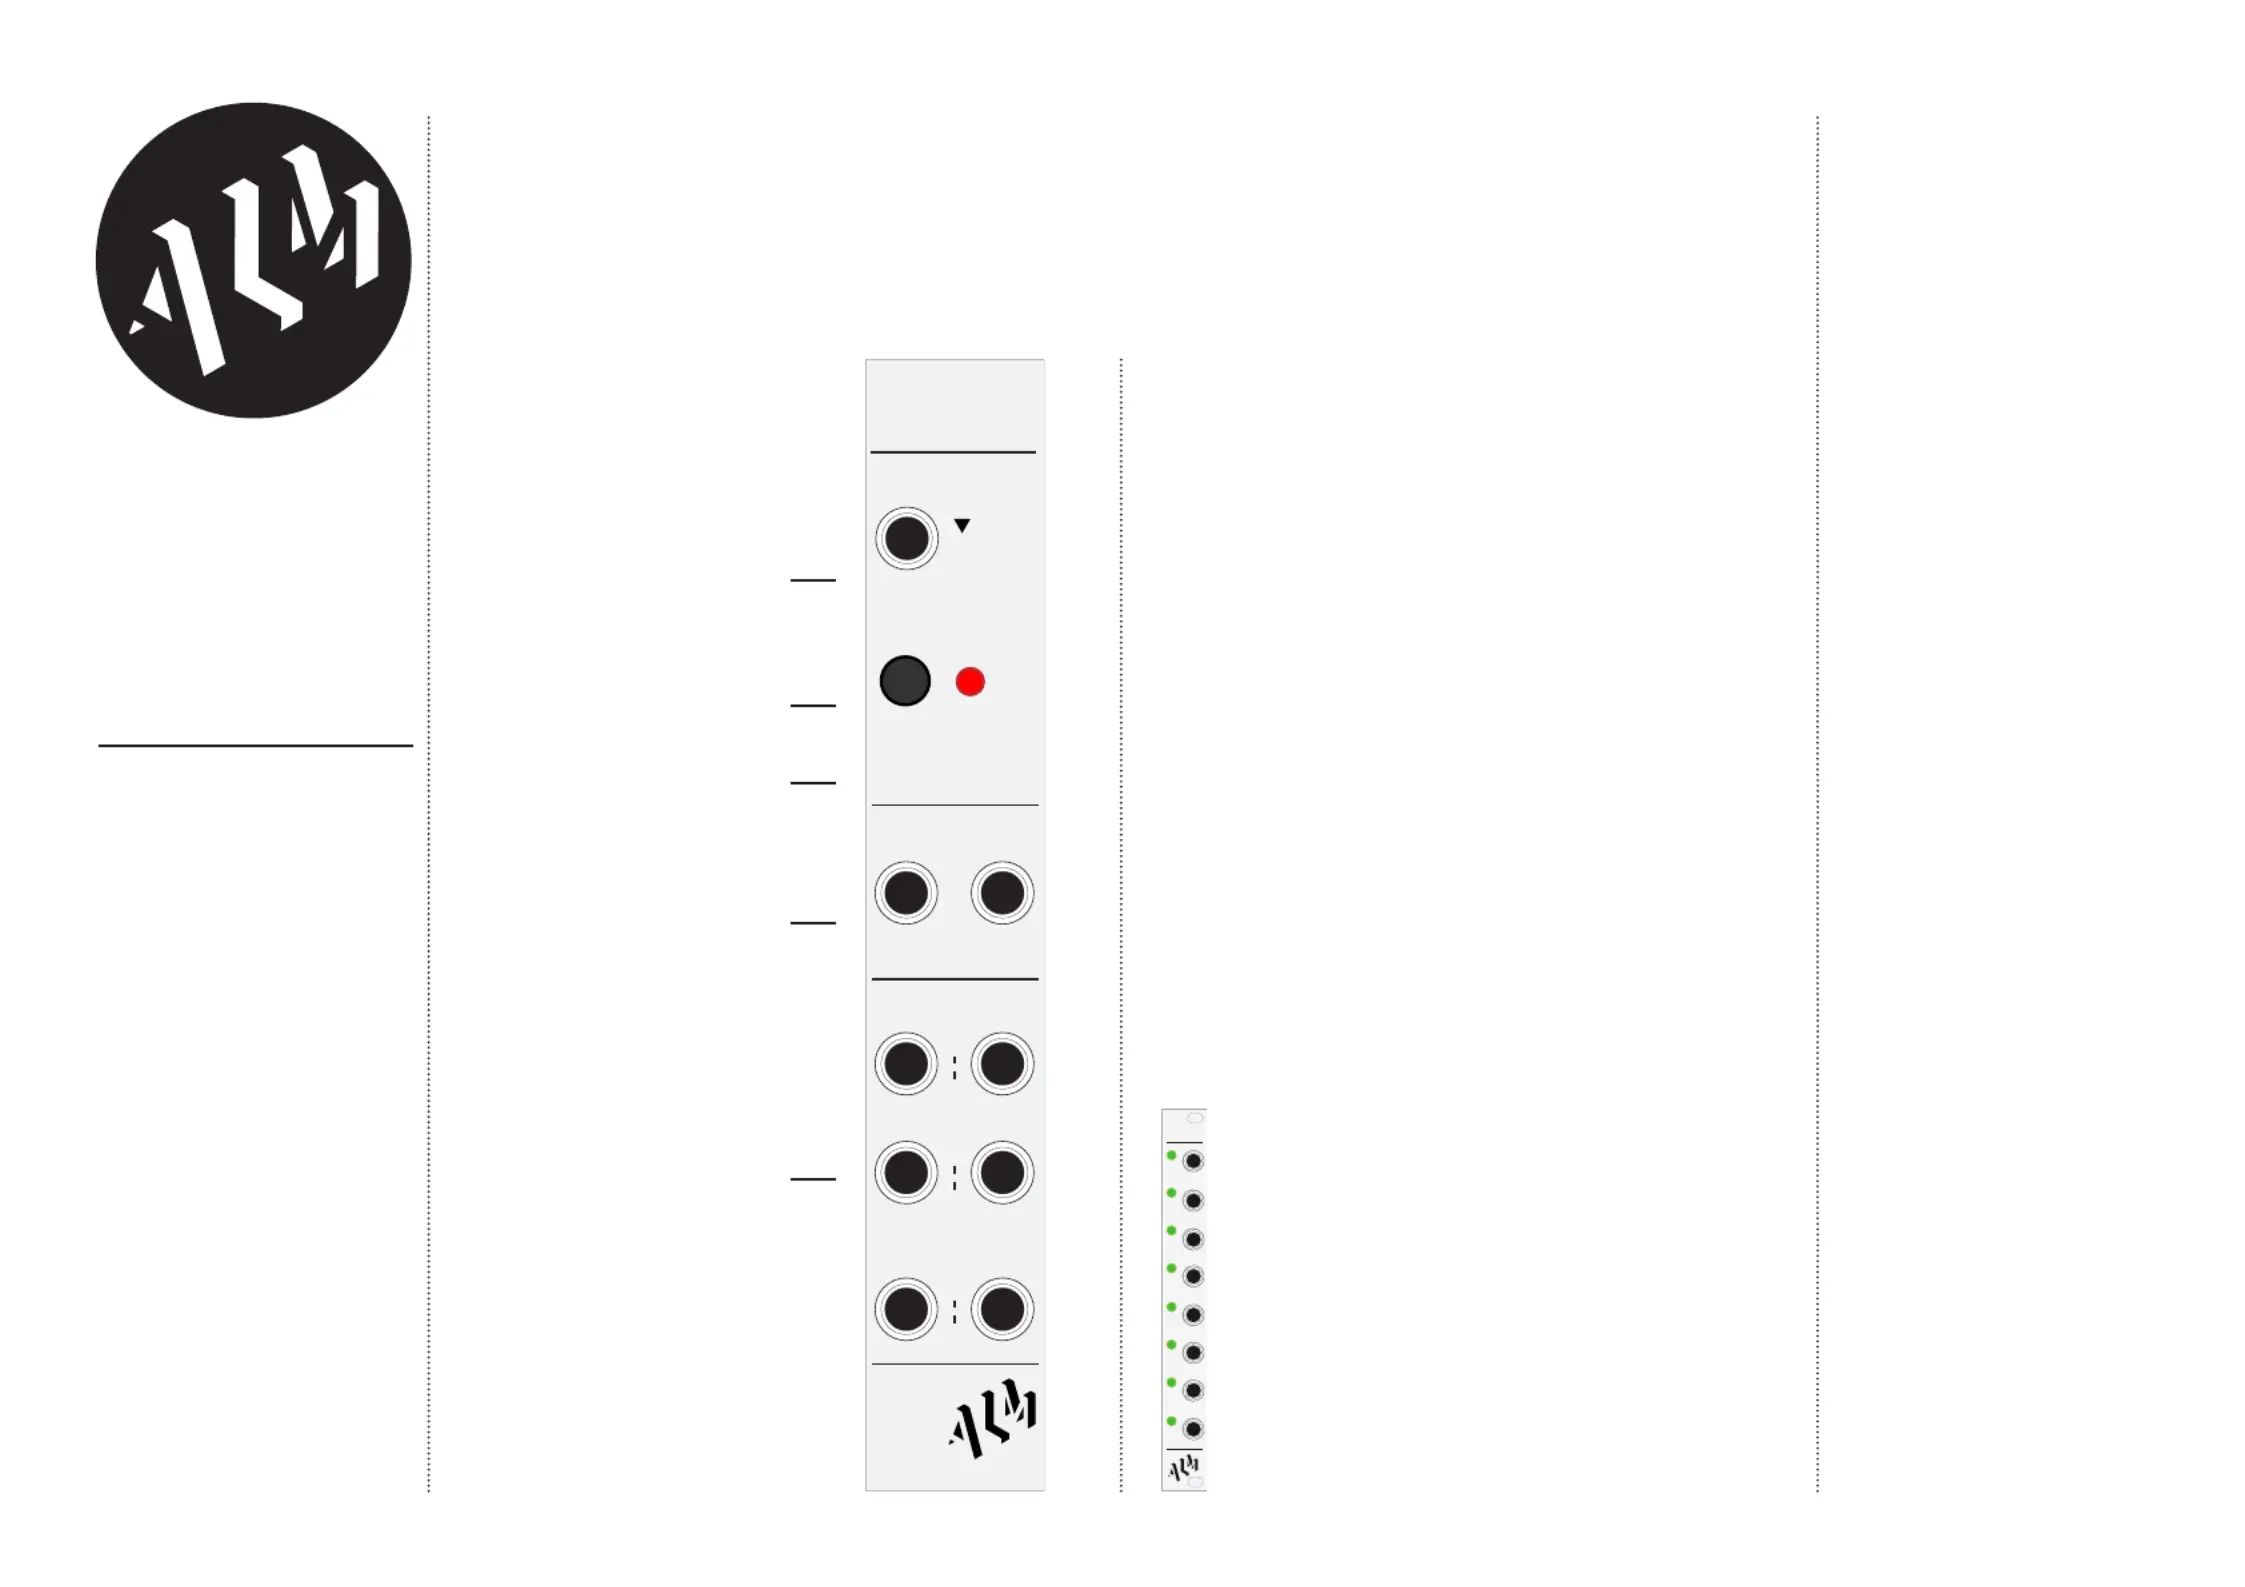
CLOCK OUTPUT
If a MIDI clock is present a
24 PPQN clock will output from
the p1-x24 jack and a gate from the
Run output. The RUN output
is high when the MIDI clock is
playing. Note, this is the default
clock format ALM’s
Pamelas NEW Workout expects.
CHANNEL SETUP
• Connect mmMidi to your MIDI controller (DAW, keyboard etc - a
MIDI device you can set the channel and send key presses). Set the
required MIDI channel on the controller corresponding to the first
voltage output channel of the mmMidi.
• Hold the ‘Learn’ button for approx 1 second until activity light starts
flashing rapidly.
• On MIDI controller press a key so a MIDI note is sent to mmMidi.
The activity light should now flash faster indicating mmMidi has
‘learnt’ the channel.
• Now change the MIDI channel on the controller for the second
voltage output channel and again press a key to send another note.
mmMidi activity LED flashes faster again, acknowledging second
MIDI channel is now set.
• Finally select a third MIDI channel (for optional expander - even if
it’s not present) and press a key on MIDI controller. The LED will stop
flashing and mmMidi is now ready to use with the configured MIDI
channels. Setup is remembered across power cycles.
NOTE:
→ From the factory mmMidi is configured to MIDI channels 1,2 & 3.
→ You can cancel setup anytime by pressing ‘Learn’ again for 1 sec.
→ The same MIDI channel number can be used across all outputs.
ACTIVITY LED
Highlights when MIDI activity is
received for configured
channels 1 & 2.
OUTPUTS
Voltage outputs for
channels 1 and 2.
V/Oct & Velocity are 0-8V range.
Gates are +5V
MIDI TRS INPUT
Use included TRS to DIN adap-
tor cable (Type B) to connect
mmMidi to MIDI controller.
OPTIONAL EXPANDER
The ‘mmT’ is an optional 3HP expander which
connects directly to the ‘expand’ socket on the
rear of the mmMidi using supplied cable. It maps
the third configured MIDI channel key presses to
corresponding trigger/gate outputs as shown on
the mmT front panel.
It’s useful for controlling drum modules and in
particular the ALM Squid Salmple.
http://busycircuits.com/alm023
TECHNICAL SPECIFICATIONS
Power: +12V 30ma / -12V 0ma
Size: 4HP
Depth: 38mm
Resolution: 12Bit 0-8V via CV
outputs. +5v via gates
ALM023 / mmMidi
Limited Warranty
From the date of manufacture this
device is guaranteed for a period of 2
years against any manufacturing or
material defects. Any such defects
will be repaired or replaced at the
discretion of ALM. This does not
apply to;
•Physical damage arising for mis
treating (i,e dropping, submerging
etc).
•Damage caused by incorrect power
connections.
•Overexposure to heat or direct
sunlight.
•Damage caused by inappropriate or
misuse.
•Use of incorrect or non official
firmware
No responsibility is implied or
accepted for harm to person or
apparatus caused through operation
of this product. By using this product
you agree to these terms.
Support
Need help? Email your questions to
help@busycircuits.com
For the latest news, additional info,
downloads and firmware updates
please visit the ALM website at
http://busycircuits.com and follow
@busycircuits on Twitter and Insta-
gram.
Module Installation
With your modular synth
powered connect the 10 pin off
end of the supplied standard
eurorack power connector cable
to the 10 pin power connector on
the rear of the module.
The red stripe on the cable
should be orientated to match
the text ‘RED’ marked on the
rear of the module near the
power connector (this is -12V).
Connect the other 16 pin end of
the cable to your eurorack bus
board (Refer to your bus board
documentation for the correct
orientation).
You are now safe to power up
your modular synth. If the mod-
ule fails to power up check you
have the power cable correctly
orientated and have carefully
read this manual.
Firmware Updates
Firmware updates can be sent over
sysex using a program like ‘Sysex
Librarian’ on Mac or ‘MIDIOX’ on
Windows. Load the firmware sysex
file and power on the mmMidi with
‘Learn’ button held down (Activity LED
will light and remain lit indicating it
is ready to receive Sysex data). Re-
lease button and then send firmware
data from your sysex program. Activ-
ity LED will flash to incate progress.
When all data received mmMidi
will reboot with updated firmware
installed.
ALM023 manual version: 0.1
mmMidi
LEARN BUTTON
Used for channel setup.
PANEL OVERVIEW
C
C
#
#
#
D
D
E
F
F
G
mmT
V/Oct
Velocity
Gates
12
Learn
Clock
Activity
Run
MIDI
In
x24
mmMidi
Produktspecifikationer
| Varumärke: | ALM |
| Kategori: | Inte kategoriserad |
| Modell: | mmMidi |
Behöver du hjälp?
Om du behöver hjälp med ALM mmMidi ställ en fråga nedan och andra användare kommer att svara dig
Inte kategoriserad ALM Manualer

18 September 2024
18 September 2024
18 September 2024
17 September 2024
11 September 2024
11 September 2024
9 September 2024
5 September 2024
5 September 2024
5 September 2024
Inte kategoriserad Manualer
Nyaste Inte kategoriserad Manualer
9 April 2025
9 April 2025
9 April 2025
9 April 2025
9 April 2025
9 April 2025
9 April 2025
9 April 2025
9 April 2025
9 April 2025