AMX VARIA-ACS-810A Bruksanvisning
AMX Inte kategoriserad VARIA-ACS-810A
Läs gratis den bruksanvisning för AMX VARIA-ACS-810A (2 sidor) i kategorin Inte kategoriserad. Guiden har ansetts hjälpsam av 24 personer och har ett genomsnittsbetyg på 4.9 stjärnor baserat på 2 recensioner. Har du en fråga om AMX VARIA-ACS-810A eller vill du ställa frågor till andra användare av produkten? Ställ en fråga
Sida 1/2
QUICK START GUIDE
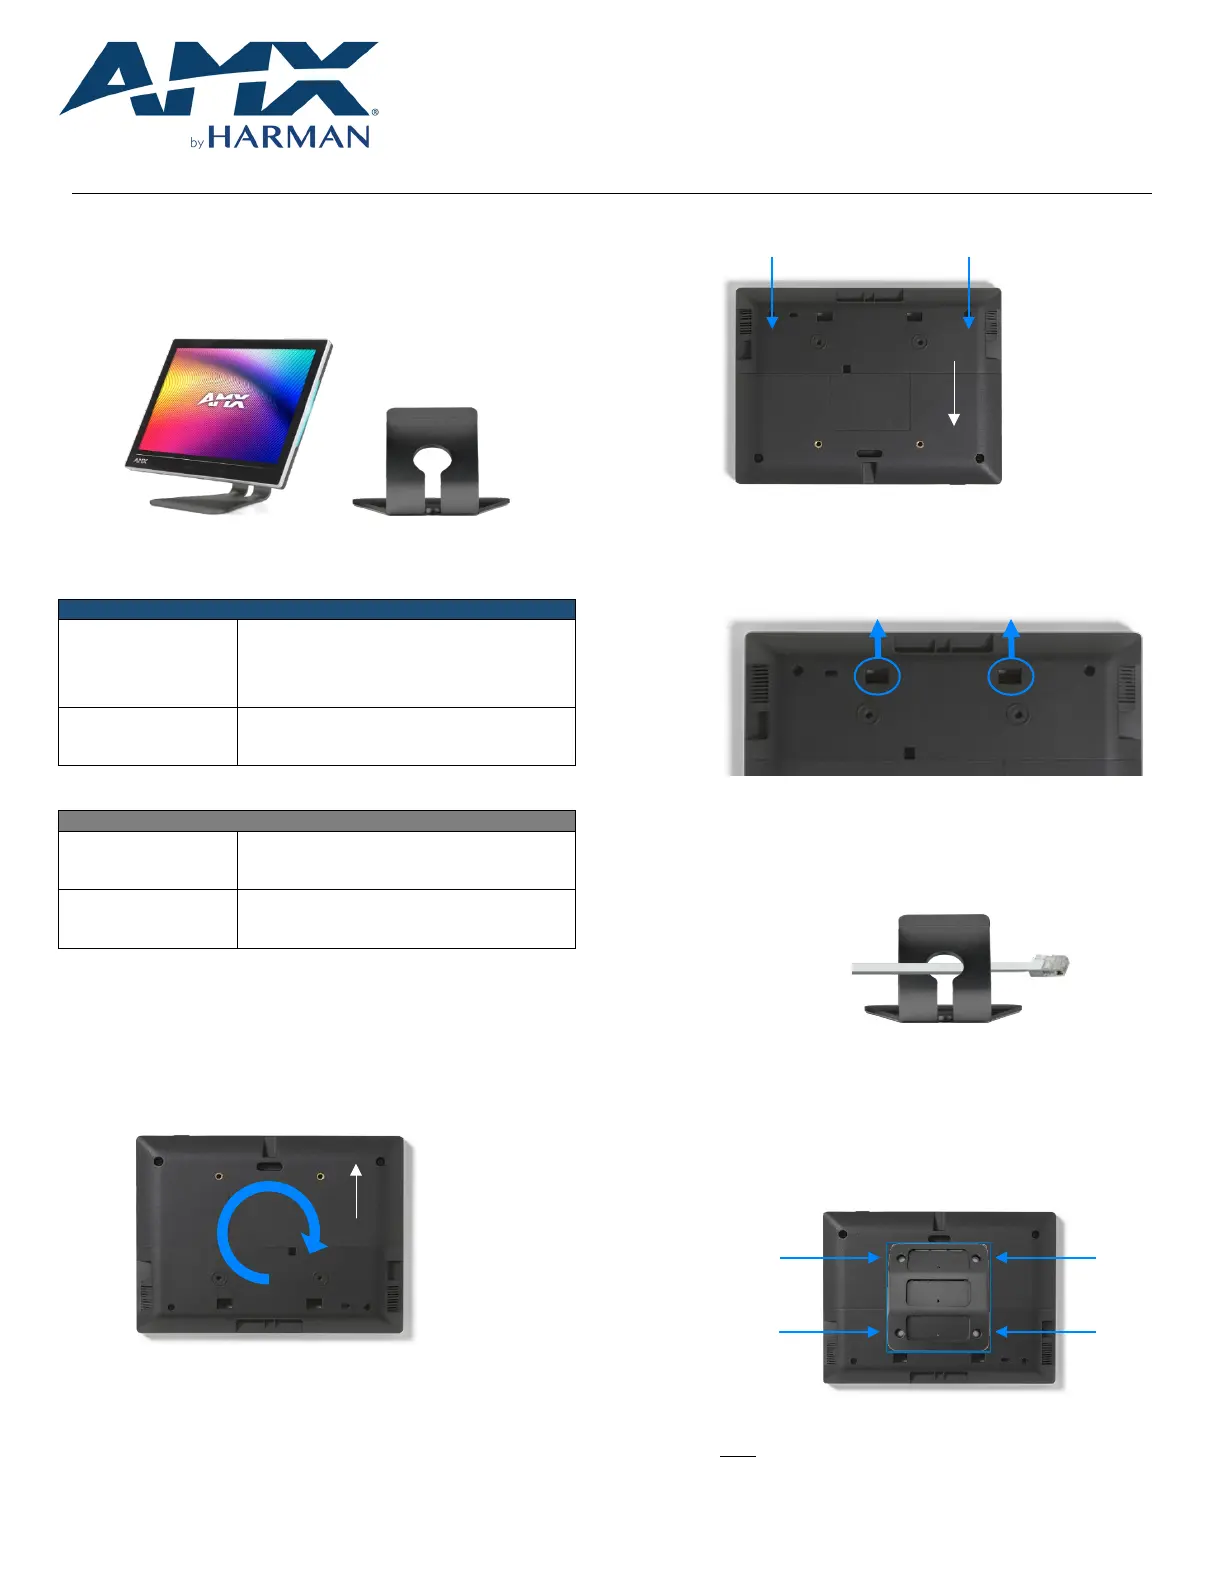
VARIA-ACS-810A 8” & 10.1” Angle-Select Tabletop Stand
VARIA-ACS-150A
15.6” Angle-Select Tabletop Stand
Overview
TheVaria Angle-Select Tabletop stands are designed for 8” VARIA-80, 10.1”
VARIA-100, & 15.6” VARIA-150 Touch Panels, and give them a sleek & modern
tabletop solution thatcan be installed at one of three angles to best suit the
users’ needs.
FIG. 1VariaTouch Panel on Angle-Select Tabletop Stand
Model Availability & Compatibility
ANGLE-SELECT TABLETOP STANDS
VARIA-ACS-810A
(AMX-UMT8111)
VARIA-80 Touch Panel (AMX-UTP0811)
VARIA-100 Touch Panel (AMX-UTP1011)
VARIA-100N Touch Panel (AMX-UTP1011N)
VARIA-ACS-150A
(AMX-UMT1511)
VARIA-150 Touch Panel (AMX-UTP1511)
VARIA-150N Touch Panel (AMX-UTP1511N)
Other Models Available
FIXED TABLETOP STANDS
VARIA-ACS-80F
(AMX-UMT0801)
VARIA-80 Touch Panel (AMX-UTP0811)
VARIA-ACS-100F
(AMX-UMT1001)
VARIA-100 Touch Panel (AMX-UTP1011)
VARIA-100N Touch Panel (AMX-UTP1011N)
Installation
VariaFixed Tabletop Stands are easily installed with the supplied hardware and
a Philips-head screwdriver.
1.Place the panel face-down on a soft cloth andarrange the panel so
that the top of the touch panel is closest to you.
FIG. 2Varia Touch Panel, rear
2.If they are installed, remove two small screws from the lower cover.
Screw Locations
FIG. 3Rear cover screws, if installed
3.Place your thumbs onthe rectangular access holes, and push the
lower cover away from you.Do not discard, this will be reinstalled
later.
FIG. 4Rear CoverRemoval
4.Rotatethe panel back around so the bottom is closest to you.
5.Route the networking cable through the base first, andthen plug the
RJ-45 connector into the back of the touch panel.
FIG. 5Angle-Select Tabletop Stand Base
6.Reinstall the lower cover, first snapping it into place. Optionally, two
small screws supplied in the hardware accessory bag may be
installed.Make sure the cable routes out the bottom of the lower
cover.
7.Screw the mount to the rear of the panel using the supplied screws.
FIG. 6Mounting Plate Installation
NOTE: The three slots should be oriented UP and the set screw
holes should be oriented DOWN.
Top
Top
Produktspecifikationer
| Varumärke: | AMX |
| Kategori: | Inte kategoriserad |
| Modell: | VARIA-ACS-810A |
Behöver du hjälp?
Om du behöver hjälp med AMX VARIA-ACS-810A ställ en fråga nedan och andra användare kommer att svara dig
Inte kategoriserad AMX Manualer

2 Januari 2025
2 Januari 2025
2 Januari 2025
2 Januari 2025
2 Januari 2025
27 December 2024
7 December 2024
25 September 2024
25 September 2024
24 September 2024
Inte kategoriserad Manualer
Nyaste Inte kategoriserad Manualer
9 April 2025
9 April 2025
9 April 2025
9 April 2025
9 April 2025
9 April 2025
9 April 2025
9 April 2025
9 April 2025
9 April 2025