AXESS AX-TOYCAM3 Bruksanvisning
AXESS
Inte kategoriserad
AX-TOYCAM3
Läs gratis den bruksanvisning för AXESS AX-TOYCAM3 (2 sidor) i kategorin Inte kategoriserad. Guiden har ansetts hjälpsam av 14 personer och har ett genomsnittsbetyg på 4.4 stjärnor baserat på 7.5 recensioner. Har du en fråga om AXESS AX-TOYCAM3 eller vill du ställa frågor till andra användare av produkten? Ställ en fråga
Sida 1/2
© COPYRIGHT 2004-2017 METRA ELECTRONICS CORPORATION
© COPYRIGHT 2004-2017 METRA ELECTRONICS CORPORATION
axxessinterfaces.com • metraonline.com
axxessinterfaces.com • metraonline.com
Axxess Integrate
®
Axxess Integrate
®
REV. 1/30/17
REV. 1/30/17
Installation Instructions for AX-TOYCAM3
Installation Instructions for AX-TOYCAM3
FEATURES
• Retains the factory back-up camera to an aftermarket radio
• Allows an aftermarket camera to be added to the factory radio screen*
* Display and navigation model radios only
INTERFACE COMPONENTS
• AX-TOYCAM3 harness
AX-TOYCAM3
Toyota Back-Up Camera Retain/Add-On
2013-2016
SCION
FRS 2016
iM 2016
tC 2016
TOYOTA
4-Runner 2014-2016
4-Runner (without NAV) 2013
Avalon 2015-2016
Camry 2014-2016
Corolla 2014-2016
Highlander 2014-2016
Prius C 2015
Prius V 2015
Rav-4 2015-2016
Rav-4 (after build
date Nov. 2013) 2014
Sienna 2015
Sequoia 2014-2016
Tacoma 2014-2016
Tundra 2014-2016
Venza 2015-2016
• Cutting tool • Tape • Crimping tool
• Connectors (example: butt connectors, bell caps, etc.)
APPLICATIONS
TOOLS REQUIRED
CAUTION!
All accessories, switches, climate controls panels, and especially air bag indicator lights
must be connected before cycling the ignition. Also, do not remove the factory radio with the key in the
on position, or while the vehicle is running.
K PNOWLEDGE IS OWER
Enhance your installation and fabrication skills by
enrolling in the most cognized and spected re re
mobile electronics school in our industry.
Log onto www.installerinstitute.com or call
800-354-6782 for mo information and take steps re
toward a better tomorrow.
Metra recommends MECP
certified technicians
Connections to be made
The AX-TOYCAM3 can be connected two different ways
To retain the factory back-up camera to an aftermarket radio:
• Connect the wire to chassis ground.Black
• Connect the Yellow wire to accessory power. *
• Connect the male Yellow RCA jack to the rear camera input of the aftermarket radio.
•
Connect the reverse wire from the aftermarket radio, to the reverse signal in the vehicle.
• Disregard the loose
Green/Purple
wire, it will not be used in this application.
* It is highly recommended to use the AX-CAM6V (sold separately) to provide the camera
with the proper voltage.
To allow an aftermarket camera to be added to the OEM screen:
• Connect the wire to the ground wire of the aftermarket camera.Black
• Connect the power wire of the aftermarket camera to accessory power.
• Tape off and disregard the Yellow wire, it will not be used in this application.
• Connect the female Yellow RCA jack to the aftermarket camera.
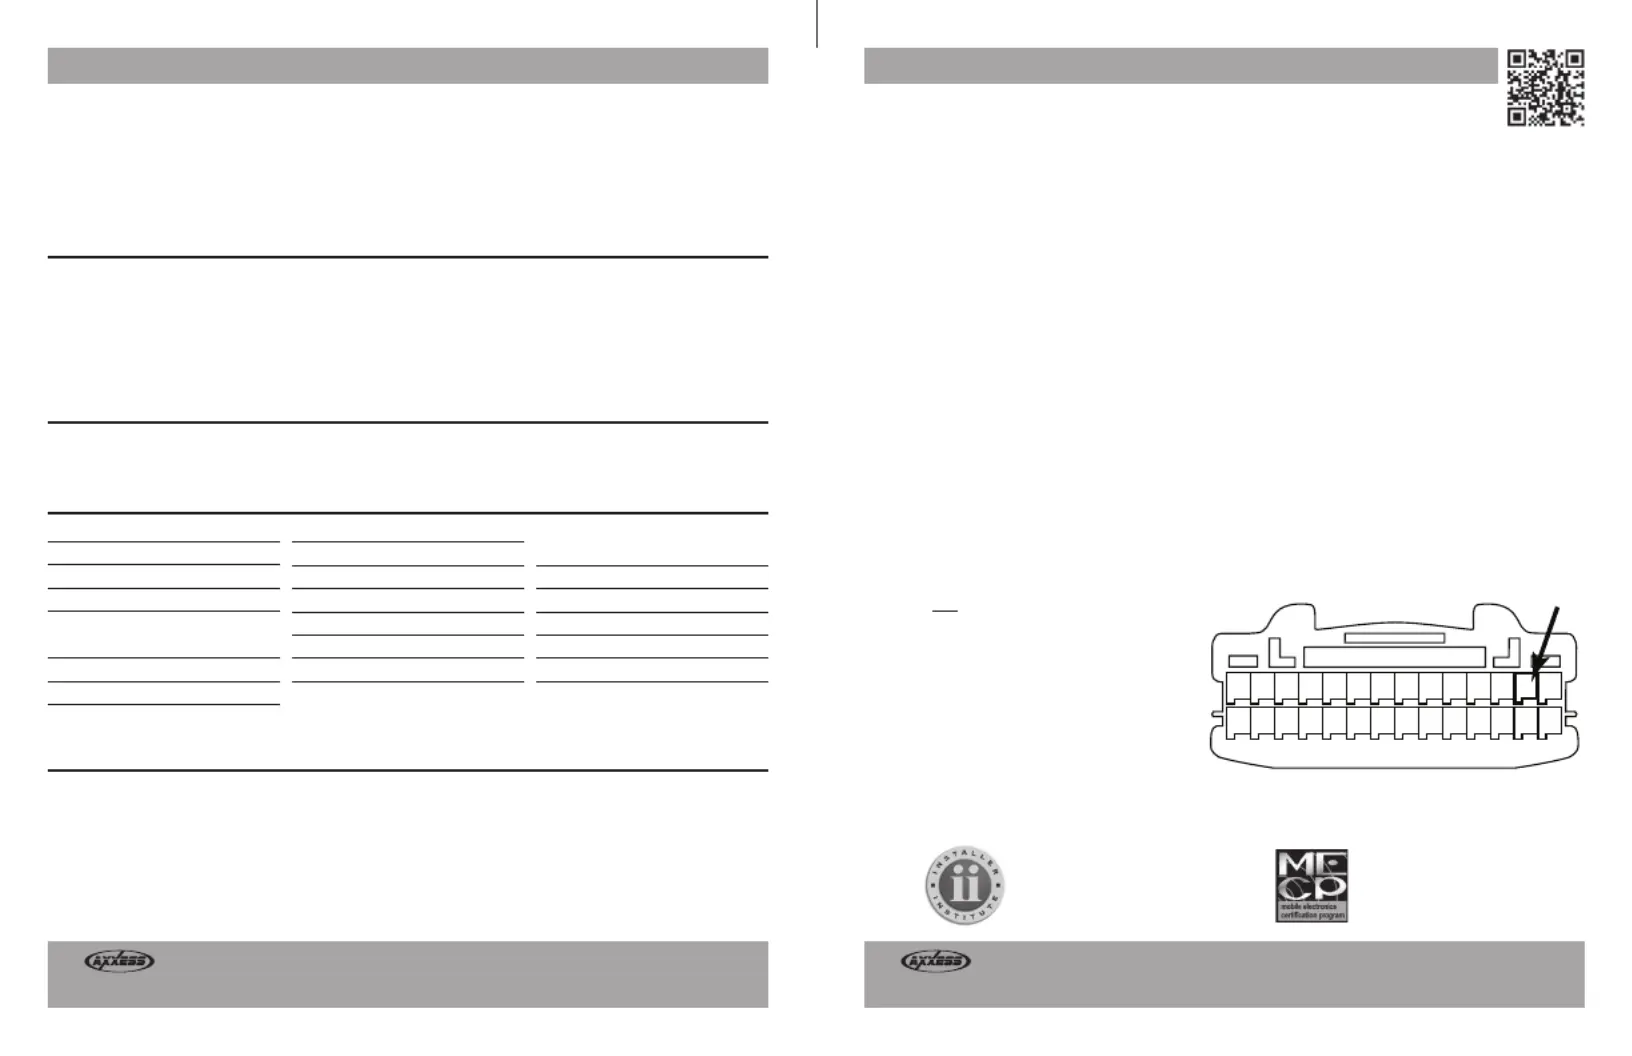
The following (2) steps are only required if
a wire is present in the factory harnessnot
.
•
If a wire is not present in pin-2 of the 28-
pin connector of the factory radio, unplug
the connector, then insert the metal pin
of the loose wire into it. Green/Purple
Connect the harness back into the radio
.
• Connect the other end of the loose
Green/Purple wire to the reverse
wire of the vehicle.
14 13 12 11 10 9 8 7 6 5 3 2 4 1
28 27 26 25 24 23 22 21 20 19 18 17 16 15
This is the wire view of the connector in the vehicle
28 Pin Harness
Produktspecifikationer
| Varumärke: | AXESS |
| Kategori: | Inte kategoriserad |
| Modell: | AX-TOYCAM3 |
Behöver du hjälp?
Om du behöver hjälp med AXESS AX-TOYCAM3 ställ en fråga nedan och andra användare kommer att svara dig
Inte kategoriserad AXESS Manualer

26 Februari 2025

26 Februari 2025

26 Februari 2025

26 Februari 2025

26 Februari 2025

26 Februari 2025

26 Februari 2025

26 Februari 2025

26 Februari 2025

26 Februari 2025
Inte kategoriserad Manualer
- Balam Rush
- Nebula
- Senal
- Luminex
- Kubo
- Ledlenser
- Electro-Voice
- Mr Handsfree
- Purpleline
- Artsound
- Soltection
- Electro Harmonix
- Abac
- Carcomm
- Turbosound
Nyaste Inte kategoriserad Manualer

9 April 2025

9 April 2025

9 April 2025

9 April 2025

9 April 2025

9 April 2025

9 April 2025

9 April 2025

9 April 2025

9 April 2025