Black Decker FS18JS Bruksanvisning
Black Decker såg FS18JS
Läs gratis den bruksanvisning för Black Decker FS18JS (7 sidor) i kategorin såg. Guiden har ansetts hjälpsam av 29 personer och har ett genomsnittsbetyg på 4.2 stjärnor baserat på 6 recensioner. Har du en fråga om Black Decker FS18JS eller vill du ställa frågor till andra användare av produkten? Ställ en fråga
Sida 1/7
GENERALSAFETYRULES - FOR ALLBATTERY
OPERATED TOOLS
WARNING!READ AND UNDERSTAND ALLINSTRUCTIONS.
Failure to follow all instructions listed below, may result in electric shock, fire and/or serious
personal injury.
SAVE THESE INSTRUCTIONS
Work Area
•Keep your work area clean and well lit.Cluttered benches and dark areas invite
accidents.
•Do not operate power tools in explosive atmospheres, such as in the presence of
flammable liquids, gases, or dust.Power tools create sparks which may ignite the dust or
fumes.
•Keep bystanders, children, and visitors away while operating a power tool.
Distractions can cause you to lose control.
Electrical Safety
•Do not abuse the cord. Never use the cord to carry the tool. Keep cord away from
heat, oil, sharp edges or moving parts. Replace damaged cords immediately.
Damaged cords may create a fire.
•Abattery operated tool with integral batteries or a separate battery pack must be
recharged only with the specified charger for the battery. Acharger that may be suitable
for one type of battery may create a risk of fire when used with another battery.
•Use battery operated tool only with specifically designated battery pack. Use of any
other batteries may create a risk of fire.
Personal Safety
•Stay alert, watch what you are doing and use common sense when operating a power
tool. Do not use tool while tired or under the influence of drugs, alcohol, or
medication. Amoment of inattention while operating power tools may result in serious
personal injury.
•Dress properly. Do not wear loose clothing or jewelry. Contain long hair. Keep your
hair, clothing, and gloves away from moving parts. Loose clothing, jewelry, or long hair
can be caught in moving parts. Air vents cover moving parts and should be avoided.
•Avoid accidental starting. Be sure switch is in the locked or off position before
inserting battery pack.Carrying tools with your finger on the switch or inserting the battery
pack into a tool with the switch on invites accidents.
•Remove adjusting keys or wrenches before turning the tool on.Awrench or key that is
left attached to a rotating part of the tool may result in personal injury.
•Do not overreach. Keep proper footing and balance at all times.Proper footing and
balance enables better control of the tool in unexpected situations.
•Use safety equipment. Always wear eye protection.Dust mask, non-skid safety shoes,
hard hat, or hearing protection must be used for appropriate conditions.
Tool Use and Care
•Use clamps or other practical way to secure and support the workpiece to a stable
platform.Holding the work by hand or against your body is unstable and may lead to loss of
control.
•Do not force tool. Use the correct tool for your application.The correct tool will do the
job better and safer at the rate for which it is designed.
•Do not use tool if switch does not turn it on or off.Atool that cannot be controlled with
the switch is dangerous and must be repaired.
•Disconnect battery pack from tool or place the switch in the locked or off position
before making any adjustments, changing accessories, or storing the tool.Such
preventative safety measures reduce the risk of starting the tool accidentally.
•Store idle tools out of reach of children and other untrained persons. Tools are
dangerous in the hands of untrained users.
•When battery pack is not in use, keep it away from other metal objects like: paper
clips, coins, keys, nails, screws or other small metal objects that can make a
connection from one terminal to another. Shorting the battery terminals together may
cause sparks, burns, or a fire.
•Maintain tools with care. Keep cutting tools sharp and clean. Properly maintained tools,
with sharp cutting edge are less likely to bind and are easier to control.with sharp.
•Check for misalignment or binding of moving parts, breakage of parts, and any other
condition that may affect the tool’s operation. If damaged, have the tool serviced
before using.Many accidents are caused by poorly maintained tools.
VEAELESPAÑOLEN LA
CONTRAPORTADA.
SAVE THIS MANUALFOR
FUTURE REFERENCE.
INSTRUCTIVO DE OPERACIÓN,
CENTROS DE SERVICIO YPÓLIZADE
GARANTÍA. ADVERTENCIA: LÉASE
ESTE INSTRUCTIVO ANTES DE USAR
ELPRODUCTO.
•Use only accessories that are recommended by the manufacturer for your model.
Accessories that may be suitable for one tool may create a risk of injury when used on
another tool.
Service
•Tool service must be performed only by qualified repair personnel.Service or
maintenance performed by unqualified personnel could result in a risk of injury.
•When servicing a tool, use only identical replacement parts. Follow instructions in
the Maintenance section of this manual.Use of unauthorized parts or failure to follow
Maintenance Instructions may create a risk of electric shock or injury.
Specific Safety Rules
•Hold tool by insulated gripping surfaces when performing an operation where the
cutting tool may contact hidden wiring or its own cord.Contact with a "live" wire will
make exposed metal parts of the tool "live" and shock the operator.
•When working on a ladder or on scaffolding be sure to lay the tool down on its side
when not in use.Some tools with large battery packs will stand upright but may be easily
knocked over.
• Keep hands awayfrom cutting area. Never reach underneath the material for any reason.
Do not insert fingers or thumb into the vicinity of the reciprocating blade and blade clamp.
Do not stabilize the saw by gripping the shoe.
• Keep blades sharp.Dull blades may cause the saw to swerve or stall under pressure.
• When cutting pipe or conduitensure that they are free from water, electrical wiring, etc.
WARNING:Some dust created by power sanding, sawing, grinding, drilling, and
other construction activities contains chemicals known to cause cancer, birth
defects or other reproductive harm. Some examples of these chemicals are:
• lead from lead-based paints,
• crystalline silica from bricks and cement and other masonry products, and
• arsenic and chromium from chemically-treated lumber (CCA).
Your risk from these exposures varies, depending on how often you do this type of work. To
reduce your exposure to these chemicals: work in a well ventilated area, and work with
approved safety equipment, such as those dust masks that are specially designed to filter
out microscopic particles.
CAUTION:Wear appropriate hearing protection during use. Under some conditions
and duration of use, noise from this product may contribute to hearing loss.
•Avoid prolonged contact with dust from power sanding, sawing, grinding, drilling,
and other construction activities. Wear protective clothing and wash exposed areas
with soap and water. Allowing dust to get into your mouth, eyes, or lay on the skin may
promote absorption of harmful chemicals.
WARNING:Use of this tool can generate and/or disperse dust, which may cause
serious and permanent respiratory or other injury. Always use NIOSH/OSHAapproved
respiratory protection appropriate for the dust exposure. Direct particles away from face and
body.
The label on your tool may include the following symbols.
V..........................voltsA..........................amperes
Hz........................hertzW........................watts
min........................minutes......................alternating current
......................direct current
n
o........................no load speed
..........................
Class IIConstruction
........................
earthing terminal
........................safety alert symbol.../min..................revolutions or
reciprocations per minute
Battery Cap Information
Battery storage and carrying caps are provided for use whenever the battery is out of the
tool or charger. Remove cap before placing battery in charger or tool.
WARNING:Do not store or carry battery so that metal objects can contact exposed
battery terminals. For example, do not place battery in aprons, pockets, tool boxes,
product kit boxes, drawers, etc. with loose nails, screws, keys, etc. without battery cap.
Transporting batteries can possibly cause fires if the battery terminals inadvertently come
in contact with conductive materials such as keys, coins, hand tools and the like. The US
Department of Transportation Hazardous Material Regulations (HMR) actually prohibit
transporting batteries in commerce or on airplanes (i.e. packed in suitcases and carryon
luggage) UNLESS they are properly protected from short circuits. So when transporting
individual batteries, make sure that the battery terminals are protected and well insulated
from materials that could contact them and cause a short circuit.
INSTRUCTION MANUAL
Catalog Number FS1800JS
11
11
88
88
VV
VV
OO
OO
LL
LL
TT
TT
JJ
JJ
II
II
GG
GG
SS
SS
AA
AA
WW
WW
Battery Cap
Cat #. FS1800JS Form # 5146961-03Rev. 1(JUN. 06)
Copyright ©2006 Black & Decker Printed in China
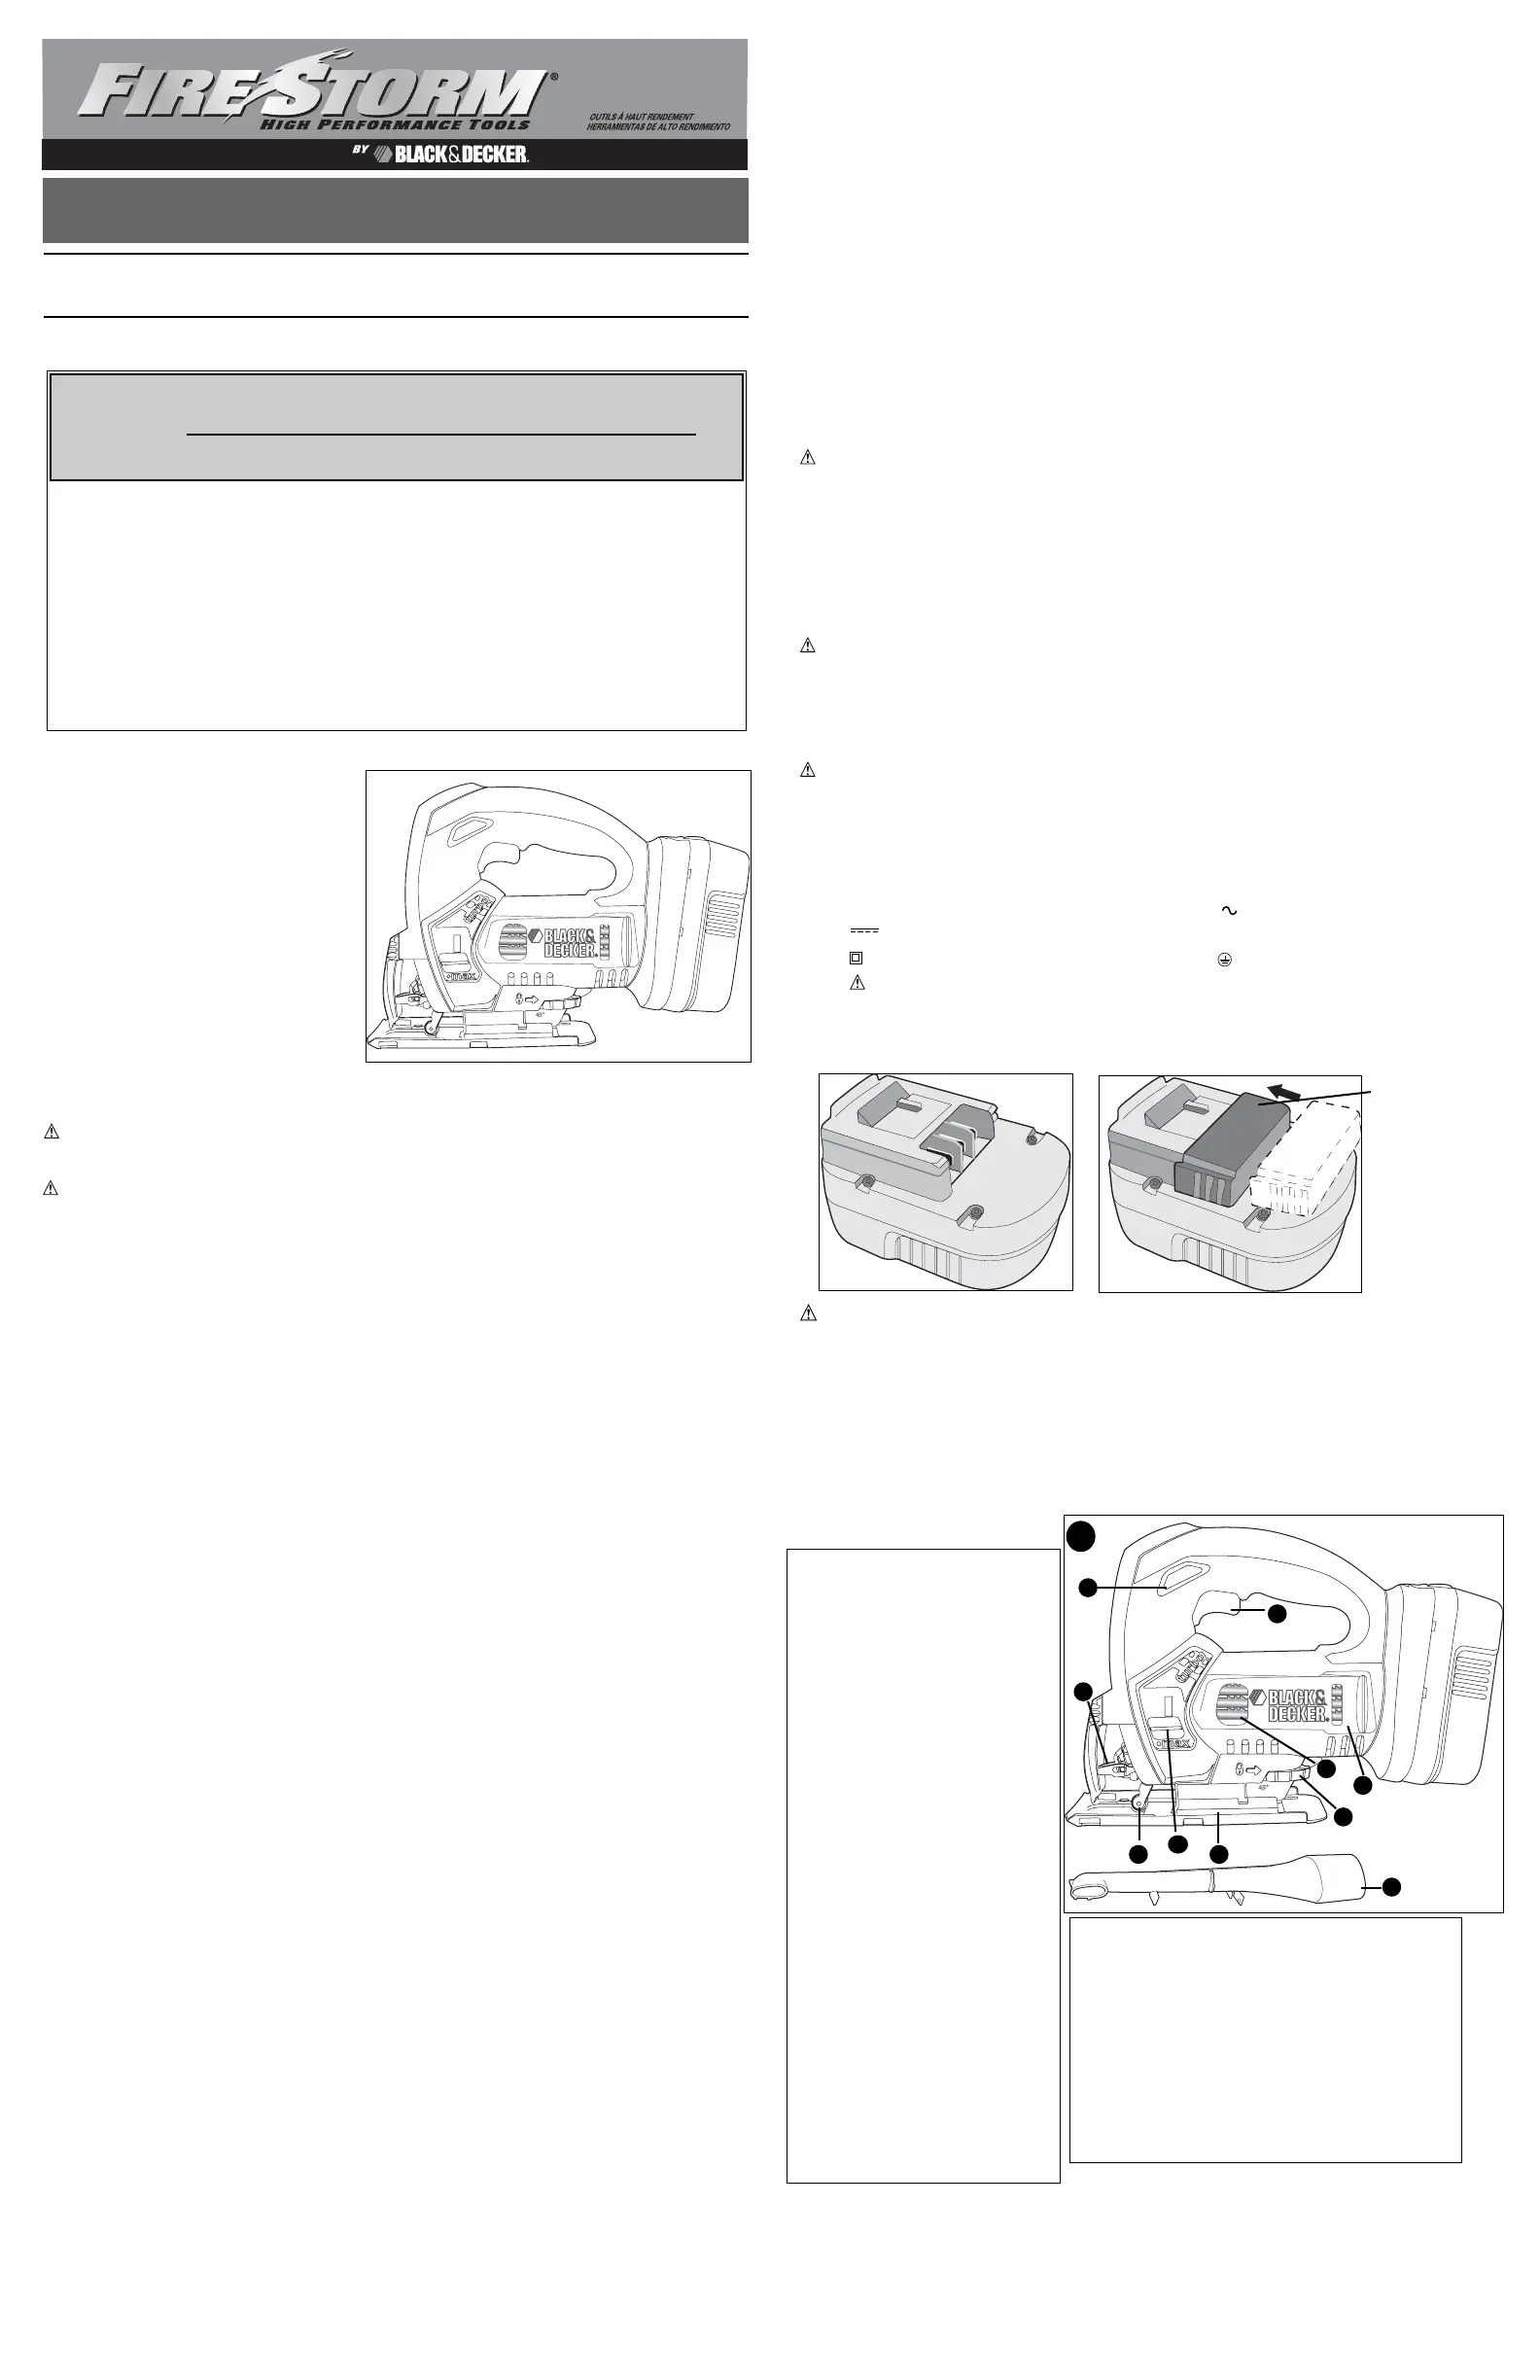
Features - Fig. A
1. Variable speed switch
2. Lock-on button
3. Saw blade locking lever
4. Saw blade support roller
5. Shoe plate
6. Shoe plate locking knob
7. Saw blade
8. Saw blade storage compartment
9. Dust extraction adaptor
10.Orbital action”Turbo” selector
Composants - Fig. A
1. Interrupteur à vitesse variable
2. Bouton de verrouillage en
position de marche
3. Levier de verrouillage de la
lame de scie
4. Galet de support de la lame
de scie
5. Bouton de verrouillage de la
plaque du patin
6. Bouton de verrouillage de la
plaque du patin
7. Lame de scie
8. Compartiment de rangement
de la lame
9. Adaptateur du tube d’aspiration
10.Sélecteur turbo de mouvement
orbital
A
3
54
2
1
6
7
9
8
Características - Fig. A
1. Interruptor de velocidad variable
2. Botón de funcionamiento continuo
3. Palanca de bloqueo de la hoja de sierra
4. Rodillo de apoyo de la hoja
5. Platina
6. Perilla de bloqueo de la platina
7. Hoja de sierra
8. Compartimento de almacenaje de las hojas
de sierra
9. Adaptador para la extracción de polvo
10.Selector de acción orbital ”Turbo”
10
BEFORE RETURNING THIS PRODUCT
FOR ANY REASON PLEASE CALL
1-800-544-6986
BEFORE YOU CALL, HAVE THE CATALOG No. AND DATE CODE AVAILABLE. IN MOSTCASES, A
BLACK & DECKER REPRESENTATIVE CAN RESOLVE THE PROBLEM OVER THE PHONE. IF
YOU HAVE ASUGGESTION OR COMMENT, GIVE US ACALL. YOUR FEEDBACK IS VITALTO
BLACK & DECKER.
T
T
HANK
HANK
YOU
YOU
FOR
FOR
CHOOSING
CHOOSING
B
B
LACK
LACK
&
&
D
D
ECKER
ECKER
!
!
G
G
O
O
T
T
O
O
WWW
WWW
.B
.B
LACKAND
LACKAND
D
D
ECKER
ECKER
.
.
COM
COM
/N
/N
EW
EW
O
O
WNER
WNER
T
T
O
O
REGISTER
REGISTER
YOUR
YOUR
NEW
NEW
PRODUCT
PRODUCT
.
.
Produktspecifikationer
| Varumärke: | Black Decker |
| Kategori: | såg |
| Modell: | FS18JS |
Behöver du hjälp?
Om du behöver hjälp med Black Decker FS18JS ställ en fråga nedan och andra användare kommer att svara dig
såg Black Decker Manualer

16 September 2025
5 September 2025
4 September 2025
4 September 2025
4 September 2025
4 September 2025
3 September 2025
3 September 2025
3 September 2025
3 September 2025
såg Manualer
Nyaste såg Manualer
2 April 2026
1 April 2026
1 April 2026
1 April 2026
1 April 2026
31 Mars 2026
31 Mars 2026
31 Mars 2026
31 Mars 2026
31 Mars 2026