Caliber HWC501 Bruksanvisning
Caliber Dörrklocka HWC501
Läs gratis den bruksanvisning för Caliber HWC501 (2 sidor) i kategorin Dörrklocka. Guiden har ansetts hjälpsam av 19 personer och har ett genomsnittsbetyg på 4.7 stjärnor baserat på 6 recensioner. Har du en fråga om Caliber HWC501 eller vill du ställa frågor till andra användare av produkten? Ställ en fråga
Sida 1/2
BUTTONS AND CONNECTIONSINSTALLATION INSTRUCTIONS #1INSTALLATION INSTRUCTIONS #2
Warning: Make sure the camera
to be within range of the Wi-Fi
network to ensure a successful
connection between the camera
and router.
Attention: Assurez-vous que la
caméra est à portée du réseau
Wi-Fi an d’assurer une connexion
réussie entre la caméra et le routeur.
Warnung: Stellen Sie sicher, dass die Kamera in Reichweite des Wi-Fi-
Netzwerks ist, um ein erfolgreiches Verbinden zwischen Kamera und Router
sicherzustellen.
Waarschuwing: Zorg ervoor dat de camera zich binnen bereik van het
Wi-Fi-netwerk bevindt om een goede verbinding tussen de camera en de
router te garanderen.
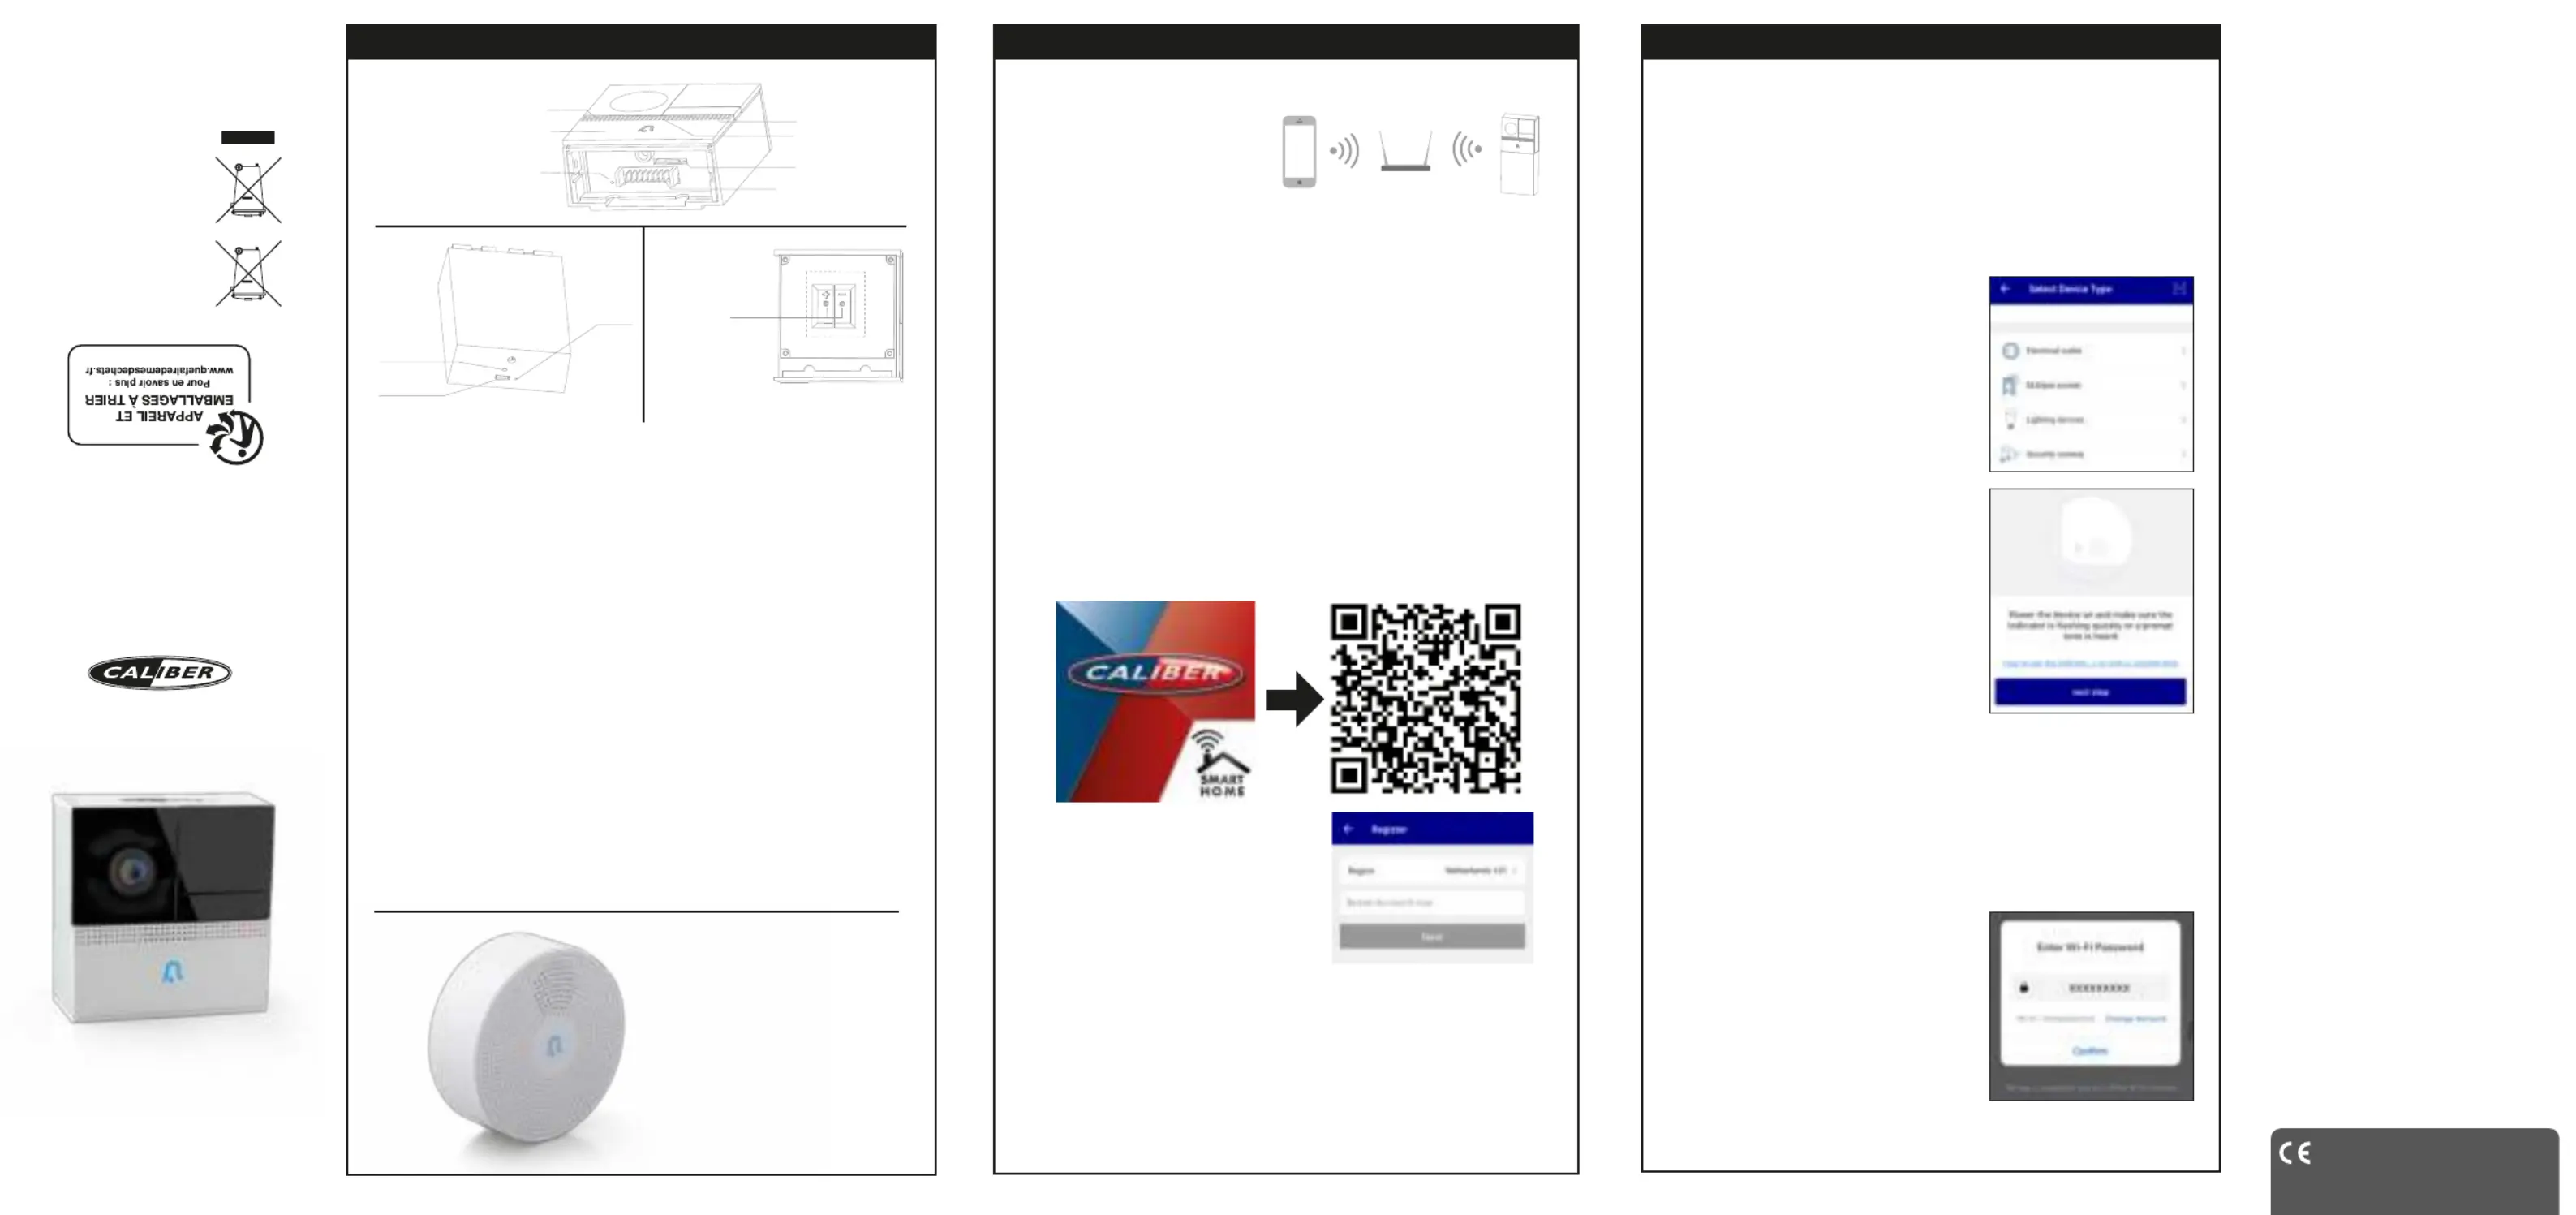
Wi-Fi Conguration instructions
1. Scan QR code to download and install “Caliber Smart Home”
Instructions de conguration Wi-Fi
1. Scannez le code QR pour télécharger et installer « Caliber Smart Home »
Anweisungen zur WLAN-Konguration
1. Scannen Sie den QR-Code, um „Caliber Smart Home“ herunterzuladen
und zu installieren
Wi-Fi-conguratie instructies
1. Scan QR-code om “Caliber Smart Home” te downloaden en te installeren
2. Sign in with cell phone number or email
2. Authentiez-vous à l’aide de votre numéro
de téléphone portable ou de votre
adresse e-mail
2. Melden Sie sich mit Ihrer Handynummer
oder E-Mail-Adresse an
2. Log in met je mobiel nummer of e-mail
3. Make sure the device on which the app is installed, is connected to the
Wi-Fi network on which you want the camera to be too.
3. Assurez-vous que le périphérique sur lequel l’application est installée est
connecté au réseau Wi-Fi sur lequel vous souhaiter également installer la
caméra.
3.
Stelle Sie sicher, dass das Gerät, auf dem die App installiert wird, mit dem
Wi-Fi-Netzwerk verbunden ist, über das auch die Kamera funktionieren soll.
3. Zorg ervoor dat het apparaat waarop de app geïnstalleerd is verbonden
is met het Wi-Fi netwerk waarmee de camera ook verbonden moet gaan
worden.
Once the camera is plugged in it will be powered ON and the indication LED
will ash rapidly.
Une fois la caméra branchée, elle sera allumée et le voyant LED clignotera
rapidement.
Wenn die Kamera eingesteckt ist, wird sie eingeschaltet (ON) und die
Anzeige-LED blinkt schnell.
Nadat de camera van stoom voorzien wordt zal deze automatisch AAN gaan
en zal de indicatie LED snel knipperen.
4. Click “+” at the up right corner to select and
add the device.
4. Cliquez sur «+» dans le coin supérieur droit
pour sélectionner et ajouter le périphérique.
4. Klicken Sie auf “+” in der oberen rechten
Ecke, um das Gerät auszuwählen.
4. Druk op de “+” in de rechter bovenhoek om
een apparaat te kiezen en toe te voegen.
5. The APP will ask if the indication LED is
ashing and if the startup tone was heard.
Then click “next step”.
If this is not the case, please reset the
camera holding the reset-button for approx.
10 seconds.
5. L’APPLICATION demandera si la LED
d’indication clignote et si la tonalité de
démarrage a été entendue.
Cliquez ensuite sur «étape suivante».
Si ce n’est pas le cas, veuillez réinitialiser
l’appareil photo en maintenant enfoncé le
bouton de réinitialisation pendant environ 10 secondes.
5. Die APP wird fragen, ob die Anzeige-LED blinkt und ob der Startup-Ton
zu hören war.
Dann klicken Sie auf “nächster Schritt”.
Wenn dies nicht der Fall ist, dann setzen Sie die Kamera zurück, indem
Sie die Reset-Taste ca. 10 Sekunden lang gedrückt halten.
5. De APP zal vragen of de indicatie LED knippert en of de opstarttoon
gehoord is. Klik dan op “Volgende stap”.
Mocht het niet het geval zijn, reset de
camera dan dmv de reset-knop ca. 10
seconden in te houden.
6. Check if the Wi-Fi network is correct, ll in
the corresponding password and conrm.
Note that the password can only contain
letters and numbers, no special characters.
6. Vériez si le réseau Wi-Fi est correct,
entrez le mot de passe correspondant et
conrmez.
Notez que le mot de passe ne peut contenir que des lettres et des chiffres,
aucun caractère spécial.
WWW.CALIBER.NL
CALIBER EUROPE BV
•
Kortakker 10
4264 AE Veen
•
The Netherlands
For all info on the disposal
of items with the Wheelie
bin icon, please see:
webshop.caliber.nl/media/
forms/wheeliebin.pdf
GBCaliber hereby declares that the item HWC501 is in compliance
with the essential requirements and other relevant provisions of
Directive 2011/65/EU (RoHS) and 2014/53/EU (RED) Par la FR
présente Caliber déclare que l’appareil HWC501 est conforme aux
exigences essentielles et aux autres dispositions pertinentes de
la directive 2011/65/EU (RoHS) et 2014/53/EU (RED) DE Hiermit
erklärt Caliber, dass sich das Gerät HWC501 in Übereinstimmung
mit den grundlegenden Anforderung und übrigen einschlägigen
Bestimmungen der Richtlinie 2011/65/EU (RoHS) und 2014/53/
EU (RED) bendet. IT Con la presente Caliber dichiara che questo
HWC501 è conforme ai requisiti essenziali ed alle alte disposizioni
pertinenti stabilite dalla directtiva 2011/65/EU (RoHS) e 2014/53/EU
(RED) ES Por medio de la presente Caliber declara que el HWC501
cumple con los requisitos esenciales y otra disposiciones aplicables o
exigibles de la Directiva 2011/65/EU (RoHS) y 2014/53/EU (RED) PT
Caliber declara que este HWC501 está conforme com os requisitos
essenciais e outras disposições da Directiva 2011/65/EU (RoHS)
e 2014/53/EU (RED) Härmed intygar Caliber att denna HWC501 S
Pro står i överensstämmelse med de väsentliga egenskapskrav och
övriga relevanta bestämmelser som framgår av direktiv 2011/65/EU
(RoHS) och 2014/53/EU (RED) PLNiniejszym Caliber oświadcza,
źe HWC501 jest zgodne z zasadniczymi wymaganiami oraz innymi
stosownymi postanowieniami Dyrektywy 2011/65/EU (RoHS) i
2014/53/EU (RED) Undertegnede Caliber erklærer hermed, at DK
følgende udstyr HWC501 overholder de væsentlige krav og øvrige
relevante krav i direktiv 2011/65/EU (RoHS) og 2014/53/EU (RED) EE
Käesolevaga kinnitab Caliber seadme HWC501 vastavust direktiivi
2011/65/EU (RoHS) ja 2014/53/EU (RED) pöhinõuetele ja nimetatud
direktiivist tulenevatelle teistele asjakohastele sätetele.Šiuo Caliber LT
deklaruoja, kad šis HWC501 atitinka esminius reikalavimus ir kitas
2011/65/EU (RoHS) ir 2014/53/EU (RED) Direktyvos nuostatas. FI
Caliber vakuuttaa täten että HWC501 tyyppinen laite on direktiivin
2011/65/EU (RoHS) ja 2014/53/EU (RED) oleellisten vaatimusten ja
sitä koskevien direktiivin muiden ehtojen mukainen. Hér með lýsi IS
Caliber yr ϸvi að HWC501 erί samræmi við grunnkröfur og aðrar
kröfur, sem gerðar eru í tilskipun 2011/65/EU (RoHS) og 2014/53/EU
(RED) NO Caliber erklærer herved at utstyret HWC501 er i samsvar
med de grunn-leggende krav og øvrige relevante krav i drektiv 2011/65/
EU (RoHS) og 2014/53/EU (RED) Hierbij verklaart Caliber dat het NL
toestel HWC501 in overeenstemming is met de essentiële eisen en
de andere relevante bepalingen van richtlijn 2011/65/EU (RoHS) en
2014/53/EU (RED)
Latest declaration form can be found at:
www.caliber.nl/media/forms/DeclarationHWC501.pdf
HWC 501
USER MANUAL
• GB • FR • DE • NL •
SPECIFICATIONS
Image sensor 1/4inch 720p CMOS sensor
Viewing angle 150º
Compression Format H.264 Main Prole
Max.Frame rate 1-25fps
Audio Input Two way audio Full duplex
Network Protocol HTTP,DHCP,DNS,RTSP
WIFI WiFi802.11b/g/n,
Storage mode Local storage / client storage
Interface Micro SD/TF,
support up to 128GB SD
Motion detection Support motion detection
Power DC5V/1.0A or Battery
8~24V DC trough power converter
Rechargeable Battery 6000mAh
Working environment Working Temperature -20~50°C
Standby time 10 months
Working time 4 months (measured with 10
calls per day)
Camera size 58mm (L) x 26mm (W) x 60mm (H)
Camera size + battery
58mm (L) x 26mm (W) x 130mm (H)
Installation Wall mounting
IP rated IP65
1. PRODUCT DESCRIPTION
The camera is a Wi-Fi based item that can work with E.G Amazon Alexa
by voice control. You can either control it with Android and iOS based APP
by phone, anywhere, at any time.
The latest information on this topic you can nd online:
CALIBER.NL/calibersmarthome
2.FEATURES
• Works with Amazon Alexa by voice control
• Remote view and control via APP anywhere anytime
• Scene control: works with other smart products
• OTA upgrade supported
We are continuously improving/updating our products and product
information. It’s therefore possible that there is a slight difference between
the description in this manual to the operation of the product.
If something is different or not clear; always check our website for the
most current version.
The (app) images and illustrations used are indicative and may vary
per device and version
11. External
power port
Back of doorbell
3. Doorbell button
WirelessWired
1. Microphone
2. Status light
4. Speaker
6. SD card slot
7. Battery pack connector
5. Reset 1
8. Charging
indicator
9. Mini USB
10. Reset 2
1. Built-in microphone
- To listen while live view or using
the intercom
- To record audio
2. Indication LED
- LED will blink rapidly in RED
while searching for a
new connection
- LED will blink rapidly in BLUE
while reconnecting
- LED will be solid RED while
restarting
- LED will be solid BLUE while
ON and connected
3. Doorbell button
To ring the bell
4. Built-in speaker
For talk back in 2-way intercom
function
5. Reset button
To reset to factory settings
6. Micro SD slot
For Micro SD card, to be able to
record (max. 128GB)
7. Connector for the battery pack
8. Charging indiator for the
battery pack
9. Mini USB power input
to charge the battery pack with
the included charge adapter
10. Reset 2
Reset the battery pack to factory
settings
11. DC input
5V/1A (use for wired connection)
Mounting
For mounting instructions please
consult the separate installment
sheet
Optional chime ‘HWC 501CH’
• sold separately •
Normally the doorbell ‘rings’
on your phone. This USB
powered chime is an extra
ringer. E.G to be placed in your
living room
Produktspecifikationer
| Varumärke: | Caliber |
| Kategori: | Dörrklocka |
| Modell: | HWC501 |
Behöver du hjälp?
Om du behöver hjälp med Caliber HWC501 ställ en fråga nedan och andra användare kommer att svara dig
Dörrklocka Caliber Manualer

10 Augusti 2024
4 Augusti 2024
Dörrklocka Manualer
Nyaste Dörrklocka Manualer
7 April 2025
30 Mars 2025
30 Mars 2025
30 Mars 2025
30 Mars 2025
12 Mars 2025
22 Februari 2025
20 Februari 2025
19 Februari 2025
4 Februari 2025