Clas Ohlson EF700ET - 32-8934 Bruksanvisning

Clas Ohlson Växla EF700ET - 32-8934

Läs gratis den bruksanvisning för Clas Ohlson EF700ET - 32-8934 (20 sidor) i kategorin Växla. Guiden har ansetts hjälpsam av 9 personer och har ett genomsnittsbetyg på 4.8 stjärnor baserat på 5 recensioner. Har du en fråga om Clas Ohlson EF700ET - 32-8934 eller vill du ställa frågor till andra användare av produkten? Ställ en fråga

Sida 1/20
English
GREAT BRITAIN customer service
tel: 08545 300 9799 e-mail: customerservice@clasohlson.co.uk internet: www.clasohlson.com/uk
Ver. 20131212
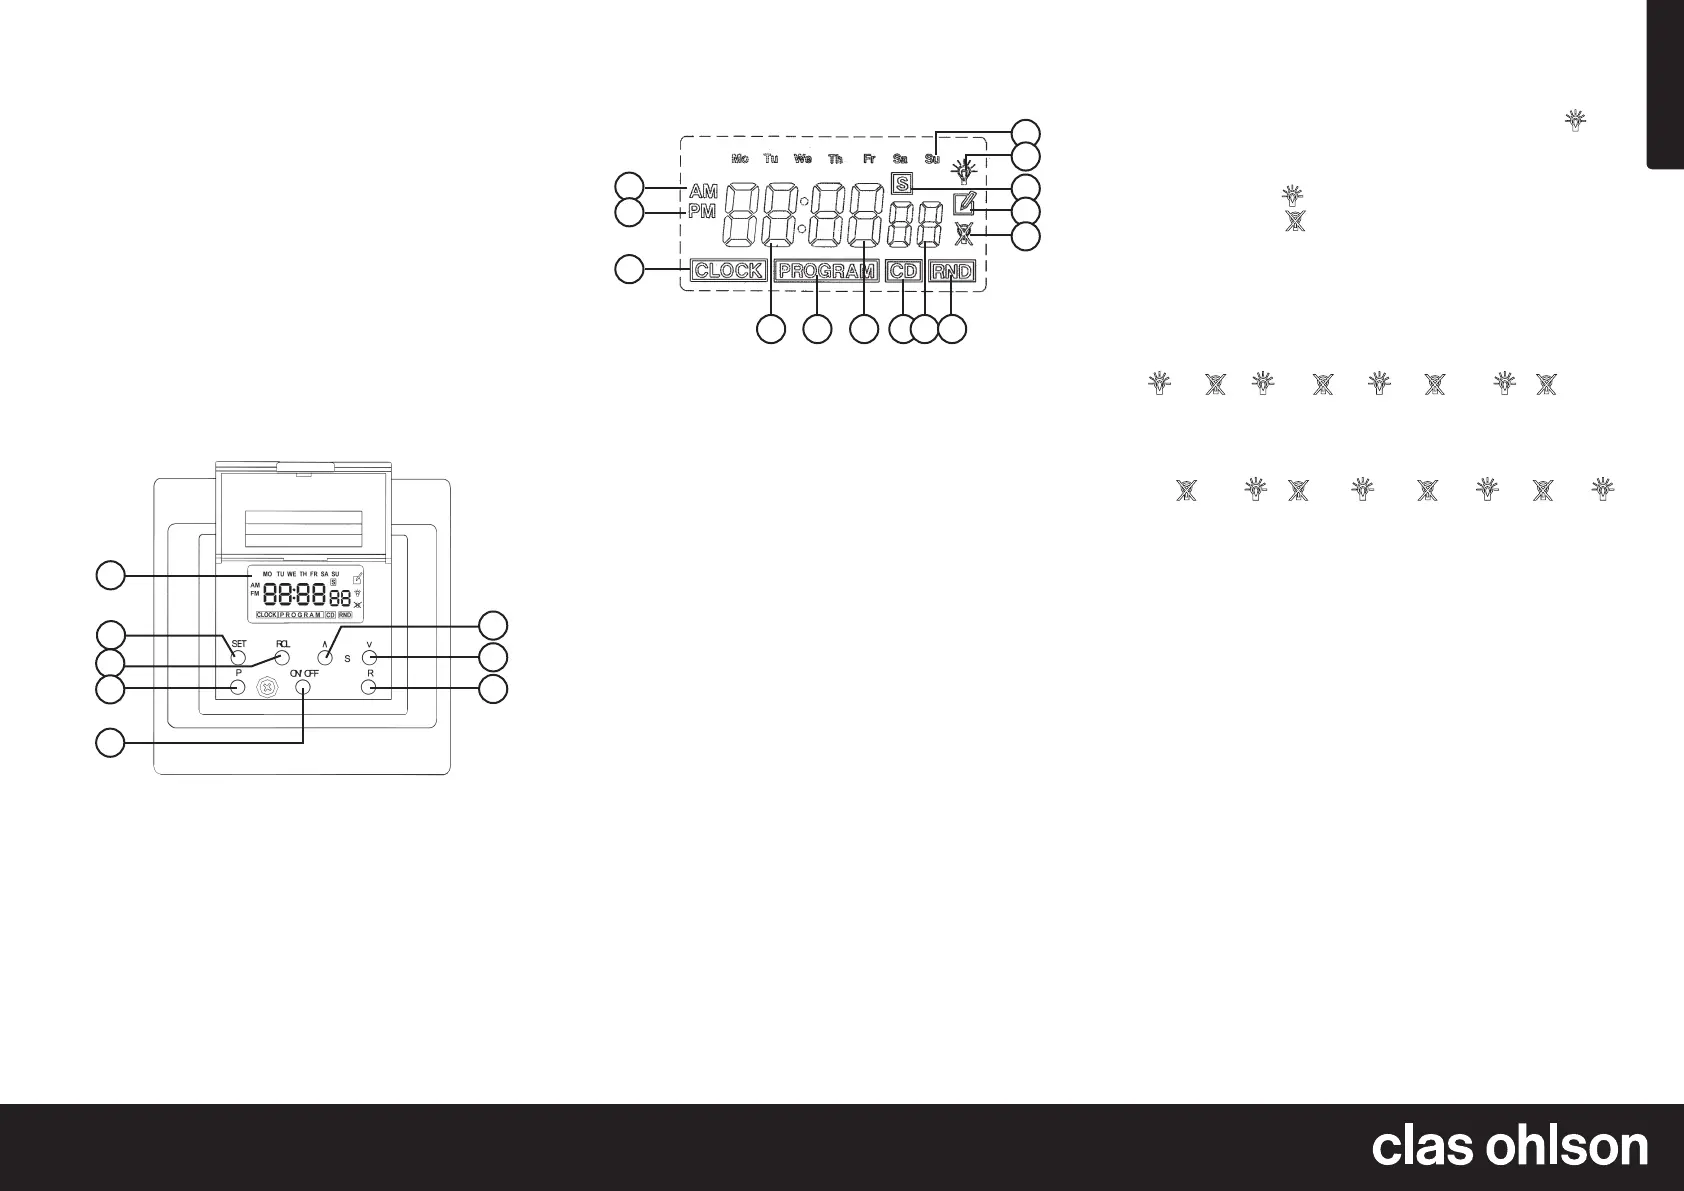
a. AM (morning, before 1200)
b. PM (afternoon, after 1200)
c. Clock
d. Hour
e. Programme
f. Minutes
g. [ CD ] Countdown
h. Seconds
i. [ RND ] Random
j. No power supply to the wall socket
k. Programme is activated
l. [ S ] Daylight Saving Time
m. Power on
n. Mo–Su Days of the week
Setting theTime and Day
1. Press [ SET ] when “CLOCK” appears in thedisplay. The days
of theweek will start to flash and thesetup can begin.
2. Select theday using theup/down arrows [ ▲ ] and [ ▼ ].
3. Press [ SET ] when thecorrect day appears on thedisplay.
4. The hour digit will now start to flash, select thecorrect hour
using theup/down arrows [ ▲ ] and [  ▼ ], press [ SET ] to save
thesetting when thecorrect hour is shown on thedisplay.
5. The minute digits will start to flash, select thecorrect minute
using theup/down arrows [ ▲ ] and [ ▼ ], press [ SET ] to
save thesetting when thecorrect time is shown on thedisplay.
Programming theTimer
1. Press [ P ] when “CLOCK” appears on thedisplay, 1
and “PROGRAM” are shown, thesymbols mean:
• The number represents theprogramme group (1–10).
• This symbol
indicates when theprogramme comes on.
• This symbol
indicates when theprogramme goes off.
• “PROGRAM” indicates that thedisplay is in programme
mode.
2. To select programme group and on/off time: Press [ ▲ ] to
advance in theprogramme groups and on/off time. Press
[ ▲ ] (first come on time) press [ ▲ ] (first go off time) and
so on for as many programmes as are required (up to 10).
1
→ 1 , 2 2 ... 9 → 9 → 10
Press [ ▼ ] to go backwards in programme group and on/off time.
Press [ ▼ ] (10-off) press [ ▼ ] (10-on) and so on.
10
→ 10 , 9 → 9 ......2 → 2 → 1 → 1
3. Press [ SET ] to confirm when thesettings appear on
the display.
4. The weekly display will flash, complete thesettings by
pressing [ ▲ ] to advance in thefollowing order:
• Mo Tu We Th Fr Sa Su
The programmes are valid from Monday to Sunday.
• Mo Tu We Th→ Fr Sa Su
The programmes are valid from Monday to Sunday.
• Mo Tu We Th Fr
The programmes are valid from Monday to Friday.
• Sa Su
The programmes are valid from Saturday to Sunday.
• Mo Tu We Th Fr Sa
The programmes are valid from Monday to Saturday.
• Mo We Fr
The programme is valid on Monday, Wednesday and
Friday.
• Tu Th Sa
The programme is valid on Tuesday, Thursday and
Saturday.
• Mo Tu Wed
The programmes are valid from Monday to Wednesday.
• Th Fr Sa
The programmes are valid from Thursday to Saturday.
Digital Time Switch
Art.no 32-8934 Model EF700ET
Features
• Programmable on/off switching of electrical devices, ideal
for lighting.
• Ideal for automation, saving energy and for home safety.
• Can be switched on/off manually like anormal on/off switch.
• Up to 70 on/off operations per week (10 programmes,
10 on, 10 off).
• Countdown or random function.
• Simple conversion to Summer Time.
Description
1. LCD Display - Displays time and programme setting.
2. [ SET ] - Starts and confirms programme.
3. [ RCL ] - Push and hold in to pause/continue programmes.
4. [ P ] - Select programme mode: Programme, Countdown,
Random on/off or Clock.
5. [ ON/OFF ] - On/Off
6. [ ▲ ] - Increase setting when programming.
7. [ ▼ ] - Decrease setting when programming.
8. [ R ] - (Reset) deletes all settings.
Symbols on theDisplay
a
b
c
d e f g h i
n
m
l
k
j
1
6
7
8
2
3
4
5
English
GREAT BRITAIN customer service
tel: 08545 300 9799 e-mail: customerservice@clasohlson.co.uk internet: www.clasohlson.com/uk
Ver. 20131212
Battery change
If thedigits in thedisplay disappear when thetimer is removed
from thepower point, thebatteries need to be changed. Remove
thedisplay according to Connection point 3 below. The battery
compartment is on theback of thedisplay. Change the2 batteries
to new ones of SR69 type.
Connection
1. Programme in thedesired ON/OFF times in thetimer as
explained above.
2. Remove thefuse from thepower point. Make sure there is
no power.
3. Disassemble thetime switch: Loosen thescrew (A) and
insert ascrewdriver at (B) and carefully bend.
4. Connect thecables to thetime switch according to fig. 3.
5. Mount thetime switch in thesocket moulding, and tighten. (Fig 4)
6. Mount theinner cover plate (fig. 5) with thescrews.
7. Fasten theexternal cover on inner cover plate.
8. Replace thefuse and test.
Specifications
Rated Voltage 230 V AC, 50 Hz
Max load 500 W or 3.15 A (resistive)
Batteries 2×1.5 V (SR69, V371)
5. Use [ ▼ ] to move backwards in reverse order, press [ SET ]
to save thesettings when thecorrect day is shown.
6. The hour digit will now start to flash, select thecorrect hour
using theup/down arrows [ ▲ ] and [ ▼ ], press [ SET ] to
save thesetting when thecorrect hour is shown on thedisplay.
7. The minute digits will start to flash, select thecorrect minute
using theup/down arrows [ ▲ ] and [ ▼ ], press [ SET ] to
save thesetting when thecorrect time is shown on thedisplay.
8. Other programmes can be set or set programmes can be
changed by: repeating steps 2 to 7 described above.
Manual Function
NOTE: The symbol appears in thedisplay when thetime switch is
activated in either theon or off mode according to theprogramme:
• Press [ RCL ] and hold until thesymbol disappears, in order
to override thepre-programmed settings and control
the ON/OFF activation manually.
• Press [ RCL ] one more time in order to return to
the pre-programmed settings. The icon will reappear.
• The display automatically returns to displaying thetime
if no button is pushed within 15 seconds.
Countdown function
1. Press [ P ] when ”CLOCK” is shown on thedisplay until
the ”CD” symbol appears.
2. Press [ SET ] in order to begin programming. The hour display
begins to flash.
3. Select thecorrect hour using theup/down arrows [ ▲ ] and
[ ▼ ], press [ SET ] to save thesetting when thecorrect hour
is shown on thedisplay.
4. The minute digits will start to flash, select thecorrect minute
using theup/down arrows [ ▲ ] and [ ▼ ], press [ SET ] to save
thesettings. The countdown function can be set from 1 min.
up to 99 hrs. and 59 min.
5. The display must be in CD mode in order to start
the countdown function. Push [ ON/OFF ] in order to start.
”CD” flashes as areminder that acountdown is in progress
when thedisplay is in theCLOCK mode.
6. Press [ ON/OFF ] in order to stop acoundown (this only
works when ”CLOCK” shows on thedisplay.)
7. When thecountdown programme is active it is themain
programme. Even if there are other programme settings,
the countdown will continue for its set time and
subsequently turn off thepower.
Random function
1. Press [ P ] when ”CLOCK” is shown on thedisplay until
the ”RND” symbol appears.
2. Press [ ON/OFF ] in order to start/stop therandom function.
3. ”RND” flashes to when therandom function is active when
”CLOCK” is shown on thedisplay.
Example:
The set time is 06:00
(on) and 18:00 (off). When theran-
dom function is activated, thepower will be turned on approx.
16–24 minutes after 06:00 and is turned off approx. 24–42 minutes
before 18:00.
Other functions
Manual to/from operation
• Press once on thecover to turn on thepower.
is shown in
thedisplay. If
is also shown in thedisplay, this means that
thepre-programmed setting will dictate when thepower will
be shut off.
• Press once on thecover to turn on thepower. is shown
in thedisplay. If
is also shown in thedisplay, this means
that thepre-programmed setting will dictate when thepower
will be shut off.
Daylight Savings Time
• Press theup/down arrows simultaneously [ ▲ ] and [ ▼ ] in
order to transition to Daylight Savings Time when ”CLOCK”
is shown on thedisplay. The time and theprogrammed
setting are now synchronised to Daylight Savings Time.
”S” now shows on thedisplay.
• Press theup/down arrows simultaneously [ ▲ ] and [ ▼ ]
in order to transition to standard time when ”CLOCK” is
shown on thedisplay. The time and theprogrammed
setting are now synchronised to standard time.
Reset
• Press [ R ] once in order to clear all programmed settings.
12/24 hour display
• When you have changed batteries or have pressed [ R ]
the 24 H will begin to flash, change to a12 hour clock
display by pressing [ ▲ ] or press [ ▼ ] to return to a24 hour
display. Confirm by pressing [ SET ].
Fig. 1.
Fig. 2.
Fig. 3.
Fig. 4.
A
B
B
Fig. 5.
Svenska
SVERIGE • kundtjänst tel. 0247/445 00 fax 0247/445 09 e-post kundservice@clasohlson.se internet www.clasohlson.se
Ver. 20131212
a. AM (tiden före klockan 12.00)
b. PM (tiden efter klockan 12.00)
c. Clock (klockan)
d. Timme
e. Programmering
f. Minut
g. [CD] Nedräkning
h. Sekund
i. [RND] Slumpvis
j. Ingen ström till uttaget
k. Programmerade inställningar aktiverade
l. [S] Sommartid
m. Ström
n. Mo–Su Veckodag, Måndag – Söndag
Inställning av tid och veckodag
1. Tryck på [SET] när ”CLOCK” visas på displayen, veckodagarna
börjar blinka på displayen och inställningen kan börja.
2. Välj rätt veckodag med upp/ner pilarna [] och [].
3. Tryck på [SET] när rätt veckodag visas på displayen.
4. Timmarkeringen börjar blinka, välj rätt timme med upp/ner
pilarna [] och [], tryck på [SET] för att spara inställningen
när rätt timme visas på displayen.
5. Minutmarkeringen börjar blinka, välj rätt minut med upp/ner
pilarna [] och [], tryck på [SET] för att spara inställningen
när rätt tid visas på displayen.
Programinställningar
1. Tryck på [P] när ”CLOCK” visas på displayen, 1
(programgrupp och på/av) och ”PROGRAM” visas,
symbolerna betyder:
• Siffran visar programgruppens nummer (1–10).
• Ikonen
visar programmets tillslag (på).
• Ikonen visar programmets frånslag (av).
• ”PROGRAM” visar att displayen är i programmeringsläge.
2. Välj programgrupp och till-/frånslag: Tryck på [] för att
stega framåt i programgrupperna och till-/frånslag.
Tryck [] (första tillslag) tryck [] (första frånslag) osv. så
många programgrupper som behövs (upp till 10).
1
→ 1 , 2 2 ... 9 → 9 → 10
Tryck på [] för att stega bakåt i programgrupperna och
till-/frånslag
Tryck [] (10-av) tryck [] (10-till) osv.
10
→ 10 , 9 → 9 ......2 → 2 → 1 → 1
3. Tryck på [SET] för att bekräfta när dina inställningar visas
på displayen.
4. Veckodisplayen blinkar, ställ in genom att trycka på [] för
att stega framåt i följande ordning:
• Mo Tu We Th Fr Sa Su
Programinställningen gäller måndag till söndag.
• Mo Tu We Th→ Fr Sa Su
Inställningen gäller måndag till söndag.
• Mo Tu We Th Fr
Programinställningen gäller måndag till fredag.
• Sa Su
Programinställningen gäller lördag till söndag.
• Mo Tu We Th Fr Sa
Programinställningen gäller måndag till lördag.
• Mo We Fr
Inställningen gäller måndag, onsdag och fredag.
• Tu Th Sa
Inställningen gäller tisdag, torsdag och lördag.
• Mo Tu Wed
Programinställningen gäller måndag till onsdag.
• Th Fr Sa
Programinställningen gäller torsdag till lördag.
Kopplingsur
Art.nr 32-8934 Modell EF700ET
Presentation
• Ställ in till-/från- slag av anslutna elektriska apparater,
speciellt lämpligt för belysning.
• Idealiskt för automation, energibesparing och säkerhet
i hemmet.
• Kan också manövreras manuellt som en vanlig
strömbrytare.
• Upp till 70 Till-/Från- slag per vecka. (10 program, 10 On – 10 Off)
• Nedräknande eller slumpvis funktion.
• Enkel omställning till sommartid.
Beskrivning
1. LCD Display - visar tid och programmeringsinställning.
2. [SET] - starta och bekräfta programmering.
3. [RCL] - tryck och håll in knappen för att avsluta/fortsätta
inställda program.
4. [P] - välj programmeringsläge: Program, nedräkning,
slumpvis till-/frånslag eller klocka.
5. [ON/OFF] - Av/På
6. [] - Öka inställning vid programmering.
7. [] - Minska inställning vid programmering.
8. [R] - (Reset) radera alla inställningar.
Displaysymboler
a
b
c
d e f g h i
n
m
l
k
j
1
6
7
8
2
3
4
5

Produktspecifikationer

Varumärke: Clas Ohlson
Kategori: Växla
Modell: EF700ET - 32-8934

Behöver du hjälp?

Om du behöver hjälp med Clas Ohlson EF700ET - 32-8934 ställ en fråga nedan och andra användare kommer att svara dig