Clas Ohlson MP-8221 Bruksanvisning
Clas Ohlson
rökdetektor
MP-8221
Läs gratis den bruksanvisning för Clas Ohlson MP-8221 (8 sidor) i kategorin rökdetektor. Guiden har ansetts hjälpsam av 3 personer och har ett genomsnittsbetyg på 4.9 stjärnor baserat på 2 recensioner. Har du en fråga om Clas Ohlson MP-8221 eller vill du ställa frågor till andra användare av produkten? Ställ en fråga
Sida 1/8

1. INTRODUCTION
This smoke alarm is equipped with a built-in high performance Lithium battery. The battery is
permanently secured: avoiding battery replacement routines, or any risk of having the battery
removed leaving your smoke alarm without power supply! This gives you fewer maintenance
hours and a higher level of security for you and your property.
2. POSITIONING
A smoke alarm should be tted in centre of
ceiling in the immediate area of the bedrooms,
and areas such as hall- and stairways. If more
than one sleeping area exists, locate additional
smoke alarm in each sleeping area.
Locate at least one alarm on every oor.
Additional smoke alarms give better coverage.
Ensure that the alarm can easily be heard from
the bedrooms.
The distance between two smoke alarms in
a typical dwelling should not exceed 10-12m,
were each alarm should not cover more
than 60m
2
.
liquids in a safe manner. Only use fuses of the correct strength in the electrical system. Never
experiment with homenade fuses of any sort. Replace faulty electric leads and power points.
Only use approved electrical appliances in your home.
Always be prepared for re
If there is a re in your house, your family’s life depend on seconds. Therefore, everyone in the
house should be well prepared for such a situation.
Make an escape plan
Choose the windows most suitable for an emergency exit if the normal exit should become
blocked by smoke or re. If the windows are high above ground, provide a ladder or a rope.
Decide on a meeting place outside in case of alarm. Preferably have the bedroom doors closed
at night. A door can keep a re at bay a sufcient time so that you will be able to escape
through a window. If you have access to reghting equipment, make sure that it is in working
order and that you know how to use it. Practice re drill with your family. Make a game of it,
as not to frighten the children.
When a re starts
Alert the other members of the household and make sure that they leave the house immediate-
ly. Follow the escape plan. If possible, shut the windows and doors to stop the re spreading.
Call the Fire Brigade from, e.g. the neighbour’s house. If the re is small, you can try to put it
out yourself with a re extinguisher, hose or, if the re is very small, with a blanket or rug.
Make sure that you have an escape route. If you cannot put out the re yourself, leave the
house as quickly as possible. Do not return to the house once you have left it.
9. TECHNICAL SPECIFICATION
Power source: Built-in 3V Lithium battery (life expectancy over 10 years)
Current consumption: 3μA
Detection method (smoke): Photo-electric optical reection system
Temperature alarm: 57°C (only applies to models MHP-8221/1231)
Max. no. of units interconnectable: Max. 12 units (only applies to models MP/MHP-1231)
Max. distance of wire (interconnection feature): Approx. 300m
Audible alarm tone: 85 dB at 3m
Maximum relative ambient humidity: 90%
Operation temperature: 0°C to 45°C
10. GUARANTEE
The smoke/heat alarm is guaranteed to be free from defects in materials and workmanship for
ve years from date of purchase. This only applies if the alarm is correctly installed, used in the
normal way and serviced regularly. The guarantee is also conditional on the smoke alarm not
having been tampered with, modied or subject to repairs. Your statutory rights as a costumer
are in no way compromised by this guarantee.
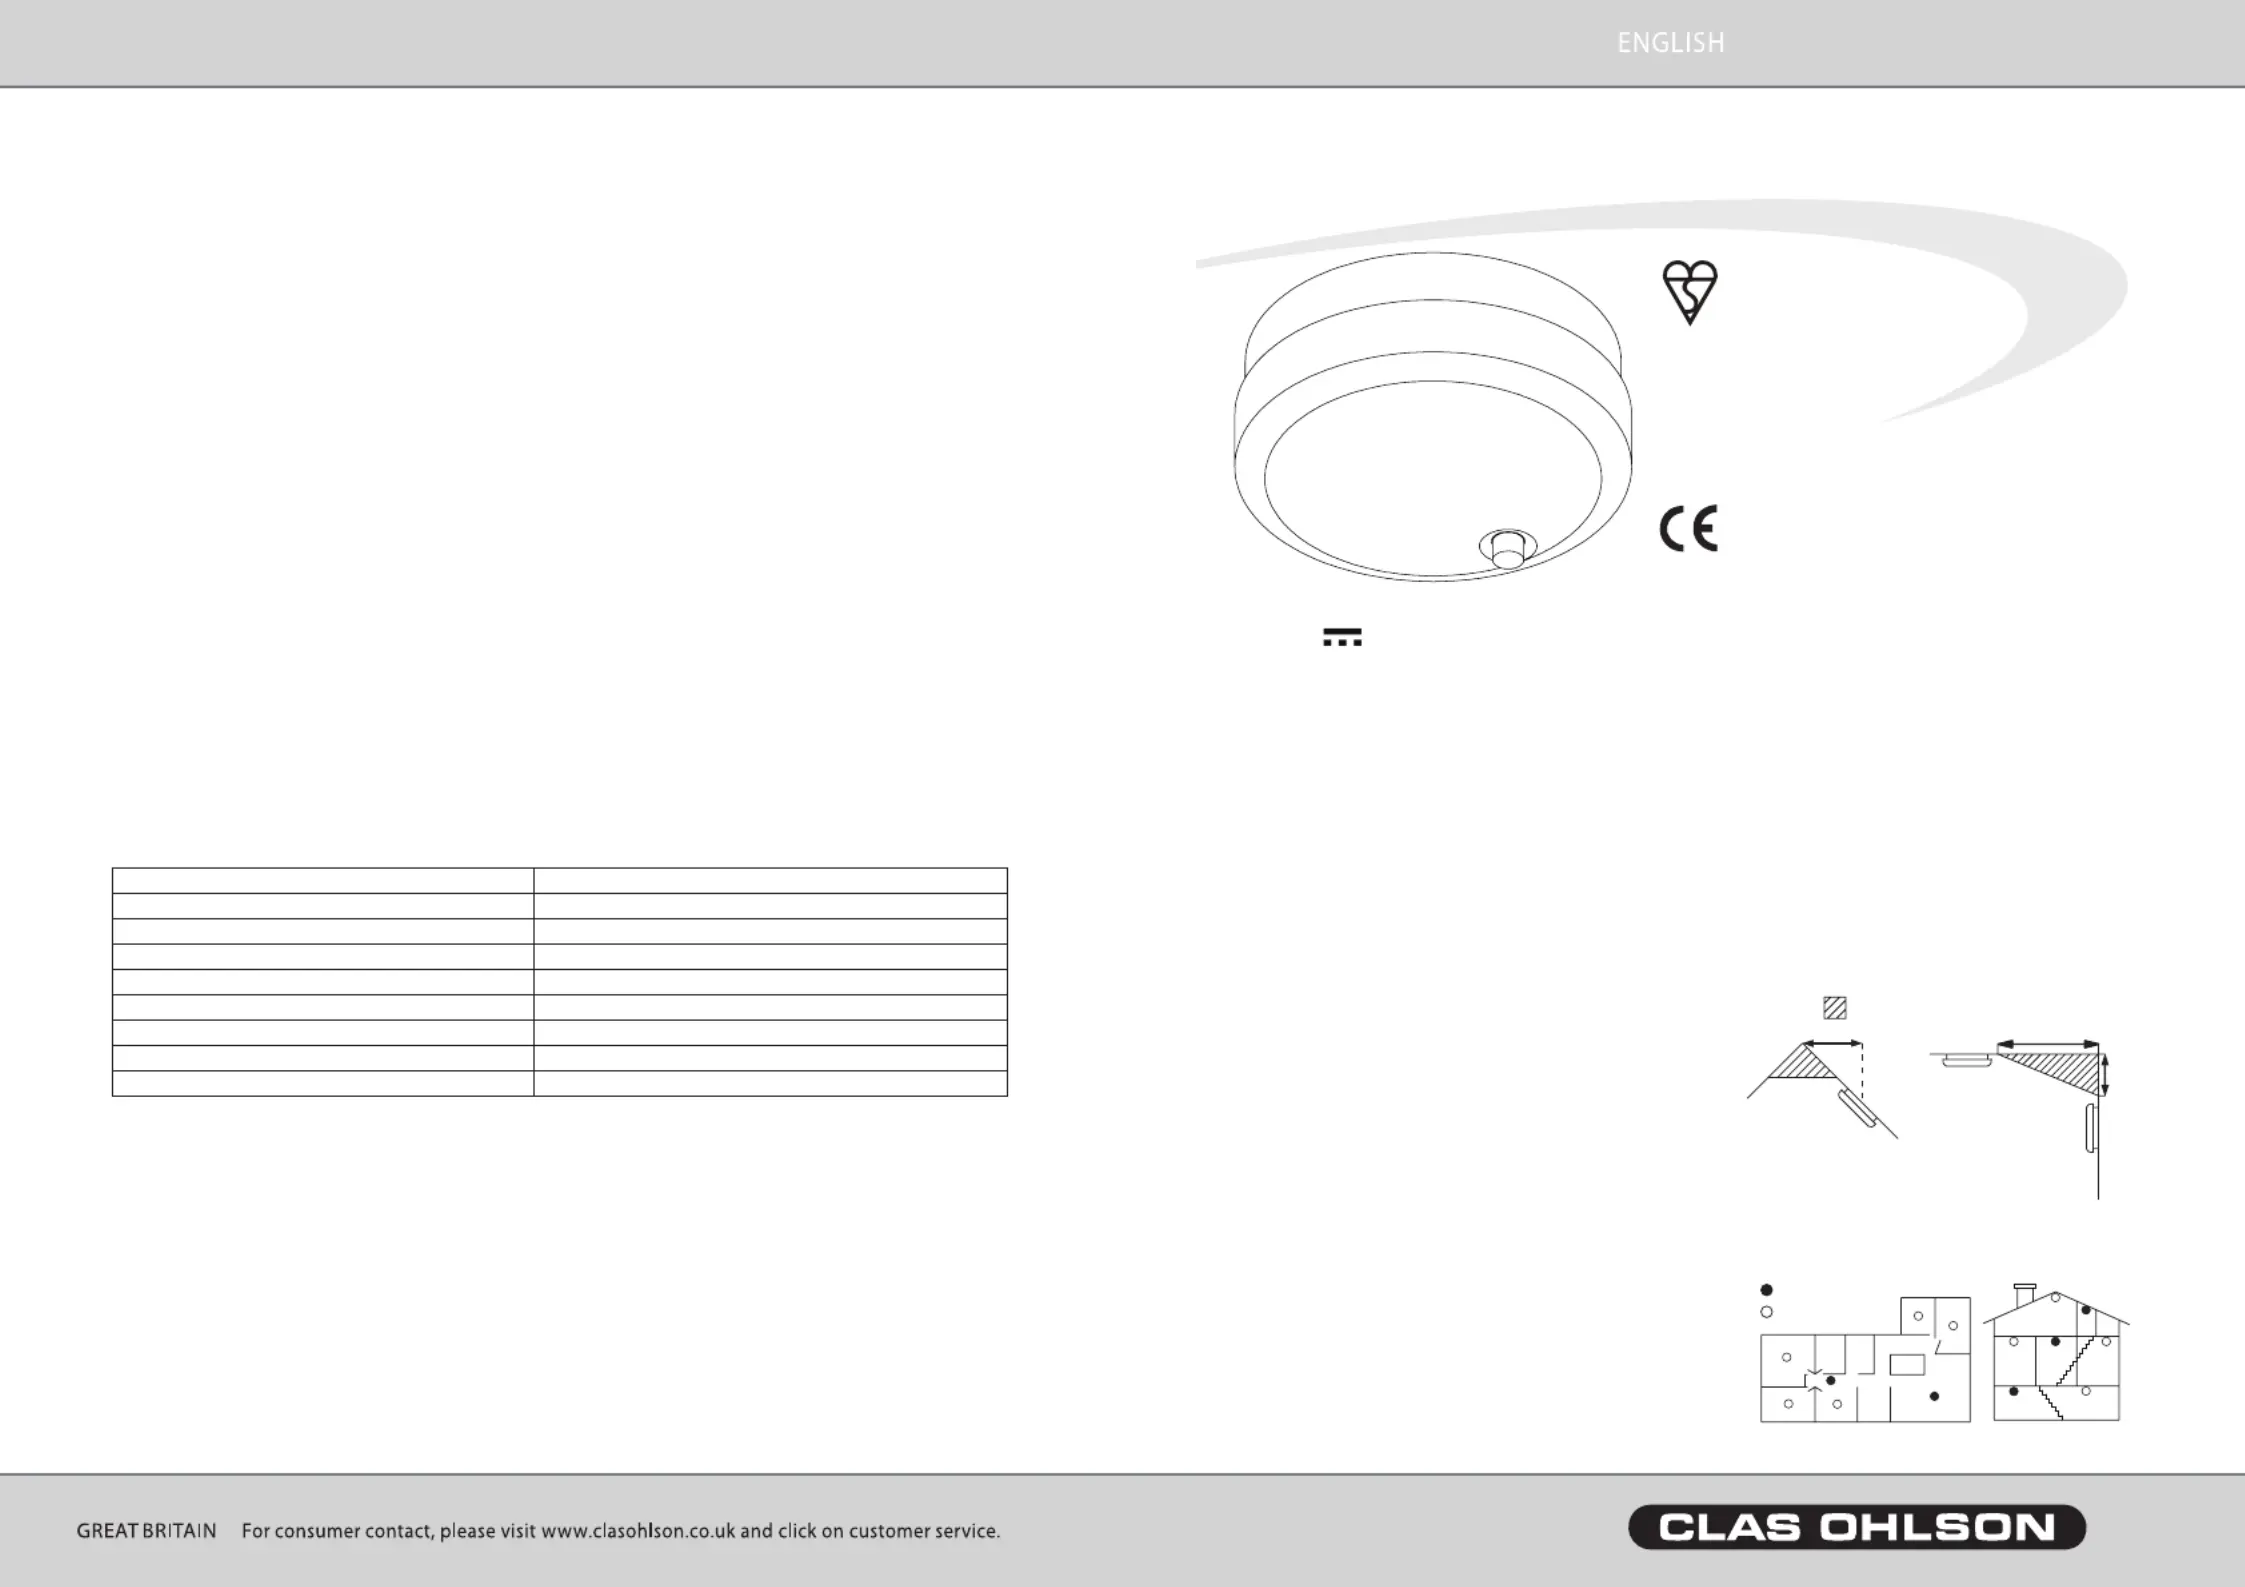
When mounting on ceiling,
at least 50cm from wall
When mounting on wall
(not recommended),
at least 15cm from ceiling
When mounting on peaked
or sloped ceilings, at least
1 m horizontally from the
highest point
Ver. 100122
© Deltronic Security AB 2010
Dead air space
Minimum protection
Additional protection
3V OPTICAL MICRO SMOKE ALARM WITH
SILENCER & BUILT-IN LITHIUM BATTERY
Note! Models MP-8321 & MHP-8231 are interconnectable
Models MHP-8221 & MHP-8231 have a built-in heat sensor detecting temperatures over 57°C
0086-CPD-537081
EN14604:2005
OPTICAL SMOKE ALARM
DELTRONIC MP-8200 SERIES
MANUAL CONTENTS
Introduction1.
Positioning2.
Installation/Mounting3.
Main features4.
Low battery warning & 5.
unit replacement
Testing & Maintenance6.
Alarm signal & LED indication7.
Important re safety information 8.
Technical specication 9.
Service & Warranty10.
BS EN 14604: 2005
KM 500468

Avoid placement near kitchens or garages, where combustion
particles from cooking or exhaust fumes may trigger an alarm.
Also avoid placement in damp or humid areas, such as unnished
attics. Do note place close to ceiling fans or fresh air vents as
draughts can blow smoke away from the alarm.
3. INSTALLATION/MOUNTING
Now t the mounting plate to the ceiling or wall using the screws
provided. Your smoke alarm will activate automatically whilst you
twist your smoke alarm into place.
Red LED is lit under the test button for a brief moment shortly after. If LED signal is obtained,
all functions are accurately tested and your smoke alarm is ready to protect. To remove your
smoke alarm for maintenance or when it is time to replace the unit, remove it from the mount-
ing plate by twisting it slightly counter-clockwise. Your smoke alarm will deactivate automati-
cally when removed for mounting bracket.
Note! Your smoke alarm will not operate without power supply, make sure to mount your
smoke alarm properly on the mounting bracket! Now test operation by pressing the test button
(please refer to the “TESTING & MAINTENANCE” section).
4. TESTING & MAINTENANCE
The LED will ash once every 10 seconds, indicating proper
operation. Every unit can be tested individually by pressing the
test button. The unit will emit a loud alarm, and all functions
are accurately tested.
Test the smoke alarm at least once every month, preferably once
every week, e.g. when you house clean. Always test the smoke
alarm after returning from holidays or after being away for a
longer period of time. The smoke alarm sounds as long as the test
button is pressed down or as long as there is smoke in the chamber.
WARNING: Do not test with ames, this may cause damage to the smoke alarm or result in
injury or death. We do not recommend test with smoke, this could be misleading unless proper
test equipment is used. The test button accurately tests all functions of the smoke alarm.
Vacuum your smoke alarm regularly with the soft brush attachment and wipe the unit with a
slightly damp cloth.
5. MAIN FEATURES
Alarm memory
A unit triggered by smoke has an alarm memory, indicated with a double blink; as well as a
short beep every 10 seconds during 12 hours. This signal can be manually silenced by pressing
the test button.
Silencer / Pause function (sensitivity reduction)
If there is a risk of nuisance alarms (before an alarm has occurred) push the test/silencer button
briey and the sensitivity will be reduced temporarily for 15 minutes (it will automatically
re-set to normal sensitivity after this period). This is indicated with two short fast beeps, and
the LED will blink every 3 seconds. The smoke alarm could also be re-set manually by a short
push of the test/silencer button, and the sensitivity immediately returns to normal (indicated
with 3 short beeps). Silence any nuisance alarms by pushing the test/silencer button after the
alarm has started. Note! If the smoke concentration is very high, the smoke alarm can only be
silenced by deactivating (dismounting) the unit.
Interconnection features (only applies to models MP/MHP-8231)
For larger dwellings several smoke alarms can be interconnected ensuring the earliest warn-
ing of re. When one alarm detects smoke, it will trigger all others to sound, giving your
family more time to escape. Connect provided cable connector to connection pin located in
the back of the smoke alarm and pull cable (e.g. EKU bell wire 2 x 0.7 mm²) between the
smoke alarms that are to be connected. The smoke alarms should be connected in paral-
lel. Follow the colour coding. Connect e.g. black to black and red to red. The smoke alarm
system can not be interconnected to other electrical installations.
6. LOW BATTERY WARNING & UNIT REPLACEMENT
This smoke alarm has a built-in non-replaceable Lithium battery with a life expectancy of over
10 years. Approximately 1 month before the battery is completely discharged, the smoke alarm
will start to emit short signals at about one-half minute intervals. It is then time to replace
the smoke alarm. The alarm works as normal during this time. Waste electrical products should
not be disposed of with household waste. Please recycle where facilities exist.
7. ALARM SIGNAL & LED INDICATION
Signal: Message: Action:
1 long beep every minute Low battery voltage Replace smoke alarm ASAP
1 short beep every 10 seconds Alarm memory, triggered alarm
(12 hours duration)
Reset by pressing test button
2 short beeps (after pressing
the test button)
Silencer activated. Operation OK - reduced sensitivity
3 short beeps (after pressing
the test button)
Silencer deactivated.
(Normal operation)
Operation OK - normal sensitivity
3 short beeps (repeated) Clean unit by vacuuming with the soft Technical problem / operation fault
brush attachment / return unit for servicing
Continuous pulsating signal Smoke detected - Alarm! Please refer to “If a re starts”
8. IMPORTANT FIRE SAFETY INFORMATION
This could be done to avoid re
Always keep matches out of children’s reach. Never leave lighted candles unattended. Never
empty ashtrays into a wastepaper basket or rubbish bag without rst seeing that everything
isproperly extinguished. Pour water into the ashtray before you empty it – or let it stand over-
night.
Before you go to bed, make sure that the re in the replace is properly extinguished
or that the rescreen is in place so that no sparks can y out. Handle and store inammable

Gör upp en utrymningsplan
Välj ut de fönster som lämpar sig bäst för nöd utrymning om den vanliga vägen skulle vara
blockerad av rök eller eld. Ligger fönstren högt över mark, ordna en stege eller lina. Bestäm
en plats utanför huset, där familjen samlas vid larm. Håll helst sovrumsdörren stängd under
natten. En dörr kan hålla branden borta så pass länge att man hinner ta sig ut genom ett fönster.
Öva utrymning med familjen. Lägg upp det hela som en lek för att inte skrämma barnen.
Om det börjar brinna
Väck övriga personer och se till att de kommer ut ur huset. Följ den uppgjorda utrymning-
splanen. Stäng om möjligt dörrar och fönster för att begränsa branden. Larma räddningstjän-
sten (SOS 112) och möt räddningstjänsten utanför huset. Om branden är liten kan du försöka
släcka den själv med en brandsläckare, vattenslang eller om branden är mycket liten med en
lt eller matta. Se till att du har en reträttväg. Kan du inte släcka själv, så ta dig ut ur huset så
snabbt som möjligt. Gå inte tillbaks in i huset när du väl kommit ut.
Speciellt om Brandskydd i lägenhet
Om det börjar brinna i din lägenhet varna alla som nns i lägenheten, och försök att släcka •
branden. Om inte detta går, stäng dörren till utrymmet där det brinner, och utrym lägenheten.
Glöm inte stänga dörren till lägenheten när du lämnar den. Larma räddningstjänsten (SOS
112) och möt räddningstjänsten utanför huset.
Om det brinner på en annan plats i huset, kan det vara bäst att stanna kvar i lägenheten och •
vänta på utrymningshjälp från räddningstjänsten. Gå aldrig ut i ett rökfyllt trapphus. Du är
säkrast i din egen lägenhet, stanna där och stäng dörrar och fönster; och vänta på Räddnings-
tjänsten. Larma räddningstjänsten (SOS 112).
9. TEKNISK SPECIFIKATION
Strömförsörjning: Inbyggt 3V litiumbatteri (livslängd över 10 år)
Strömförbrukning: 3μA
Detektionsmetod (rök): Fotooptiskt reektionssystem
Pausfunktion 15 minuter med manuell eller automatisk återställning
Larmminne 12 timmar med manuell eller automatisk återställning
Temperaturlarm: 57°C (gäller endast modellerna MHP8221/8231)
Antal enheter som kan sammankopplas: Högst 12 enheter (gäller endast modellerna MP/MHP8231)
Maxlängd på slingan (vid sammankoppling): Högst 300m
Ljudstyrka alarmsignal: 85 dB på 3m avstånd
Maximal relativ luftfuktighet: 90%
Temperaturområde: 0°C till 45°C
10. GARANTI
På varnaren lämnas 10 års garanti från leveransdatum. Garantin gäller material- och tillverk-
ningsfel, och garantiansvarigheten är begränsad till utbyte eller reparation av bristfälliga var-
nare. Denna garanti gäller endast under förutsättning att skötselanvisningarna följts. Felaktig
brandvarnare returneras till inköpsstället eller generalagenten med uppgift om typ av fel.
Ver. 1002112© Deltronic Security AB 2010
1. INTRODUKTION
Denna brandvarnare är utrustad med ett inbyggt specialanpassat litiumbatteri. Batteriet är fast
monterat: du slipper brandvarnare som piper för batteribyte, eller risken att någon tar ut bat-
teriet och lämnar brandvarnaren utan strömförsörjning! Detta innebär både lägre kostnader och
högre säkerhet för dig.
2. PLACERING
Brandvarnaren bör helst monteras mitt i taket
utanför sovrummen; i trapphus och liknande i
dess högsta punkt. Om sovrummen ligger i
skilda delar av bostaden, bör man montera era
brandvarnare och i hus med era våningar bör
man p3-ha minst 1 brandvarnare på varje våning.
Fler brandvarnare ger ökad säkerhet. Kontrollera
att brandvarnarna hörs tillräckligt i sovrummet. Avståndet mellan brandvarnare i en bostad bör
normalt inte vara större än 10-12m. Varje brandvarnare får högst skydda 60m
2
.
Undvik placering i kök eller garage, där matlagningsos
och bilavgaser kan utlösa larmet. Montera ej brand-
varnare i fuktiga lokaler, eller i närheten av äktar och
liknande, ej heller i lantbrukets ekonomibyggnader.
Brandvarnaren får ej målas.
Vid montering i tak
minst 50cm från vägg
Vid montering på vägg
(rekommenderas ej)
minst 15cm från tak
Vid montering i snedtak
minst 1m horisontellt
från taknock/takås
Död zon (stillastående luft)
Minimalt skydd
Utökat skydd
3V OPTISK MICROBRANDVARNARE MED INBYGGT LITIUMBATTERI:
OPTISK BRANDVARNARE
DELTRONIC MP8200 SERIEN
INNEHÅLLSFÖRTECKNING
Introduktion1.
Placering2.
Installation/montering3.
Funktioner4.
Batterivarning/brandvarnarbyte5.
Test & skötsel6.
Översikt signalfunktioner7.
Viktigt om brandskydd 8.
Teknisk specikation 9.
Garanti10.
med pausfunktion
med pausfunktion • sammankopplingsbar
med pausfunktion • värmesensor som larmar vid 57°C
med pausfunktion • sammankopplingsbar • värmesensor som larmar vid 57°C
MP8221
MP8231
MHP8221
MHP8231
0086
D CELTRONI
08
008 537086-CPD- 1
EN 14604
BRANDVARNARE
MODELLNR: MP8221, MP8231,
MHP8221, MHP8231
Produktspecifikationer
Varumärke: | Clas Ohlson |
Kategori: | rökdetektor |
Modell: | MP-8221 |
Behöver du hjälp?
Om du behöver hjälp med Clas Ohlson MP-8221 ställ en fråga nedan och andra användare kommer att svara dig
rökdetektor Clas Ohlson Manualer
19 Juli 2025
rökdetektor Manualer
Nyaste rökdetektor Manualer
11 Juli 2025
22 Juni 2025
20 Juni 2025
13 Juni 2025