Clas Ohlson OY380-9 Bruksanvisning
Clas Ohlson powerbank OY380-9
Läs gratis den bruksanvisning för Clas Ohlson OY380-9 (9 sidor) i kategorin powerbank. Guiden har ansetts hjälpsam av 44 personer och har ett genomsnittsbetyg på 4.1 stjärnor baserat på 6 recensioner. Har du en fråga om Clas Ohlson OY380-9 eller vill du ställa frågor till andra användare av produkten? Ställ en fråga
Sida 1/9
English
GREAT BRITAIN •customer service
tel:08545 300 9799 customerservice@clasohlson.co.uk www.clasohlson.com/uke-mail:internet:
1
2
3
4
5
6
7
Ver. 20130326
4000 mAh Solar Charger
Art.no 38-5357 Model OY380-9
Please read theentire instruction manual before using theproduct and
then save it for future reference. We reserve theright for any errors in
text or images and any necessary changes made to technical data.
Ifyou have any questions regarding technical problems please
contact our Customer Services.
Safety
•Never attempt to open or dismantle thesolar charger.
•Never subject thesolar charger to knocks orblows.
•Do not let children play with thesolar charger.
•The solar charger is splashproof but should never be immersed in
water or any other liquid.
•Do not leave thesolar charger in thesun in aconfined space
such as acar, doing so could lead to themaximum operating
temperature (45 ºC) being exceeded.
Buttons and functions
Operating instructions
Charging thesolar charger via thesolarpanel
•Place thesolar charger in thesun.
•The green LED indicator shines strongly or weakly depending on
how efficiently thesolar charger is being charged.
•When thesolar charger is fully charged theLED indicator goesoff.
•In optimum conditions it takes 15 hours to fully charge thesolar charger.
Charging thesolar charger from anexternal power source
•Connect thesolar charger’s built-in USB cable to acomputer,
mains USB charger or 12V car USB charger.
•The green LED indicator comes on to indicate that thesolar charger
is being charged.
•When thesolar charger is fully charged theLED indicator goesoff.
•An external power source takes 5–7 hours to fully charge
thesolar charger.
Charging anexternal device via thesolar charger
Note: Theincluded USB/Micro-USB cable is specially designed for
charging Android phones and is not suitable for data transference.
•Check that thesolar charger is adequately charged by pressing
[
].Thebattery charge status is indicated by theLEDs:
-All lit - fully charged
-Two lit - half capacity
-One lit - solar charger needs charging
•The solar charger, can, if at least at half capacity, fully charge
astandard mobile phone.
•The solar charger needs to be fully charged if you wish to utilize
both USB ports and charge two devices simultaneously.
Note: Whenthesolar charger is in use and its battery charge level is
very low, thesolar charger will automatically shut off in order to protect
its battery from adeep discharge. Whenthesolar charger begins to
recharge, it takes 3 minutes before it can output any charging current.
Apple products and other products with their own charger cables
•Use thedevice’s charger cable by connecting it between thedevice
and thesolar charger.
•Press [to start charging.]
•Disconnect thecharger cable form thesolar charger to finish charging.
•It takes about 90 minutes to fully charge astandard phone.
•The solar charger shuts off automatically as soon thedevice being
charged is disconnected.
Android phones
•Use theincluded USB/Micro-USB cable by connecting it between
theAndroid phone and thesolar charger.
•Press [to start charging.]
•Disconnect thecharger cable form thesolar charger to finish charging.
•It takes about 90 minutes to fully charge astandard phone.
•The solar charger shuts off automatically as soon thedevice being
charged is disconnected.
LED torchlight
Hold in [for about 2 seconds to switch thetorch on andoff.]
Care and maintenance
•Clean theproduct using alightly moistened cloth. Onlyuse mild
cleaning agents, never solvents or corrosive chemicals.
•Keep thesurface of thesolar panel clean for optimum performance.
Troubleshooting guide
The external
device is not
being charged.
•Is thesolar charger’s built-in battery charged?
•Have you pressed [to start thecharging ]
process?
•Is thecable you are using in good condition
and correctly connected to both theexternal
device and thesolar charger?
The solar
charger’s built-
in battery is not
being charged.
The prevailing light conditions are not adequate to
charge thebattery. Waituntil thelight conditions
are better or connect thesolar charger to another
USB charger using thebuilt-in charger cable on
theback of thesolar charger.
Disposal
This product should be disposed of in accordance with local regulations.
Ifyou are unsure how to proceed, contact your local authority.
Specifications
Battery 4000 mAh lithium-polymer
Solar panel 5 V 320 mA max (optimum conditions)
Input voltage 5V DC/800mA
Output voltage 5 V, 2×1A
Operating temperature 0–45 °C
Size 138×84×13mm
Weight 162g
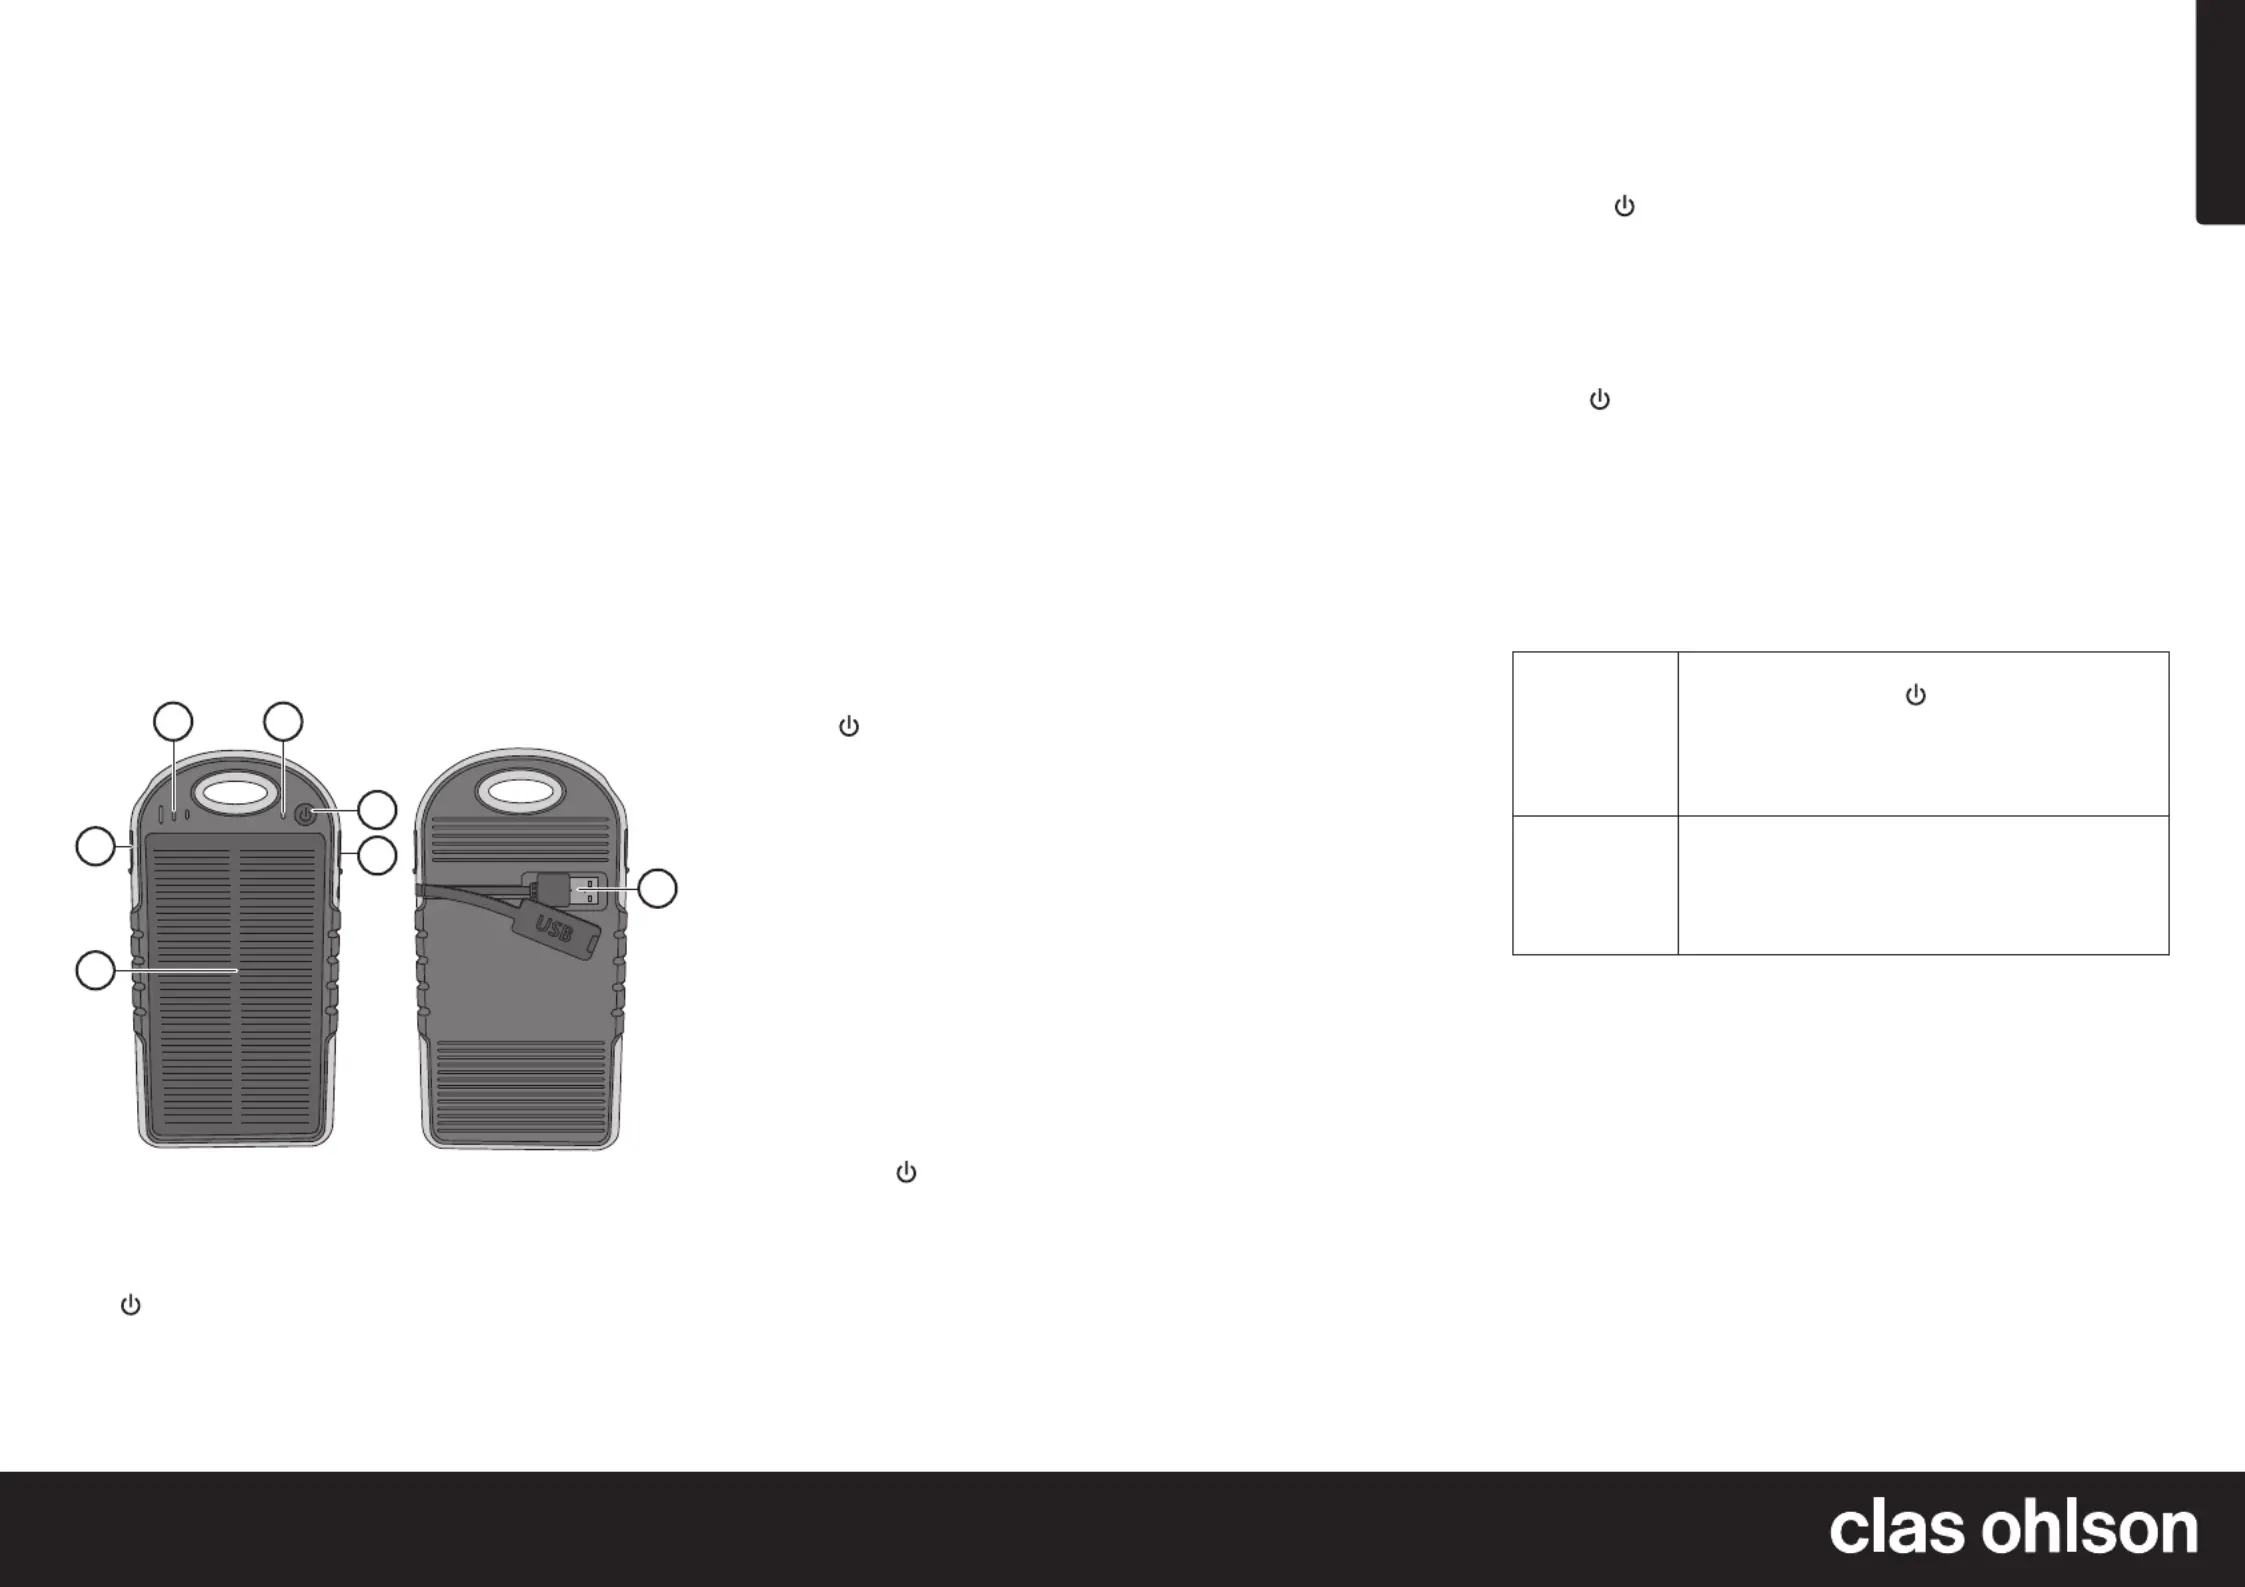
Front
1. Solar panel for charging thesolar charger’s built-in battery
2. USB port for charging electronic devices
3. LED indicator which shows thesolar charger’s battery charge status
4. LED indicator which shows thesolar charger’s efficiency
5. [
]On/off
6. USB port for charging electronic devices
Back
7. USB cable for charging thesolar charger’s built-in battery
Produktspecifikationer
| Varumärke: | Clas Ohlson |
| Kategori: | powerbank |
| Modell: | OY380-9 |
| Färg på produkten: | Zwart |
| Medium effekt subwoofer: | 1200 W |
| Diameter drivrutin subwoofer (imperiaal): | 18 " |
| Subwoofertyp: | Actieve subwoofer |
| Subwooferns frekvensområde: | 20 - 18000 Hz |
| Subwooferkänslighet: | 103 dB |
| AC-ingångsspänning: | 220-240 V |
| AC-ingångsfrekvens: | 50 Hz |
| Diameter drivrutin för subwoofer: | 460 mm |
Behöver du hjälp?
Om du behöver hjälp med Clas Ohlson OY380-9 ställ en fråga nedan och andra användare kommer att svara dig
powerbank Clas Ohlson Manualer

29 September 2024
17 September 2024
15 Augusti 2024
11 Augusti 2024
8 Augusti 2024
4 Augusti 2024
31 Juli 2024
powerbank Manualer
Nyaste powerbank Manualer
2 April 2025
30 Mars 2025
30 Mars 2025
28 Mars 2025
27 Mars 2025
27 Mars 2025
27 Mars 2025
27 Mars 2025
14 Mars 2025
14 Mars 2025