Conair CB06 Bruksanvisning
Conair Inte kategoriserad CB06
Läs gratis den bruksanvisning för Conair CB06 (2 sidor) i kategorin Inte kategoriserad. Guiden har ansetts hjälpsam av 56 personer och har ett genomsnittsbetyg på 4.4 stjärnor baserat på 7 recensioner. Har du en fråga om Conair CB06 eller vill du ställa frågor till andra användare av produkten? Ställ en fråga
Sida 1/2
IMPORTANT SAFETY
INSTRUCTIONS
When using electrical appliances, especially
when children are present, basic safety
precautions should always be taken, including
the following:
READ ALL INSTRUCTIONS
BEFORE USING
KEEP AWAY FROM WATER
DANGER–Any appliance is electrically
live even when the switch is off. To reduce the
risk of death by electric shock:
1. Always unplug appliance immediately
after using.
2. Do not use while bathing or in the shower.
3. Do not place or store appliance where it can
fall or be pulled into a tub or sink.
4. Do not place in or drop into water or
other liquids.
5. If an appliance falls into water, unplug it
immediately. Do not reach into the water.
WARNING– To reduce the risk of
burns, electrocution, fire, or injury to persons:
1. This appliance should never be left
unattended when plugged in.
2. Do not pull, twist, or wrap line cord
around appliance.
3. This appliance should not be used by,
on, or near children or individuals with
certain disabilities.
4. Use this appliance only for its intended
use as described in this manual. Do not
use attachments not recommended by
the manufacturer.
5. Never operate this appliance if it has a
damaged cord or plug, if it is not working
properly, or if it has been dropped, damaged,
or dropped into water. Return the appliance
to an authorized service center for
examination and repair.
6. Keep the cord away from heated surfaces.
7. Never use while sleeping.
8. Never drop or insert any object into any
opening or hose.
9. Do not use outdoors or operate where aerosol
(spray) products are being used or where
oxygen is being administered.
10. Unit is hot when in use. Do not let heated
surfaces touch eyes or bare skin.
11. Do not place the heated unit directly on
any surface while it is hot or plugged in.
Use the stand provided.
12. Never block the air openings of the
appliance or place it on a soft surface, such as
a bed or couch, where the air openings may
be blocked. Keep the air openings free of lint,
hair, and the like.
13. Do not use an extension cord with
this appliance.
14. Do not touch hot surfaces of the appliance.
Use handles or knobs.
15. Do not attempt to touch the housing of your
appliance near the barrel, as it is hot when
in use.
16. This appliance is not a toy. Keep away
from children.
17. Do not use with a voltage converter.
SAVE THESE
INSTRUCTIONS
OPERATING
INSTRUCTIONS
This appliance is intended for household use.
Use on Alternating Current (60 hertz) only. This
unit is designed to be operated at 120V AC.
This appliance has a polarized plug (one blade is
wider than the other). As a safety feature, this
plug will fit in a polarized outlet only one way. If
the plug does not fit fully in the outlet, reverse
the plug. If it still does not fit, contact a qualified
electrician. Do not attempt to defeat this
safety feature.
NOTE: Do not use this styling appliance on
hair extensions.
IMPORTANT OPERATING INSTRUCTIONS:
Before plugging in your curling iron, be sure
to attached and lock a barrel into place. An
error message will appear on the display
screen if the handle is plugged in without
an attachment.
CERAMIC TECHNOLOGY provides even heat
to eliminate damaging hot spots for healthy-
looking, shiny hair.
SEAMLESS INTERCHANGEABILITY with
power handle that's compatible with all Style
Chemistry by Conair
®
attachments. Includes
locking mechanism for safe styling.
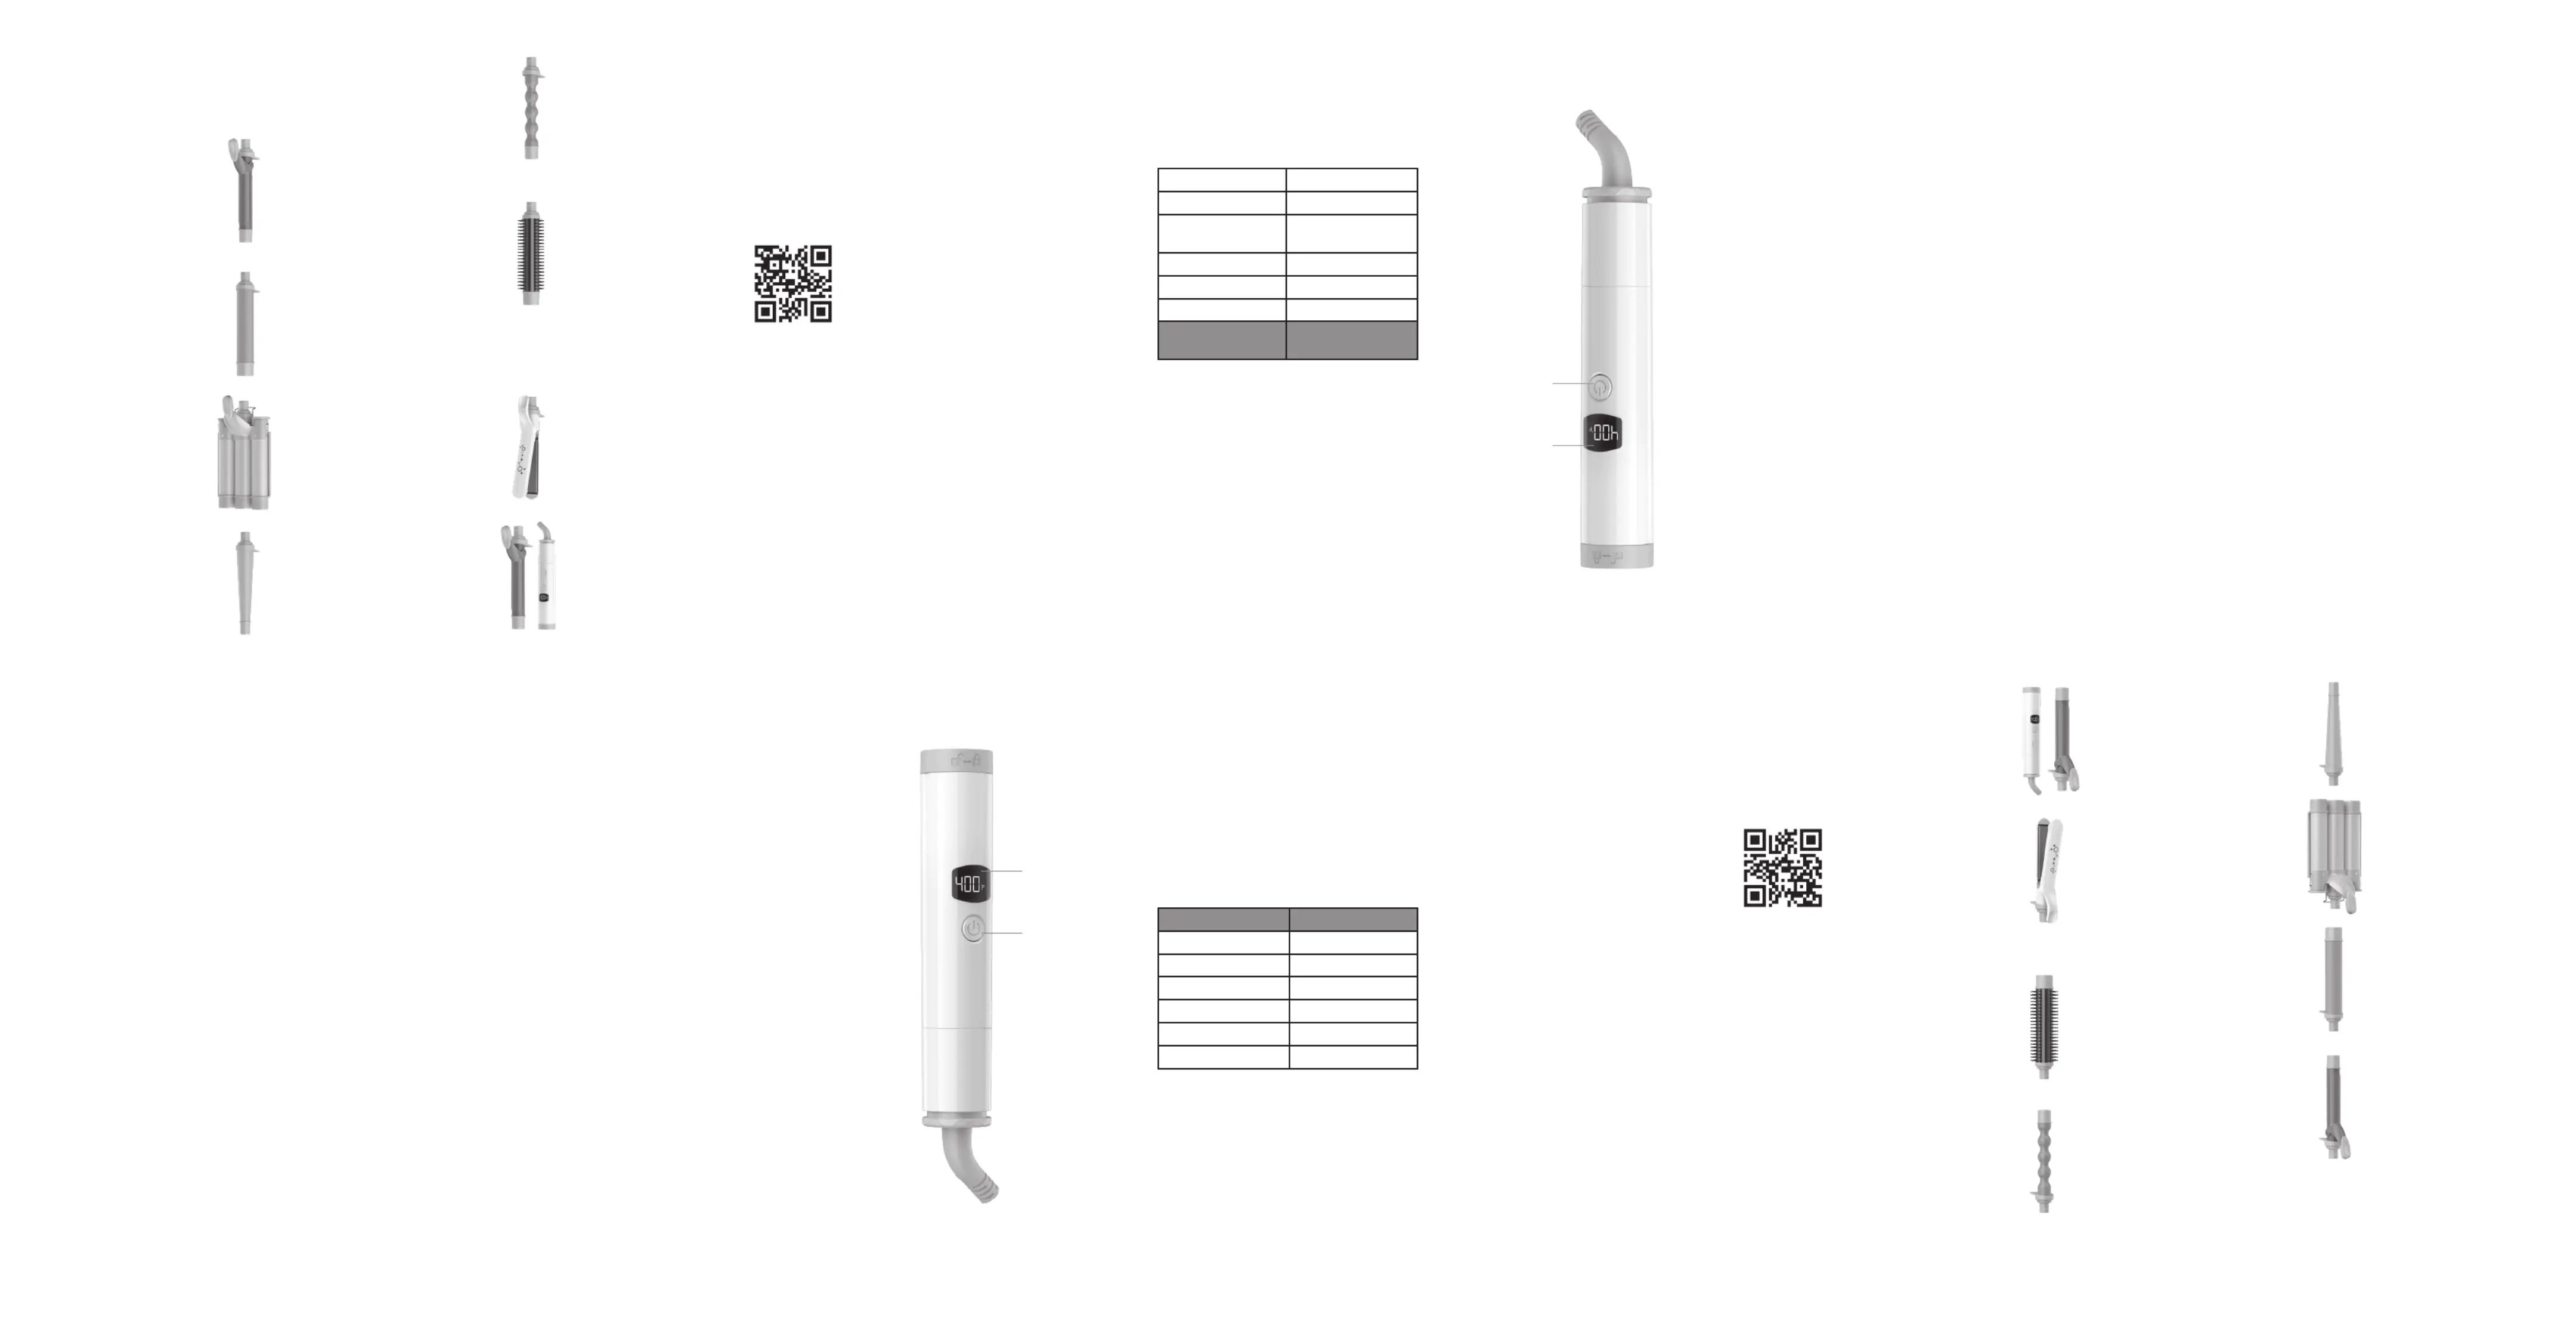
HEAT FOR EVERY HAIR TYPE
6 temperature settings and Instant Heat
Technology provide styling versatility for all
hair types. Use a lower temperature for fine
hair and a higher temperature for thick, wavy,
or textured hair.
Temperature ControlHair Type
230°FFragile Hair
265°FFine Hair
300°FAverage/Medium Hair
335°FWavy/Curly Hair
375°FThick Hair
400°FTextured Hair
IMPORTANT! The unit will become very hot
when plugged in and switched on. Before
removing or attaching an attachment, make
sure the appliance has been turned off,
unplugged, and cooled.
HOW TO CHANGE ATTACHMENTS
1. Make sure appliance is cool.
2. Turn locking dial to the right to unlock
attachment on handle.
3. Pull attachment straight off the handle.
STYLING TIPS
Hair should be clean and completely dry before
using the styler. For best results, use a light
styling product before blow-drying hair.
For additional beauty tips,
scan QR code below:
Starter Pack
Model CB01
Includes power handle (CB13)
and 1 in. curling iron (CB11).
1 in. Flat Iron
Model CB02
Pro Tip: Use a comb as a guide to
separate hair strands for better,
even heat contact.
The comb also adds gentle tension
to the hair for expert straightening.
Round Brush
Model CB03
Pro Tip: Add lift and volume by
holding brush at roots for a few
seconds before gliding down.
1 in. Bubble Wand
Model CB05
Pro Tip: For bouncy curls, wrap hair
around the bubbles. For tight curls,
wrap hair between the bubbles.
Never leave your styler on and unattended.
However, should you fail to turn the iron off,
it will shut itself off automatically within
60 minutes.
GET TO KNOW YOUR
POWER HANDLE
Power ON/OFF/
Temperature
Select Button
LED
Temperature
Display
Auto Off
Single Voltage
Model CB13
Compatible with all
Style Chemistry by
Conair
®
attachments
4. Push new attachment into power handle.
Counter rest should be flush against locking
dial and face downward.
5. Turn locking dial to the left to secure
attachment in place.
GETTING STARTED
Select and lock your desired attachment in
place. Plug the styler cord into any household
outlet (120V). "OFF" will be illuminated on the
LED display. Press and hold ON/OFF button for
1–2 seconds to turn on the unit. Press the ON/
OFF button repeatedly to select your desired
temperature. Once the temperature has stopped
blinking on the LED screen, the unit is ready to
use. Press and hold ON/OFF button for 1–2
seconds again to power off the unit.
IMPORTANT! Immediately after turning the
appliance on, you are able to adjust the
temperature. After 5 seconds, the ON/OFF button
will automatically lock. To adjust the
temperature setting, quickly press ON/OFF
button twice to unlock the ON/OFF button. This
will deactivate the lock mode and allow the
setting to be changed. To turn off the appliance
while in lock mode, hold down the ON/OFF
button until the appliance switches off.
WARNING: The iron’s attachment will get
very hot within a few seconds and should
not come into contact with the skin after
the iron has been turned on.
NOTE: Never leave your iron on and
unattended. However, should you fail
to turn the iron off, it will shut itself off
automatically within 60 minutes.
Always wait for the appliance to cool
down before switching attachments.
1¼ – ¾ in. Curling Wand
Model CB06
Pro Tip: Wrap hair in alternate
directions for modern waves.
1¼ in. Waver
Model CB08
Pro Tip: For gentle, soft waves,
use larger pieces of hair each
time you curl.
1¼ in. Curling Wand
Model CB09
Pro Tip: Wrap hair farther apart
for loose waves and closer
together for defined waves.
1 in. Curling Iron
Model CB11
Pro Tip: Leave the last inch of hair
out when curling for a more natural,
beachy look.
MEDIDAS DE
SEGURIDAD
IMPORTANTES
Al usar aparatos eléctricos, especialmente en
presencia de niños, siempre se deben tomar
precauciones básicas de seguridad, entre ellas
las siguientes:
LEA TODAS LAS
INSTRUCCIONES
ANTES DEL USO
MANTÉNGALO
ALEJADO DEL AGUA
PELIGRO–Cualquier aparato enchufado
permanece en tensión, aunque esté apagado.
Para reducir el riesgo de electrocución:
1. Siempre desenchufe el aparato
inmediatamente después del uso.
2. No lo use en el baño o la ducha.
3. No coloque ni guarde el aparato donde pueda
caerse o ser empujado a una bañera o un lavabo.
4. No coloque el aparato ni lo deje caer al agua u
otros líquidos.
5. Si el aparato se cae al agua, desenchúfelo
inmediatamente; no intente alcanzarlo en
el agua.
ADVERTENCIA– Para reducir el
riesgo de quemaduras, electrocución, incendio o
lesiones personales:
1. Nunca descuide/deje el aparato sin
vigilancia mientras está enchufado.
2. No jale, retuerza ni enrolle el cable
alrededor del aparato.
3. Este aparato no debe ser usado por,
en o cerca de niños o personas con ciertas
discapacidades.
4. Use este aparato solo para el uso previsto y
como se describe en este manual. Solo use
accesorios recomendados por el fabricante.
5. No use este aparato si el cable o el enchufe
están dañados, si no funciona
correctamente, si está dañado, o después de
una caída/caída en agua; devuélvalo a un
centro de servicio autorizado para su
revisión y reparación.
6. Mantenga el cable lejos de las superficies
calientes.
7. Nunca lo use mientras duerme.
8. Nunca deje caer ni inserte ningún objeto en
ninguna de las aberturas.
9. No use este producto en exteriores, ni lo haga
funcionar donde se estén usando productos en
aerosol (spray) o donde se esté administrando
oxígeno.
10. Este aparato se pone muy caliente durante el
uso; mantenga los ojos y la piel alejados de las
superficies calientes.
11. No coloque el aparato en ninguna
superficie mientras esté caliente o
enchufado; use el soporte integrado.
12. Nunca obstruya los orificios de ventilación, ni
coloque el aparato sobre una superficie blanda,
tal como una cama o un sofá, donde se puedan
obstruir. Mantenga los orificios de ventilación
libres de pelusas, cabellos y elementos similares.
13. No use un cable alargador/de extensión con
este aparato.
14. No toque las superficies calientes; use los
mangos/asas/agarraderas y los botones/
perillas/diales.
15. La carcasa del aparato cerca del tubo se
pone muy caliente durante el uso; no la toque.
16. Este aparato no es un juguete; manténgalo
fuera del alcance de los niños.
17. No use este aparato con un convertidor
de voltaje.
GUARDE ESTAS
INSTRUCCIONES
INSTRUCCIONES
DE USO
Para uso doméstico solamente. Úselo solamente
con corriente alterna (60Hz). Este aparato ha
sido diseñado para funcionar con corriente de
120V AC.
El cable de este aparato cuenta con un enchufe
polarizado (una pata es más ancha que la otra).
Como medida de seguridad, se podrá enchufar
de una sola manera en las tomas de corriente
polarizadas. Si no entra en la toma de corriente,
inviértalo. Si aun así no entra completamente,
comuníquese con un electricista. No intente
modificar esta función de seguridad.
NOTA: No use este aparato en cabello
sintético/extensiones.
IMPORTANTE: Antes de enchufar el aparato,
cerciórese de instalar y bloquear el accesorio
deseado. Un mensaje de error aparecerá en
la pantalla si el accesorio no está instalado.
TECNOLOGÍA CERÁMICA – Proporciona calor
uniforme para eliminar los puntos calientes
dañinos y dejar el cabello brillante y con un
aspecto saludable.
ACCESORIOS INTERCAMBIABLES – Mango
compatible con todos los accesorios Style
Chemistry by Conair
®
. Sistema de bloqueo para
un uso seguro.
TEMPERATURAS PARA TODO
TIPO DE CABELLO
6 opciones de temperatura y la tecnología del
calentamiento instantáneo proporcionan una
mayor versatilidad para todo tipo de cabello. Si
su cabello es fino/delgado, use una temperatura
más baja. Si es grueso/espeso ondulado o con
textura, use una temperatura más alta
Ajuste de
temperatura
Tipo de cabello
230°FCabello frágil
265°FCabello fino/delgado
300°FCabello normal/medio
335°F
Cabello ondulado/
rizado
375°FCabello espeso/grueso
400°FCabello con textura
¡IMPORTANTE! El aparato se pone muy caliente
durante el uso. Antes de quitar/instalar un
accesorio, desenchufe el aparato y deje que se
enfríe.
ADVERTENCIA: Los accesorios se ponen muy
calientes en segundos; evite el contacto con
la piel después de encender el aparato.
NOTA: Nunca descuide/deje el aparato
sin vigilancia después de encenderlo.
Para su seguridad, el aparato se apagará
automáticamente después de 60 minutos.
Siempre deje que el aparato se enfríe antes
de cambiar los accesorios.
CONSEJOS DE PEINADO
El cabello debe estar limpio y completamente
seco. Para obtener resultados óptimos, aplique
una loción fijadora ligera en el cabello antes
de secarlo.
Para obtener consejos adicionales,
escanee este código QR:
Set básico
Modelo CB01
Incluye un mango (CB13)
y una tenaza de
1in (25mm) (CB11).
Plancha alisadora
de 1 in (25 mm)
Modelo CB02
Consejo de pro: Use un peine como
guía para separar las secciones de
cabello y lograr un mejor y uniforme
contacto con el calor.
El peine también estira suavemente
el cabello para un alisado experto.
Cepillo redondo
Modelo CB03
Consejo de pro: Levante las raíces
y añada volumen dejando el cepillo
en la raíz por unos segundos antes
de deslizarlo hasta las puntas.
Rizador de burbujas
de 1in (25mm)
Modelo CB05
Consejo de pro: Para conseguir
rizos elásticos, enrolle el cabello
alrededor de las burbujas. Para
conseguir rizos apretados, enrolle
el cabello entre las burbujas.
CÓMO CAMBIAR
LOS ACCESORIOS
1. Compruebe que el aparato esté frío.
2. Gire el botón de bloqueo/liberación hacia
la derecha para liberar el accesorio.
3. Jale el accesorio para quitarlo.
4. Instale el nuevo accesorio sobre el mango,
presionando suavemente. El soporte debe
encontrarse directamente contra el botón de
liberación y apuntar hacia abajo.
5. Gire el botón de bloqueo/liberación hacia la
izquierda para sujetar el accesorio.
FUNCIONAMIENTO BÁSICO
Elija e instale el accesorio deseado. Enchufe el
aparato en una toma de corriente de 120 V;
“OFF” aparecerá en la pantalla. Mantenga
presionado el botón de encendido/apagado por
1-2 segundos para encender el aparato Presione
repetidamente el botón ON/OFF para elegir la
temperatura deseada. Cuando el indicador
luminoso de la temperatura elegida deje de
parpadear, el aparato está listo para su uso.
Mantenga presionado el botón de encendido/
apagado por 1-2 segundos para apagar el
aparato.
¡IMPORTANTE! Se puede ajustar la temperatura
solamente inmediatamente después de
encender el aparato. Después de 5 segundos,
el botón de encendido/apagado se bloqueará
automáticamente. Para ajustar la temperatura,
presione rápidamente el botón de encendido/
apagado dos veces; esto desactivará el modo de
bloqueo y permitirá ajustar la temperatura. Para
apagar el aparato mientras está en el modo de
bloqueo, mantenga presionado el botón de
encendido/apagado por 1-2 segundos.
Nunca descuide/deje el aparato sin vigilancia
después de encenderlo. Para su seguridad,
el aparato se apagará automáticamente
después de 60 minutos.
FAMILIARÍCESE
CON SU ESTILIZADOR
Botón de encendido/
apagado y selección de
la temperatura
Pantalla de
temperatura
LED
Apagado automático
Voltaje único
Modelo CB13
Compatible con
todos los accesorios
Style Chemistry
by Conair
®
Rizador de 1¼-¾in(32-19mm)
Modelo CB06
Consejo de pro: Enrolle el cabello
en direcciones alternas para
conseguir ondas modernas.
Ondulador de 1¼in(32mm)
Modelo CB08
Consejo de pro: Para crear ondas
suaves, rice secciones de cabello
más anchas.
Rizador de 1¼ in (32 mm)
Modelo CB09
Consejo de pro: Enrolle el
cabello aparte para conseguir
ondas sueltas o más cerca para
conseguir ondas definidas.
Tenaza de 1 in (25 mm)
Modelo CB11
Consejo de pro: Para crear ondas
playeras de aspecto natural, deje
1in(2.5cm) de las puntas sin rizar.
Produktspecifikationer
| Varumärke: | Conair |
| Kategori: | Inte kategoriserad |
| Modell: | CB06 |
Behöver du hjälp?
Om du behöver hjälp med Conair CB06 ställ en fråga nedan och andra användare kommer att svara dig
Inte kategoriserad Conair Manualer

28 December 2024
27 December 2024
27 December 2024
27 December 2024
27 December 2024
27 December 2024
27 December 2024
26 December 2024
26 December 2024
10 December 2024
Inte kategoriserad Manualer
Nyaste Inte kategoriserad Manualer
9 April 2025
9 April 2025
9 April 2025
9 April 2025
9 April 2025
9 April 2025
9 April 2025
9 April 2025
9 April 2025
9 April 2025