Conair HC1100N Bruksanvisning
Conair Inte kategoriserad HC1100N
Läs gratis den bruksanvisning för Conair HC1100N (2 sidor) i kategorin Inte kategoriserad. Guiden har ansetts hjälpsam av 16 personer och har ett genomsnittsbetyg på 4.5 stjärnor baserat på 8 recensioner. Har du en fråga om Conair HC1100N eller vill du ställa frågor till andra användare av produkten? Ställ en fråga
Sida 1/2
Attach comb
guide
Remove comb guide
Fig. 1
Fig. 2
Oil both
areas
Oil both
areas
hc1100_12pg129346_ib_final.indd 111/7/12 2:37 PM
Model HC1100
LITHIUM ION
CORD/CORDLESS CLIPPER
Instruction Booklet
For your safety and continued enjoyment
of
this product, always read the instruction
booklet carefully before using.
Full Power
Cord-Free
Cutting
IMPORTANT SAFETY
INSTRUCTIONS
When using electrical appliances, especially
when children are present, take basic safety
precautions, including the following:
READ ALL INSTRUCTIONS
BEFORE USING
KEEP AWAY FROM WATER
FOR HOUSEHOLD USE ONLY
DANGER – any appliance is electrically
live, even when the switch is off.
To reduce the risk of death or injury by electric
shock:
1. Unplug this appliance before cleaning.
2. Do not place or store appliance where it can
fall or be pulled into a tub or sink.
3. Do not use while bathing or in a shower.
4. Do not place in, or drop into water or other
liquids.
5. Do not reach for an appliance that has fallen
into water. Unplug immediately. Dry location
use only or expose to liquid, vapor or rain.
6. Except when charging, always unplug this
appliance from electrical outlet immediately
after using.
7. Never operate the adapter if the specifica-
tion is out of the rating.
DO NOT REACH
INTO THE WATER
WARNING – To reduce the risk of
burns, electric shock, fire, or injury to persons:
1. This appliance should never be left
unattended when plugged in. Do not pull,
twist, or wrap line cord around appliance.
2. This appliance should not be used by, on
or near children or individuals with certain
disabilities.
3. Use this appliance only for its intended
purpose as described in this manual. Do not
use attachments not recommended by the
manufacturer. Do not use an extension cord to
operate this appliance.
4. Never operate this appliance if it has a
damaged cord or plug, if it is not working
properly or if it has been dropped or
damaged, or dropped into water. Return the
appliance to a service center for examination
and repair.
5. Keep the cord away from heated surfaces.
6. Never drop or insert any object into any
opening on this appliance.
7. Do not place appliance on any surface while
it is operating.
8. Do not use this appliance with a damaged
or broken comb or with teeth missing from the
blades as injury may occur. Before use, make
certain blades are aligned properly. (See taking
care of your trimmer).
9. Do not use outdoors or operate where
aerosol (spray) products are being used or
where oxygen is being administered.
10. Never operate the appliance with the
air openings blocked or while on a soft
surface, such as a bed or couch, where the
air openings may be blocked. Keep the air
openings free of lint, hair, and other debris.
11. Always attach plug to appliance first, then
to outlet. To disconnect, turn all controls to
“OFF”, then remove plug from outlet.
12. Avoid skin contact with moving blade.
13. When using the appliance with its cord,
be mindful of tangles or kinks in the cord. If
the cord does become tangled during use,
turn the unit off and straighten cord before
operating again.
14. Do not short the polarity (output cord),
ensure jack is plugged into the unit before
plugging the adapter into outlet.
15. This power unit is intended to be correctly
oriented in vertical floor mount position.
16. For connection to a supply not in the
U.S.A., use an attachment plug adapter of the
proper configuration for the power outlet.
17. The adapter complies with Part 15 of
the FCC Rules. Operation is subject to the
following two conditions: (1) the adapter
may not cause harmful interference, and (2)
the adapter must accept any interference
received, including interference that may
cause undesired operation.
WARNING: Changes or modifications to this
unit not expressly approved by the party
responsible for compliance could void the
user’s authority to operate the equipment.
SAVE THESE
INSTRUCTIONS
OPERATING
INSTRUCTIONS
USER MANUAL
Also included are 10 attachment combs for
different hair lengths (including left and right
ear taper combs), barber scissors, a barber
comb with straight teeth, styling comb with
angled teeth, a full-length barber cape, and a
deluxe case for easy storage. It also comes
with lubricating oil, a cleaning brush and a
blade guard for easy maintenance and
protection of the clipper blades.
The Conair Clipper is a professional grade hair
clipper with Lithium Ion technology to give
sustained power performance for cord or cord-
less use. The precision-engineered hardened
steel blades have a unique super sharp cutting
angle for smooth, effortless cutting on any hair
length or type.
FEATURES
• Cord or Cordless operational clipper - use
corded for continuous power while plugged
into the outlet or use cordless for total flexibility
and control.
• Lithium-ion technology with lightweight DC
motor for powerful cutting action and sustained
power performance.
• Precision-engineered high grade hardened
steel blades with unique super sharp cutting
angle for smooth, effortless cutting.
• Lightweight for easy handling during use.
• Taper control for custom settings.
• 3 hour full charge for approximately 75
minutes of use.
• 15 minute quick charge for approximately
15 minutes of use.
INSTRUCTIONS
FOR USE
CHARGING THE APPLIANCE
IMPORTANT
Only use the adapter supplied with this
appliance. This clipper is so easy to use, but
before you do anything you must take your
time to charge the unit for 3 hours before its
fi rst use. Even if you want to use it plugged in
straight from an outlet, this initial supercharge
ensures optimum power performance to give
smooth fast cutting every time. Maximum
battery capacity will only be reached after
3 charging/discharging cycles.A full
charge will provide approximately 75 minutes
use. When the clipper is about to run out of
power, the charging indicator will fl ash and
you will have approximately 3 minutes of use
remaining. A 15 minute quick charge will
provide approximately 15 minutes use.
When charging the appliance the blue LED
charging light will fl ash slowly and continu-
ously until the battery has fully charged, then
the blue LED charging light will stop fl ashing
but remain on.
WARNING:If the charging light suddenly starts
to flash rapidly then the appliance is faulty. If this
happens then please stop charging and remove
the adapter from the outlet and contact our
Customer Care Center for further advise (see the
“warranty” section of the information booklet).
CORDED OPERATION
• Ensure the appliance is switched off.
• Connect the adaptor to the base of the
appliance and plug the adapter into a suitable
outlet.
• The blue LED charging light will fl ash when
the adapter is correctly inserted into the
appliance and connected to an outlet.
• The appliance is now ready for use.
NOTE:The appliance should not be used for
longer than 20 minutes when operated with
the cord.
CORDLESS OPERATION
• Insert the adapter into the base of the
appliance, plug into a suitable outlet and
switch on. The blue LED charging light will go
on when the adapter is correctly inserted into
the appliance and connected to an outlet.
• Once the appliance is fully charged the blue
LED charging light will stop fl ashing but remain
on, unplug the adapter from the outlet.
OILING INSTRUCTIONS
IMPORTANT! It is highly recommended before
each use to oil the blades with the oil provided.
This ensures optimum cutting performance.
For the fi rst use you will need to use the oil
supplied with the product, unscrew the cap
and cut off the very end of the plastic tube with
a pair of scissors to release the oil.
To oil the blades ensure the unit is switched
on. Gently squeeze the oil tube and apply 2
drops of oil onto the blades. Leave the unit on
for a few seconds to allow the oil to thoroughly
spread the length of the blades. Switch off the
unit and remove any excess oil by gently
dabbing with a cloth.
Be careful not to use too much oil and don’t oil
y
our clipper more than necessary, as this could
damage the motor. (Never attempt to oil the
motor bearing, as it is permanently lubricated).
KEEP OIL OUT OF REACH OF CHILDREN
PRESERVING THE BATTERIES
In order to maintain the optimum capacity of the
r
echargeable batteries, the appliance has to be
fully discharged every 6 months approximately.
Then recharge the appliance to full capacity,
again for 3 hours.
COMB GUIDES
Th
is appliance is supplied with 8 comb guides
a
nd a left and right ear taper guide:
CUTTING LENGTHGRADE
3mm#1
6mm#2
9.5mm#3
13mm#4
16mm#5
19mm#6
22mm#7
25mm#8
• To attach a comb guide, ensure the
appliance is switched off. Position the comb
guide over the front of the clipper blade and
slide over the head. Push and click the rear of
the comb guide into position (see Fig.1).
• To remove the comb guide, ensure the
appliance is switched off. Push the tab on the
rear of the comb guide away from the head
and lift off (see Fig.2).
The appliance is also supplied with 2 taper
guides. The taper guides can be used above
the ear to get a clean line.
• Attach either the left or right guide
depending on which ear you are cutting
above.
• Angle the clipper and gently stroke around
the ear towards the back of the neck.
TAPER CONTROL
•
The taper control provides a variety of total
settings for custom cuts.
• To increase the cutting length, push the
lever down.
• To reduce the cutting length, push the
lever up.
PREPARATION FOR USE
• Always inspect the appliance before use to
ensure the clipper blades are free from hair,
debris etc.
• For best performance, use on clean, dry hair
that has been combed until tangle-free.
• Ensure the appliance is suffi ciently charged
or plugged into an outlet.
NOTE: The appliance should not be used for
longer than 20 minutes when operated from
an outlet.
CLIPPING
FOR AN ALL OVER EVEN CUT:
•
Attach a comb guide as required – your
clipper is supplied with 8 comb guides
(grades 1-8). Each comb guide is labelled.
• Switch the clipper on and the blades will
start to move.
• Starting at the nape of the neck, hold the
clipper with the teeth of the clipper pointing
upwards, ensuring that the comb guide is
resting fl at against the head.
• Slowly move the clipper upwards and
outwards through the hair towards your
crown, against the direction of the hair
growth. The comb guide will help to lift the
hair and the blades will cut the hair at the
desired length.
• Once the desired length is achieved at the
back of the hair, start clipping the top and
sides.
• Hold the clipper to the front of your hair
with the teeth pointing towards the back of
your head, and move the clipper towards your
crown. Repeat as necessary, moving in rows
from the front and the sides of your head to
the back.
• You should achieve an even length cut all
over your head.
FOR A SHORTER BACK AND SIDES, WITH
LENGTH ON THE TOP
• Attach the longer comb guide as required
for the top of your hair – your clipper is
supplied with 8 comb guides (grades 1-8).
Each comb guide is labelled.
• Switch the clipper on and the blades will
start to move.
• Hold the clipper to the front of your hair
with the teeth pointing towards the back of
your head and move the clipper towards your
crown. Repeat as necessary, moving in rows
from the front and the sides of your head to
the back.
• If you then wish to take the back and sides
of your hair to a shorter length, switch off the
appliance and attach a shorter comb guide.
• Starting at the nape of the neck, with the
comb guide fl at against the head, move the
clipper upwards and outwards over the area
you want to take shorter.
• Repeat on the sides of the hair, starting with
the teeth of the clipper pointing upwards and
comb guide fl at against the area above the
ear, again moving the clipper upwards and
outwards.
OUTLINING
•
To tidy up the edges around your cut e.g.
neckline and sideburns, detach the comb
guides.
• Hold the appliance upside down, so the
front of the clipper is facing towards your
head.
• Hold the clipper straight on your sideburns
or neckline and move the clipper downwards.
This will give you a clean, smooth fi nish.
CLEANING & MAINTENANCE
• Regular cleaning will maintain the high
performance of your appliance.
• Switch off and remove the power cord if
connected.
• Use the cleaning brush supplied to brush
away any hair and debris. Do not use a sharp
object to clean the trimmer blade.
• Gently blow away any hair trapped beneath
the blades.
• Ensure you clean the blades after each use
and before storing away.
• It is highly recommended to oil the blades
from time to time with the oil provided. This
ensures optimum cutting performance. For
the fi rst use you will need to use the oil
supplied with the product, unscrew the cap
and cut off the very end of the plastic tube
with a pair of scissors to release the oil.
• To oil the blades ensure the unit is switched
on. Gently squeeze the oil tube and apply 2
drops of oil onto the blades. Leave the unit on
for a further few seconds to allow the oil to
thoroughly spread the length of the blades.
• Switch off the unit and remove any excess
oil by gently dabbing with a cloth.
BATTERY DISPOSAL
This appliance contains Lithium Ion batteries.
To protect the environment this appliance and
its batteries must be disposed of safely. At the
end of its life, please take this appliance to a
recycling center, where the internal recharge-
able battery should be removed by a
professional and recycled separately. For
more information about the recycling of
electrical and battery operated appliances
please contact your local council offi ce or
your household waste disposal service. For
specifi c enquiries regarding the replacement
of batteries in this product please contact our
Conair Customer Care Line.
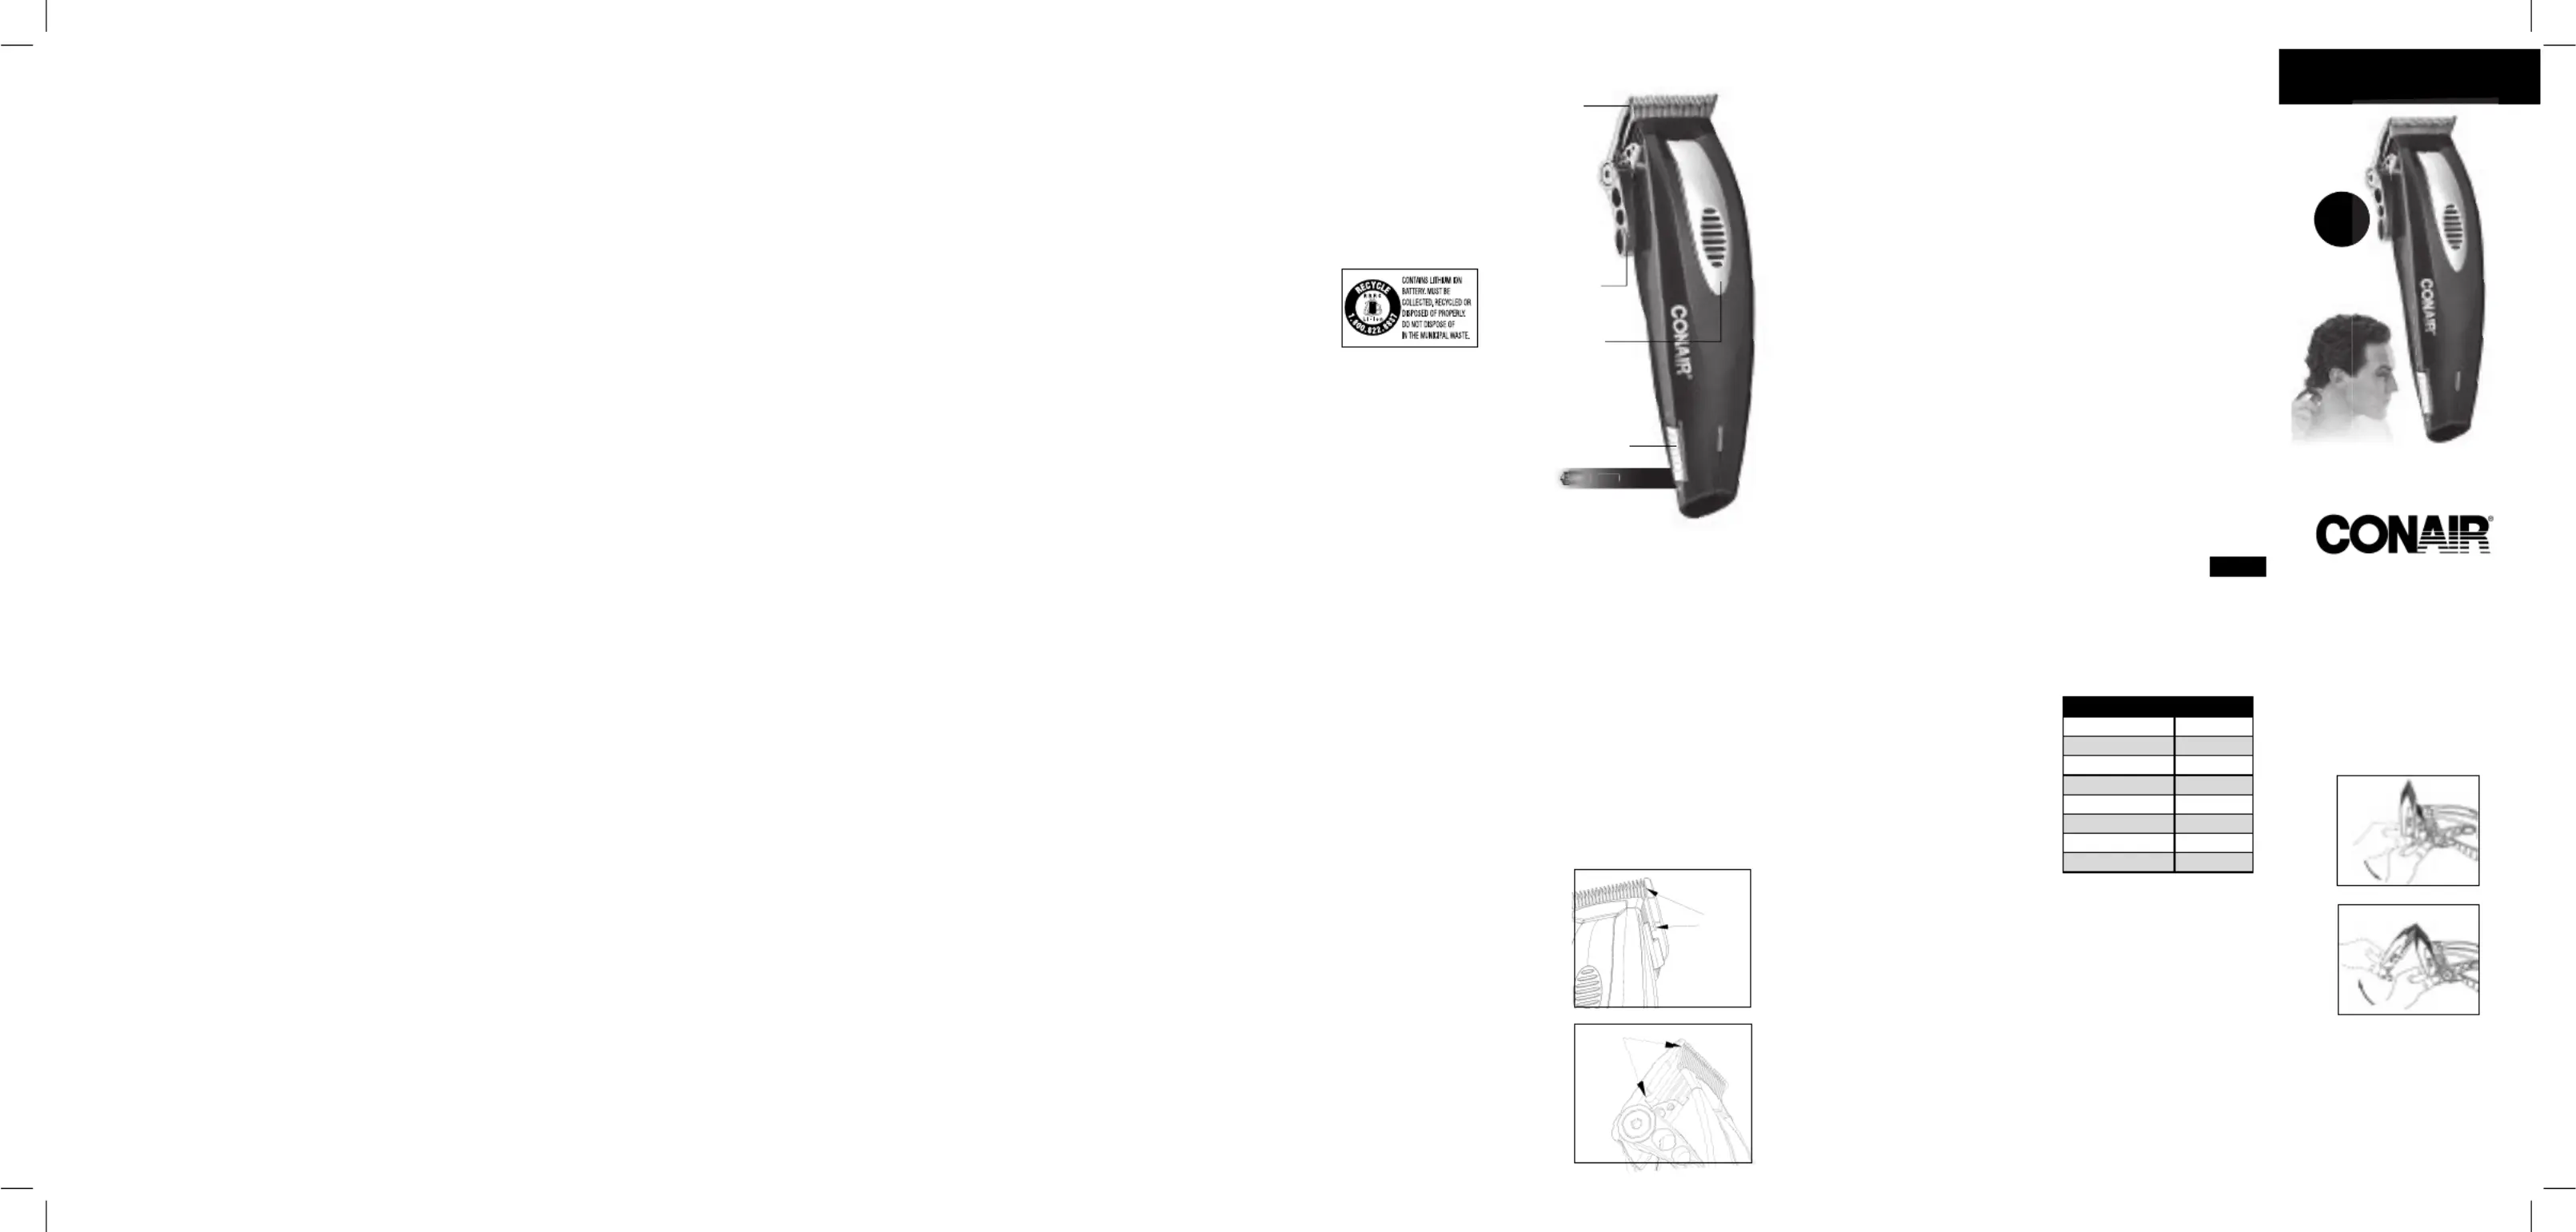
HC1100 CORD/CORDLESS CLIPPER
QUICQUICKQUICKKKCHARCHARGEGE
Taper
Control
Stainless steel,
self-sharpening
blades
High Power
Motor
On/Off
switch
3-hour full charge for
75 minutes of use or
15-minute quick charge
for 15 minutes of use.
LIMITED THREE YEAR WARRANTY
Conair will repair or replace (at our option)
your unit free of charge for 36 months from
the date of purchase if the appliance is
defective in workmanship or materials.
To obtain service under this warranty, return
the defective product to the service center
listed below, together with your purchase
receipt and $5.00 for postage and handling.
California residents need only provide proof
of purchase and should call 1-800-366-0937
for shipping instructions. In the absence of a
purchase receipt, the warranty period shall
be 36 months from the date of manufacture.
ANY IMPLIED WARRANTIES, OBLIGATIONS,
OR LIABILITIES, INCLUDING BUT NOT
LIMITED TO THE IMPLIED WARRANTY
OF MERCHANTABILITY AND FITNESS
FOR A PARTICULAR PURPOSE, SHALL BE
LIMITED IN DURATION TO THE 36 MONTH
DURATION OF THIS WRITTEN, LIMITED
WARRANTY. Some states do not allow
limitations on how long an implied warranty
lasts, so the above limitations may not apply
to you.
IN NO EVENT SHALL CONAIR BE LIABLE
FOR ANY SPECIAL, INCIDENTAL, OR
CONSEQUENTIAL DAMAGES FOR BREACH
OF THIS OR ANY OTHER WARRANTY,
EXPRESS OR IMPLIED, WHATSOEVER.
Some states do not allow the exclusion or
limitation of special, incidental, or conse-
quential damages, so the above limitation
may not apply to you.
This warranty gives you specific legal rights,
and you may also have other rights, which
vary from state
to state.
Please register this product at:
www.conair.com/registration
©2012 Conair Corporation
Service Center
Conair Corporation
Service Department
7475 North Glen Harbor Blvd.
Glendale, AZ 85307
12PG129346
IB-11227
Produktspecifikationer
| Varumärke: | Conair |
| Kategori: | Inte kategoriserad |
| Modell: | HC1100N |
Behöver du hjälp?
Om du behöver hjälp med Conair HC1100N ställ en fråga nedan och andra användare kommer att svara dig
Inte kategoriserad Conair Manualer

28 December 2024
27 December 2024
27 December 2024
27 December 2024
27 December 2024
27 December 2024
27 December 2024
26 December 2024
26 December 2024
10 December 2024
Inte kategoriserad Manualer
Nyaste Inte kategoriserad Manualer
9 April 2025
9 April 2025
9 April 2025
9 April 2025
9 April 2025
9 April 2025
9 April 2025
9 April 2025
9 April 2025
9 April 2025