Conair HLD23TGR Bruksanvisning
Conair Inte kategoriserad HLD23TGR
Läs gratis den bruksanvisning för Conair HLD23TGR (2 sidor) i kategorin Inte kategoriserad. Guiden har ansetts hjälpsam av 23 personer och har ett genomsnittsbetyg på 5.0 stjärnor baserat på 9 recensioner. Har du en fråga om Conair HLD23TGR eller vill du ställa frågor till andra användare av produkten? Ställ en fråga
Sida 1/2
Heated Lotion Dispenser
trueglow
™
For your safety and continued enjoyment of this product,
always read the instruction book carefully before using.
HLD23TG Model
IMPORTANT SAFETY
INSTRUCTIONS
When using electrical appliances, especially
when children are present, basic safety
precautions should always be followed,
including the following:
READ ALL INSTRUCTIONS
BEFORE USING
KEEP AWAY FROM WATER
DANGER
– To reduce the risk of
electrocution:
1.Always unplug this appliance
immediately after using.
2.Do not use while bathing or in the
shower.
3.Do not place or store the heated lotion
dispenser where it can fall or be pulled
into a tub or sink.
4.Do not place in or drop into water or any
other liquid.
5.Do not reach for the heated lotion
dispenser that has fallen into the water.
Unplug immediately.
6.Unplug the heated lotion dispenser
before cleaning.
WARNING –To reduce the risk of
burns, fire, electric shock or injury to persons:
1. The heated lotion dispenser should
never be left unattended when plug is in
and power is on.
2.Close supervision is necessary when the
heated lotion dispenser is used by, on
or near children or persons with certain
disabilities.
3. Use the heated lotion dispenser only for
its intended purpose as described in the
Instruction booklet. Do not use attachments
not recommended by the manufacturer.
Do not pull or twist cord, or wrap cord
around machine.
4. Never operate the heated lotion
dispenser if it has a damaged plug or
cord, if it is not working properly, or
if it has been dropped or damaged, or
dropped in water. Return appliance
to an authorized service center for
examination and repair.
5.Never drop or insert objects into openings.
6.Do not use outdoors. Do not operate
where aerosol (spray) products are
being used or where oxygen is being
administered.
7.Use only on level surface.
8.Keep cord away from heated surfaces.
9.Never use a tool to remove anything from
the dispenser.
10.Unplug this appliance before filling.
Fill reservoir with lotion. Do not overfill.
11.Do not use an extension cord with this
appliance.
12.Can be used with most brands of hand
and body lotions. Not for use with heavy
creams.
13.Never use while sleeping.
14.For household use only.
SAVE THESE
INSTRUCTIONS
OPERATING
INSTRUCTIONS
To reduce the risk of electric shock, this
appliance has a polarized plug (one blade is
wider than the other). This plug will fit in a
polarized outlet only one way.
If the plug does not fit fully in the outlet,
reverse the plug. If it still does not fit, contact
a qualified electrician to install the proper
outlet. Do not change the plug in any way.
USING YOUR CONAIR
®
HEATED LOTION DISPENSER
1. Unscrew bottom half of dispenser. Then take
your favorite brand of hand or body lotion
and empty contents into the bottom half of
the heated lotion dispenser. Typically, most
lotion bottles are 16 ounces in size. Your
lotion dispenser reservoir was designed to
accommodate 16 ounces of lotion.
2. After you have filled the reservoir with lotion,
screw the reservoir back into the top
housing until it is tight. Do not overtighten.
3. The heated lotion dispenser heats up only
the lotion you use, which will prevent your
lotion from drying out. The dispenser must
be primed with the unit unplugged. Depress
the entire top housing in a downward
pumping motion. Repeat this pumping
process until a small amount of lotion comes
out.
4. You are now ready to use your heated lotion
dispenser. Plug unit into outlet. Always
follow precautions when plugging unit into
wall outlet. See IMPORTANT SAFETY
INSTRUCTIONSWARNING and sections of
this instruction booklet for reference.
5. After dispenser is plugged into outlet, turn
the unit on with the switch on the line cord.
A red "Power On" indicator light will appear.
6. After two minutes, your heated lotion
dispenser is ready to use. (May take longer
to heat depending on the type of lotion.)
7. Repeat pumping process and dispense
lotion into your hands. Apply lotion as you
would normally. Enjoy the benefits of your
favorite lotion combined with the luxurious
feeling of heat.
8. When you run out of lotion and wish to refill,
if you are using the same brand of lotion,
repeat processes 1 through 7. If changing
brands of lotion, see section below on
"changing lotions."
CHANGING LOTIONS
When changing to a different brand of lotion,
simply unscrew the reservoir and add new
lotion, then repeat steps 1 through 7 above.
Note that you will have to pump and prime
dispenser as noted in step three to flush out
old lotion. Repeat pumping process until new
lotion is dispensed.
If you wish to clean the reservoir, simply
unscrew the bottom reservoir container from
your heated lotion dispenser and rinse with
warm water in the sink. For a thorough
cleaning, you may put the bottom reservoir on
the top rack of your dishwasher.
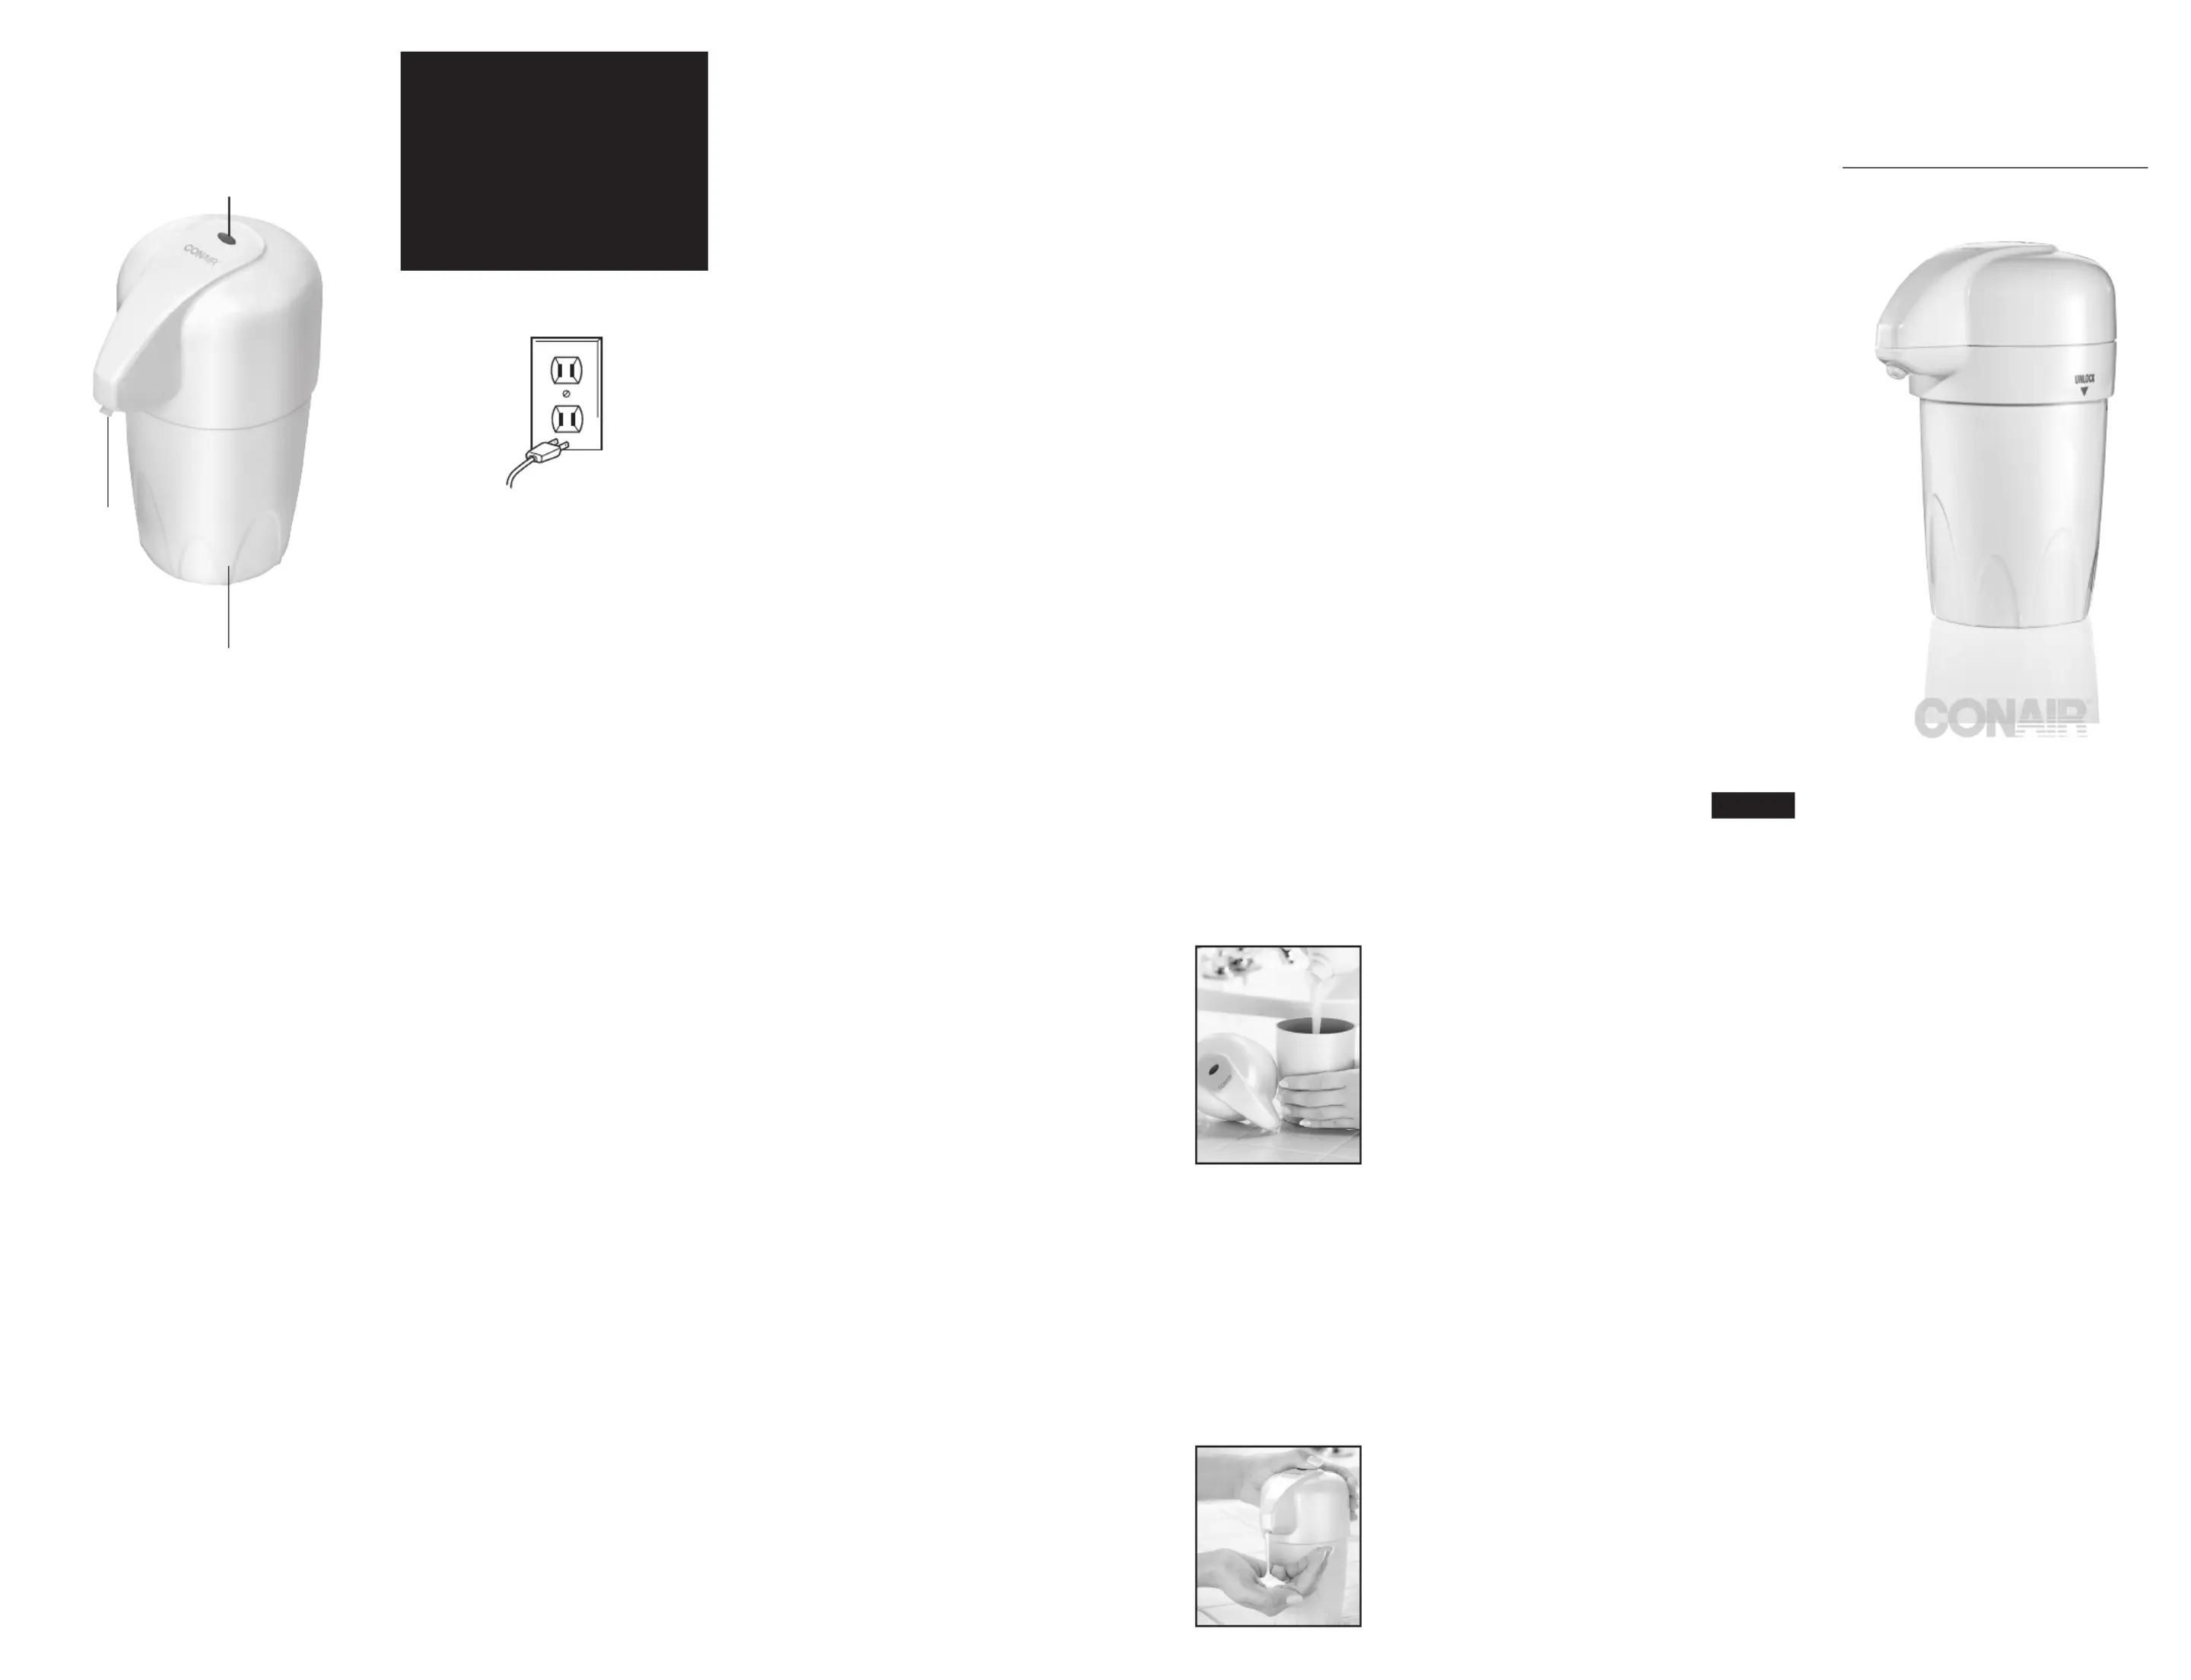
GET TO KNOW YOUR
HOT LOTION DISPENSER
Portable, compact and complements any
bath, kitchen or office decor.
Power On indicator light
Removable 16 oz. capacity dishwasher-safe
hand and body lotion reservoir
•Not for use with oils
•Lotion not included
5ft. line cord with
On/Off switch
(not shown)
Heating unit
with coil-heat
design and
two-minute
heat-up time
WARNING:
IF YOU THINK THE
POWER IS OFF WHEN
THE SWITCH IS OFF,
YOU’RE WRONG.
KEEP AWAY FROM WATER
Everyone knows that electricity and water
are a dangerous combination. But did you
know that an electric appliance is still
electrically live even if the switch is off?
If the plug is in, the power is on. So when
you are not using your appliances, keep
them unplugged.
ALWAYS UNPLUG
SMALL APPLIANCES
ONE YEAR LIMITED WARRANTY
Conair will repair or replace (at our option)
your unit free of charge for 12 months
from the date of purchase if the appliance
is defective in workmanship or materials.
To obtain service under this warranty,
return the defective product to the service
center listed below, together with your
purchase receipt and $3.00 for postage
and handling. California residents need
only provide proof of purchase and
should call 1-800-3-CONAIR for shipping
instructions. In the absence of a purchase
receipt, the warranty period shall be 12
months from the date of manufacture.
ANY IMPLIED WARRANTIES, OBLIGATIONS,
OR LIABILITIES, INCLUDING BUT NOT
LIMITED TO THE IMPLIED WARRANTY
OF MERCHANTABILITY AND FITNESS
FOR A PARTICULAR PURPOSE, SHALL BE
LIMITED IN DURATION TO THE 12-MONTH
DURATION OF THIS WRITTEN, LIMITED
WARRANTY.
Some states do not allow limitations on how
long an implied warranty lasts, so the above
limitations may not apply to you.
IN NO EVENT SHALL CONAIR BE LIABLE
FOR ANY SPECIAL, INCIDENT
AL, OR
CONSEQUENTIAL DAMAGES FOR BREACH
OF THIS OR ANY OTHER WARRANTY,
EXPRESS OR IMPLIED, WHATSOEVER.
Some states do not allow the exclusion
or limitation of special, incidental, or
consequential damages, so the above
limitation may not apply to you.
This warranty gives you specific legal
rights, and you may also have other rights,
which vary from state to state.
IB-12455
Service Center
Conair Corporation
Service Department
7475 N. Glen Harbor Blvd.
Glendale, AZ 85307
©2013 Conair Corporation
150 Milford Road
East Windsor, NJ 08520
13PS145473
Produktspecifikationer
| Varumärke: | Conair |
| Kategori: | Inte kategoriserad |
| Modell: | HLD23TGR |
Behöver du hjälp?
Om du behöver hjälp med Conair HLD23TGR ställ en fråga nedan och andra användare kommer att svara dig
Inte kategoriserad Conair Manualer

28 December 2024
27 December 2024
27 December 2024
27 December 2024
27 December 2024
27 December 2024
27 December 2024
26 December 2024
26 December 2024
10 December 2024
Inte kategoriserad Manualer
Nyaste Inte kategoriserad Manualer
9 April 2025
9 April 2025
9 April 2025
9 April 2025
9 April 2025
9 April 2025
9 April 2025
9 April 2025
9 April 2025
9 April 2025